NFC application development for Android

NFC (near field communication) is a standardized technology for exchanging data over short distances, allowing interaction between two electronic devices in an easy and intuitive way. For example, with an NFC-equipped smartphone, you can make purchases, hand out business cards, download discount coupons, and so on. Many new uses for NFC will be found soon.
This article describes technologies using NFC and how they are used today. It also shows how to use NFC in Android applications, and finally, two examples of NFC applications with source codes are given.
NFC technology architecture
NFC is based on RFID technology with a frequency of 13.56 MHz and a working distance of up to 10 cm. The data transfer rate is up to 424 kb / s. Compared to other communication technologies, the main advantage of NFC is its speed and ease of use. The figure below shows the location of NFC among other communication technologies.
NFC technology has three modes: NFC card emulation, peer to peer mode, and read / write mode.
')
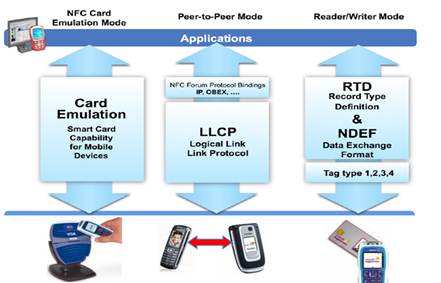
In emulation mode, the NFC card is an analogue of a chip-based RFID card with its own security module, allowing you to protect the purchase process. In peering mode, you can share information, such as a business card, with other NFC devices. You can also set up a WiFi or Bluetooth connection via NFC to transfer large amounts of data. The read / write mode is designed to read or modify NFC tags using NFC devices.
Each mode is described in more detail below.
NFC card emulation mode
The NFC module usually consists of two parts: the NFC controller and the security element (EB). The NFC controller is responsible for communications, the DL is for the encryption and decryption of information sensitive to hacking.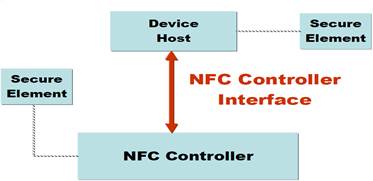
The EB is connected to the NFC controller via the SWP (Single Wire Protocol) bus or DCLB (Digital Contactless Bridge) bus. NFC standards define a logical interface between a host and a controller, allowing them to communicate through an RF field. DL is implemented using an embedded application or OS component.
There are three options for implementing an EB: you can embed it in a SIM card, SD card, or NFC chip.
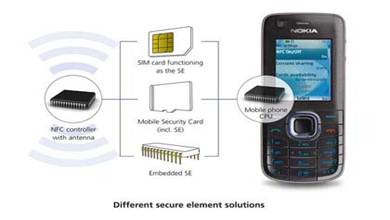
Telecom operators such as CMCC (China Mobile Communication Corporation), Vodafone or AT & T usually use a SIM-card solution, encouraging their subscribers to replace old SIM cards with new ones equipped with NFC for free.
Peering mode
Two NFC devices can easily communicate with each other directly, sharing small files. To establish a Bluetooth / WiFi connection, you need to exchange a special format XML file. In this mode, EB is not used.Write / read mode
In this NFC mode, the device can read and write NFC tags. A good example of application is reading information from NFC-equipped “smart” posters.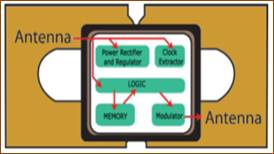
Introduction to the development of NFC for Android
Android supports NFC using two packages: android.nfc and android.nfc.tech.The main classes in android.nfc are:
NfcManager: Android devices can be used to manage any NFC adapters detected, but since most Android devices only support one NFC adapter, NfcManager is usually called with getDefaultAdapter to access a specific adapter.
The NfcAdapter works as an NFC agent, like a network adapter on a PC. With it, the phone accesses the NFC hardware to initialize the NFC connection.
NDEF: NFC standards define a common data format called the NFC Data Exchange Format (NDEF), which can store and transmit various types of objects, starting with MIME and ending with ultra-short RTD documents such as URLs. NdefMessage and NdefRecord are two types of NDEF for the NFC forum-defined data formats that will be used in the example code.
Tag: When an Android device detects a passive object such as a label, card, etc., it creates an object of the “tag” type, placing it further on the target object and finally sending it to the corresponding process.
The android.nfc.tech package also contains many important subclasses. These subclasses provide access to label functions that include read and write operations. Depending on the type of technology used, these classes are divided into different categories, such as NfcA, NfcB, NfcF, MifareClassic, and so on.
When a phone with NFC enabled detects a tag, the delivery system automatically creates a package of targeted information. If the phone has several applications that can work with this target information, the user will be shown a window with a suggestion to choose one from the list. The label delivery system defines three types of target information, in order of decreasing priority: NDEF_DISCOVERED, TECH_DISCOVERED, TAG_DISCOVERED.
Here we use a target filter to work with all types of information from TECH_DISCOVERED to ACTION_TECH_DISCOVERED. The nfc_tech_filter.xml file is used for all types defined in the label. Details can be found in the Android documentation . The figure below shows the flow chart for detecting a tag.

Example 1. Developing NFC applications for reading / writing tags.
The following example shows the read / write functions of an NFC tag. In order to access the NFC hardware and correctly process the NFC information, declare these positions in the AndroidManifest.xml file.<uses-permission android:name="android.permission.NFC" /> The minimum SDK version your application should support is 10, declare it in the AndroidManifest.xml file
<uses-sdk android:minSdkVersion="10"/> In the onCreate function,you can apply the NfcAdapter: public void onCreate(Bundle savedInstanceState) { …… adapter = NfcAdapter.getDefaultAdapter(this); …… } The following target call demonstrates the read function. If the system broadcast message is NfcAdapter.ACTION_TAG_DISCOVERED, then you can read the information and display it.
@Override protected void onNewIntent(Intent intent){ if(NfcAdapter.ACTION_TAG_DISCOVERED.equals(intent.getAction())){ mytag = intent.getParcelableExtra(NfcAdapter.EXTRA_TAG); // get the detected tag Parcelable[] msgs = intent.getParcelableArrayExtra(NfcAdapter.EXTRA_NDEF_MESSAGES); NdefRecord firstRecord = ((NdefMessage)msgs[0]).getRecords()[0]; byte[] payload = firstRecord.getPayload(); int payloadLength = payload.length; int langLength = payload[0]; int textLength = payloadLength - langLength - 1; byte[] text = new byte[textLength]; System.arraycopy(payload, 1+langLength, text, 0, textLength); Toast.makeText(this, this.getString(R.string.ok_detection)+new String(text), Toast.LENGTH_LONG).show(); } } The following code demonstrates the write function. Before you can determine the value of mytag, you must make sure that the label is defined and only then enter your data in it.
If (mytag==Null){ …… } else{ …… write(message.getText().toString(),mytag); …… } private void write(String text, Tag tag) throws IOException, FormatException { NdefRecord[] records = { createRecord(text) }; NdefMessage message = new NdefMessage(records); // Get an instance of Ndef for the tag. Ndef ndef = Ndef.get(tag); // Enable I/O ndef.connect(); // Write the message ndef.writeNdefMessage(message); // Close the connection ndef.close(); } Depending on the information you read, you can perform additional actions, such as starting a task, following a link, etc.
Example 2. Developing an NFC application using MifareClassic cards
In this example, we will use MifareClassic cards and the corresponding label type for reading. MifareClassic cards are widely used for various needs, such as identification of a person, bus ticket, etc. In the traditional MifareClassic map, the storage area is divided into 16 zones, there are 4 blocks in each zone, and each block can store 16 bytes of data.The last block in the zone is called a trailer and is usually used to store the local read / write key. It contains two keys, A and B, 6 bytes each, the default is 00 or FF, depending on the value of MifareClassic.KEY_DEFAULT.
To write to the Mifare card, you must first of all have the correct key value (which plays a protective role), as well as successfully pass authentication.
<manifest xmlns:android="http://schemas.android.com/apk/res/android" package="org.reno" android:versionCode="1" android:versionName="1.0" > <uses-permission android:name="android.permission.NFC" /> <uses-sdk android:minSdkVersion="14" /> <uses-feature android:name="android.hardware.nfc" android:required="true" /> <application android:icon="@drawable/ic_launcher" android:label="@string/app_name" > <activity android:name="org.reno.Beam" android:label="@string/app_name" android:launchMode="singleTop" > <intent-filter> <action android:name="android.intent.action.MAIN" /> <category android:name="android.intent.category.LAUNCHER" /> </intent-filter> <intent-filter> <action android:name="android.nfc.action.TECH_DISCOVERED" /> </intent-filter> <meta-data android:name="android.nfc.action.TECH_DISCOVERED" android:resource="@xml/nfc_tech_filter" /> </activity> </application> </manifest> res / xml / nfc_tech_filter.xml :
<resources xmlns:xliff="urn:oasis:names:tc:xliff:document:1.2"> <tech-list> <tech>android.nfc.tech.MifareClassic</tech> </tech-list> </resources> An example of how to read the MifareClassic map:
private void processIntent(Intent intent) { Tag tagFromIntent = intent.getParcelableExtra(NfcAdapter.EXTRA_TAG); for (String tech : tagFromIntent.getTechList()) { System.out.println(tech); } boolean auth = false; MifareClassic mfc = MifareClassic.get(tagFromIntent); try { String metaInfo = ""; //Enable I/O operations to the tag from this TagTechnology object. mfc.connect(); int type = mfc.getType(); int sectorCount = mfc.getSectorCount(); String typeS = ""; switch (type) { case MifareClassic.TYPE_CLASSIC: typeS = "TYPE_CLASSIC"; break; case MifareClassic.TYPE_PLUS: typeS = "TYPE_PLUS"; break; case MifareClassic.TYPE_PRO: typeS = "TYPE_PRO"; break; case MifareClassic.TYPE_UNKNOWN: typeS = "TYPE_UNKNOWN"; break; } metaInfo += "Card type:" + typeS + "n with" + sectorCount + " Sectorsn, " + mfc.getBlockCount() + " BlocksnStorage Space: " + mfc.getSize() + "Bn"; for (int j = 0; j < sectorCount; j++) { //Authenticate a sector with key A. auth = mfc.authenticateSectorWithKeyA(j, MifareClassic.KEY_DEFAULT); int bCount; int bIndex; if (auth) { metaInfo += "Sector " + j + ": Verified successfullyn"; bCount = mfc.getBlockCountInSector(j); bIndex = mfc.sectorToBlock(j); for (int i = 0; i < bCount; i++) { byte[] data = mfc.readBlock(bIndex); metaInfo += "Block " + bIndex + " : " + bytesToHexString(data) + "n"; bIndex++; } } else { metaInfo += "Sector " + j + ": Verified failuren"; } } promt.setText(metaInfo); } catch (Exception e) { e.printStackTrace(); } } About the authors
Songyue Wang and Liang Zhang are engineers at Intel Software and Service Group, developing mobile applications, including those for Android, and optimizing them for the x86 platform.Source: https://habr.com/ru/post/194344/
All Articles