Flask Mega-Tutorial, Part 3: Forms
This is the third article in the series, where I describe my experience of writing a Python web application using the Flask mic framework.
The purpose of this guide is to develop a fairly functional microblog application, which I decided to call microblog, in the absence of originality.
')
In the previous section, we defined a simple template for the home page and used imaginary objects as prototypes of things that we don’t have yet. For example, users or records.
In this article we are going to fill one of the gaps that exist in our application. We will consider working with forms.
Forms are one of the most basic blocks in any web application. Using forms will allow users to leave entries in the blog, as well as login to the application.
To follow this part, your microblog application must be the way we left it at the end of the previous one. Please make sure the application is installed and working.
For form processing, we will use the
Many Flask extensions require some configuration, so we will create a configuration file inside our microblog root folder, so it will be easily available for editing if needed. This is where we begin (the config.py file):
It's simple, these are the two settings that our
Now we have a config, and we need to tell Flask to read and use it. We can do this right after the Flask application object is created. (file app / __ init__.py):
In
We will create a login form that will be used with the identification system. The login mechanism that we will support in our application is not a standard username / password type - we will use OpenID as logins. The advantage of OpenID is that the authorization is passed by the OpenID provider, so we do not need to check passwords, which will make our site more secure for our users.
OpenID login only requires one line called OpenID. We will also drop the 'Remember me' checkbox into a form so that the user can set a cookie in his browser, which will remember their login when they return.
Let's write our first form (file app / forms.py):
I am sure that the class speaks for itself. We imported the
The imported
We also need an HTML template that contains a form. The good news is that the
Notice that we again use the
There are several interesting differences between the usual HTML form and our template. The template expects an instance of the form class that we just assigned to the
The template parameter
The fields of our form are given by the form object, you just have to refer to the
Since we have not defined the submit button in the form class, we must define it as a regular field. The send field does not carry any data, so there is no need to define it in the form class.
The final step before we can see our form will be the writing of the view function that gives the template.
In fact, this is quite simple, since we only have to transfer the form object to the template. Here is our new view function (file app / views.py):
We imported our
We will not pay attention to the import of
Another innovation is the method arguments in the
At this stage you can launch the application and look at your form in the browser. After launch, open the address we associated with the login view function: http: // localhost: 5000 / login
We have not yet programmed the part that receives the data, so clicking on the submit button will have no effect.
Getting form data
Another area where
The
If
If at least one field fails validation, then the function will return
When
Flash messages will not automatically appear on our page, our templates should display messages in the form that is suitable for the layout of our site. We will add messages to the base template, so all our templates inherit this functionality. This is the updated base template (app / templates / base.html file):
I hope the way to display messages does not require explanations.
Another new feature we used in our login view is
Great time to start the application and check how the forms work. Try sending a form with an empty openid field to see how the
With the application in its current state, forms submitted with incorrect data will not be accepted. Instead, the form will again be given to the user for correction. This is exactly what we need.
What we missed is that the user is notified of what is wrong with the form. Fortunately,
When a field fails validation,
This is our login template with field validation messages (app / templates / login.html file):
The only change we made was to add a loop that renders any error messages added by the validator to the right of the openid field. As a rule, any fields with validators attached will have errors added as
In fact, we will be faced with the fact that many people do not even know that they already have a couple of OpenID. It is not well known that a number of large service providers on the Internet support OpenID authentication for their users. For example, if you have a Google account, then you also have OpenID with it. As well as in Yahoo, AOL, Flickr and many other services.
To make it easier for the user to log into our site with one of the frequently used OpenIDs, we will add links to some of them, so that the user does not need to enter OpenID manually.
Let's start by defining the list of OpenID providers we want to submit. We can do this in our configuration file (config.py file):
Now let's see how we use this list in our login view function:
Here we get the settings by searching them by key in
As you guessed, we need to take another step to end this. Now we need to specify how we would like to display links to these providers in our login template (file app / templates / login.html):
The template turned out to be somewhat long due to all these changes. Some OpenIDs include usernames, for them we need to have some javascript magic that asks for a username and then creates OpenID. When a user clicks on an OpenID provider link and (optionally) enters a username, the OpenID for that provider is inserted into the text field.
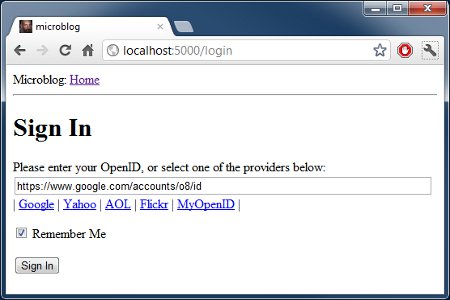
screenshot of our login page after clicking on the Google OpenID link
Although we have made great progress with our login forms, in reality we have not done anything to log users into our system. Everything we did was related to the GUI of the login process. This is because before we can make real logins, we need to have a database where we can record our users.
In the next part, we will raise and launch our database, and later we will complete our login system, so stay tuned for updates in the following articles.
The microblog application in its current state is available for download here:
microblog-0.3.zip
Note that the zip file does not contain the flask virtual environment. Create it yourself, following the instructions in the first part, before you can run the application.
If you have any questions or comments, then freely leave them below.
Miguel
The purpose of this guide is to develop a fairly functional microblog application, which I decided to call microblog, in the absence of originality.
Table of contents
Part 1: Hello, World!
Part 2: Templates
Part 3: Forms
Part 4: Database
Part 5: User Login
Part 6: Profile Page and Avatars
Part 7: Unit Testing
Part 8: Subscribers, Contacts and Friends
Part 9: Pagination
Part 10: Full Text Search
Part 11: Email Support
Part 12: Reconstruction
Part 13: Date and Time
Part 14: I18n and L10n
Part 15: Ajax
Part 16: Debugging, Testing, and Profiling
Part 17: Deploying to Linux (even to Raspberry Pi!)
Part 18: Deploying to Heroku Cloud
')
Brief repetition
In the previous section, we defined a simple template for the home page and used imaginary objects as prototypes of things that we don’t have yet. For example, users or records.
In this article we are going to fill one of the gaps that exist in our application. We will consider working with forms.
Forms are one of the most basic blocks in any web application. Using forms will allow users to leave entries in the blog, as well as login to the application.
To follow this part, your microblog application must be the way we left it at the end of the previous one. Please make sure the application is installed and working.
Configuration
For form processing, we will use the
Flask-WTF extension, which is a wrapper WTForms and integrates perfectly with Flask applications.Many Flask extensions require some configuration, so we will create a configuration file inside our microblog root folder, so it will be easily available for editing if needed. This is where we begin (the config.py file):
CSRF_ENABLED = True SECRET_KEY = 'you-will-never-guess' It's simple, these are the two settings that our
Flask-WTF extension needs. CSRF_ENABLED activates the prevention of fake cross-site requests. In most cases, you will want to enable this option, which will make your application more secure.SECRET_KEY needed only when CSRF enabled. It is used to create a cryptographic token that is used during form validation. When you write your application, make sure that your secret key is difficult to find.Now we have a config, and we need to tell Flask to read and use it. We can do this right after the Flask application object is created. (file app / __ init__.py):
from flask import Flask app = Flask(__name__) app.config.from_object('config') from app import views Login form
In
Flask-WTF forms are represented as subclass objects of the Form class. The subclass of forms simply defines the form fields as variables in a class.We will create a login form that will be used with the identification system. The login mechanism that we will support in our application is not a standard username / password type - we will use OpenID as logins. The advantage of OpenID is that the authorization is passed by the OpenID provider, so we do not need to check passwords, which will make our site more secure for our users.
OpenID login only requires one line called OpenID. We will also drop the 'Remember me' checkbox into a form so that the user can set a cookie in his browser, which will remember their login when they return.
Let's write our first form (file app / forms.py):
from flask.ext.wtf import Form from wtforms import TextField, BooleanField from wtforms.validators import Required class LoginForm(Form): openid = TextField('openid', validators = [Required()]) remember_me = BooleanField('remember_me', default = False) I am sure that the class speaks for itself. We imported the
Form class and two field classes that we need, TextField and BooleanField .The imported
Required is a validator, a function that can be attached to a field, to validate the data sent by the user. The Required validator simply checks that the field was not sent empty. Flask-WTF has a lot of validators, we will use some new ones in the future.Form templates
We also need an HTML template that contains a form. The good news is that the
LoginForm class that we just created knows how to render form fields in HTML, so we just need to concentrate on the layout. Here is our login template: (app / templates / login.html file): <!-- extend from base layout --> {% extends "base.html" %} {% block content %} <h1>Sign In</h1> <form action="" method="post" name="login"> {{form.hidden_tag()}} <p> Please enter your OpenID:<br> {{form.openid(size=80)}}<br> </p> <p>{{form.remember_me}} Remember Me</p> <p><input type="submit" value="Sign In"></p> </form> {% endblock %} Notice that we again use the
base.html template through the inheritance operator, extending it. We will do this with all of our templates, ensuring that the layout is consistent across all pages.There are several interesting differences between the usual HTML form and our template. The template expects an instance of the form class that we just assigned to the
form template argument. We will take care of sending this template argument in the future when we write the view function that returns this template.The template parameter
form.hidden_tag() will be replaced with a hidden field to prevent CSRF, included in our settings file. This field must be in all of your forms if CSRF is enabled.The fields of our form are given by the form object, you just have to refer to the
{{form.field_name}} argument in the place of the template where the field is to be inserted. Some fields can take arguments. In our case, we ask the form to create our openid field with a width of 80 characters.Since we have not defined the submit button in the form class, we must define it as a regular field. The send field does not carry any data, so there is no need to define it in the form class.
Form submissions
The final step before we can see our form will be the writing of the view function that gives the template.
In fact, this is quite simple, since we only have to transfer the form object to the template. Here is our new view function (file app / views.py):
from flask import render_template, flash, redirect from app import app from forms import LoginForm # index @app.route('/login', methods = ['GET', 'POST']) def login(): form = LoginForm() return render_template('login.html', title = 'Sign In', form = form) We imported our
LoginForm class, created an instance of it and sent it to a template. This is all you need to draw the form fields.We will not pay attention to the import of
flash and redirect . We use them a little later.Another innovation is the method arguments in the
route decorator. Here we tell Flask that the view function accepts a GET and POST request. Without this, the view will only accept GET requests. We want to receive POST requests which will give the form with the data entered by the user.At this stage you can launch the application and look at your form in the browser. After launch, open the address we associated with the login view function: http: // localhost: 5000 / login
We have not yet programmed the part that receives the data, so clicking on the submit button will have no effect.
Getting form data
Another area where
Flask-WTF facilitates our work is the processing of submitted data. This is a new version of our login view function, which validates and saves form data (app / views.py file): @app.route('/login', methods = ['GET', 'POST']) def login(): form = LoginForm() if form.validate_on_submit(): flash('Login requested for OpenID="' + form.openid.data + '", remember_me=' + str(form.remember_me.data)) return redirect('/index') return render_template('login.html', title = 'Sign In', form = form) The
validate_on_submit method does all the processing. If you call the method when the form is submitted to the user (that is, before the user has the opportunity to enter data there), then he will return False , in which case you know that you must draw the template.If
validate_on_submit is called together as part of the form validate_on_submit request, it will collect all the data, run any validators attached to the fields, and if everything is OK, it returns True , which indicates the data is valid. This means that the data is safe to be included in the application.If at least one field fails validation, then the function will return
False and this will again cause the form to be drawn to the user, thereby making it possible to correct the errors. Later we will learn to show error messages when validation fails.When
validate_on_submit returns True , our view function calls two new functions imported from Flask. The Flash feature is a quick way to display a message on the next page presented to the user. In this case, we will use this for debugging as long as we do not have the infrastructure necessary for logging, instead, we will simply display a message that will show the sent data. Also, flash extremely useful on the production server to provide user feedback.Flash messages will not automatically appear on our page, our templates should display messages in the form that is suitable for the layout of our site. We will add messages to the base template, so all our templates inherit this functionality. This is the updated base template (app / templates / base.html file):
<html> <head> {% if title %} <title>{{title}} - microblog</title> {% else %} <title>microblog</title> {% endif %} </head> <body> <div>Microblog: <a href="/index">Home</a></div> <hr> {% with messages = get_flashed_messages() %} {% if messages %} <ul> {% for message in messages %} <li>{{ message }} </li> {% endfor %} </ul> {% endif %} {% endwith %} {% block content %}{% endblock %} </body> </html> I hope the way to display messages does not require explanations.
Another new feature we used in our login view is
redirect . This function redirects the client web browser to another page, instead of the requested one. In our presentation function, we used a redirect to the main page developed in the previous sections. Keep in mind that flash messages will be displayed even if the function ends with redirection.Great time to start the application and check how the forms work. Try sending a form with an empty openid field to see how the
Required validator stops the transfer process.Improving field validation
With the application in its current state, forms submitted with incorrect data will not be accepted. Instead, the form will again be given to the user for correction. This is exactly what we need.
What we missed is that the user is notified of what is wrong with the form. Fortunately,
Flask-WTF also facilitates this task.When a field fails validation,
Flask-WTF adds a visual error message to the form object. These messages are available in the template, so we just need to add some logic to display them.This is our login template with field validation messages (app / templates / login.html file):
<!-- extend base layout --> {% extends "base.html" %} {% block content %} <h1>Sign In</h1> <form action="" method="post" name="login"> {{form.hidden_tag()}} <p> Please enter your OpenID:<br> {{form.openid(size=80)}}<br> {% for error in form.errors.openid %} <span style="color: red;">[{{error}}]</span> {% endfor %}<br> </p> <p>{{form.remember_me}} Remember Me</p> <p><input type="submit" value="Sign In"></p> </form> {% endblock %} The only change we made was to add a loop that renders any error messages added by the validator to the right of the openid field. As a rule, any fields with validators attached will have errors added as
form.errors._ . In our case, we use form.errors.openid . We display these messages in red to draw the user's attention to them.OpenID interaction
In fact, we will be faced with the fact that many people do not even know that they already have a couple of OpenID. It is not well known that a number of large service providers on the Internet support OpenID authentication for their users. For example, if you have a Google account, then you also have OpenID with it. As well as in Yahoo, AOL, Flickr and many other services.
To make it easier for the user to log into our site with one of the frequently used OpenIDs, we will add links to some of them, so that the user does not need to enter OpenID manually.
Let's start by defining the list of OpenID providers we want to submit. We can do this in our configuration file (config.py file):
OPENID_PROVIDERS = [ { 'name': 'Google', 'url': 'https://www.google.com/accounts/o8/id' }, { 'name': 'Yahoo', 'url': 'https://me.yahoo.com' }, { 'name': 'AOL', 'url': 'http://openid.aol.com/<username>' }, { 'name': 'Flickr', 'url': 'http://www.flickr.com/<username>' }, { 'name': 'MyOpenID', 'url': 'https://www.myopenid.com' }] Now let's see how we use this list in our login view function:
@app.route('/login', methods = ['GET', 'POST']) def login(): form = LoginForm() if form.validate_on_submit(): flash('Login requested for OpenID="' + form.openid.data + '", remember_me=' + str(form.remember_me.data)) return redirect('/index') return render_template('login.html', title = 'Sign In', form = form, providers = app.config['OPENID_PROVIDERS']) Here we get the settings by searching them by key in
app.config . Next, the list is added to the render_template call as a template argument.As you guessed, we need to take another step to end this. Now we need to specify how we would like to display links to these providers in our login template (file app / templates / login.html):
<!-- extend base layout --> {% extends "base.html" %} {% block content %} <script type="text/javascript"> function set_openid(openid, pr) { u = openid.search('<username>') if (u != -1) { // openid requires username user = prompt('Enter your ' + pr + ' username:') openid = openid.substr(0, u) + user } form = document.forms['login']; form.elements['openid'].value = openid } </script> <h1>Sign In</h1> <form action="" method="post" name="login"> {{form.hidden_tag()}} <p> Please enter your OpenID, or select one of the providers below:<br> {{form.openid(size=80)}} {% for error in form.errors.openid %} <span style="color: red;">[{{error}}]</span> {% endfor %}<br> |{% for pr in providers %} <a href="javascript:set_openid('{{pr.url}}', '{{pr.name}}');">{{pr.name}}</a> | {% endfor %} </p> <p>{{form.remember_me}} Remember Me</p> <p><input type="submit" value="Sign In"></p> </form> {% endblock %} The template turned out to be somewhat long due to all these changes. Some OpenIDs include usernames, for them we need to have some javascript magic that asks for a username and then creates OpenID. When a user clicks on an OpenID provider link and (optionally) enters a username, the OpenID for that provider is inserted into the text field.
screenshot of our login page after clicking on the Google OpenID link
Final words
Although we have made great progress with our login forms, in reality we have not done anything to log users into our system. Everything we did was related to the GUI of the login process. This is because before we can make real logins, we need to have a database where we can record our users.
In the next part, we will raise and launch our database, and later we will complete our login system, so stay tuned for updates in the following articles.
The microblog application in its current state is available for download here:
microblog-0.3.zip
Note that the zip file does not contain the flask virtual environment. Create it yourself, following the instructions in the first part, before you can run the application.
If you have any questions or comments, then freely leave them below.
Miguel
Source: https://habr.com/ru/post/194062/
All Articles