Connecting SlidingMenu to the Support Library and avoiding potential problems
Foreword
Hello, Habr!
I just want to make a small digression from the topic: I am not a professional android developer and am just learning. In this post, designed more for beginners, I would like to combine solutions to the problems I encountered while writing the conceived application, and in particular using the ActionBar using the Support Library and joining SlidingMenu to them.
Examples of quality for me are VK, Forsquare and Instagram applications. Actually, the ideas of using ActionBar and SlidingMenu were immediately taken from them. As with the layout / development of websites (my main business) and their decent work in Internet Explorer, so here, I first thought about compatibility with older versions of Android, since ActionBar is supported only with 3.0. Thanks to the search, I quickly found a solution - ActionBar for versions 2.1+ .
')
Let's start
1. Create a new project in Eclipse. How to do this can be found with the help of search habrabra. The minimum supported version of API is 7. Preferably without a theme (Theme: None).
2. Connect the Support Library, how to do it, written by the link above. Here again, just in case. Register a topic.
3. Here is the first problem I had to face: everything works fine on Android below 3.0. It turns out that one thing is not clarified in the article above: the topic is proposed to be inherited in the res / values / styles.xml file , however this turned out to be not the most correct option. When you create a project, Eclipse immediately creates several style files for different versions of the API:
- res / values / styles.xml - standard style file;
- res / values-v11 / styles.xml - style file for API 11+;
- and res / values-v14 / styles.xml - style file for API 14+;
We inherit the theme only in the first of the above files, so it only works up to Android 3.0 (API11).
It is solved by inheriting the theme in all files or directly in the project manifest. To do this, go to AndroidManifest.xml and find the line:
<application android:allowBackup="true" android:icon="@drawable/ic_launcher" android:label="@string/app_name" android:theme="@style/AppTheme" > where we replace:
android:theme="@style/AppTheme" on:
android:theme="@style/Theme.AppCompat.Light" In the absence of the line android: theme - add it.
In this case, it is worth remembering that when you inherit a theme directly in the manifest, you will not be able to use your color scheme, so I recommend using the first option, with inheritance in each file separately.
This problem took 2 days, the solution of which was found when searching for information, on a completely different topic.
We start, we check. Everything is working.

Connecting SlidingMenu
In the process of finding such a menu, I immediately came across a Drawer . However, I didn’t need this, for some reason, which I will not describe here.
The choice fell on SlidingMenu. The library is completely free and available on GitHub .
1. Download all the files and start connecting to Eclipse: for this, go to File → New → Other → Android Project from Existing Code , in the window that opens, specify the path to the library folder of the previously downloaded SlidingMenu. After the files are copied, click OK. The library is connected.
2. We connect it to our project created earlier. Repeat the Support Lirary connection procedure, but this time we select “library”.
3. And here is the second problem - the console reports a conflict between two android-support-v4.jar files . It turned out that this file is not enough that is contained in the project itself, so the Support Library and SlidingMenu are also connected. The solution turned out to be simple, it was found on StackOverflow.com: we delete this file from the SlidingMenu library and from our project (both of them are in the “lib” folder).
Now there is a new problem - SlidingMenu library reports a lot of errors. This is due to the absence of a file deleted by us. A workaround for this was also found on StackOverflow: disconnect the Support Lib library from our project and connect it the same, but already to the SlidingMenu library. In this case, the file needed for all three will be connected first to the SlidingMenu library, and SlidingMenu, already with its functionality, will connect the Support Lib to our project.
In the comments, the problem was described in a more technical language and a simple solution was suggested: “You had problems with the older version of the library support in SlidingMenu and a message about different hash sums fell to the console; it was enough to copy the lib from the main project and throw in SlidingMenu. ”
It took 3 days to solve this problem (yes, I like to ruin my life), simply because I did not pay attention to errors in the console.
It is difficult, but if you understand these nuances, everything becomes quite clear and logical.
To red labels do not confuse, clear the console.
After all of the above, go to MainActivity.java and declare a variable before the onCreate () method:
private SlidingMenu menu; Next, directly in onCreate we add a menu initializer:
menu = new SlidingMenu(this); menu.setMode(SlidingMenu.LEFT); menu.setTouchModeBehind(SlidingMenu.TOUCHMODE_FULLSCREEN); menu.setShadowDrawable(R.drawable.slidemenu_shadowgradient); menu.setShadowWidth(15); menu.setFadeDegree(0.0f); menu.attachToActivity(this, SlidingMenu.SLIDING_WINDOW); menu.setBehindWidth(200); menu.setMenu(R.layout.menu_frame); As can be seen in the code, the path to the file with the shadow ( menu.setShadowDrawable (R.drawable. Slidemenu_shadowgradient ) ) and, in fact, the menu itself ( menu.setMenu (R.layout. Menu_frame ) ) are indicated . These files need to be created. Examples of all sources under the spoiler below.
Sources
MainActivity.java
import com.jeremyfeinstein.slidingmenu.lib.SlidingMenu; import android.os.Bundle; import android.support.v7.app.ActionBarActivity; import android.view.Menu; import android.view.MenuItem; public class MainActivity extends ActionBarActivity { private SlidingMenu menu; @Override protected void onCreate(Bundle savedInstanceState) { super.onCreate(savedInstanceState); setContentView(R.layout.activity_main); menu = new SlidingMenu(this); menu.setMode(SlidingMenu.LEFT); menu.setTouchModeBehind(SlidingMenu.TOUCHMODE_FULLSCREEN); menu.setShadowDrawable(R.drawable.aslidingmenu_shadowgradient); menu.setShadowWidth(15); menu.setFadeDegree(0.0f); menu.attachToActivity(this, SlidingMenu.SLIDING_WINDOW); menu.setBehindWidth(200); menu.setMenu(R.layout.menu_frame); } } res / drawable / slidingmenu_shadowgradient.xml
<?xml version="1.0" encoding="utf-8"?> <selector xmlns:android="http://schemas.android.com/apk/res/android"> <item> <shape> <gradient android:endColor="@color/purple_dark" android:startColor="@color/back" /> </shape> </item> </selector> res / layout / menu_frame.xml
<?xml version="1.0" encoding="utf-8"?> <LinearLayout xmlns:android="http://schemas.android.com/apk/res/android" android:layout_width="match_parent" android:layout_height="match_parent" android:orientation="vertical" android:background="@color/back"> <TextView android:id="@+id/textView1" android:layout_width="wrap_content" android:layout_height="wrap_content" android:text="@string/menu_1" android:textAppearance="?android:attr/textAppearanceLarge" /> <TextView android:id="@+id/textView2" android:layout_width="wrap_content" android:layout_height="wrap_content" android:text="@string/menu_2" android:textAppearance="?android:attr/textAppearanceLarge" /> <TextView android:id="@+id/textView3" android:layout_width="wrap_content" android:layout_height="wrap_content" android:text="@string/menu_3" android:textAppearance="?android:attr/textAppearanceLarge" /> <TextView android:id="@+id/textView4" android:layout_width="wrap_content" android:layout_height="wrap_content" android:text="@string/menu_4" android:textAppearance="?android:attr/textAppearanceLarge" /> </LinearLayout> res / values / strings.xml
<?xml version="1.0" encoding="utf-8"?> <resources> <string name="app_name">SlideMenu Demo</string> <string name="action_settings">Settings</string> <string name="hello_world">Hello world!</string> <color name="back">#3d4140</color> <color name="purple_light">#ffffff</color> <color name="purple_dark">#353838</color> <string name="menu_1">Menu 1</string> <string name="menu_2">Menu 2</string> <string name="menu_3">Menu 3</string> <string name="menu_4">Menu 4</string> </resources> Adding functionality
All that is described above is nice, but some trifles are missing. For example, using the VK application, it is often necessary to resort to the side menu (SlidingMenu). I push it with a finger movement on the screen, however there are several different ways to open it.
Icon in ActionBar
To add functionality to the button in the action bar, use the following code, which is placed in any place in MainActivity.java :
@Override public boolean onOptionsItemSelected(MenuItem item) { switch (item.getItemId()) { // ID case android.R.id.home: // - ActionBar, menu.toggle(true); // ( ) return true; } return super.onOptionsItemSelected(item); } At the end of onCreate () add:
getSupportActionBar().setDisplayShowCustomEnabled(true); getSupportActionBar().setDisplayHomeAsUpEnabled(true); Among other things, the last code adds a beautiful arrow to the icon.
Closing the menu by pressing the "Back" button
Everything is simple, the menu is open, but when you press "Back" the application closes, not the menu. We fix it with the following code:
public boolean onKeyDown(int keyCode, KeyEvent event) { if (keyCode == KeyEvent.KEYCODE_BACK) { // "" if(menu.isMenuShowing()){ // SlidingMenu menu.toggle(true); // return false; } } return super.onKeyDown(keyCode, event); } The comments also suggested using onBackPressed ()
Full code MainActivity.java
import com.jeremyfeinstein.slidingmenu.lib.SlidingMenu; import android.os.Bundle; import android.support.v7.app.ActionBarActivity; import android.view.KeyEvent; import android.view.Menu; import android.view.MenuItem; public class MainActivity extends ActionBarActivity { private SlidingMenu menu; @Override protected void onCreate(Bundle savedInstanceState) { super.onCreate(savedInstanceState); setContentView(R.layout.activity_main); menu = new SlidingMenu(this); menu.setMode(SlidingMenu.LEFT); menu.setTouchModeBehind(SlidingMenu.TOUCHMODE_FULLSCREEN); menu.setShadowDrawable(R.drawable.actionbar_gradient); menu.setShadowWidth(15); menu.setFadeDegree(0.0f); menu.attachToActivity(this, SlidingMenu.SLIDING_WINDOW); menu.setBehindWidth(200); menu.setMenu(R.layout.menu_frame); getSupportActionBar().setDisplayShowCustomEnabled(true); getSupportActionBar().setDisplayHomeAsUpEnabled(true); } @Override public boolean onCreateOptionsMenu(Menu menu) { // Inflate the menu; this adds items to the action bar if it is present. getMenuInflater().inflate(R.menu.main, menu); return true; } @Override public boolean onOptionsItemSelected(MenuItem item) { switch (item.getItemId()) { case android.R.id.home: menu.toggle(true); return true; } return super.onOptionsItemSelected(item); } public boolean onKeyDown(int keyCode, KeyEvent event) { if (keyCode == KeyEvent.KEYCODE_BACK) { if(menu.isMenuShowing()){ menu.toggle(true); return false; } } return super.onKeyDown(keyCode, event); } } Result:
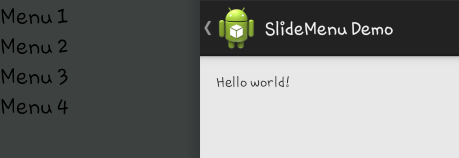
(unfortunately, this screen was not loaded completely on HabraStorage, it was necessary to use third-party image hosting).
As a conclusion
I will answer a logical question that may arise from the reader: “Why not ActionBar Sherlock” (if of course you know what it is)?
The answer is simple: I did not know about its existence at the beginning of work. When I started SlidingMenu, I found out about the recommended Sherlock, but there was no longer any desire to change Support Lib and half the code with it.
As it turned out, it is not so easy to start programming for Android, given that half of the problems are not connected with this platform, but with the tools for it.
But, as I said above, you only need to understand a bit and then everything becomes much clearer.
Thank you if you have read to the end.
PS If you have comments on the quality of the code or the quality of the text - express, but do not forget, please, that everything is calculated for beginners from the same newcomer.
UPD: Added comments from comments.
Source: https://habr.com/ru/post/194056/
All Articles