How we built our WiFi network
I want to talk about how we built our own, good WLAN - Wireless LAN.
This article will be useful to those who are going to build a WLAN in their company, and not simple, but well-managed and so that users of this WLAN are satisfied, that is, they would not notice it after the initial connection.
WLAN in our company has existed for a very long time, since 2002, when the entire wireless network in the office was represented by just one SOHO point of the 802.11b 3COM standard, which covered the entire office. The load on it was small, the WiFi devices were very small.
The years went by, the office grew, the 802.11g standard appeared. We followed the path of gradually increasing the number of SOHO points with the same SSID. The challenge was to just have WiFi. At first there was one floor with 6 points LinkSys WAP54G, then the second floor appeared, where we began to put dots on Cisco (they are LinkSys) of the gn standard. If somewhere there was not enough coverage, we simply added a point.
')
While the client devices were not very many, this scheme worked well. Yes, there were problems with roaming, when the client to the last clung to the point with which he connected at the beginning and did not want to move to another point, the signal from which is better. Yes, such a network was inconvenient to manage: replacing the SSID, or adding a new one, required to bypass all the points that were at the maximum of this network - 12 pieces. Yes, it was not easy to understand what is happening in the WLAN network, since all the points worked “by themselves” without centralized control. Even determine the number of simultaneously connected clients was not easy. The fault tolerance of such a network was also not up to par. It was enough to “hang” at one point - and immediately a hole appeared in the coating. But all this was offset by the low cost of this network. One point cost $ 130- $ 150, in fact, only from the cost of points and the cost of the network was formed.
At the same time, the number of WiFi clients, who were no longer satisfied with “just WiFi in the office”, grew. They wanted high-performance WiFi, with the ability to move around the office without losing touch. It also became clear that our company will move to a new office. It was the beginning and middle of 2012, respectively, our department was faced with the task of building high-quality WiFi in the new office before the move.
The plan was:
1. Decide on the tasks that our WLAN should have solved.
2. Select a WLAN manufacturer.
3. Design the location of the points, because it had to be done before the end of the SCS installation in the building, in order not to turn the installation of points into a separate construction project.
4. Make an accurate list of equipment for ordering.
5. Mount, configure and test the network.
First of all, we need a reliable WLAN so that users do not think about solving network connection problems. WLAN speed should provide comfortable software development and Internet access. We did not set ourselves the task of replacing a wired network with a wireless one, since no WLAN will replace the developer with a 1 Gbit wired connection, which we already provide at every workplace.
You need the ability to conveniently manage WLANs - to quickly create new wireless networks, for example, for guests or conferences held in the office. The possibility of centralized network management in geographically separated offices, i.e., that a user, having connected in one of the offices and moved with his mobile devices to another office, has connected to the network automatically.
Of course, we need the ability to remotely manage WLAN networks in our other offices, which, by a strange coincidence, also moved to new premises around the same time and in which the old WLAN also needed to be replaced.
It was one of the most difficult tasks. All manufacturers promise that their decision is the best. It is clear that for our tasks (centralized network management, and even in several offices) we need a WLAN with a controller, since we already used the option without a controller, and the new network should be 2-3 times larger.
I considered such manufacturers: Cisco, Motorola and Aruba. At first, I also considered HP, since our wired network is built on HP, but after reading several performance tests, where HP occupied the last places, I excluded it from consideration.
So, Cisco is the leader in the networking industry. Any Cisco networking solution should work well. The downside is the price of the solution, which is usually higher than that of competitors. In a typical Cisco WLAN solution, all traffic from the access points goes to the controller, which handles further packet processing. In this variant there are both pluses (all traffic passes through one point) and minuses: a hard dependence on the controller’s performance and the width of the channel through which the controller is connected to the wired network. For the same reason, in each office you need to install your own WLAN controller.
Aruba Networks . One of the main competitors of Cisco in a segment of wireless networks. Promote your decision without a controller, i.e. the controller is located somewhere in the cloud, and the points are in your office. A year ago, I was not ready to set my wireless network dependent on cloud service.
Motorola . Motorola's WLAN solution - WiNG 5 - focuses on decentralization. Each point is smart enough to authorize the client and then pass traffic between the wireless and wired network segments in accordance with the settings that the point receives from the controller. That is, in this case, we get a wired network segment, usually a VLAN with traffic from wireless clients, and then we can manage this traffic using the infrastructure of a regular LAN. The controller is used only for managing access points and collecting statistics. There is also a very useful mode of operation for us, when one of the access points becomes the controller, and when it is not available, the procedure for selecting a controller point from the remaining network points is performed.
Here Motorola shows how data goes on the WiNG5 network compared to other architectures:

Also in the process of choosing a manufacturer, I was influenced by the advice of a friend of apcsb , who sent links to very good manuals on deploying and configuring WiNG 5. After reading these documents, it became clear that the WiNG 5 architecture with the NOC (Network Operations Center) connection option suits us best .

The network layout was as follows: in the largest office, where you need to put the most points, we install the controller and the simplest, “dependent” points, which without a controller can work only a few minutes. In remote offices, we set up “independent” points that can take over the functions of the controller if the main controller is unavailable, but we will still manage the remote offices from the central controller. This was especially convenient, since the remote offices already needed a new wireless network, which we could already deploy using independent points, and the main office was not yet ready. After starting the main office, where the WLAN controller will be located, we will switch the remote offices to work with it.
We had to provide excellent WiFi-coverage in the new office, which is a new 7-storey building. WiFi was needed on every floor, as well as on the roof of a building that is exploited, that is, there might be people there. The fact that the building is new, in the process of designing a WiFi network, is very useful to know, since it is in new buildings that good reinforced concrete floors are used that perfectly shield the WiFi signal. All floors have the same shape - almost a rectangle of 45x30 meters with a reinforced concrete structure in the center (toilets, stairs and elevator shafts).
The difficulty was as follows: there were no internal partitions on the floors, since they were still to be built. But the WLAN equipment had to be ordered already, since the usual delivery time is from 2 months. Accordingly, we could not make a full-fledged radio survey of the finished premises, as advised in all the manuals, and had to rely only on the blueprints for future partitions. We did a little radio survey: we found out that it is possible to cover almost the entire floor with two 2.4 GHz WiFi points with a capacity of 17 dBm and get the signal level in most places on the floor at least -70d Bm. We also found out that there are no extraneous WLAN networks in the building and nearby, and the reinforced concrete overlap between the floors shields the signal to the level of -80-90 dBm.
It became clear that with the help of two, or better than three WiFi-points, we will somehow provide coverage of one floor in the 2.4 GHz range in the absence of partitions. However, there was no certainty that it would be good wifi. Therefore, I decided to model the floor in any system for designing wireless networks. Motorola has such software specifically designed for such tasks - LANPlanner. Surely the system is good, but it costs around 300 thousand rubles. and it is impossible to see even the demo version. After some searches, I found the TamoGraph Site Survey program, which allows you to map the WLAN coverage, as well as conduct simulations using virtual WiFi points and virtual walls. The price of this program was 10 times less compared to LANPlanner, and, considering that the wrong location of WiFi-points is much more expensive, I decided to use TamoGraph.
Armed with building plans for future partitions and TamoGraph Site Survey, I drew a floor plan using virtual wall materials with the same characteristics that our future partitions will have. After placing virtual WiFi points on the plan, it became clear that the simulation program was extremely useful. She immediately showed how the concrete columns, which were also on the floor, but which “by eye” was very difficult to influence the propagation of the signal, would influence the signal propagation. After the simulation, it became clear that even for the 2.4 GHz range, it is very desirable to put 4 points on the floor. And if we want to use the 5 GHz range, then we need more points and need to install them more often. As a result, we stopped at a scheme with 6 points per floor, while the power of each point in the 5 GHz range does not exceed 17 dB and the main parts of the floor are covered simultaneously with at least 2 points. Thus, we ensure the reliability of the WLAN in the event of the failure of one of the points on the floor.
Here is an example of how the result of modeling one of the floors looks like (the signal level at 5 GHz is shown in color):

So, the location of the points is known, the scheme of the network as a whole is clear.
In the main office, you need 39 “dependent” dependent or thin points, since the controller will be nearby. These will be dual-band Motorola AP-650 "AP-0650-66030-WW" with integrated antennas. These are the best dual band dots from Motorola with support for a / b / g / n standards. They cannot work without a controller, and they cannot be configured without a controller.
In remote offices you need to buy full-fledged AP-6532 "AP-6532-66030-WW" points. This point on the WiFi-characteristics is a copy of the AP-650. But these points can work both by themselves and under the control of the controller. If they lose contact with the controller, then continue to serve WiFi-clients. If the controller does not initially exist, then one of the points takes over its functions (it is automatically selected). The software on the WiFi points and on the controller is the same. The cost of the AP-6532 point is about $ 150 higher than the AP-650.
This is the point on the table:

But already installed on the ceiling:

Conveniently, on many types of suspended ceilings these points can be fixed without drilling holes: the point is attached to the T-profile of the ceiling with latches.
As a controller, or rather two controllers to work in a cluster, I chose the RFS6000 . Here the choice was quite simple: the simpler version of the RFS4000 does not support the number of points we need, and the RFS7000 is simply more expensive. Also on the controllers you need to buy a service contract, under which you can receive software updates and get warranty service for 3 years.
It would seem that everything was bought: points, controllers, a guarantee on controllers. But no: you still need to buy a license to connect the points to the controller. The most advantageous way is to buy licenses in packages, in our case, these are 4 packages of 16 licenses each, that is, our controllers will be able to serve 64 points with regard to all remote offices. An interesting detail: licenses and controllers are purchased independently, and then on the Motorola website you link licenses with a specific controller or controllers. In our case, all licenses are tied to one controller, and the second controller is combined with it in a cluster. So in case of failure of the first controller (with licenses), the second one will continue maintenance with the same licenses.
Now we will deal with a guarantee for points. The warranty for replacing defective points for all Motorola points of the “N” standard is lifetime. Lifetime - this means not during your life, but during the life cycle of these points from Motorola. As soon as they stop the release of these points + some years, and the point will not change. I think that other manufacturers have exactly the same "lifetime" warranty, so this is not a feature of Motorola. You can also purchase an additional guarantee on the point at which, if your point fails, you are first brought a new one, and then you send the old one back.
But that's not all. You also need a service contract for points, so that you can update the firmware. In the case of AP-650 points, the cost of a service contract for points is already included in the service contract for the controller and, accordingly, depends on the number of points that are connected to the controller. But at the AP-6532 points that were purchased in other countries for remote offices, you had to buy a service contract for these points.
Perhaps someone will be interested in prices for equipment in Russia:
There were no problems with the connection. At first we had to start WLAN in remote offices, since the central office was not ready yet. To do this, we connected several independent AP-6532 points to a regular network segment on PoE ports. The points turned on, independently found each other within the LAN segment and independently selected one of them as Virtual Controller. Accordingly, all settings should be made by connecting exactly to the point with the function of the controller. To update the firmware, it is enough to update it on the controller point, and it will already flash the remaining points.
We set up ports on LAN switches to trunk mode so that they receive tagged packets and distribute them to the corresponding VLANs. Our VLAN is configured 2: for internal users and for guests. Each VLAN has its own IP addressing, and they are routed differently, but all this is already done on conventional wired equipment. We also created 2 WLAN networks on the controller: for employees and for guests, each with its own SSID, which were mapped to the corresponding VLAN. That is, the client, connecting to one of the WLAN, falls into the corresponding VLAN. Simply put, WiFi-points act as a distributed WLAN switch and transmit packets between WLAN and LAN networks.
The settings on the points at this point had to be done a bit:
1. Set the country for the rf-domain so that the points work in the range allowed for this country.
2. Create the required number of WLA networks (in our case, two) with the appropriate security settings. When creating a WLAN, you need to specify the VLAN with which it will be tagged.
3. Enable SMART-RF technology, which will help you automatically select channels and power of radio modules at the points, based on the noise of the air and the relative position of the points. In the future, SMART-RF can change the channel or point power in case of interference or, for example, increase its power when the neighboring point is disconnected to increase coverage. The technology is quite convenient, although there are certainly cases where it interferes.
In general, that's all. You can also set specific parameters of the radio modules of any of the points or all at once, but for this you need to be well aware of what you are doing. To do this, it is very useful to read the book CWDP Certified Wireless Design Professional Official Study Guide , which TamoSoft recommends along with its network design program. It seems that the authors of the program developed it based on this book, since many terms coincide. In our case, we have disabled support for speeds below 6 Mbps, so that slow WiFi connections do not interfere.
I want to say a few words about what a rf-domain (Radio Frequency domain) is. This is a physical area that combines a group of WiFi-points. Within this group, roaming clients may occur. For example: if the office should be fully covered by a WLAN, then it makes sense to merge all points of this office into one rf-domain. If the office has 2 separated conference rooms and points are set only for customer service in these rooms, then you need to make two rf-domains, one for each room. In the case of using independent points with a virtual controller, you can create only one rf-domain.
At this stage, we received several completely independent WLAN networks in remote offices, each of which needed to be configured separately. But on the other hand, each of these networks worked very well, roaming between points worked, statistics were collected, users were satisfied.
For launching the entire WLAN infrastructure, Motorola has an excellent document, “WiNG 5.X How-To Guide Centralized Deployments,” which describes the steps in how to do it. Each step is described in two versions: there are pictures for GUI lovers, for SSH lovers there are corresponding commands. I will describe the configuration process in general terms.
First we connect the controllers, we have 2 of them. In order for one of them to fail when the network continues to work, they need to be clustered. The controllers connect to the network with a regular 1 Gb Ethernet, although you can also connect with optics through an SFP connector. We configure one of the controllers: IP addresses, DNS name, passwords. Then we configure the IP address for the second controller and flash the firmware of the same version as the first controller into it — this is absolutely necessary for clustering. That is why you need to buy a service contract for controllers. Without a contract, you will not get access to the firmware, neither to the old nor to the new ones, and in my case the controllers came with different versions of the firmware.
Then, on the “second” controller, execute the “join cluster” command with the address of the first controller. The second controller reboots - and it's ready, the cluster of two controllers works with identical settings. A cluster is of two types: Active-Active - when both controllers service points simultaneously, and Active-Passive - when the points are serviced only by the first controller, and the second is put into operation only when the first one fails. In any case, all points on the network know the IP addresses of both controllers.
Now on the controller, we need to create the rf-domains we need. In our case, we create one rf-domain: spb-office, munich-office, etc. for each office. Each rf-domain has its own country and its own SMART-RF technology setup, which is logical: in different areas we may need to configure the radio modules of points in different ways.
Next on the controller we create WLAN-networks. Any of the created WLANs can be included in any of the offices, which, of course, is very convenient and was one of our initial requirements. A component of a WLAN is to configure its security, i.e., the type of authentication, encryption and QoS. It is important to understand that rf-domain and WLAN are completely independent entities. Also in the WLAN is set its SSID and VLAN tag, which can be overridden for each rf-domain. This is convenient, since not in every office we have the same numbering of VLANs, and here we can specify the desired VLAN of a specific WLAN for a particular rf-domain.
Now go to the setting points. We presume that each point when turned on must be connected to the controller and receive all the settings from it. To do this, you need to set certain vendor specific options on the DHCP server, in which we specify the IP addresses of the controllers and some timeout settings. These options do not affect other network clients, because the DHCP server sends them only to those who request these options. This scheme allows you to quickly connect new points to the network: they took a new point out of the box, connected it to the correct port on the switch, and that's it. Point receives from the controller the desired firmware and all the necessary settings. When you turn off the point, it loses all its settings and becomes “clean”, as from the factory (only the firmware is saved).
At the moment of the very first connection to the controller, the controller remembers this point by its MAC address in its config and reduces the number of free licenses by 1. Then the controller finds a suitable profile for setting this point and returns the settings for this profile to the point. If this is not the first connection point, then the controller can store additional settings for this particular point, which it combines with the settings of a suitable profile and sends it to the point.
What are the profiles in WiNG 5? Profiles allow you to issue the same settings immediately to a group of WiFi points or controllers. Profiles are stored on the controller and represent a complete set of parameters for a point of a certain type. For example, if we need to automatically configure the AP-650 and AP-6532 points on the same network, then we will need at least 2 profiles: for AP-650 and for AP-6532. It is in the profile that it is indicated which WLAN our point will serve, in what ranges the radio modules will work and at what speeds. Also on the profile settings are imposed restrictions rf-domain, in which there is a specific point.
How does the controller determine which profile to output to a specific point? For this, the controller has “Automatic Provisioning Policies”. I can not think of a good Russian analogue. There are several pieces of these Policies on the controller, each of them contains a specific condition according to which this policy applies to the point or not. Conditions can be: the range of IP addresses where the point is located, the range of MAC addresses of points and many others. But it is enough for me to distinguish points by type and by IP network. Also, the policy indicates which profile to apply to the point and in which rf-domain this point is located. As a result, when the point is connected, the controller goes through the list of policies and the first policy approaching this point is applied.
In the central office we have 3 types of points: AP-650, AP-6532 and AP-7161 (street performance). So, you need to create 3 profiles and 3 Automatic Provisioning Policies. Since we have relatively many points in this office, we have made a separate VLAN (WiFi Management VLAN), into which we connect the points themselves. In remote offices, points are connected to a regular network segment together with users, since there are usually not many points. The points receive an IP address, connect to the controller and, depending on the type of point, receive their profile to configure, and also receive instructions from the controller in which rf-domain they are located. After this, the point starts servicing the clients of those WLANs that are defined in its profile.
When each new point is connected, SMART-RF technology determines the best channel number for the radio modules of this point and power. This selection is made depending on the channels on which neighboring points operate and on the distance from them. The areas of radio coverage of neighboring points overlap, so each point "sees" several neighboring ones (in our case, 3-4 adjacent points on the floor can be seen).
As I already mentioned, for the connection of WLAN and LAN, we have made 2 VLANs: working and guest. WLAN for employees is displayed in the working VLAN, and 1 or more guest WLANs are displayed in the guest VLAN. We raise additional guest WLANs in case of any events in the office, so that after the end of the event this additional guest WLAN can be disabled along with the guests. :-)
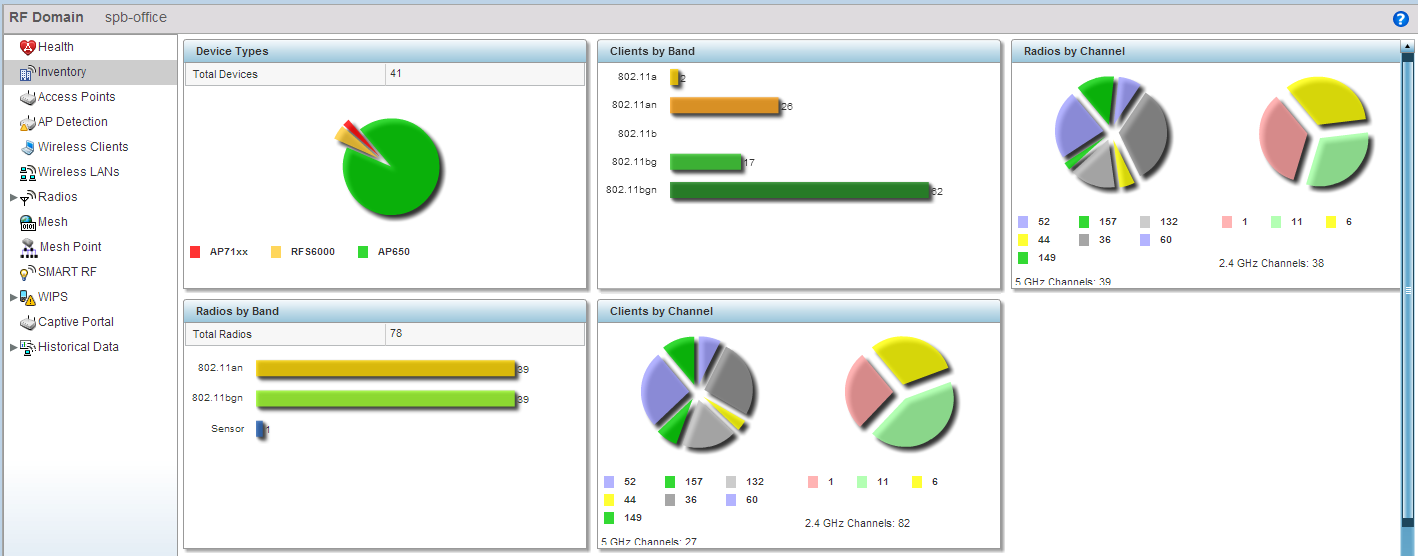
And this is what the floor looks like in the web interface when the network is running:

As a result, by the time we moved to a new office, we built a very good WiFi network. The users for whom they built this network are completely satisfied with its work. One of the comments of our users is characteristic: “How did you manage to build such fast WiFi?” We did not try to make the fastest WiFi possible, we needed the most stable WiFi, and I am sure that this task was solved. , , WiFi . , 15 /. , . 5 , 200 .
WiNG 5 Motorola . , , . , «» . WLAN . , - LAN, . AirDefense — WLAN WLAN. , .
WiNG5: , ( ), Advanced. WiFi- Wireshark. , , . , , , WiNG5 , . . , .
This article will be useful to those who are going to build a WLAN in their company, and not simple, but well-managed and so that users of this WLAN are satisfied, that is, they would not notice it after the initial connection.
How it all began
WLAN in our company has existed for a very long time, since 2002, when the entire wireless network in the office was represented by just one SOHO point of the 802.11b 3COM standard, which covered the entire office. The load on it was small, the WiFi devices were very small.
The years went by, the office grew, the 802.11g standard appeared. We followed the path of gradually increasing the number of SOHO points with the same SSID. The challenge was to just have WiFi. At first there was one floor with 6 points LinkSys WAP54G, then the second floor appeared, where we began to put dots on Cisco (they are LinkSys) of the gn standard. If somewhere there was not enough coverage, we simply added a point.
')
While the client devices were not very many, this scheme worked well. Yes, there were problems with roaming, when the client to the last clung to the point with which he connected at the beginning and did not want to move to another point, the signal from which is better. Yes, such a network was inconvenient to manage: replacing the SSID, or adding a new one, required to bypass all the points that were at the maximum of this network - 12 pieces. Yes, it was not easy to understand what is happening in the WLAN network, since all the points worked “by themselves” without centralized control. Even determine the number of simultaneously connected clients was not easy. The fault tolerance of such a network was also not up to par. It was enough to “hang” at one point - and immediately a hole appeared in the coating. But all this was offset by the low cost of this network. One point cost $ 130- $ 150, in fact, only from the cost of points and the cost of the network was formed.
At the same time, the number of WiFi clients, who were no longer satisfied with “just WiFi in the office”, grew. They wanted high-performance WiFi, with the ability to move around the office without losing touch. It also became clear that our company will move to a new office. It was the beginning and middle of 2012, respectively, our department was faced with the task of building high-quality WiFi in the new office before the move.
The plan was:
1. Decide on the tasks that our WLAN should have solved.
2. Select a WLAN manufacturer.
3. Design the location of the points, because it had to be done before the end of the SCS installation in the building, in order not to turn the installation of points into a separate construction project.
4. Make an accurate list of equipment for ordering.
5. Mount, configure and test the network.
Tasks
First of all, we need a reliable WLAN so that users do not think about solving network connection problems. WLAN speed should provide comfortable software development and Internet access. We did not set ourselves the task of replacing a wired network with a wireless one, since no WLAN will replace the developer with a 1 Gbit wired connection, which we already provide at every workplace.
You need the ability to conveniently manage WLANs - to quickly create new wireless networks, for example, for guests or conferences held in the office. The possibility of centralized network management in geographically separated offices, i.e., that a user, having connected in one of the offices and moved with his mobile devices to another office, has connected to the network automatically.
Of course, we need the ability to remotely manage WLAN networks in our other offices, which, by a strange coincidence, also moved to new premises around the same time and in which the old WLAN also needed to be replaced.
Manufacturer selection
It was one of the most difficult tasks. All manufacturers promise that their decision is the best. It is clear that for our tasks (centralized network management, and even in several offices) we need a WLAN with a controller, since we already used the option without a controller, and the new network should be 2-3 times larger.
I considered such manufacturers: Cisco, Motorola and Aruba. At first, I also considered HP, since our wired network is built on HP, but after reading several performance tests, where HP occupied the last places, I excluded it from consideration.
So, Cisco is the leader in the networking industry. Any Cisco networking solution should work well. The downside is the price of the solution, which is usually higher than that of competitors. In a typical Cisco WLAN solution, all traffic from the access points goes to the controller, which handles further packet processing. In this variant there are both pluses (all traffic passes through one point) and minuses: a hard dependence on the controller’s performance and the width of the channel through which the controller is connected to the wired network. For the same reason, in each office you need to install your own WLAN controller.
Aruba Networks . One of the main competitors of Cisco in a segment of wireless networks. Promote your decision without a controller, i.e. the controller is located somewhere in the cloud, and the points are in your office. A year ago, I was not ready to set my wireless network dependent on cloud service.
Motorola . Motorola's WLAN solution - WiNG 5 - focuses on decentralization. Each point is smart enough to authorize the client and then pass traffic between the wireless and wired network segments in accordance with the settings that the point receives from the controller. That is, in this case, we get a wired network segment, usually a VLAN with traffic from wireless clients, and then we can manage this traffic using the infrastructure of a regular LAN. The controller is used only for managing access points and collecting statistics. There is also a very useful mode of operation for us, when one of the access points becomes the controller, and when it is not available, the procedure for selecting a controller point from the remaining network points is performed.
Here Motorola shows how data goes on the WiNG5 network compared to other architectures:
Also in the process of choosing a manufacturer, I was influenced by the advice of a friend of apcsb , who sent links to very good manuals on deploying and configuring WiNG 5. After reading these documents, it became clear that the WiNG 5 architecture with the NOC (Network Operations Center) connection option suits us best .
The network layout was as follows: in the largest office, where you need to put the most points, we install the controller and the simplest, “dependent” points, which without a controller can work only a few minutes. In remote offices, we set up “independent” points that can take over the functions of the controller if the main controller is unavailable, but we will still manage the remote offices from the central controller. This was especially convenient, since the remote offices already needed a new wireless network, which we could already deploy using independent points, and the main office was not yet ready. After starting the main office, where the WLAN controller will be located, we will switch the remote offices to work with it.
How to locate WiFi points?
We had to provide excellent WiFi-coverage in the new office, which is a new 7-storey building. WiFi was needed on every floor, as well as on the roof of a building that is exploited, that is, there might be people there. The fact that the building is new, in the process of designing a WiFi network, is very useful to know, since it is in new buildings that good reinforced concrete floors are used that perfectly shield the WiFi signal. All floors have the same shape - almost a rectangle of 45x30 meters with a reinforced concrete structure in the center (toilets, stairs and elevator shafts).
The difficulty was as follows: there were no internal partitions on the floors, since they were still to be built. But the WLAN equipment had to be ordered already, since the usual delivery time is from 2 months. Accordingly, we could not make a full-fledged radio survey of the finished premises, as advised in all the manuals, and had to rely only on the blueprints for future partitions. We did a little radio survey: we found out that it is possible to cover almost the entire floor with two 2.4 GHz WiFi points with a capacity of 17 dBm and get the signal level in most places on the floor at least -70d Bm. We also found out that there are no extraneous WLAN networks in the building and nearby, and the reinforced concrete overlap between the floors shields the signal to the level of -80-90 dBm.
It became clear that with the help of two, or better than three WiFi-points, we will somehow provide coverage of one floor in the 2.4 GHz range in the absence of partitions. However, there was no certainty that it would be good wifi. Therefore, I decided to model the floor in any system for designing wireless networks. Motorola has such software specifically designed for such tasks - LANPlanner. Surely the system is good, but it costs around 300 thousand rubles. and it is impossible to see even the demo version. After some searches, I found the TamoGraph Site Survey program, which allows you to map the WLAN coverage, as well as conduct simulations using virtual WiFi points and virtual walls. The price of this program was 10 times less compared to LANPlanner, and, considering that the wrong location of WiFi-points is much more expensive, I decided to use TamoGraph.
Armed with building plans for future partitions and TamoGraph Site Survey, I drew a floor plan using virtual wall materials with the same characteristics that our future partitions will have. After placing virtual WiFi points on the plan, it became clear that the simulation program was extremely useful. She immediately showed how the concrete columns, which were also on the floor, but which “by eye” was very difficult to influence the propagation of the signal, would influence the signal propagation. After the simulation, it became clear that even for the 2.4 GHz range, it is very desirable to put 4 points on the floor. And if we want to use the 5 GHz range, then we need more points and need to install them more often. As a result, we stopped at a scheme with 6 points per floor, while the power of each point in the 5 GHz range does not exceed 17 dB and the main parts of the floor are covered simultaneously with at least 2 points. Thus, we ensure the reliability of the WLAN in the event of the failure of one of the points on the floor.
Here is an example of how the result of modeling one of the floors looks like (the signal level at 5 GHz is shown in color):
So, the location of the points is known, the scheme of the network as a whole is clear.
What you need to buy?
In the main office, you need 39 “dependent” dependent or thin points, since the controller will be nearby. These will be dual-band Motorola AP-650 "AP-0650-66030-WW" with integrated antennas. These are the best dual band dots from Motorola with support for a / b / g / n standards. They cannot work without a controller, and they cannot be configured without a controller.
In remote offices you need to buy full-fledged AP-6532 "AP-6532-66030-WW" points. This point on the WiFi-characteristics is a copy of the AP-650. But these points can work both by themselves and under the control of the controller. If they lose contact with the controller, then continue to serve WiFi-clients. If the controller does not initially exist, then one of the points takes over its functions (it is automatically selected). The software on the WiFi points and on the controller is the same. The cost of the AP-6532 point is about $ 150 higher than the AP-650.
This is the point on the table:
But already installed on the ceiling:
Conveniently, on many types of suspended ceilings these points can be fixed without drilling holes: the point is attached to the T-profile of the ceiling with latches.
As a controller, or rather two controllers to work in a cluster, I chose the RFS6000 . Here the choice was quite simple: the simpler version of the RFS4000 does not support the number of points we need, and the RFS7000 is simply more expensive. Also on the controllers you need to buy a service contract, under which you can receive software updates and get warranty service for 3 years.
It would seem that everything was bought: points, controllers, a guarantee on controllers. But no: you still need to buy a license to connect the points to the controller. The most advantageous way is to buy licenses in packages, in our case, these are 4 packages of 16 licenses each, that is, our controllers will be able to serve 64 points with regard to all remote offices. An interesting detail: licenses and controllers are purchased independently, and then on the Motorola website you link licenses with a specific controller or controllers. In our case, all licenses are tied to one controller, and the second controller is combined with it in a cluster. So in case of failure of the first controller (with licenses), the second one will continue maintenance with the same licenses.
Now we will deal with a guarantee for points. The warranty for replacing defective points for all Motorola points of the “N” standard is lifetime. Lifetime - this means not during your life, but during the life cycle of these points from Motorola. As soon as they stop the release of these points + some years, and the point will not change. I think that other manufacturers have exactly the same "lifetime" warranty, so this is not a feature of Motorola. You can also purchase an additional guarantee on the point at which, if your point fails, you are first brought a new one, and then you send the old one back.
But that's not all. You also need a service contract for points, so that you can update the firmware. In the case of AP-650 points, the cost of a service contract for points is already included in the service contract for the controller and, accordingly, depends on the number of points that are connected to the controller. But at the AP-6532 points that were purchased in other countries for remote offices, you had to buy a service contract for these points.
Perhaps someone will be interested in prices for equipment in Russia:
| Equipment | Price |
|---|---|
| AP-650 Point | $ 570 |
| AP-6532 Point | $ 720 |
| RFS-6010 controller without licenses | $ 1870 |
| 3 years warranty for RFS-6010 | $ 850 |
| 64 adaptive licenses | $ 2835 |
| Point AP-7161 (street) | $ 2170 |
| Antennas for AP-7161 (need 6 pieces) | $ 125 for 1 piece |
Connect and configure
There were no problems with the connection. At first we had to start WLAN in remote offices, since the central office was not ready yet. To do this, we connected several independent AP-6532 points to a regular network segment on PoE ports. The points turned on, independently found each other within the LAN segment and independently selected one of them as Virtual Controller. Accordingly, all settings should be made by connecting exactly to the point with the function of the controller. To update the firmware, it is enough to update it on the controller point, and it will already flash the remaining points.
We set up ports on LAN switches to trunk mode so that they receive tagged packets and distribute them to the corresponding VLANs. Our VLAN is configured 2: for internal users and for guests. Each VLAN has its own IP addressing, and they are routed differently, but all this is already done on conventional wired equipment. We also created 2 WLAN networks on the controller: for employees and for guests, each with its own SSID, which were mapped to the corresponding VLAN. That is, the client, connecting to one of the WLAN, falls into the corresponding VLAN. Simply put, WiFi-points act as a distributed WLAN switch and transmit packets between WLAN and LAN networks.
The settings on the points at this point had to be done a bit:
1. Set the country for the rf-domain so that the points work in the range allowed for this country.
2. Create the required number of WLA networks (in our case, two) with the appropriate security settings. When creating a WLAN, you need to specify the VLAN with which it will be tagged.
3. Enable SMART-RF technology, which will help you automatically select channels and power of radio modules at the points, based on the noise of the air and the relative position of the points. In the future, SMART-RF can change the channel or point power in case of interference or, for example, increase its power when the neighboring point is disconnected to increase coverage. The technology is quite convenient, although there are certainly cases where it interferes.
In general, that's all. You can also set specific parameters of the radio modules of any of the points or all at once, but for this you need to be well aware of what you are doing. To do this, it is very useful to read the book CWDP Certified Wireless Design Professional Official Study Guide , which TamoSoft recommends along with its network design program. It seems that the authors of the program developed it based on this book, since many terms coincide. In our case, we have disabled support for speeds below 6 Mbps, so that slow WiFi connections do not interfere.
I want to say a few words about what a rf-domain (Radio Frequency domain) is. This is a physical area that combines a group of WiFi-points. Within this group, roaming clients may occur. For example: if the office should be fully covered by a WLAN, then it makes sense to merge all points of this office into one rf-domain. If the office has 2 separated conference rooms and points are set only for customer service in these rooms, then you need to make two rf-domains, one for each room. In the case of using independent points with a virtual controller, you can create only one rf-domain.
At this stage, we received several completely independent WLAN networks in remote offices, each of which needed to be configured separately. But on the other hand, each of these networks worked very well, roaming between points worked, statistics were collected, users were satisfied.
Central Office Setup (NOC)
For launching the entire WLAN infrastructure, Motorola has an excellent document, “WiNG 5.X How-To Guide Centralized Deployments,” which describes the steps in how to do it. Each step is described in two versions: there are pictures for GUI lovers, for SSH lovers there are corresponding commands. I will describe the configuration process in general terms.
First we connect the controllers, we have 2 of them. In order for one of them to fail when the network continues to work, they need to be clustered. The controllers connect to the network with a regular 1 Gb Ethernet, although you can also connect with optics through an SFP connector. We configure one of the controllers: IP addresses, DNS name, passwords. Then we configure the IP address for the second controller and flash the firmware of the same version as the first controller into it — this is absolutely necessary for clustering. That is why you need to buy a service contract for controllers. Without a contract, you will not get access to the firmware, neither to the old nor to the new ones, and in my case the controllers came with different versions of the firmware.
Then, on the “second” controller, execute the “join cluster” command with the address of the first controller. The second controller reboots - and it's ready, the cluster of two controllers works with identical settings. A cluster is of two types: Active-Active - when both controllers service points simultaneously, and Active-Passive - when the points are serviced only by the first controller, and the second is put into operation only when the first one fails. In any case, all points on the network know the IP addresses of both controllers.
Now on the controller, we need to create the rf-domains we need. In our case, we create one rf-domain: spb-office, munich-office, etc. for each office. Each rf-domain has its own country and its own SMART-RF technology setup, which is logical: in different areas we may need to configure the radio modules of points in different ways.
Next on the controller we create WLAN-networks. Any of the created WLANs can be included in any of the offices, which, of course, is very convenient and was one of our initial requirements. A component of a WLAN is to configure its security, i.e., the type of authentication, encryption and QoS. It is important to understand that rf-domain and WLAN are completely independent entities. Also in the WLAN is set its SSID and VLAN tag, which can be overridden for each rf-domain. This is convenient, since not in every office we have the same numbering of VLANs, and here we can specify the desired VLAN of a specific WLAN for a particular rf-domain.
Now go to the setting points. We presume that each point when turned on must be connected to the controller and receive all the settings from it. To do this, you need to set certain vendor specific options on the DHCP server, in which we specify the IP addresses of the controllers and some timeout settings. These options do not affect other network clients, because the DHCP server sends them only to those who request these options. This scheme allows you to quickly connect new points to the network: they took a new point out of the box, connected it to the correct port on the switch, and that's it. Point receives from the controller the desired firmware and all the necessary settings. When you turn off the point, it loses all its settings and becomes “clean”, as from the factory (only the firmware is saved).
At the moment of the very first connection to the controller, the controller remembers this point by its MAC address in its config and reduces the number of free licenses by 1. Then the controller finds a suitable profile for setting this point and returns the settings for this profile to the point. If this is not the first connection point, then the controller can store additional settings for this particular point, which it combines with the settings of a suitable profile and sends it to the point.
What are the profiles in WiNG 5? Profiles allow you to issue the same settings immediately to a group of WiFi points or controllers. Profiles are stored on the controller and represent a complete set of parameters for a point of a certain type. For example, if we need to automatically configure the AP-650 and AP-6532 points on the same network, then we will need at least 2 profiles: for AP-650 and for AP-6532. It is in the profile that it is indicated which WLAN our point will serve, in what ranges the radio modules will work and at what speeds. Also on the profile settings are imposed restrictions rf-domain, in which there is a specific point.
How does the controller determine which profile to output to a specific point? For this, the controller has “Automatic Provisioning Policies”. I can not think of a good Russian analogue. There are several pieces of these Policies on the controller, each of them contains a specific condition according to which this policy applies to the point or not. Conditions can be: the range of IP addresses where the point is located, the range of MAC addresses of points and many others. But it is enough for me to distinguish points by type and by IP network. Also, the policy indicates which profile to apply to the point and in which rf-domain this point is located. As a result, when the point is connected, the controller goes through the list of policies and the first policy approaching this point is applied.
Now we put it all together
In the central office we have 3 types of points: AP-650, AP-6532 and AP-7161 (street performance). So, you need to create 3 profiles and 3 Automatic Provisioning Policies. Since we have relatively many points in this office, we have made a separate VLAN (WiFi Management VLAN), into which we connect the points themselves. In remote offices, points are connected to a regular network segment together with users, since there are usually not many points. The points receive an IP address, connect to the controller and, depending on the type of point, receive their profile to configure, and also receive instructions from the controller in which rf-domain they are located. After this, the point starts servicing the clients of those WLANs that are defined in its profile.
When each new point is connected, SMART-RF technology determines the best channel number for the radio modules of this point and power. This selection is made depending on the channels on which neighboring points operate and on the distance from them. The areas of radio coverage of neighboring points overlap, so each point "sees" several neighboring ones (in our case, 3-4 adjacent points on the floor can be seen).
As I already mentioned, for the connection of WLAN and LAN, we have made 2 VLANs: working and guest. WLAN for employees is displayed in the working VLAN, and 1 or more guest WLANs are displayed in the guest VLAN. We raise additional guest WLANs in case of any events in the office, so that after the end of the event this additional guest WLAN can be disabled along with the guests. :-)
And this is what the floor looks like in the web interface when the network is running:
Results
As a result, by the time we moved to a new office, we built a very good WiFi network. The users for whom they built this network are completely satisfied with its work. One of the comments of our users is characteristic: “How did you manage to build such fast WiFi?” We did not try to make the fastest WiFi possible, we needed the most stable WiFi, and I am sure that this task was solved. , , WiFi . , 15 /. , . 5 , 200 .
WiNG 5 Motorola . , , . , «» . WLAN . , - LAN, . AirDefense — WLAN WLAN. , .
WiNG5: , ( ), Advanced. WiFi- Wireshark. , , . , , , WiNG5 , . . , .
Source: https://habr.com/ru/post/193830/
All Articles