Installing and configuring TeamSpeak 3 servers on VDS
This article will focus on installing the TeamSpeak 3 server ; this program is intended for use by voice by various communities. In my example, Linux Debian 6.0 x64 will be used, the VDS with Ubuntu pre-installed is also optimal for the TC3 server, the bit doesn't matter, the principle of operation is the same.
You can use almost any VDS hosting in the price range of $ 10 per month. Pay attention to the localization of hosting, because Ping in TeamSpeak 3 will depend on where the data center is located with your server. As a basic configuration, optimally proceed from Debian and Ubuntu systems. From personal experience, I do not recommend using other solutions, but if your hosting is limited, you can of course use other options.
The first thing you need to do is create a user to work with the TeamSpeak 3 server, since Using the server as a root user is a vulnerability warned by program developers.
')
To do this, type the following command in the console:
After the user is created, upload the files downloaded from here to the / home / ts3server folder: TeamSpeak Downloads (Linux Server amd64, or x86 depending on the bitness of your system)
Browse to the ts3server folder and assign attributes to the following server files:
Next, perform the first server start with the command:
During the launch of this command, all the necessary files will be created on the server, and you will be given a password from serveradmin and a privilege key from the server admin group in the teamspeak client itself:
Be sure to save passwords and can stop the server with the command:
Now, to properly configure the crontab, you will need to go to the directory above and assign the user ts3server to own the server's TeamSpeak files.
Check if everything worked out (the result should look like the image below):
Now let's move on to setting up crontab for the user ts3server so that in case of failures the server will automatically start when you reboot your VDS:
Add a line to the opened file:
Execute the reboot command and then try to access your server from the TeamSpeak client using the IP address of your VDS. If, after rebooting the VDS, you can log in to the server and get a window in front of you asking to enter the privilege key from the server admin group , it means that you did not make any mistakes during the server installation:
1. There is a small nuance, for some reason unknown to me, always after installing the server, an error occurs in the file browser, which refuses to display Cyrillic files. To solve this problem, I do the following:
2. Initially installed server will have the status No license . In this case, you will have 1 virtual server with 32 slots. If you want to increase the number of virtual servers and slots, you can apply for an NPL license , which expands the server to the possibility of creating up to 10 virtual servers with 512 slots in total. The application for the NPL takes place in this section of the teamspeak site: Non-Profit License Registration . If you succeed, the licensekey.dat file will be sent to you, you need to put it in the root of the TeamSpeak 3 server and execute the command:
3. You remember the stage where the password was stored from the user serveradmin . This password is needed for the console management of TeamSpeak 3 servers, the most convenient client for working with the Query Server Admin : Admin Tool: YaTQA (English / German) . The essence of the utility is that the password is not very long and special characters are not always present in it, and therefore it is prone to brut (personally, in my experience there was a clever man who managed to foul up picking up a similar password from the user serveradmin ), so I strongly recommend changing the password on more complicated. To do this, stop the server and start with the following command:
4. To update the server version, you need to stop the server, create a backup copy of the ts3server.sqlitedb file just in case, then overwrite the files in the teamspeak server folder with new ones, set attributes, that's all, your server will be updated to the latest version.
Choosing the right hosting
You can use almost any VDS hosting in the price range of $ 10 per month. Pay attention to the localization of hosting, because Ping in TeamSpeak 3 will depend on where the data center is located with your server. As a basic configuration, optimally proceed from Debian and Ubuntu systems. From personal experience, I do not recommend using other solutions, but if your hosting is limited, you can of course use other options.
Preparing VDS server
The first thing you need to do is create a user to work with the TeamSpeak 3 server, since Using the server as a root user is a vulnerability warned by program developers.
')
To do this, type the following command in the console:
adduser ts3server After the user is created, upload the files downloaded from here to the / home / ts3server folder: TeamSpeak Downloads (Linux Server amd64, or x86 depending on the bitness of your system)
Browse to the ts3server folder and assign attributes to the following server files:
cd /home/ts3server chmod +x ts3server_minimal_runscript.sh chmod +x ts3server_startscript.sh chmod +x ts3server_linux_x86 chmod +x ts3server_linux_amd64 Installing TeamSpeak 3 servers
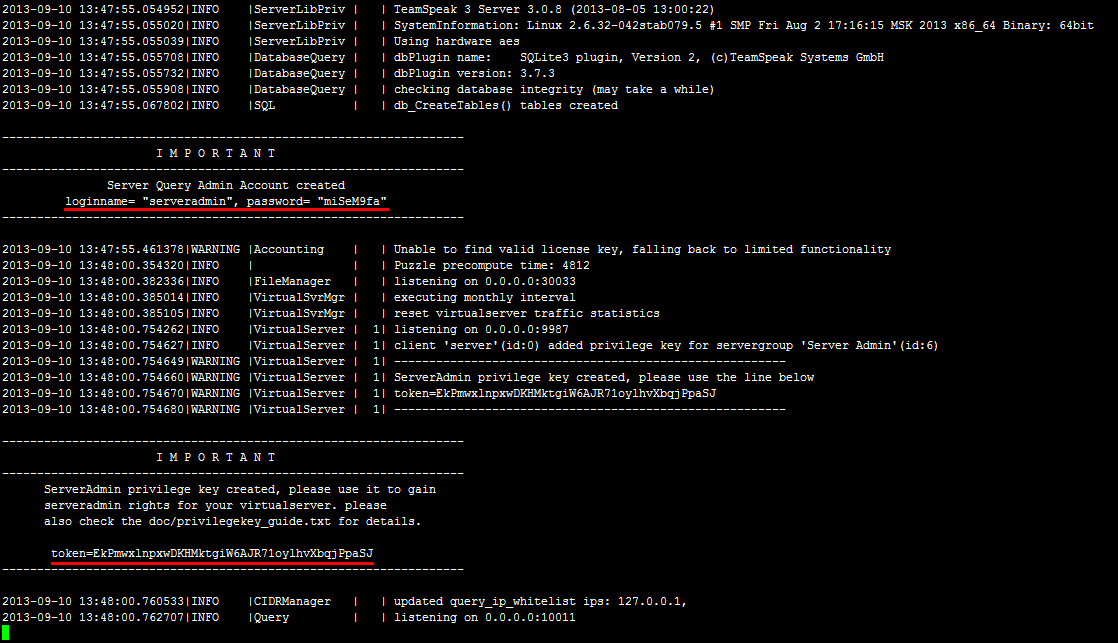
Next, perform the first server start with the command:
./ts3server_minimal_runscript.sh During the launch of this command, all the necessary files will be created on the server, and you will be given a password from serveradmin and a privilege key from the server admin group in the teamspeak client itself:
Be sure to save passwords and can stop the server with the command:
./ts3server_minimal_runscript.sh stop or by pressing Ctrl + cSetup autorun
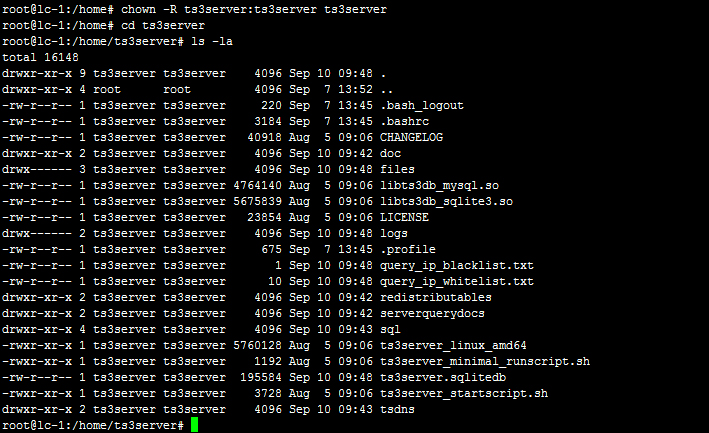
Now, to properly configure the crontab, you will need to go to the directory above and assign the user ts3server to own the server's TeamSpeak files.
cd /home chown -R ts3server:ts3server ts3server Check if everything worked out (the result should look like the image below):
cd ts3server ls -la Now let's move on to setting up crontab for the user ts3server so that in case of failures the server will automatically start when you reboot your VDS:
crontab -u ts3server -e Add a line to the opened file:
@reboot /home/ts3server/ts3server_startscript.sh start press Esc , type : wq and press Enter to save the settings.Completion of the installation and configuration of the TeamSpeak server
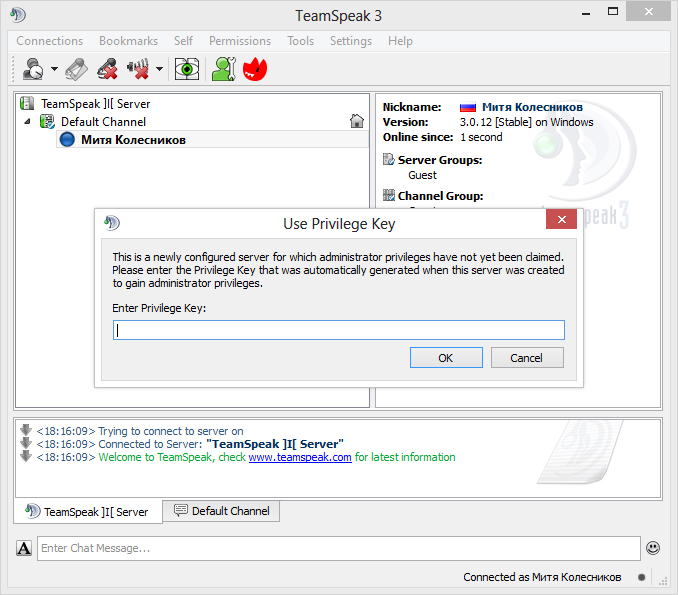
Execute the reboot command and then try to access your server from the TeamSpeak client using the IP address of your VDS. If, after rebooting the VDS, you can log in to the server and get a window in front of you asking to enter the privilege key from the server admin group , it means that you did not make any mistakes during the server installation:
Utility
1. There is a small nuance, for some reason unknown to me, always after installing the server, an error occurs in the file browser, which refuses to display Cyrillic files. To solve this problem, I do the following:
localedef -v -c -i en_US -f UTF-8 en_US.UTF-8 then add the line LC_ALL = en_US.UTF-8 to / etc / environment and reboot for verification.2. Initially installed server will have the status No license . In this case, you will have 1 virtual server with 32 slots. If you want to increase the number of virtual servers and slots, you can apply for an NPL license , which expands the server to the possibility of creating up to 10 virtual servers with 512 slots in total. The application for the NPL takes place in this section of the teamspeak site: Non-Profit License Registration . If you succeed, the licensekey.dat file will be sent to you, you need to put it in the root of the TeamSpeak 3 server and execute the command:
./ts3server_startscript.sh restart 3. You remember the stage where the password was stored from the user serveradmin . This password is needed for the console management of TeamSpeak 3 servers, the most convenient client for working with the Query Server Admin : Admin Tool: YaTQA (English / German) . The essence of the utility is that the password is not very long and special characters are not always present in it, and therefore it is prone to brut (personally, in my experience there was a clever man who managed to foul up picking up a similar password from the user serveradmin ), so I strongly recommend changing the password on more complicated. To do this, stop the server and start with the following command:
./ts3server_startscript.sh stop ./ts3server_startscript.sh start serveradmin_password=__ 4. To update the server version, you need to stop the server, create a backup copy of the ts3server.sqlitedb file just in case, then overwrite the files in the teamspeak server folder with new ones, set attributes, that's all, your server will be updated to the latest version.
Source: https://habr.com/ru/post/193378/
All Articles