Highly Available RabbitMQ Cluster
Meet RabbitMQ
Translations in Habré:
RabbitMQ tutorial 1 - Hello World
RabbitMQ tutorial 2 - Queue of tasks
RabbitMQ tutorial 3 - Publish / Subscribe
Immediately complement some shortcomings. And briefly repeat the basic terms.
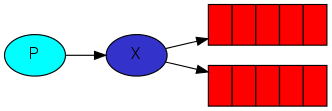
The principle of operation of the architecture using rabbitMq
')
There is an application (client) that generates messages, messages get to the exchange point, depending on the message parameters and settings of the exchange point, the message is copied to one or several queues (or simply deleted), after which customers can pick up messages from the queues.
The queue is associated with the exchange point by routing key or message header.
Routing key - the value that is specified when the message is published to the exchange point, is used to determine the queues in which the message will fall.
The message header is a set of key-value type arguments associated with the message.
Exchange points can be 4 types:
- direct - messages that fall into this exchange point will be copied only to those queues that are associated with the exchange point with a strong routing key.
- The topic - a routing key can be composite, and can be specified as a pattern, for which there are two special characters: * - means one word, # - one or several words. Words are separated by a dot. Example: routingKey = "* .database" - all messages with keys in which the second word is database will be copied to the pattern-bound queues.
- headers - the queue is associated with the exchange point not by the routing key, but by the message header, the condition is specified, which arguments and their values are expected, and when the exchange receives a message with a header containing arguments from the condition, the queue receives it. An example can be found here .
- fanout - the message received at the exchange point is copied to all associated queues, without checking the routing key or message header.
Each queue has 4 flags defining its behavior:
- auto_delete - if the queue is empty and there are no active connections to it, the queue is automatically deleted
- durable - steady queue, messages are not lost when rabbitMQ is restarted (or abrupt reboot), during publication and until the end of the return is stored in the database
- exclusive - the queue is designed for no more than one connection at a time
- passive - when declaring the queue passive, when the client accesses the server will consider that the queue has already been created, i.e. will not automatically create it in case of absence, this option is needed if you want to access the server without changing its state. For example, you just need to check if there is a queue. To do this, declare the queue passive, and if you get an error, then the queue does not exist.
Now, a little about rabbit's work itself, when installing and running as a service, the default settings are used, as the developers write in the official documentation , this should be enough for most scenarios, however I have not yet encountered situations in real products when there would be enough settings default Work parameters can be changed in runtime using service utilities (located in the \ rabbitmq_server-3.2.0 \ sbin directory), however, changes made in this way will be lost when rabbitmq is restarted (and also during restart). Go to the next topic.
Configuration rabbitMQ
RabbitMQ server operation configuration is located in three places, these are environment variables (ports and locations and file names are set), configuration files (access settings, clusters, plugins), and runtime settings (policies, performance settings).
When installing in Windows, the configuration file is not created, there is only an example located in the \ rabbitmq_server-3.2.0 \ etc \ rabbitmq.config.example directory. Create your configuration file, call it rabbitmq.config (the extension is .config and nothing else!), And fill it with simple settings:
%% Sample [ {rabbit, [ {tcp_listeners, [5672]}, {log_levels, [{connection, error}]}, {default_vhost, <<"/">>}, {default_user, <<"username">>}, {default_pass, <<"password">>}, {default_permissions, [<<".*">>, <<".*">>, <<".*">>]}, {heartbeat, 60}, {frame_max, 1048576} ]} ]. Framing << >> is not a mistake, it should be so.
Comments in the settings are preceded by a double percent symbol - %%.
Now we place the file in a convenient place, for example, in the root folder with the RabbitMQ server installed, for example, let there be a path:
c: \ rabbitmq \ rabbitmq.config
In order for RabbitMq to see the configuration file, it is necessary to create an environment variable with its location
RABBITMQ_CONFIG_FILE = c:\rabbitmq\rabbitmq A variable should be created both in the user’s environment and in the system’s environment.
We write the path to the file name, the extension is cut off. Creating a config file and setting up the environment is best done before installing the RabbitMQ server, or reinstalling it after. (It must be re-installed for the environment to take effect.) A simple restart does not help.
Now you can install Erlang and RabbitMQ server.
Create and configure a cluster
Attention
, RabbitMQ : RabbitMQ\RabbitMQ Server\rabbitmq_server-3.2.1\sbin A cluster, in rabbitMQ, is the connection of one or more RabbitMQ servers with each other, in which one of the nodes acts as a master server, the rest as a slave servers, on the wizard the cluster settings are specified, which are duplicated on the slaves, to them, particulars include access settings and policies. When a master falls, one of the slaves assumes his role, and becomes a master.
First of all, before creating the cluster, we need to synchronize the cookies of the RabbitMQ nodes, the cookies in RabbitMQ are generated during the installation of the hash, which is used as the node identifier, since the cluster acts as a single node, on each server the cookies must be identical.
On the master server, take the file
%WINDOWS%\.erlang.cookie and copy it with replacement along the way
C:\Users\%CurrentUser%\.erlang.cookie then we copy with replacement on each cluster node along the specified paths.
The cluster is created by executing the following commands on each slave:
rabbitmqctl stop_app rabbitmqctl join_cluster --ram rabbit@master rabbitmqctl start_app Or by specifying in the configuration file:
{cluster_nodes, {["rabbit@master", "rabbit@host01"], disc}} This procedure needs to be performed only once, when a new node is added, the node will later connect to the cluster automatically (for example, after rebooting the server on which the node is raised).
The cluster is created, but it is not suitable for full-fledged use, at the current stage the queues and messages on each node live separately, no synchronization is performed, and therefore if two clients connect to the cluster to different nodes, then when one of them publishes the messages to the queue, the second will not know anything about it. Also, if one of the nodes falls, all messages that were on it will be lost.
Synchronization Policies
Go to the tools and execute the following command in runtime:
rabbitmqctl set_policy HA ".*" "{""ha-mode"": ""all""}" Now all the queues and messages in them will be synchronized. When a message is published, it becomes available to clients only after copying to all nodes of the cluster.
One problem remains, when one of the nodes drops, the clients connected to it should determine the fact of the fall and be able to switch to the available nodes, the RabbitMQ developers write:
Connect to a cluster of client applications.
The client can connect to any node in the cluster. If a node crashes while the rest of the cluster continues to work, then the clients connected to it must determine the fact of the fall and must be able to reconnect to the cluster, to the working nodes. As a rule, it is not recommended to bring real IP of all cluster nodes into client applications, this hinders flexibility both in the operation of the applications themselves and in the cluster configuration. Instead, we recommend using a more abstract approach: it can be a DNS service with a very low TTL value, or a simple TCP balancer, or some sort of mobile IP , or similar technologies. In general, this aspect goes beyond RabbitMQ, and we recommend using technologies developed to solve these problems.
Those. It is recommended not to write a bicycle, but to use a ready-made solution, in my version I use NLB, as a native solution built into Windows. This stage is up to you.
Utility
Ping a node from the command line:
rabbitmqctl eval "net_adm:ping(rabbit@hostname)." if node is available we get pong
Links
www.rabbitmq.com/clustering.html
www.rabbitmq.com/ha.html
Source: https://habr.com/ru/post/193332/
All Articles