I will build my mail server with Postfix and Dovecot
As part of the program for the unification of installed server systems, the task was to redesign the mail server. Thoughtful study of manuals and manuals showed a rather curious fact - nowhere was definitely found a reliable guide or the best practice similarity to deploying a mailer.
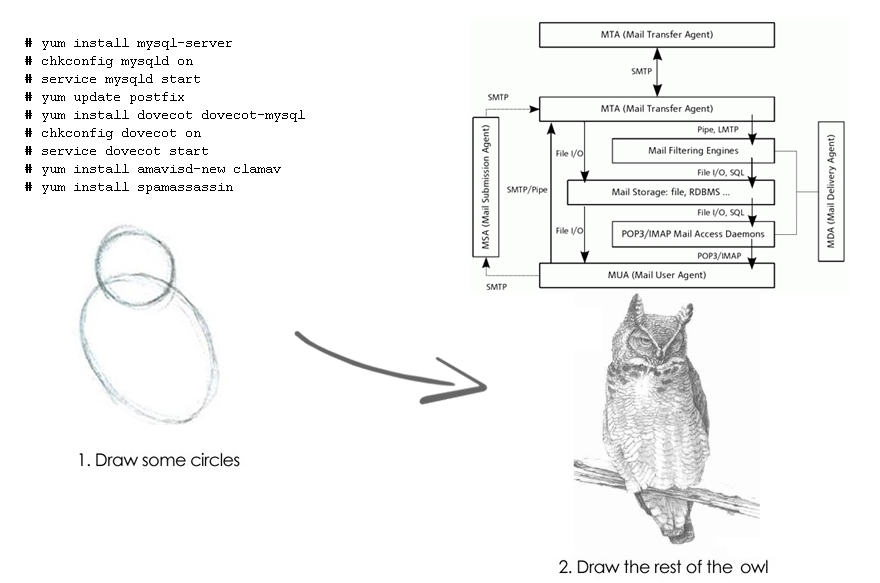
The manual is step-by-step, based on the internal documentation of the company and raises obvious questions. Gurus can not waste time, know-how is not here - the manual is a hodgepodge and is published only because all the found guidelines for deploying a mailer resembled a picture of how to draw an owl.
For those who do not want to collect everything manually, the best option would probably be the iRedMail package. Excellent build Postfix, Dovecot, Apache, MySQL / PostgreSQL, Policyd, Amavis, Fail2ban, Roundcube and even Awstats. It is easy to install, it works stably, there is a beautiful admin panel (free) and a very beautiful admin panel (paid), which is no match for PostfixAdmin. Fans of manual labor can continue reading.
')
The old server worked under Gentoo and carried a thermonuclear charge from Postfix + VDA with Courier and a buggy implemented SASL, which decided to connect to mysql only during the first authentication. The rework plan was to migrate to our internal standard, CentOS. The role of MTA and MDA is assigned to a bunch of Postfix and Dovecot, and as auxiliary artillery: Amavis + SpamAssassin + ClamAV + Postgrey + Fail2Ban. Letters are stored in files, and accounts and domains - in MySQL. The server spins several mail domains and there is support for virtual quotas.

[*] We connect additional repositories. I had enough epel, rpmforge, centalt and remi . Not all of them are needed permanently enabled, and you can install the yum-priorities plugin; Well, or if you are too lazy to understand, then turn on and off their hands. Further I will say what repository is installed from.
[*] Working with SELinux is worthy of a separate material, therefore, in this article, we assume that selinux is permissive or disabled.
[*] Do not forget about ntp :
yum install ntp ntpdate < ntp > chkconfig ntpd on && /etc/init.d/ntpd start This will avoid the possible Dovecot "Time has moved backwards" problem. You can also change the switch to -L in / etc / sysconfig / ntpd so that ntpd does not listen to the network.
[*] At the end of the preparatory stage, we put utilities that will facilitate our testing and further work:
yum install wget mlocate bind-utils telnet mailx sharutils 
For our database we use MySQL 5.5 from Remi . It is possible and mariadb, of course, but as long as MySQL is still alive, the above assembly suits me completely. The version is important because When Postfix is updated to 2.10, it will want a new version and if you put 5.1 from the base, then the update of the postfix from CentALT will pull MariaDB along. Who likes PgSQL more - please put it. Deployment will not be any different, even postfix configuration files can be taken unchanged. Only the configuration of the postgresql itself and the creation of the database will differ
The “out of the box” option is suitable for launching (the slightly expanded my.cnf is presented in the repository below). Create a postfix user with the same name base and all rights to it.
CREATE USER postfix@localhost IDENTIFIED BY 'mypassword'; CREATE DATABASE postfix; GRANT ALL PRIVILEGES ON postfix.* TO postfix; Antivirus works for me ClamAV . It is worth noting that the latest version is on CentALT, however, it does not want to be downloaded from there point-blank, dying on trying to download 50 megabytes of clamav-db. Therefore, we put fewer versions of EPEL for a few minor versions; the weather will not do that. Clam will work on our socket, so in /etc/clamd.conf we comment on the lines:
#TCPSocket 3310 #TCPAddr 127.0.0.1 The anti-virus database update is automatically connected, the freshclam utility is responsible for it. We check that the corresponding file is in cron.daily and run the anti-virus service
freshclam chkconfig clamd on && /etc/init.d/clamd start 
To deploy or not to deploy a web interface is a personal matter. I needed it to control the migration process. You may need it to create the base structure and administer domains, mailboxes, aliases, etc. For the latter tasks, most manuals actively offer PostfixAdmin , but I categorically dislike it. As well as I would recommend to adhere to the principle of separation, according to which the mail server should deal with mail processing, the web server to keep web applications, and the DB server to work with databases.
For those who do not want to deploy the web subsystem, I attach a SQL database dump for the mail server for all occasions. Even with some unused features: mysql_dump.sql on github .
If PostfixAdmin is required, put nginx / apache + php and PostfixAdmin itself. And note that it will not be possible to deploy it over the above dump - some “extra” tables have been removed from the structure. Nuances of PostfixAdmin settings a bit. Edit the config.inc.php , paying attention to the following parameters:
## , dovecot $CONF['encrypt'] = 'md5crypt'; $CONF['transport_default'] = 'virtual'; $CONF['emailcheck_resolve_domain']='NO'; ## dovecot, $CONF['create_mailbox_subdirs_prefix']=''; ## , maildir, dict $CONF['new_quota_table'] = 'yes'; After that, you can go to domain.tld / postfixadmin / setup.php , generate a password and create a super administrator account. Now the generated hash should be entered into the config.inc.php file and its status should be changed:
$CONF['configured'] = true; $CONF['setup_password'] = 't8h9i9s2i7s7m2y4l9o8g9i4n:a0n9d5p2a5s2s9w5o4r7d'; [!] Postfixadmin itself creates the base structure in both mysql and postgresql when running setup.php. If you intend to use it, the installation should be carried out on an empty base.

Let's check that the entire default structure has been created in the postfix database and proceed to install the MTA and MDA. Postfix is already bundled with CentOS, but not the newest. Update it from CentALT and install Dovecot from there.
yum update postfix yum install dovecot dovecot-mysql All major ship systems will operate on files in / var / vmail under a separate user:
groupadd -g 1000 vmail useradd -d /var/vmail/ -g 1000 -u 1000 vmail chown vmail:vmail /var/vmail Make a self-signed SSL
mkdir /etc/postfix/certs openssl req -new -x509 -days 3650 -nodes -out /etc/postfix/certs/cert.pem -keyout /etc/postfix/certs/key.pem The nastiest build stage is to convince Postfix to work with the database:
mkdir /etc/postfix/mysql In this directory we create files with the following content:
Postfix mysql configuration
relay_domains.cf
virtual_alias_domain_maps.cf
virtual_alias_maps.cf
virtual_mailbox_domains.cf
virtual_mailbox_maps.cf
hosts = localhost user = postfix password = mypassword dbname = postfix query = SELECT domain FROM domain WHERE domain='%s' and backupmx = '1' virtual_alias_domain_maps.cf
hosts = localhost user = postfix password = mypassword dbname = postfix query = SELECT goto FROM alias,alias_domain WHERE alias_domain.alias_domain = '%d' and alias.address = CONCAT('%u', '@', alias_domain.target_domain) AND alias.active = 1 virtual_alias_maps.cf
hosts = localhost user = postfix password = mypassword dbname = postfix query = SELECT goto FROM alias WHERE address='%s' AND active = '1' virtual_mailbox_domains.cf
hosts = localhost user = postfix password = mypassword dbname = postfix query = SELECT domain FROM domain WHERE domain='%s' AND backupmx = '0' AND active = '1' virtual_mailbox_maps.cf
hosts = localhost user = postfix password = mypassword dbname = postfix query = SELECT maildir FROM mailbox WHERE username='%s' AND active = '1' We edit the /etc/postfix/main.cf file, teaching Postfix how to work with the database using the newly created files:
# ============================================================ # MySQL mappings # ============================================================ relay_domains = mysql:/etc/postfix/mysql/relay_domains.cf virtual_alias_maps = mysql:/etc/postfix/mysql/virtual_alias_maps.cf, mysql:/etc/postfix/mysql/virtual_alias_domain_maps.cf virtual_mailbox_domains = mysql:/etc/postfix/mysql/virtual_mailbox_domains.cf virtual_mailbox_maps = mysql:/etc/postfix/mysql/virtual_mailbox_maps.cf A good mail server lets its own and authorizes others. In order for the authentication to work correctly, we will launch Submission , raising the SMTP service to an additional 587 port. Smartphones when creating new accounts when entering an smtp server with authentication by default offer port 587; you do not want to explain to customers that it is not enough to enter mail.domain.tld, but also it is necessary to prescribe some ports. In general, in /etc/postfix/master.cf we edit the section responsible for the submission:
submission inet n - n - - smtpd -o syslog_name=postfix/submission -o smtpd_tls_wrappermode=no -o smtpd_tls_security_level=encrypt -o smtpd_sasl_auth_enable=yes -o smtpd_recipient_restrictions=permit_mynetworks,permit_sasl_authenticated,reject -o smtpd_relay_restrictions=permit_mynetworks,permit_sasl_authenticated,defer_unauth_destination -o milter_macro_daemon_name=ORIGINATING [!] Be sure to pay attention to the spaces before the -o keys - without them the config will not be valid.
As long as we set aside master.cf, we will return to it later, and continue with /etc/postfix/main.cf
soft_bounce = no myhostname = mail.domain.tld mydomain = domain.tld myorigin = $myhostname # $myhostname $mydomain # do not list domain in BOTH mydestination and virtual_mailbox_domains mydestination = localhost.$mydomain, localhost ## ## ## mynetworks = 192.168.0.0/16, 127.0.0.0/8 ## nis:/ ## dict_nis_init: NIS domain name not set - NIS lookups disabled alias_maps = hash:/etc/aliases smtpd_banner = $myhostname ESMTP $mail_name debug_peer_level = 2 debug_peer_list = 127.0.0.1 These were default string changes. And now add some sections of our settings. Check for duplicates by removing them from the native configuration, if they are there. I suggest entering your settings in structured blocks at the bottom of the /etc/postfix/main.cf file:
Another configuration sheet
# ============================================================ # RESTRICTIONS # # Uncomment reject_rbl_client if necessary # More information at: http://help.ubuntu.ru/wiki/____smtp_ # ============================================================ smtpd_discard_ehlo_keywords = etrn, silent-discard smtpd_forbidden_commands = CONNECT GET POST broken_sasl_auth_clients = yes smtpd_delay_reject = yes smtpd_helo_required = yes disable_vrfy_command = yes smtpd_helo_restrictions = permit_mynetworks, permit_sasl_authenticated, reject_non_fqdn_helo_hostname, reject_invalid_helo_hostname smtpd_data_restrictions = permit_mynetworks, permit_sasl_authenticated, reject_unauth_pipelining, reject_multi_recipient_bounce, smtpd_sender_restrictions = permit_mynetworks, permit_sasl_authenticated, reject_non_fqdn_sender, reject_unknown_sender_domain smtpd_recipient_restrictions = reject_non_fqdn_recipient, reject_unknown_recipient_domain, reject_multi_recipient_bounce, permit_mynetworks, permit_sasl_authenticated, reject_unauth_destination, check_policy_service unix:/var/spool/postfix/postgrey/socket, #reject_rbl_client zen.spamhaus.org, #reject_rbl_client bl.spamcop.net, #reject_rbl_client dnsbl.sorbs.net, reject_invalid_hostname # ============================================================ # TLS # ============================================================ smtp_tls_security_level = may smtpd_tls_security_level = may smtpd_tls_loglevel = 1 smtpd_tls_received_header = yes smtpd_tls_session_cache_timeout = 3600s smtp_tls_session_cache_database = btree:$data_directory/smtp_tls_session_cache smtpd_tls_key_file = /etc/postfix/certs/key.pem smtpd_tls_cert_file = /etc/postfix/certs/cert.pem tls_random_source = dev:/dev/urandom # ============================================================ # LIMITS # ============================================================ message_size_limit = 51200000 smtpd_soft_error_limit = 10 smtpd_hard_error_limit = 15 smtpd_error_sleep_time = 20 anvil_rate_time_unit = 60s smtpd_client_connection_count_limit = 20 smtpd_client_connection_rate_limit = 30 smtpd_client_message_rate_limit = 30 smtpd_client_event_limit_exceptions = 127.0.0.1/8 smtpd_client_connection_limit_exceptions = 127.0.0.1/8 # ============================================================ # QUEUE # ============================================================ maximal_queue_lifetime = 1d bounce_queue_lifetime = 1d [!] To use or not to use blacklists is your choice. I commented out the relevant directives reject_rbl_client , so as not to produce holivary. Greylisting is often enough, and Spamhaus and others like him profess an ambiguous policy, but in practice it turned out that the “honest guys” didn’t enter black lists and we didn’t have any false positives. Lucky, I guess. Therefore, it is a matter of taste to include RBL directives or not. Consider that I indicated them for informational purposes.
[!] Parameters are divided into groups - carefully review them and adjust to your own needs. Worse, there is no option than blindly slapping someone else's config without edits.
[!] Malamut rightly observed that the option `permit_mynetworks` is highly dubious and dangerous. It would be much better to remove it and only allow authenticated users to send correspondence.
[!] We’ll go back to the main.cf file by adding postgrey , amavis and dovecot to it, but for now let's move on to MDA

What it is:
- This is our Mail Delivery Agent, local transport.
- Own SASL through which Postfix will work
- Work with quotas
- Providing the user with imap and pop3
A couple of changes in /etc/dovecot/dovecot.conf :
protocols = imap pop3 login_greeting = Hello there. The rest of the configuration file is conveniently divided into components and well documented:
10-auth.conf
disable_plaintext_auth = no auth_realms = domain.tld domain2.tld auth_default_realm = domain.tld auth_mechanisms = plain login ## [!] auth-system.conf.ext, ## dovecot pam #!include auth-system.conf.ext 10-logging.conf
Separate listing will not be - optionally turn on the necessary options.
10-mail.conf
mail_location = maildir: / var / vmail /% d /% n
mail_uid = 1000
mail_gid = 1000
mail_plugins = quota
mail_uid = 1000
mail_gid = 1000
mail_plugins = quota
10-master.conf
# imap imaps service imap-login { inet_listener imap { port = 143 } inet_listener imaps { port = 993 ssl = yes } } # pop3 pop3s service pop3-login { inet_listener pop3 { port = 110 } inet_listener pop3s { port = 995 ssl = yes } } # SASL, postfix service auth { unix_listener auth-userdb { mode = 0600 user = vmail group = vmail } unix_listener /var/spool/postfix/private/auth { mode = 0666 user=postfix group=postfix } } 10-ssl.conf
ssl = yes
ssl_cert = </etc/postfix/certs/cert.pem
ssl_key = </etc/postfix/certs/key.pem
ssl_cert = </etc/postfix/certs/cert.pem
ssl_key = </etc/postfix/certs/key.pem
15-lda.conf
quota_full_tempfail = no
lda_mailbox_autocreate = yes
lda_mailbox_autosubscribe = yes
protocol lda {
mail_plugins = $ mail_plugins autocreate
}
lda_mailbox_autocreate = yes
lda_mailbox_autosubscribe = yes
protocol lda {
mail_plugins = $ mail_plugins autocreate
}
20-imap.conf
protocol imap {
mail_plugins = $ mail_plugins autocreate quota imap_quota
}
mail_plugins = $ mail_plugins autocreate quota imap_quota
}
90-plugin.conf
# . # plugin { autocreate = Trash autocreate2 = sent-mail autocreate3 = drafts autosubscribe = Trash autosubscribe2 = sent-mail autosubscribe3 = drafts } 90-quota.conf
# . plugin { quota_rule = *:storage=200M quota_rule2 = Trash:storage=+10M } plugin { quota_warning = storage=90%% quota-warning 90 %u } # , chmod # quota-warning.sh dovecot-lda service quota-warning { executable = script /usr/local/bin/quota-warning.sh user = vmail unix_listener quota-warning { user = vmail } } # - maildir # dict, fs dirsize # http://wiki2.dovecot.org/Quota plugin { quota = maildir:User quota } auth-sql.conf.ext
passdb {
driver = sql
args = /etc/dovecot/dovecot-sql.conf.ext
}
userdb {
driver = sql
args = /etc/dovecot/dovecot-sql.conf.ext
}
driver = sql
args = /etc/dovecot/dovecot-sql.conf.ext
}
userdb {
driver = sql
args = /etc/dovecot/dovecot-sql.conf.ext
}
Create /etc/dovecot/dovecot-sql.conf.ext :
dovecot-sql.conf.ext
driver = mysql
connect = host = localhost dbname = postfix user = postfix password = mypassword
default_pass_scheme = MD5-CRYPT
user_query = SELECT '/ var / vmail /% d /% n' as home, 'maildir: / var / vmail /% d /% n'as mail, 1000 AS uid, 1000 AS gid, concat (' *: bytes = ', quota) AS quota_rule FROM mailbox WHERE username ='% u 'AND active =' 1 '
password_query = select username as user, password, '/ var / vmail /% d /% n' as userdb_home, 'maildir: / var / vmail /% d /% n' as userdb_mail, 1000 as userdb_uid, 1000 as userdb_gid, concat ('*: bytes =', quota) AS userdb_quota_rule FROM mailbox WHER
E username = '% u' AND active = '1'
Now we will be friends with Postfix with Dovecot . Add two sections to /etc/postfix/main.cf :
# ============================================================ # SASL # ============================================================ smtpd_sasl_auth_enable = yes smtpd_sasl_security_options = noanonymous smtpd_sasl_type = dovecot smtpd_sasl_path = private/auth # ============================================================ # VIRTUAL # ============================================================ virtual_mailbox_base = /var/vmail virtual_minimum_uid = 1000 virtual_uid_maps = static:1000 virtual_gid_maps = static:1000 virtual_transport = dovecot dovecot_destination_recipient_limit = 1 And put Postfix in front of the fact that dovecot handles mail delivery. In /etc/postfix/master.cf :
# ==================================================================== # DOVECOT # ==================================================================== dovecot unix - nn - - pipe flags=DRhu user=vmail:vmail argv=/usr/libexec/dovecot/deliver -f ${sender} -d ${recipient} Next, you need to check that the / qur /usal/local/bin/quota-warning.sh warning script is correctly executed. In my case, the CentOS path was incorrect and I had to manually edit it. In any case, by the way, correct it manually by editing the sender's address, which is specified by default as postmaster@domain.tld . Find the desired binary
updatedb locate dovecot-lda chmod 755 /usr/local/bin/quota-warning.sh And fix the path in the /usr/local/bin/quota-warning.sh itself, if desired, adding more meaningful headers to the script.

Since Amavis , which is a layer between mail agents and anti-virus and anti-spam systems, will work with us, you do not need to start spamd separately - it works as a module, loaded if necessary. To keep SA updated, the native sa-update utility is used. Make sure that in etc / cron.d there is a sa-update file with the scheduled launch of the update.
[!] Install spamassassin 3.3.2 from rpmforge-extras , as Version 3.3.1 stuck in from EPEL has a congenital defect in sa-update. The latest version 3.3.2 is already spared from this problem and is updated correctly.
yum install spamassassin amavisd-new Adjust slightly /etc/mail/spamassassin/local.cf
local.cf
required_hits 6 report_safe 0 rewrite_header Subject ***SPAM*** # # WEIRD STUFF # score FORGED_MUA_OUTLOOK 2.199 2.199 0.963 1.116 score FH_DATE_PAST_20XX 0.0 score DOS_OE_TO_MX_IMAGE 0.0 score DOS_OE_TO_MX 0.0 score DOS_OUTLOOK_TO_MX 0.0 score TO_NO_BRKTS_DIRECT 0.0 score HELO_LOCALHOST 0.0 score FSL_RU_URL 0.0 score FROM_MISSP_EH_MATCH 1.0 score TVD_RCVD_SINGLE 1.0 score TO_IN_SUBJ 1.0 # # TUNING # score SUBJ_FULL_OF_8BITS 0.00 score HTML_COMMENT_8BITS 0.01 score HEADER_8BITS 0.00 score TO_NO_USER 0.01 score FORGED_MUA_OUTLOOK 0.5 score X_AUTH_WARNING 0.01 score SUBJ_HAS_UNIQ_ID 9.99 score HTTP_USERNAME_USED 9.99 score FORGED_YAHOO_RCVD 9.99 score FORGED_JUNO_RCVD 16 score UNWANTED_LANGUAGE_BODY 1.02 score MLM 5.55 score RCVD_NUMERIC_HELO 4.95 # # WHITE/BLACK LISTS # whitelist_from root@localhost whitelist_from *@example.com blacklist_from *@outblaze.com auto_whitelist_path /etc/mail/spamassassin/auto-whitelist auto_whitelist_file_mode 0666 But the Amavis ' a configuration file is the exact opposite of the Dovecot configs that I praised. It is a regular perl script, which is also poorly formatted. I make the changes simply - I rename the file to .pl and edit with syntax highlighting; it makes life a little easier.
amavisd.conf
# amavisd # /etc/postfix/master.cf $max_servers = 4; # $mydomain = 'domain.tld'; # @mynetworks = qw( 127.0.0.0/8 [::1] [FE80::]/10 [FEC0::]/10 10.0.0.0/8 172.16.0.0/12 192.168.0.0/16 ); # 2.6.4 . # Open relay? Nonlocal recips but not originating @client_ipaddr_policy = map { $_ => 'MYNETS' } @mynetworks; # spamassassin $sa_tag_level_deflt = 2.0; $sa_tag2_level_deflt = 5.2; $sa_kill_level_deflt = 6.5; $sa_dsn_cutoff_level = 10; # $virus_admin = "virusalert\@$mydomain"; $mailfrom_notify_admin = "virusalert\@$mydomain"; $mailfrom_notify_recip = "virusalert\@$mydomain"; $mailfrom_notify_spamadmin = "abuse\@$mydomain"; # $myhostname = 'mail.domain.tld'; # $final_virus_destiny = D_DISCARD; $final_banned_destiny = D_BOUNCE; $final_spam_destiny = D_DISCARD; $final_bad_header_destiny = D_PASS; # , # , $virus_quarantine_to = "virus-quarantine\@$mydomain"; $spam_quarantine_to = "spamtrap\@$mydomain"; # - # @whitelist_sender_maps = ( new_RE( qr'.*@example\.com$'i, qr'user@test\.org$'i, )); # @av_scanners @av_scanners = ( ['ClamAV-clamd', \&ask_daemon, ["CONTSCAN {}\n", "/var/run/clamav/clamd.sock"], qr/\bOK$/m, qr/\bFOUND$/m, qr/^.*?: (?!Infected Archive)(.*) FOUND$/m ], ); ); # @av_scanners_backup = ( ['ClamAV-clamscan', 'clamscan', "--stdout --no-summary -r --tempdir=$TEMPBASE {}", [0], qr/:.*\sFOUND$/m, qr/^.*?: (?!Infected Archive)(.*) FOUND$/m ], ); Now let Postfix tell you that it will now use Amavis to check for mail. We enter the appropriate block in /etc/postfix/master.cf
master.cf
# ==================================================================== # AMAVIS # ==================================================================== amavisfeed unix - - n - 4 lmtp -o lmtp_data_done_timeout=1200 -o lmtp_send_xforward_command=yes -o disable_dns_lookups=yes -o max_use=20 127.0.0.1:10025 inet n - n - - smtpd -o content_filter= -o smtpd_delay_reject=no -o smtpd_client_restrictions=permit_mynetworks,reject -o smtpd_helo_restrictions= -o smtpd_sender_restrictions= -o smtpd_recipient_restrictions=permit_mynetworks,reject -o smtpd_data_restrictions=reject_unauth_pipelining -o smtpd_end_of_data_restrictions= -o smtpd_restriction_classes= -o mynetworks=127.0.0.0/8,192.168.0.0/16 -o smtpd_error_sleep_time=0 -o smtpd_soft_error_limit=1001 -o smtpd_hard_error_limit=1000 -o smtpd_client_connection_count_limit=0 -o smtpd_client_connection_rate_limit=0 -o receive_override_options=no_header_body_checks,no_unknown_recipient_checks,no_milters,no_address_mappings -o local_header_rewrite_clients= -o smtpd_milters= -o local_recipient_maps= -o relay_recipient_maps= and add to /etc/postfix/main.cf
# ============================================================ # AMAVIS # ============================================================ content_filter=amavisfeed:[127.0.0.1]:10024 Develop services:
chkconfig amavisd on && /etc/init.d/amavisd start /etc/init.d/postfix restart telnet 127.0.0.1 10024 # 220 [127.0.0.1] ESMTP amavisd-new service ready 
Greylist's efficiency has been written more than once, so just silently
yum install postgrey No additional configuration is required - we register it in /etc/postfix/main.cf
smtpd_recipient_restrictions = ... reject_unauth_destination, check_policy_service unix:/var/spool/postfix/postgrey/socket, ... [!] The check_policy_service directive must always follow reject_unauth_destination.
If there is a need to exclude any servers from the scan, we edit /etc/postfix/postgrey_whitelist_clients.local , and to exclude specific email addresses on the local server from the check, we edit the postgrey_whitelist_recipients . Comprehensive information is available on the wiki: wiki.centos.org/HowTos/postgrey
About Fail2ban conversation separate. To demonstrate its effectiveness, I’ll show a picture with mail server statistics before and after installing the utility. The red line on the chart - unauthorized swotting in search of an open relay. Letters, of course, are cut off, and the load is not created much, but why listen to this garbage at all. Therefore, installing fail2ban with three rules significantly improves the appearance of the graph:

yum install fail2ban Rules for the mail server /etc/fail2ban/jail.conf
# # , # ## ## , ## [ssh-iptables] enabled = true filter = sshd action = iptables[name=SSH, port=ssh, protocol=tcp] logpath = /var/log/secure maxretry = 5 [postfix-banhammer] enabled = true filter = postfix action = iptables-multiport-tcp[name=PFIX, port="smtp,smtps", protocol=tcp] logpath = /var/log/maillog maxretry = 3 bantime = 7200 [dovecot-banhammer] enabled = true filter = dovecot action = iptables-multiport-tcp[name=DCOT, port="pop3,pop3s,imap,imaps", protocol=tcp] logpath = /var/log/maillog findtime = 300 maxretry = 10 bantime = 1800 [sasl-banhammer] enabled = true filter = sasl action = iptables-multiport-tcp[name=SASL, port="smtp,smtps", protocol=tcp] logpath = /var/log/maillog findtime = 300 maxretry = 10 bantime = 1800 If SSH is open only to the internal network, then the first rule can be removed. And yet, no additional gestures - the rules work out of the box. Thank you urbain for reminding you about smtp brute force protection.
chkconfig fail2ban on && /etc/init.d/fail2ban start 
Since we connected the autocreate plugin in Dovecot , to create domains and mailboxes, it is enough to get them into the database via Postfixadmin or by doing INSERT INTO in the console. At the first authentication or the first letter received, the directory structure will be created automatically.
Test pop3, imap, smtp in different poses
- We test POP3 login
telnet 127.0.0.1 110 user test pass testpassword UIDL - We test login IMAP
telnet 127.0.0.1 143 1 LOGIN test testpassword 1 SELECT INBOX - SMTP
telnet 127.0.0.1 25 #220 mail.domain.tld ESMTP Postfix helo darling #250 mail.domain.tld MAIL FROM: root@localhost #250 2.1.0 Ok RCPT TO: test@example.com #250 2.1.5 Ok DATA #354 End data with <CR><LF>.<CR><LF> this is text message . #250 2.0.0 Ok: queued as E3BA1A15FA quit #221 2.0.0 Bye - SMTP c SSL
base64 , AUTH LOGIN. 334 base64.telnet 127.0.0.1 25 #220 mail.domain.tld ESMTP Postfix ehlo darling #250-mail2.dautkom.lv #250-PIPELINING #250-SIZE 51200000 #250-STARTTLS #250-AUTH PLAIN LOGIN #250-AUTH=PLAIN LOGIN #250-ENHANCEDSTATUSCODES #250-8BITMIME #250 DSN AUTH LOGIN #334 VXNlcm5hbWU6 dGVzdA== #334 UGFzc3dvcmQ6 dGVzdHBhc3N3b3Jk #235 2.7.0 Authentication successful - SMTP c SSL
# credentials perl -MMIME::Base64 -e 'print encode_base64("\000test\@example.com\000testpassword")' # # AHRlc3RAZXhhbXBsZS5jb20AdGVzdHBhc3N3b3Jk openssl s_client -starttls smtp -connect 127.0.0.1:587 -crlf -ign_eof # # EHLO darling #250-mail.example.com #250-PIPELINING #250-SIZE 51200000 #250-ENHANCEDSTATUSCODES #250-8BITMIME #250 DSN AUTH PLAIN AHRlc3RAZXhhbXBsZS5jb20AdGVzdHBhc3N3b3Jk #235 2.7.0 Authentication successful
Test anti-virus protection
- amavis . , . , . :
cd /usr/share/doc/amavisd-new-2.8.0/test-messages perl -pe 's/./chr(ord($&)^255)/sge' <sample.tar.gz.compl | zcat | tar xvf - - :
sendmail -i your-address@example.com < sample-virus-simple.txt sendmail -i your-address@example.com < sample-spam-GTUBE-junk.txt
( /var/log/maillog). , verbose /etc/dovecot/conf.d/10-logging.conf log-level /etc/amavisd/amavisd.conf .

Now
- I use git to work with configuration files, turning the / etc directory into a repository. This approach allows you to conveniently fiddle with configs between the technical department staff and step by step to control the configuration process. In working with such a complex system as a mail server, this practice can make life much easier.
- c courier dovecot. , . wiki2.dovecot.org/Migration/Courier . POP3 UIDL , . , .
find . -name "courier*" -delete - iptables — .
- CentOS rsyslog , syslog-ng EPEL. , syslog-ng — .
- vacation , dovecot Sieve «» . — « ». .
, , . , . . , . , - .
, . , , . ; , ; ..
. «» , . … … , .
Source: https://habr.com/ru/post/193220/
All Articles