Home server on Windows 8 Pro
Greetings
Probably everyone would like to have their own home server, which would not only serve as a media server, but also allowed to use it as a file storage, Backup storage and print server.
On one of the wonderful autumn days, I was also visited by this thought. The fact is, there are too many devices in the house that they wanted to combine into something structured. It was decided to raise the home server. As an operating system, I first wanted to use Windows Server 2012 Essentials, which included products such as Windows Home Server and Windows Small Business Server, but after several hours of working with it, I realized that using Windows Server 2012 at home was too “fat” . Then I decided to use the OS easier, namely Windows 8 Pro, the license for which lay idle.
')
Warning I understand perfectly well that it might be easier to raise a home server on a Unix-like OS, but in this article I want to tell how to raise such a server on a Windows 8 Professional client OS for an ordinary PC user (well, or almost normal), who never had any experience with Unix.
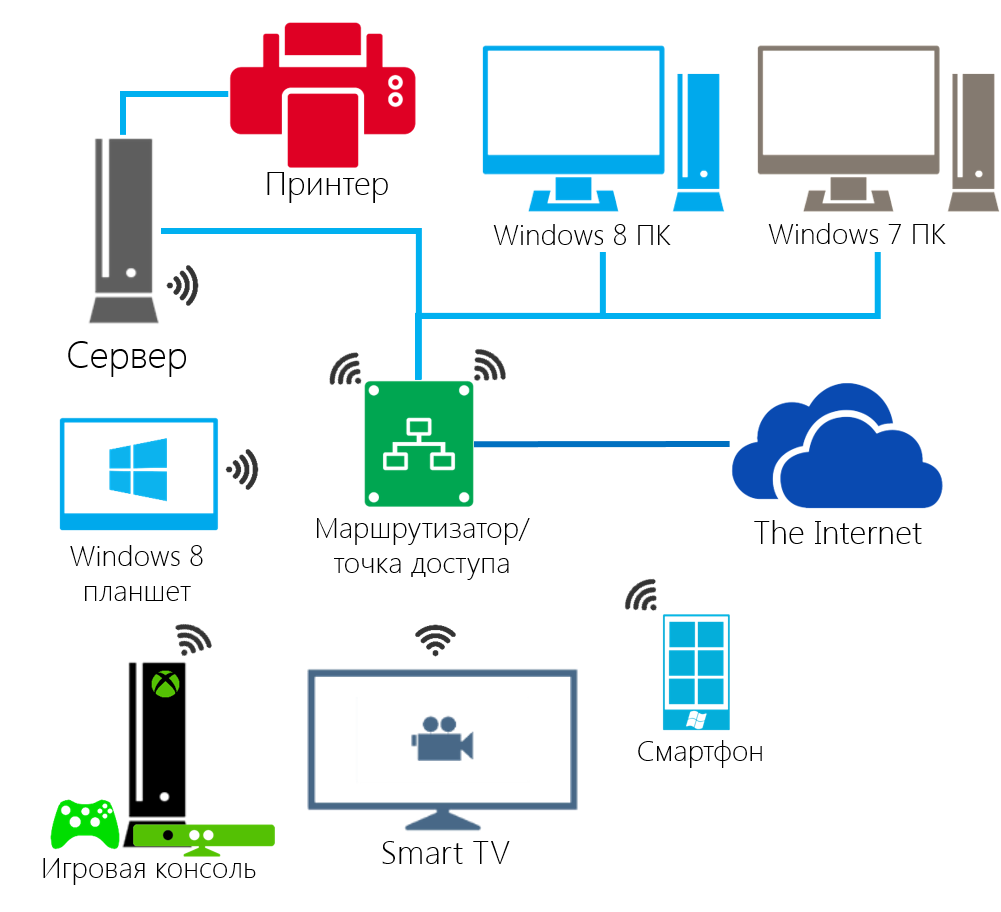
All home devices were merged into such a network (I hope I drew it clearly):
The basis for the home server was taken old PC, with such characteristics:
The following components were purchased:
The video card was replaced due to the incredible noise already existed.
After installation in the case and connection of new components to the motherboard, Windows 8 Pro was installed on a 250 GB hard disk. Only OS and some software were planned to be stored on this hard disk.
The installation was made in a completely normal mode. At the initial system setup stage, the computer name HOMESERVER was specified, an administrator account (admin) was created with a complex password, and then an account with the rights of a regular user (user), to which the password was also set.
The settings will be made under the user account, with the administrator's password entered when the system parameters are changed. So safer.
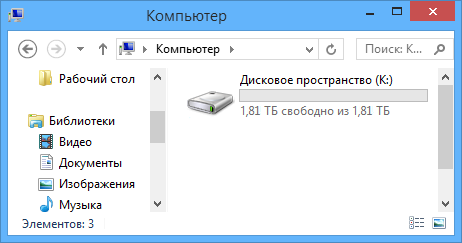
In Windows 8, there was a great feature Storage Spaces (in the Russian version of Disk Space), which, to some extent, is a software analog of a RAID array.
Storage Spaces offers to combine physical drives with USB, SATA, SAS, SCSI interfaces (and in any combination) into pools, and the pools themselves into disk spaces that look to the user as regular logical drives.
Also, with the help of Storage Spaces you can ensure data integrity with the help of mirroring and parity functions. I will tell about it a little later.
To create a pool and disk space, go to Control Panel> System and Security> Disk Spaces and select Create New Pool and Disk Space
.
A window will open in which you need to select the physical drives to create the pool. Both formatted and unformatted drives are displayed, as well as with and without stored data. The system disk can not be selected.
Attention! When adding a data disk to the pool, all of them will be deleted.
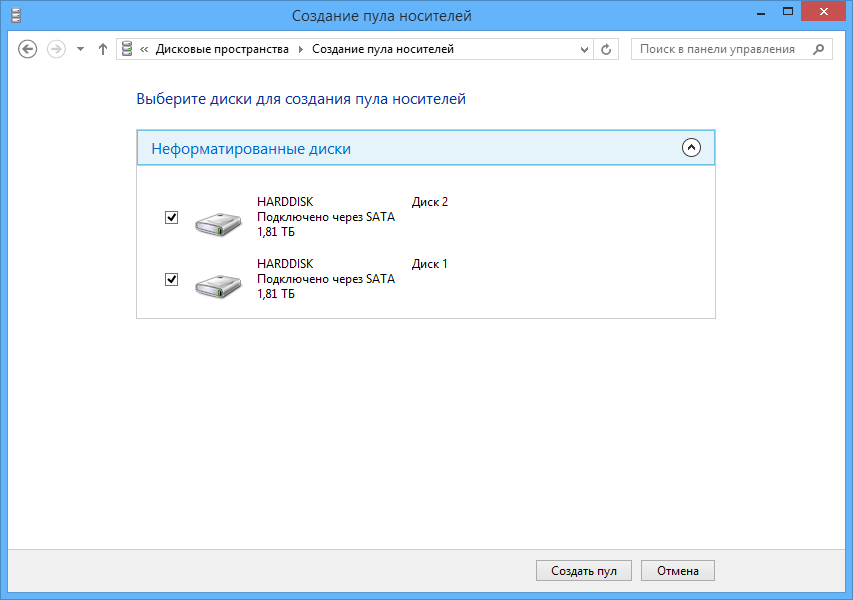
In my case, there are two disks with a capacity of 2 TB, and I will select them. Next, click Create Pool .
Windows will prepare the disks and pool them. Unformatted drives will be formatted, formatted drives will be reformatted anew.
After creating the pool, you will be prompted to create a disk space (or several), specify its name and associate a drive letter with it.
In the stability section you need to select the type of stability I chose a two-sided mirror. With this type of resiliency, Windows will store a copy of the data on each of the drives.
For reference, Windows suggests choosing four types of resilience:
One of the parameters of a space that can be set is its size. In my case, when using a double-sided mirror, Windows suggests setting its size equal to half the total capacity of the disks used. It seems to be logical, but in the spaces you can use disks of different sizes, but “by default” the system will again offer half of the total volume, although the drives used would not be equal. Moreover, you can specify any size, it will not affect the functioning of the space ... For the time being. As soon as the smaller drive is filled, the space will be dismantled and its functionality will be restored only by adding new drives to the corresponding pool.
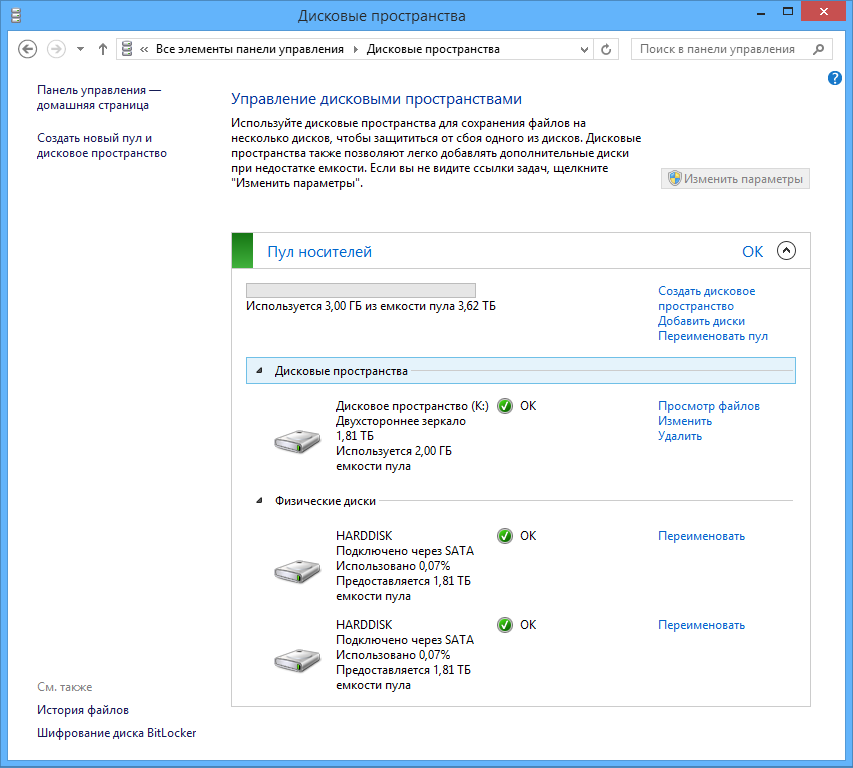
As I said, after configuration, the use of disk spaces is completely transparent to the user.
The next step will be to move the location of the standard Music, Images, Documents and Video libraries to the created Disk space. We do not want to lose a lot of gigabytes of Lossless-music, valuable family videos and photos in case of a system disk failure?
To begin, create folders in the root of the disk space. I have created the Music, Video, Images and Documents folders. What will be stored in each of them, I think obviously. Next, right-click on one of the Windows libraries (in the right pane of the explorer) and select Properties .

In the window that opens, click the Add button and select the created folder in the root of the disk space.

Now it remains only to delete the standard locations of the selected library. The same must be done with the rest of the libraries.
Streaming media allows you to play media files on devices that support DLNA. Among the devices that have support for this technology, there are TVs, various stationary DVD and Blu-Ray players, smartphones, game consoles, computers and even refrigerators!
To do this, start Windows Media Player and perform the initial setup. I selected the recommended options. Next you need to go to the player's library and click the Stream drop-down list. In the list, select the option Enable streaming media .

In the window that opens, click the button Enable media streaming .

The next window that opens will be the streaming media settings window. Here you need to specify the name of the multimedia library, select display options for files with certain ratings, as well as select the devices that will have access to the multimedia library.

After filling in the parameters, click OK.
You might ask why. The thing is that the Windows Media library is used to stream media to other devices. How will this library be updated when adding new files, if Windows Media is not running?
We will solve this question with the help of the Task Scheduler . By the way, a very useful tool with a wide range of launch parameters and tasks. Windows itself also constantly uses the Scheduler to perform certain tasks, for example, to start automatic maintenance of a computer during the period of user inactivity.
Let's get started Go to Control Panel> System and Security> Administration and launch Task Scheduler as administrator.
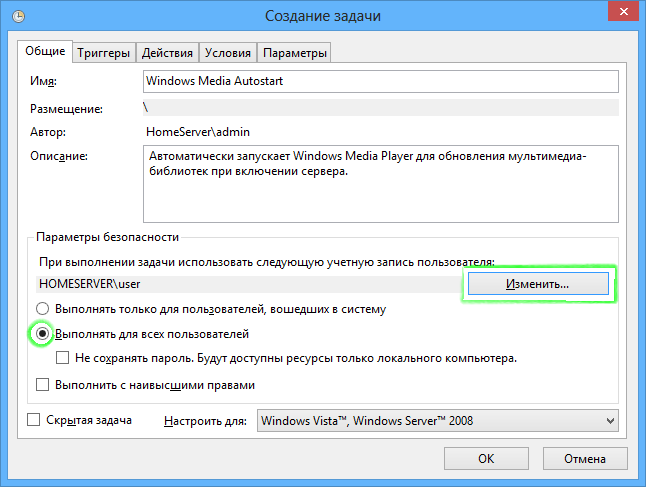
In the right pane, click Create Task . The task creation window will open. Enter a name for the task, I advise you to use a name that allows you to determine what the task is doing without opening its details. I pointed out Windows Media Autostart. Description of the task is not mandatory, but it would be nice to fill it.
You can not forget to change the account under which the task will be executed, and therefore run Windows Media Player.
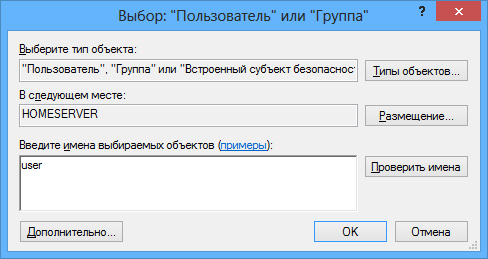
To do this, in the Security Settings group, click the Edit button. A window will open in which you need to write the user name. Write user and click OK.
Also in this group, set the switch to Execute for all users , which is necessary for the task to start, even if no user is logged on.
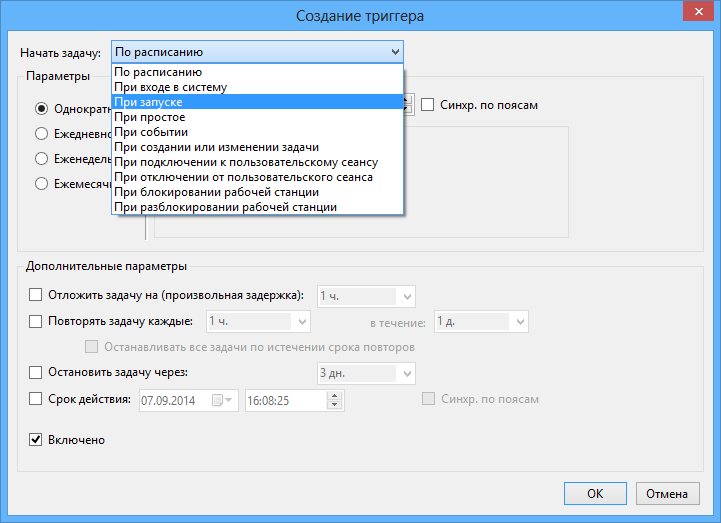
Now go to the Triggers tab. Click the New button and, in the window that opens, select the Start task from the Start task drop-down list.
Click OK and go to the Actions tab. Click the Create button.
The Create Action window appears. Make sure that Run is selected in the Action item. In the Program or script input field, enter the path to the program. Click the Browse button and select the wmplayer.exe file, which is located in C: \ Program Files (x86) \ Windows Media Player in a 64-bit version of Windows or C: \ Program Files \ Windows Media Player in 32-bit. The remaining fields are not required.

Click OK and go to the Conditions tab. Uncheck Run only when powered from the mains , although this is not necessary. To your taste.
Scroll to the last tab Options . Uncheck the Stop task for longer task: 3 days .
Click OK and enter the password for the user account.

After entering the password and pressing the OK button, the task scheduler will inform you that the account must have “Login as a batch job” permission.
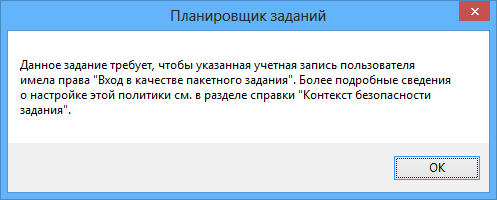
Click OK and close Task Scheduler.
Open Local Security Policy (also in administration) as administrator.
In the window that opens, double-click Local Policies , then User Rights Assignment , and finally Sign in as a batch job .
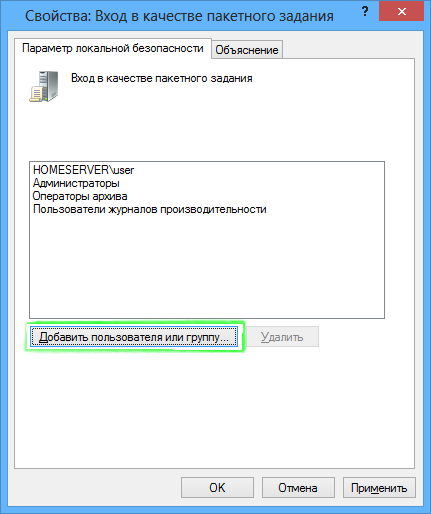
Click the Add User or Group button, as in the Task Scheduler, enter the user name and click OK. Check whether the new item has appeared with the username in the list, and click OK. Now Local Security Policies can be closed.
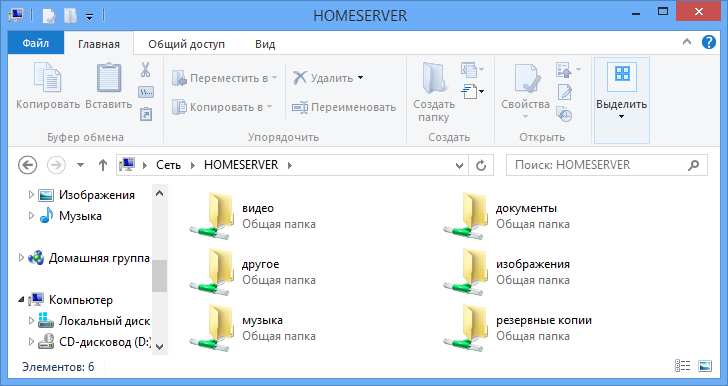
The next step will be to open shared folders on the disk space. This is necessary in order for network users to be able to read and write files to certain folders. We will open the shared access to the Music, Video, Images, Documents, Backup copies and Other folders (the last two need to be created).
Right-click on folders and select Properties. Click the Access tab.
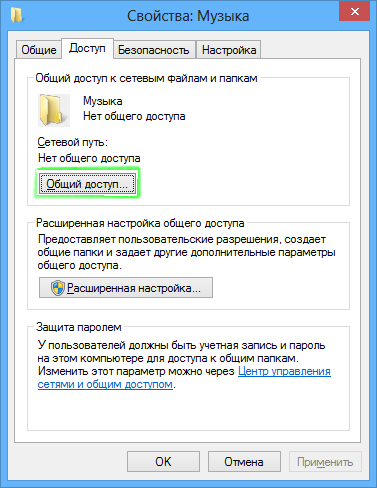
Click the Share button. The following window will open:
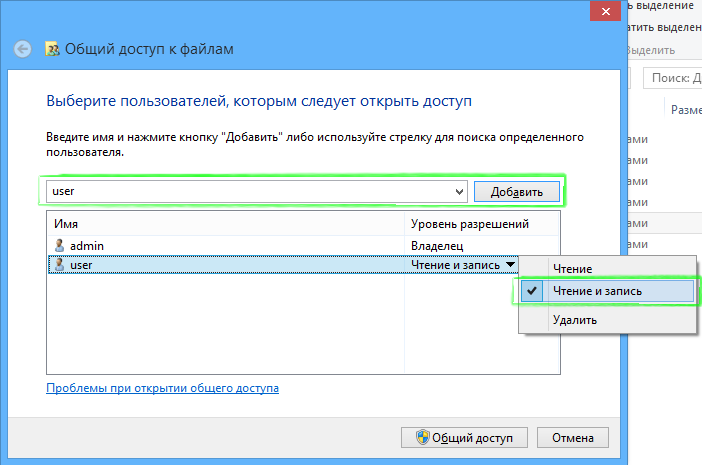
Enter the username (user) and click Add. Then, in the list below, set the user permission level to Read and Write . It remains only to click Sharing at the bottom of the window, enter the administrator password and click Finish.
Repeat these steps for the remaining folders.
Everything is very, very simple. On the client machine, open the folder with network computers (Network in Windows Vista / 7/8 or Network Neighborhood in Windows XP). Double-click the name of the created server. A window opens in which you need to enter a username and password.
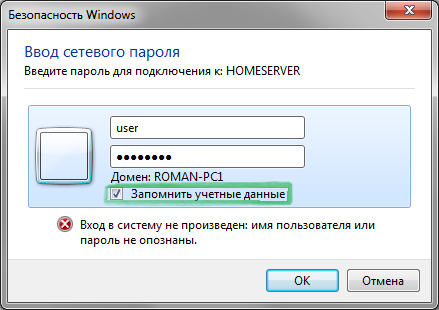
You need to enter credentials stored on the server. True, this is the user and his password. Check the Remember credentials box and click OK.
Now on this computer, you can read and write files that are in folders on the server.
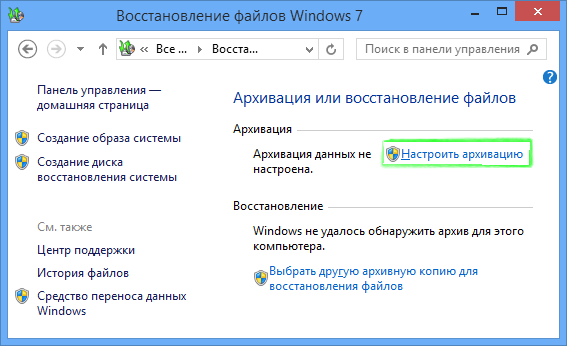
Probably every computer in the house has important files. Windows has a great data archiving function that creates a backup of the OS itself and the folders with the files that were specified during setup. This feature allows you to store copies on another hard drive or in a network location. I propose to configure the latter, since the reliability of data storage on the server is somewhat higher, because it is configured to mirror data to a second hard disk.
Let's start. Open Control Panel , select to view all the items in the Control Panel, and double-click on Recover Windows 7 files (Windows 8 has exactly the same name). The Backup or Restore Files window opens.
A window will open to select the location of the archive.
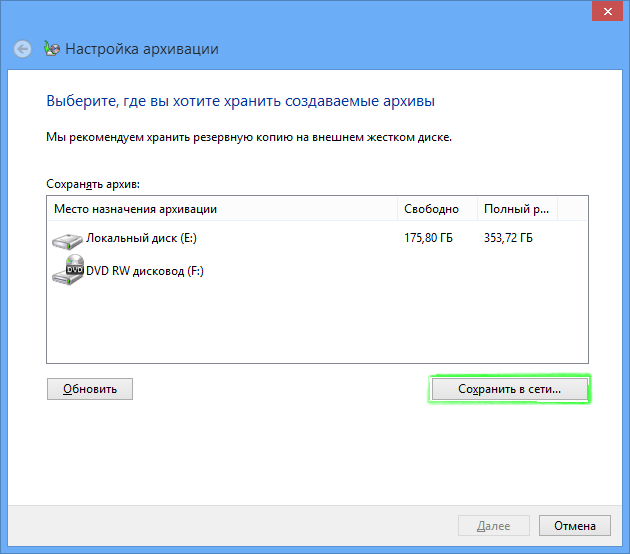
Since we want to save an archive copy on the server, we need to click the Save to network button.
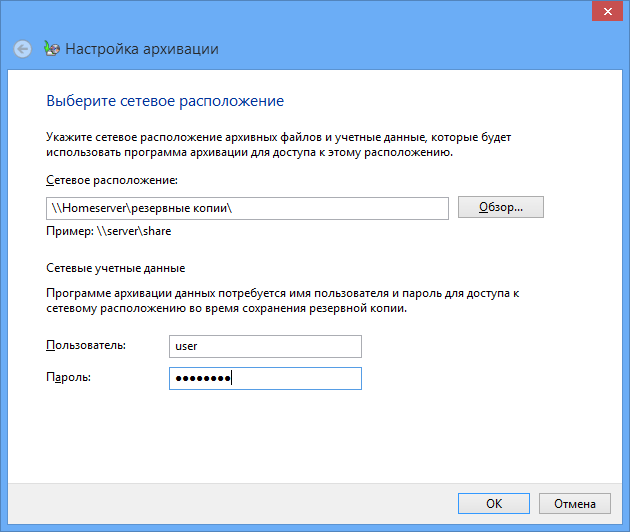
The archives will be stored in the Backup copies folder created above, sharing with the record is already open. Using the Browse button, specify the path to the folder or write it manually. In the User field, you need to record user, and in the Password, the corresponding account password.
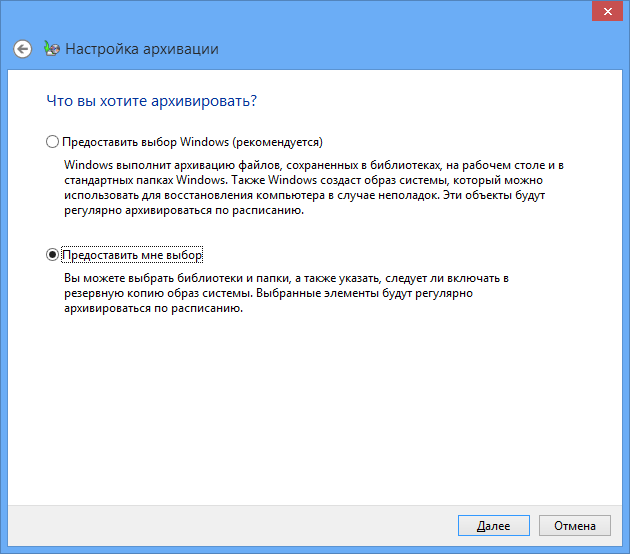
Click OK. In the next window, you need to select whether to allow Windows to select files for archiving or not. I decided to give the choice to myself, because I do not need an image of the system.
Click Next.
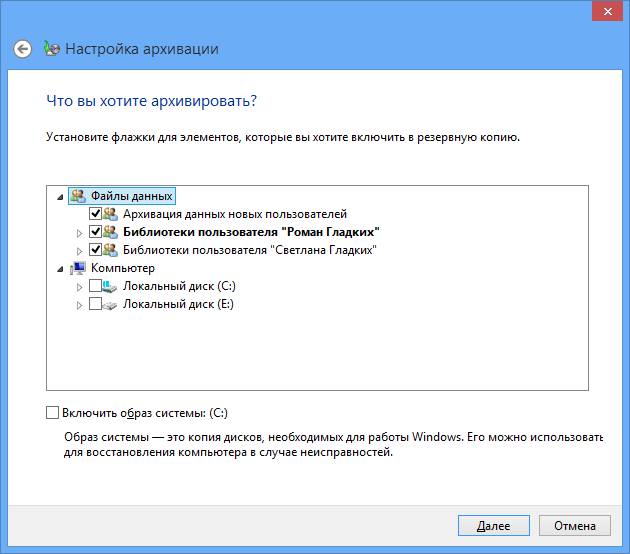
Since I do not need the image of the system, I took a tick. Also in this window, you can select additional folders for archiving. Click Next.
In the next window, check the specified archiving options and change the schedule as desired. For myself, I indicated a weekly archive on Sunday at 3:00.
Check all the data again and click Save settings and run the backup .
Perhaps you have only one printer in your house, but several people want to use its services at once. To solve this problem is very simple! Simply connect the printer to your home server and share it with you. After that, all the computers in the house will be able to print on this printer.
The first thing to do is to connect the printer to the server and install the driver. I used the Samsung SCX-4100 MFP. After installing the driver, open the Control Panel , select the display of all items, then go to the Devices and Printers section.
Locate the printer you have installed and open its context menu. Select Printer Properties.
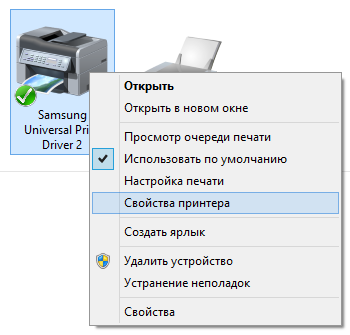
Click the Access tab.
Check the box next to Share this printer . Next, enter a name for the printer that will be visible to other computers on the network.
If there are computers in your network with both 32-bit and 64-bit versions of Windows, I recommend clicking the Additional drivers button in this window.
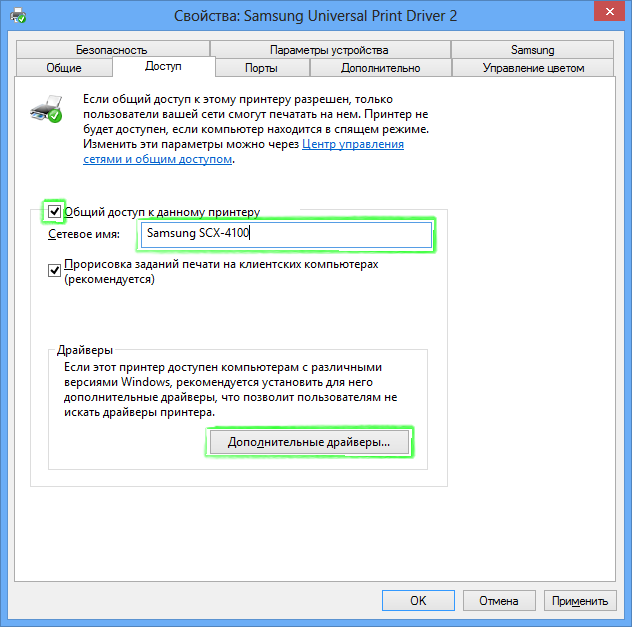
In the next window, you need to select the driver for which bit depth to install. Since I already have the driver installed for the 64-bit version of Windows, I tick the x86 (32-bit). In your case, everything may be the other way around, but this is not the point.
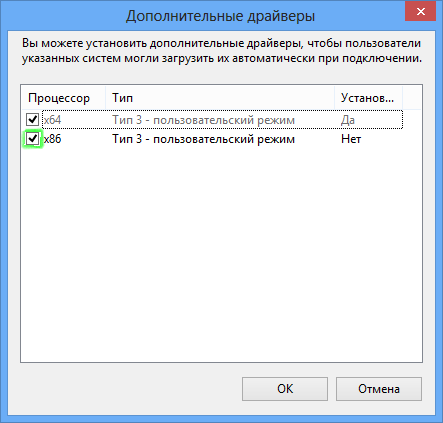
After installing the checkmark, click OK. A window opens in which you need to specify the path to the driver. If the drivers for your printer are supplied as one installation file (* .exe), then try extracting files from it using an archiver, or perhaps the installer extracts them into the Temp folder, for example.
Specify the path to the driver of the desired bit depth and click OK. Wait for the driver to install and close the printer properties by clicking on the OK button.
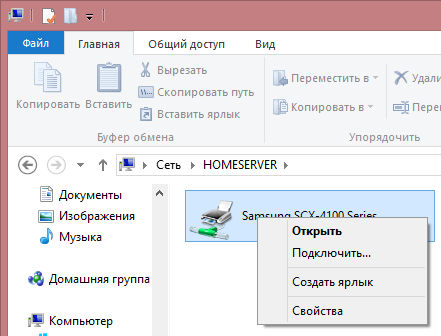
Now we will try to connect the printer to the network computer. Open the folder where all devices on your network are listed, then open your server. In addition to open network folders, a printer appeared with the name that was specified above. Open its context menu and select Connect .
Windows will ask if you trust the printer.
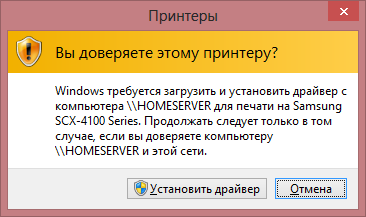
Click the Install Driver button. After that, Windows will automatically download the necessary driver from the server and install it.
Done! Now you can print to the printer from another computer, while the printer is not connected to it directly.
Since this is a server, it doesn’t need a monitor, keyboard and mouse (otherwise it would have been a regular PC). But how to perform additional configuration without all of this? For this purpose, Remote Desktop Connection will be used.
We proceed to the setting. Go to Control Panel> System and Security> System , then in the left part of the window select Configure Remote Access .
Set the switch to Allow remote connections to this computer , and also check that a check mark under the switch is checked.
Next, you need to allow the user to connect via remote desktop. Click the Select Users button.

In the window that opens, click Add. In the new window, enter user and click OK.

Check that the name user appears in the list. Click OK. Also close the System Properties window with the OK button.
After setting these parameters, you can connect to the server from any home PC using the Remote Desktop Connection program or using another RDP client.
When connecting, you will need to enter the server name, username (user) and password. Then you will see the server desktop and be able to configure it remotely.
This is one of the most important points. Since Windows is used on the server, this means that the server has the danger of being infected with viruses, of which there are a lot of divorces. How to secure the server?
Microsoft is constantly releasing security updates for Windows that close security holes (and sometimes open new ones). If all updates are installed, the security of the computer is at a higher level.
Open Windows Update , then on the left side of the window, click Customize settings . Make sure that Install updates automatically (recommended) is selected in the drop-down list. Select this option if it is not selected, and click OK.
For a more complete protection of the computer (server, in our case), you need to have an antivirus.
Windows 8 has built-in comprehensive Windows Defender protection system, which included the wonderful product Microsoft Security Essentials. Windows Defender works in Windows 8 immediately after installing the system and does not require manual activation and launch.
If you want to install an antivirus from another company, the built-in Windows 8 will automatically turn off.
Windows Defender automatically updates its virus databases immediately after they become available (usually several times a day). Manual update is not required.
Immediately after installation, an administrator and regular user account was created. To work with the server, customers use the latter option. This will not allow changing critical server parameters and accessing system files without knowledge of administrator credentials.
The article was quite voluminous, detailed, and, I hope, interesting. I tried to share my knowledge with you, told me how to set up a home server on Windows 8 Professional and set up computers to work with it. I will be very happy if someone helped this article.
Please share in the comments your opinions, additions, comments and other useful things.
With you was Roman Gladkikh.
See you!
Probably everyone would like to have their own home server, which would not only serve as a media server, but also allowed to use it as a file storage, Backup storage and print server.
On one of the wonderful autumn days, I was also visited by this thought. The fact is, there are too many devices in the house that they wanted to combine into something structured. It was decided to raise the home server. As an operating system, I first wanted to use Windows Server 2012 Essentials, which included products such as Windows Home Server and Windows Small Business Server, but after several hours of working with it, I realized that using Windows Server 2012 at home was too “fat” . Then I decided to use the OS easier, namely Windows 8 Pro, the license for which lay idle.
')
Warning I understand perfectly well that it might be easier to raise a home server on a Unix-like OS, but in this article I want to tell how to raise such a server on a Windows 8 Professional client OS for an ordinary PC user (well, or almost normal), who never had any experience with Unix.
All home devices were merged into such a network (I hope I drew it clearly):
The basis for the home server was taken old PC, with such characteristics:
- Processor: AMD Athlon 64 X2 5200+, 2.7 GHz
- Motherboard: Asus M2N-E (Gigabit LAN)
- Power supply: FSP ATX-350PNR, 350 watts
- Wi-Fi TP-Link TL-WN851ND adapter;
- RAM: 2 GB
- HDD: Western Digital WD2500JS, 250 GB
- Video Card: ATI Radeon X1600XT, 256 MB
The following components were purchased:
- HDD x2: Western Digital Caviar Green WD20EZRX, 2 TB
- Video card: NVIDIA GeForce 210, with passive cooling
The video card was replaced due to the incredible noise already existed.
After installation in the case and connection of new components to the motherboard, Windows 8 Pro was installed on a 250 GB hard disk. Only OS and some software were planned to be stored on this hard disk.
The installation was made in a completely normal mode. At the initial system setup stage, the computer name HOMESERVER was specified, an administrator account (admin) was created with a complex password, and then an account with the rights of a regular user (user), to which the password was also set.
The settings will be made under the user account, with the administrator's password entered when the system parameters are changed. So safer.
Preparing file storage
In Windows 8, there was a great feature Storage Spaces (in the Russian version of Disk Space), which, to some extent, is a software analog of a RAID array.
Storage Spaces offers to combine physical drives with USB, SATA, SAS, SCSI interfaces (and in any combination) into pools, and the pools themselves into disk spaces that look to the user as regular logical drives.
Also, with the help of Storage Spaces you can ensure data integrity with the help of mirroring and parity functions. I will tell about it a little later.
To create a pool and disk space, go to Control Panel> System and Security> Disk Spaces and select Create New Pool and Disk Space
.
A window will open in which you need to select the physical drives to create the pool. Both formatted and unformatted drives are displayed, as well as with and without stored data. The system disk can not be selected.
Attention! When adding a data disk to the pool, all of them will be deleted.
In my case, there are two disks with a capacity of 2 TB, and I will select them. Next, click Create Pool .
Windows will prepare the disks and pool them. Unformatted drives will be formatted, formatted drives will be reformatted anew.
After creating the pool, you will be prompted to create a disk space (or several), specify its name and associate a drive letter with it.
In the stability section you need to select the type of stability I chose a two-sided mirror. With this type of resiliency, Windows will store a copy of the data on each of the drives.
For reference, Windows suggests choosing four types of resilience:
- Simple . Stored information is distributed across all disks in the pool sequentially. The total capacity of the space in this case is equal to the total volume of all drives included in it. This type is analogous to RAID 0. Failover does not provide - in case of failure of one of the drives, all information is lost.
- Two way mirror . Recording is carried out simultaneously on each drive. This type of stability requires at least two disks. In case of failure of one of the drives, the information is not lost. The total capacity of the space is equal to half of the total volume of drives. This type of stability is analogous to RAID 1.
- Tripartite mirror . Record is carried out simultaneously on three drives. Data is saved when two disks fail. A minimum of 5 drives is required. This scheme has maximum reliability, but reduces the speed of reading and writing. The total capacity of the space is equal to ¼ of the total capacity of all disks. The trailer works like a RAID 1E, but I'm not sure. Please share your thoughts on this in the comments.
- Parity Can be used from 3 to 8 drives. Data is written to all drives except one, and parity information is written to the last one (block of checksums calculated using the XOR algorithm). In case of failure of one of the drives, the missing data can be calculated. Reliability is similar to a two-way mirror, but the amount of redundant data is 1 / N (the number of drives), while a double-sided mirror is always ½. That is, the amount of space available for recording useful data in the case of using parity is larger. But since it is required to calculate checksums, the write speed is significantly lower.
One of the parameters of a space that can be set is its size. In my case, when using a double-sided mirror, Windows suggests setting its size equal to half the total capacity of the disks used. It seems to be logical, but in the spaces you can use disks of different sizes, but “by default” the system will again offer half of the total volume, although the drives used would not be equal. Moreover, you can specify any size, it will not affect the functioning of the space ... For the time being. As soon as the smaller drive is filled, the space will be dismantled and its functionality will be restored only by adding new drives to the corresponding pool.
As I said, after configuration, the use of disk spaces is completely transparent to the user.
Changing the location of Windows libraries
The next step will be to move the location of the standard Music, Images, Documents and Video libraries to the created Disk space. We do not want to lose a lot of gigabytes of Lossless-music, valuable family videos and photos in case of a system disk failure?
To begin, create folders in the root of the disk space. I have created the Music, Video, Images and Documents folders. What will be stored in each of them, I think obviously. Next, right-click on one of the Windows libraries (in the right pane of the explorer) and select Properties .
In the window that opens, click the Add button and select the created folder in the root of the disk space.
Now it remains only to delete the standard locations of the selected library. The same must be done with the rest of the libraries.
Starting Multimedia Streaming
Streaming media allows you to play media files on devices that support DLNA. Among the devices that have support for this technology, there are TVs, various stationary DVD and Blu-Ray players, smartphones, game consoles, computers and even refrigerators!
To do this, start Windows Media Player and perform the initial setup. I selected the recommended options. Next you need to go to the player's library and click the Stream drop-down list. In the list, select the option Enable streaming media .
In the window that opens, click the button Enable media streaming .
The next window that opens will be the streaming media settings window. Here you need to specify the name of the multimedia library, select display options for files with certain ratings, as well as select the devices that will have access to the multimedia library.
After filling in the parameters, click OK.
Autostart Windows Media when you turn on the server
You might ask why. The thing is that the Windows Media library is used to stream media to other devices. How will this library be updated when adding new files, if Windows Media is not running?
We will solve this question with the help of the Task Scheduler . By the way, a very useful tool with a wide range of launch parameters and tasks. Windows itself also constantly uses the Scheduler to perform certain tasks, for example, to start automatic maintenance of a computer during the period of user inactivity.
Let's get started Go to Control Panel> System and Security> Administration and launch Task Scheduler as administrator.
In the right pane, click Create Task . The task creation window will open. Enter a name for the task, I advise you to use a name that allows you to determine what the task is doing without opening its details. I pointed out Windows Media Autostart. Description of the task is not mandatory, but it would be nice to fill it.
You can not forget to change the account under which the task will be executed, and therefore run Windows Media Player.
To do this, in the Security Settings group, click the Edit button. A window will open in which you need to write the user name. Write user and click OK.
Also in this group, set the switch to Execute for all users , which is necessary for the task to start, even if no user is logged on.
Now go to the Triggers tab. Click the New button and, in the window that opens, select the Start task from the Start task drop-down list.
Click OK and go to the Actions tab. Click the Create button.
The Create Action window appears. Make sure that Run is selected in the Action item. In the Program or script input field, enter the path to the program. Click the Browse button and select the wmplayer.exe file, which is located in C: \ Program Files (x86) \ Windows Media Player in a 64-bit version of Windows or C: \ Program Files \ Windows Media Player in 32-bit. The remaining fields are not required.
Click OK and go to the Conditions tab. Uncheck Run only when powered from the mains , although this is not necessary. To your taste.
Scroll to the last tab Options . Uncheck the Stop task for longer task: 3 days .
Click OK and enter the password for the user account.
After entering the password and pressing the OK button, the task scheduler will inform you that the account must have “Login as a batch job” permission.
Click OK and close Task Scheduler.
Open Local Security Policy (also in administration) as administrator.
In the window that opens, double-click Local Policies , then User Rights Assignment , and finally Sign in as a batch job .
Click the Add User or Group button, as in the Task Scheduler, enter the user name and click OK. Check whether the new item has appeared with the username in the list, and click OK. Now Local Security Policies can be closed.
Opening shared folders
The next step will be to open shared folders on the disk space. This is necessary in order for network users to be able to read and write files to certain folders. We will open the shared access to the Music, Video, Images, Documents, Backup copies and Other folders (the last two need to be created).
Right-click on folders and select Properties. Click the Access tab.
Click the Share button. The following window will open:
Enter the username (user) and click Add. Then, in the list below, set the user permission level to Read and Write . It remains only to click Sharing at the bottom of the window, enter the administrator password and click Finish.
Repeat these steps for the remaining folders.
Opening shared network folders on client machines
Everything is very, very simple. On the client machine, open the folder with network computers (Network in Windows Vista / 7/8 or Network Neighborhood in Windows XP). Double-click the name of the created server. A window opens in which you need to enter a username and password.
You need to enter credentials stored on the server. True, this is the user and his password. Check the Remember credentials box and click OK.
Now on this computer, you can read and write files that are in folders on the server.
Setting up backup to server
Probably every computer in the house has important files. Windows has a great data archiving function that creates a backup of the OS itself and the folders with the files that were specified during setup. This feature allows you to store copies on another hard drive or in a network location. I propose to configure the latter, since the reliability of data storage on the server is somewhat higher, because it is configured to mirror data to a second hard disk.
Let's start. Open Control Panel , select to view all the items in the Control Panel, and double-click on Recover Windows 7 files (Windows 8 has exactly the same name). The Backup or Restore Files window opens.
A window will open to select the location of the archive.
Since we want to save an archive copy on the server, we need to click the Save to network button.
The archives will be stored in the Backup copies folder created above, sharing with the record is already open. Using the Browse button, specify the path to the folder or write it manually. In the User field, you need to record user, and in the Password, the corresponding account password.
Click OK. In the next window, you need to select whether to allow Windows to select files for archiving or not. I decided to give the choice to myself, because I do not need an image of the system.
Click Next.
Since I do not need the image of the system, I took a tick. Also in this window, you can select additional folders for archiving. Click Next.
In the next window, check the specified archiving options and change the schedule as desired. For myself, I indicated a weekly archive on Sunday at 3:00.
Check all the data again and click Save settings and run the backup .
Sharing a printer
Perhaps you have only one printer in your house, but several people want to use its services at once. To solve this problem is very simple! Simply connect the printer to your home server and share it with you. After that, all the computers in the house will be able to print on this printer.
The first thing to do is to connect the printer to the server and install the driver. I used the Samsung SCX-4100 MFP. After installing the driver, open the Control Panel , select the display of all items, then go to the Devices and Printers section.
Locate the printer you have installed and open its context menu. Select Printer Properties.
Click the Access tab.
Check the box next to Share this printer . Next, enter a name for the printer that will be visible to other computers on the network.
If there are computers in your network with both 32-bit and 64-bit versions of Windows, I recommend clicking the Additional drivers button in this window.
In the next window, you need to select the driver for which bit depth to install. Since I already have the driver installed for the 64-bit version of Windows, I tick the x86 (32-bit). In your case, everything may be the other way around, but this is not the point.
After installing the checkmark, click OK. A window opens in which you need to specify the path to the driver. If the drivers for your printer are supplied as one installation file (* .exe), then try extracting files from it using an archiver, or perhaps the installer extracts them into the Temp folder, for example.
Specify the path to the driver of the desired bit depth and click OK. Wait for the driver to install and close the printer properties by clicking on the OK button.
Now we will try to connect the printer to the network computer. Open the folder where all devices on your network are listed, then open your server. In addition to open network folders, a printer appeared with the name that was specified above. Open its context menu and select Connect .
Windows will ask if you trust the printer.
Click the Install Driver button. After that, Windows will automatically download the necessary driver from the server and install it.
Done! Now you can print to the printer from another computer, while the printer is not connected to it directly.
Remote server management
Since this is a server, it doesn’t need a monitor, keyboard and mouse (otherwise it would have been a regular PC). But how to perform additional configuration without all of this? For this purpose, Remote Desktop Connection will be used.
We proceed to the setting. Go to Control Panel> System and Security> System , then in the left part of the window select Configure Remote Access .
Set the switch to Allow remote connections to this computer , and also check that a check mark under the switch is checked.
Next, you need to allow the user to connect via remote desktop. Click the Select Users button.
In the window that opens, click Add. In the new window, enter user and click OK.
Check that the name user appears in the list. Click OK. Also close the System Properties window with the OK button.
After setting these parameters, you can connect to the server from any home PC using the Remote Desktop Connection program or using another RDP client.
When connecting, you will need to enter the server name, username (user) and password. Then you will see the server desktop and be able to configure it remotely.
Server security
This is one of the most important points. Since Windows is used on the server, this means that the server has the danger of being infected with viruses, of which there are a lot of divorces. How to secure the server?
Turn on automatic Windows updates!
Microsoft is constantly releasing security updates for Windows that close security holes (and sometimes open new ones). If all updates are installed, the security of the computer is at a higher level.
Open Windows Update , then on the left side of the window, click Customize settings . Make sure that Install updates automatically (recommended) is selected in the drop-down list. Select this option if it is not selected, and click OK.
Antivirus protection
For a more complete protection of the computer (server, in our case), you need to have an antivirus.
Windows 8 has built-in comprehensive Windows Defender protection system, which included the wonderful product Microsoft Security Essentials. Windows Defender works in Windows 8 immediately after installing the system and does not require manual activation and launch.
If you want to install an antivirus from another company, the built-in Windows 8 will automatically turn off.
Windows Defender automatically updates its virus databases immediately after they become available (usually several times a day). Manual update is not required.
Account with normal rights
Immediately after installation, an administrator and regular user account was created. To work with the server, customers use the latter option. This will not allow changing critical server parameters and accessing system files without knowledge of administrator credentials.
Total
The article was quite voluminous, detailed, and, I hope, interesting. I tried to share my knowledge with you, told me how to set up a home server on Windows 8 Professional and set up computers to work with it. I will be very happy if someone helped this article.
Please share in the comments your opinions, additions, comments and other useful things.
With you was Roman Gladkikh.
See you!
Source: https://habr.com/ru/post/193148/
All Articles