Downloading from mSATA on the ACER Aspire V7-482PG Ultrabook
This manual describes the process of transferring a partition from Windows 8 to an SSD disk (without reinstalling the system), which is connected to mSATA and is regularly used for the cache of some operations. The transfer process is not easy, it requires some skills to create bootable flash drives. Also, if you have problems with resistance to stress, then I advise you not to do this, but to boot in normal mode from a 2.5 inch drive. Immediately I apologize for the quality of the screen shots, only an old smartphone was available.
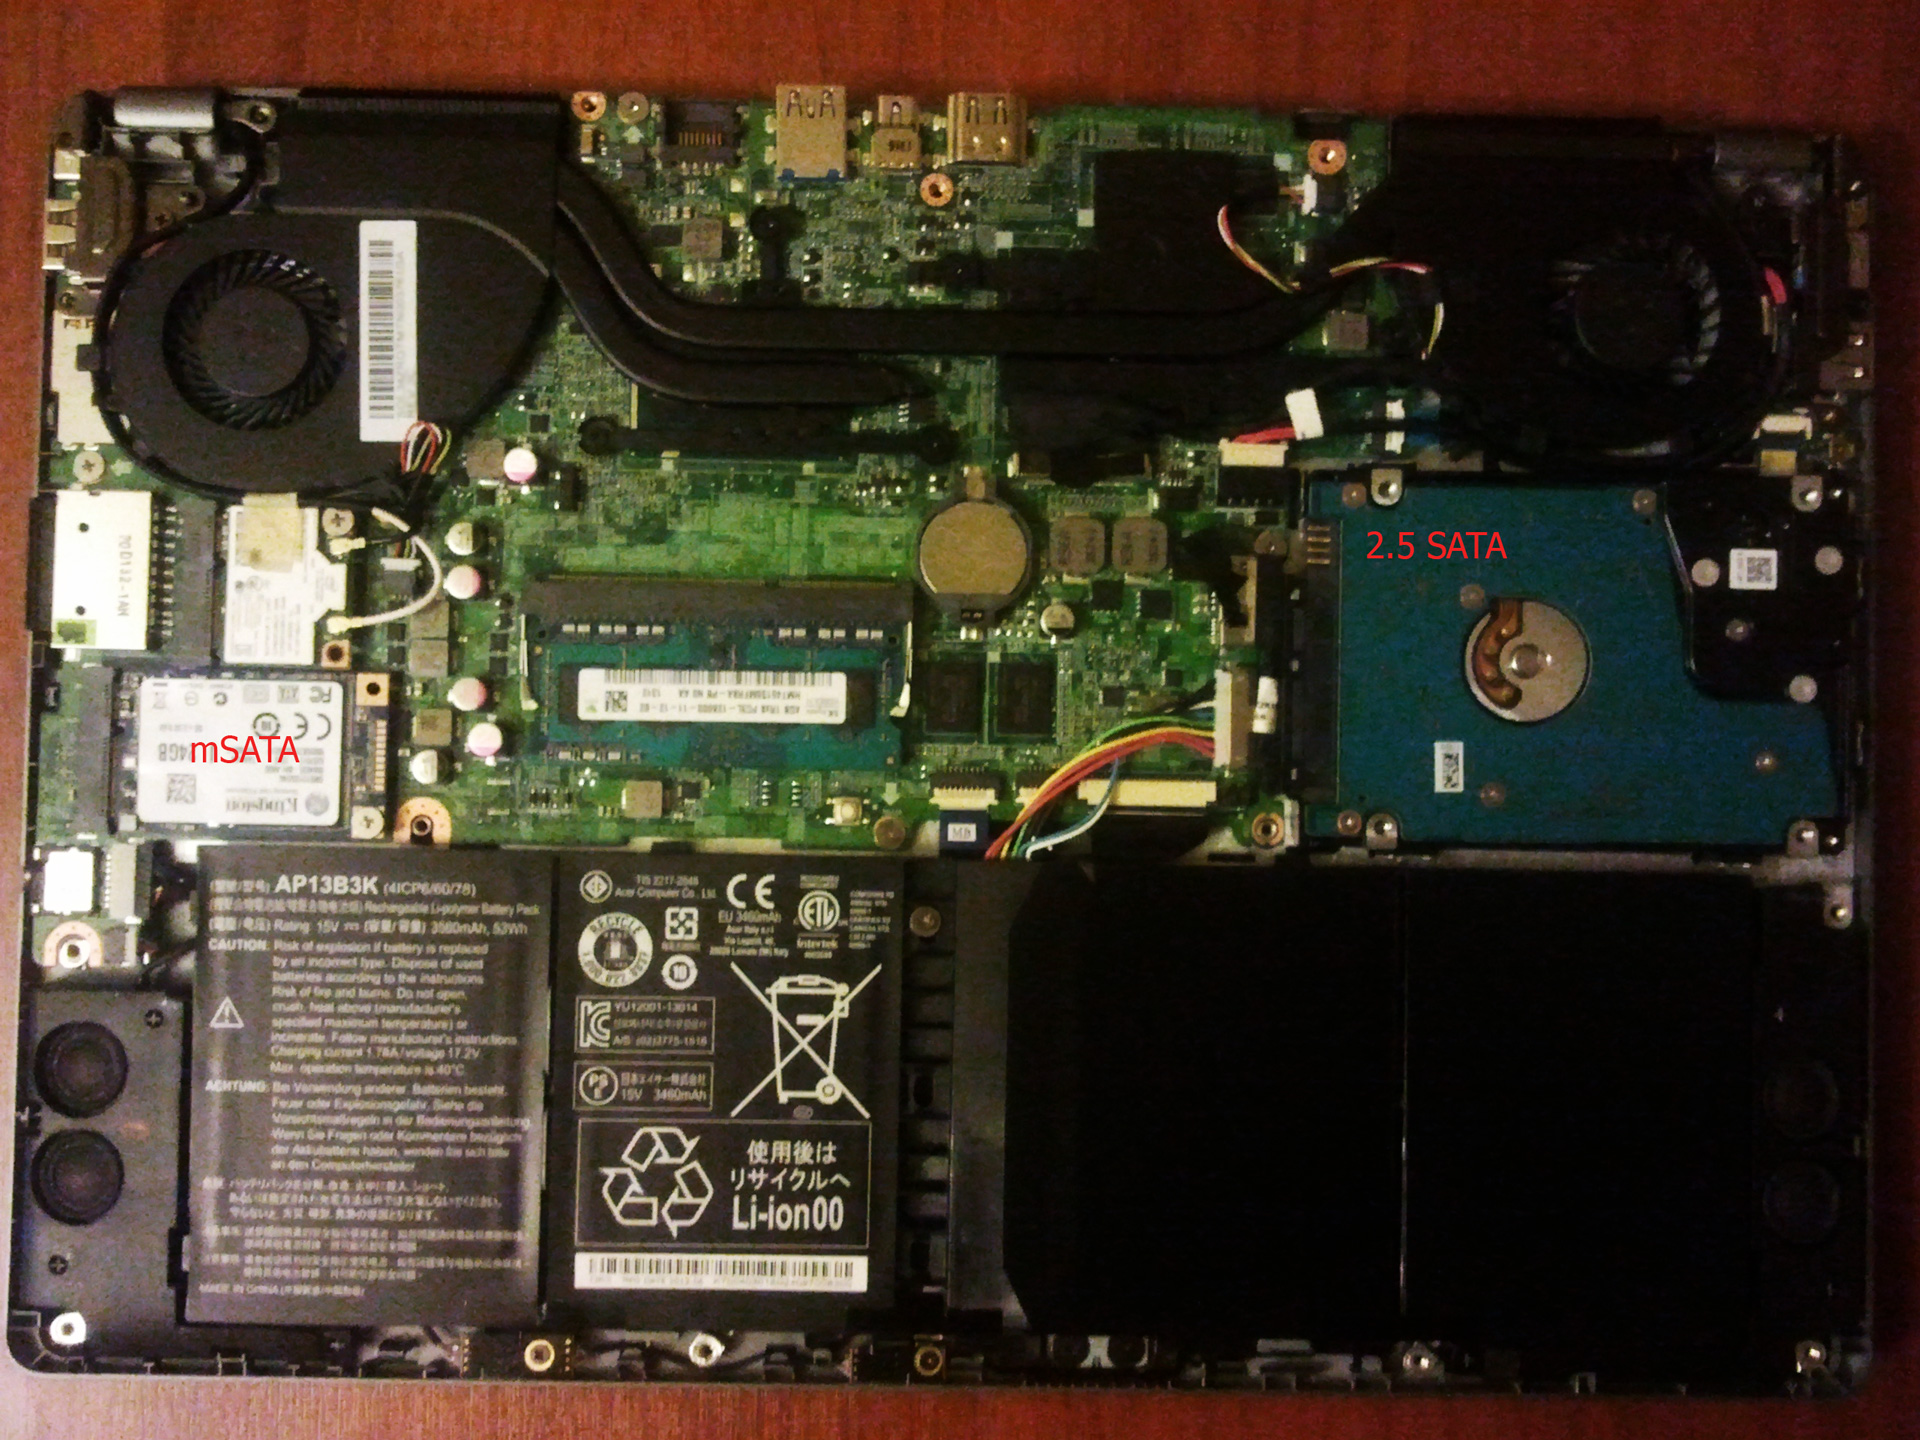
For the implementation of our plans, we need a larger mSATA SSD. SSD Kingston 24Gb is installed in the system. I personally installed the mSATA PLEXTOR PX-128M5M.
To copy and edit partitions, you can use any boot programs (Acronis, Paragon, etc.) that can work on this ultrabook. My Acronis did not boot directly, so I used the WINPE 4.0 boot image and started Acronis directly from there. Build WinPE was TechAdmin1.4 (which can be found on torrents). I downloaded it directly from the image, using the previously created multiboot USB flash drive with a Grub-bootloader and an emulator using the firadisk disk, setting it in menu.lst like this:
')
The programs used in WinPE got out of the image on the USB flash drive, since for some reason the image is not visible in the environment after loading.
I will not describe in detail the boot process from the flash drive, this is information for another manual.
We proceed directly to the transfer:
By default, there is one partition on the hard disk, on which windows 8 is installed. Therefore, it is necessary to split it into 2 parts in order to make the partition with data independent of loading.
To do this, run the ultrabook in the regular mode (if you have not done it yet), register a Microsoft account, and so on. You can update the Windows and drivers (weighty programs are better not to install). That is, we translate the system into a ready-for-base type.
We turn off the system, but not through the standard menu, as by default in Windows 8 “Shutdown” is a common hibernation, which means the saved configuration will be loaded. For standard shutdown, as in Windows 7, you need to type " shutdown -p " on the command line, we will use this shutdown throughout the manual.
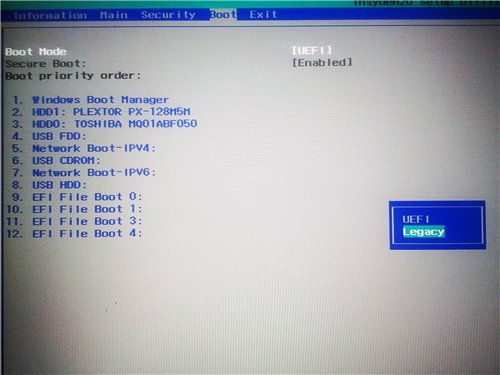
We load Akronis / WinPE / Paragon and so on. To do this, go to the BIOS (F2 button when you turn on the ultrabook, it is necessary to "spam" immediately after pressing the power button), translate the boot mode to Legacy:
Press F10, reboot and again “spam” F2. Further in the list of priorities of loading we move our flash drive to the very top with the F6 button. Press F10 and reboot.
Next, run Acronis. We will see 4 sections: Recovery, ESP, Acer, Push Button Reset. The Windows partition is the “Acer” partition. Reduce the size of the partition to the minimum (around 50-60GB) so that the free space remains to the right of the disk. On the free space, create an NTFS partition, you can call it “DATA”. It should end up with something like this:

Rebooting in UEFI mode (changing the Legacy point to UEFI in BIOS) and verifying that the partition has appeared (before this, the system partition recovery process can take place, that's okay). We will use it to store the image of partitions.
Next, you need to "release" from their duties caching SSD. Such actions helped me to do this:
After all the actions, the SSD should appear in the Disk Management list (in Administrative Tools -> Computer Management). Now we need to "correctly" mark the SSD. Press the Win + R combination on the keyboard and write " diskpart ". The DISKPART console opens. In it, we write a number of commands in turn:
After that, the “WinSSD” section should appear in the My Computer list.
Now let's start copying the system partition. Shut down Windows 8 (as described above!).
Next, the choice is to copy the partitions directly or first create an image of all Acronis TrueImage partitions. I chose the second option.
We create an image of all partitions, except for the “DATA” section created by us, we place the image file on this section. The resulting image can be saved on an external device (for example, transferred over the network to a server). It can then be used if something happens to the HDD. Without these partitions, the SSD itself will not boot via mSATA.
Now we press in Akronis to restore partitions. Select the saved image, restore only 2 sections ESP and Acer. In the recovery settings, respectively, select the sections on the SSD. The size of the partition will be less than the size of the SSD, but it is not terrible, after successfully booting from the SSD, you can then expand the partition with Acronis.
After recovery, we boot again through UEFI into our native Windows 8. Check that the partition on the SSD with the copied windows is displayed in the My Computer list (with the same letter as before), also check for the presence of the copied files.
Now the most difficult thing is to edit the UEFI bootloader in order to add a partition with copied Windows 8 to the SSD. As a result, both windows versions will be available, it will be possible to choose from which partition to load it (maybe it will be convenient for someone), but you can remove this option and load the partition with SSD by default.
We start the CMD console on behalf of the administrator (otherwise there will be no access).
The first is to copy the boot files to the partition we created. In the console "cmd" execute the command:
Where e: the letter of our SSD partition in the current Windows 8.
If everything went well, we continue.
Now you need to edit the UEFI bootloader (Windows Boot Manager), that is, add the copied partition to the boot list.
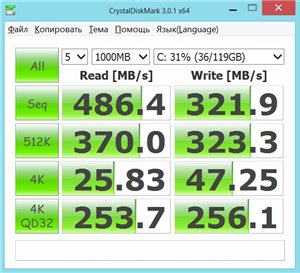
Now our new section should appear in the download list. Shut down Windows, start the ultrabook, see the download list, choose our fad and enjoy many times the increased speed of work. The “DATA” section can be used to store data.


You can then assign the default boot from the SSD partition or remove the selection altogether. For example, typing WIN + R " msconfig ". You can also download Acronis and expand the partition to full size, or create a second partition on the free SSD space.
Similar actions can be performed with any other laptop with a mSATA connector, as long as the SSD is visible as an independent disk.
For the implementation of our plans, we need a larger mSATA SSD. SSD Kingston 24Gb is installed in the system. I personally installed the mSATA PLEXTOR PX-128M5M.
To copy and edit partitions, you can use any boot programs (Acronis, Paragon, etc.) that can work on this ultrabook. My Acronis did not boot directly, so I used the WINPE 4.0 boot image and started Acronis directly from there. Build WinPE was TechAdmin1.4 (which can be found on torrents). I downloaded it directly from the image, using the previously created multiboot USB flash drive with a Grub-bootloader and an emulator using the firadisk disk, setting it in menu.lst like this:
')
title WinPE WIN8map --mem /grub/fw32.ima (0)map --mem (md)+8 (9)map /grub/winpe4.iso (255)map --hookwrite (9) [FiraDisk]\nStartOptions=cdrom,vmem=find:/grub/winpe4.iso;\n\0root (255)chainloaderThe programs used in WinPE got out of the image on the USB flash drive, since for some reason the image is not visible in the environment after loading.
I will not describe in detail the boot process from the flash drive, this is information for another manual.
We proceed directly to the transfer:
1) Creating a DATA partition on HDD
By default, there is one partition on the hard disk, on which windows 8 is installed. Therefore, it is necessary to split it into 2 parts in order to make the partition with data independent of loading.
To do this, run the ultrabook in the regular mode (if you have not done it yet), register a Microsoft account, and so on. You can update the Windows and drivers (weighty programs are better not to install). That is, we translate the system into a ready-for-base type.
We turn off the system, but not through the standard menu, as by default in Windows 8 “Shutdown” is a common hibernation, which means the saved configuration will be loaded. For standard shutdown, as in Windows 7, you need to type " shutdown -p " on the command line, we will use this shutdown throughout the manual.
We load Akronis / WinPE / Paragon and so on. To do this, go to the BIOS (F2 button when you turn on the ultrabook, it is necessary to "spam" immediately after pressing the power button), translate the boot mode to Legacy:
Press F10, reboot and again “spam” F2. Further in the list of priorities of loading we move our flash drive to the very top with the F6 button. Press F10 and reboot.
Next, run Acronis. We will see 4 sections: Recovery, ESP, Acer, Push Button Reset. The Windows partition is the “Acer” partition. Reduce the size of the partition to the minimum (around 50-60GB) so that the free space remains to the right of the disk. On the free space, create an NTFS partition, you can call it “DATA”. It should end up with something like this:
Rebooting in UEFI mode (changing the Legacy point to UEFI in BIOS) and verifying that the partition has appeared (before this, the system partition recovery process can take place, that's okay). We will use it to store the image of partitions.
2) Disable SSD from cache
Next, you need to "release" from their duties caching SSD. Such actions helped me to do this:
- Turning off the system restore section C: (My computer -> System Properties -> System Protection -> System Restore -> section C: -> Configure).
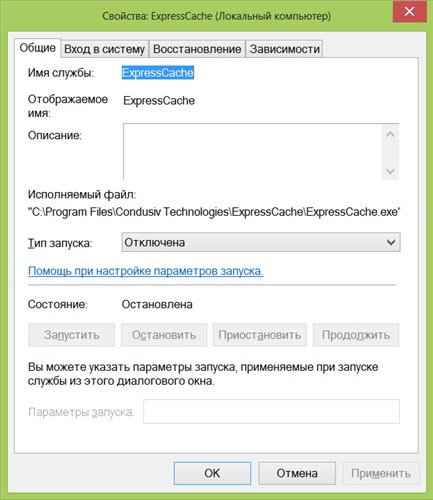
- Disable the ExpressCache service (Control Panel -> Administrative Tools -> Services -> ExpressCache -> Startup Type: Stopped, click the Stop -> Apply button). Although I did not understand what it does useful, it may not work with mSATA
- We remove the Intel Rapid program, it just blocks the SSD in the system. After deleting, restart the system.
After all the actions, the SSD should appear in the Disk Management list (in Administrative Tools -> Computer Management). Now we need to "correctly" mark the SSD. Press the Win + R combination on the keyboard and write " diskpart ". The DISKPART console opens. In it, we write a number of commands in turn:
// list disk // ( N SSD) sel disk N // clean // GPT convert gpt // EFI create partition efi size=300 // EFI FAT32, format fs=fat32 label="System" quick // 1024KB create partition primary align=1024 // select partition 2 // NTFS, format fs=NTFS label="WinSSD" quick // assign exit After that, the “WinSSD” section should appear in the My Computer list.
Now let's start copying the system partition. Shut down Windows 8 (as described above!).
3) Copying partitions to SSD
Next, the choice is to copy the partitions directly or first create an image of all Acronis TrueImage partitions. I chose the second option.
We create an image of all partitions, except for the “DATA” section created by us, we place the image file on this section. The resulting image can be saved on an external device (for example, transferred over the network to a server). It can then be used if something happens to the HDD. Without these partitions, the SSD itself will not boot via mSATA.
Now we press in Akronis to restore partitions. Select the saved image, restore only 2 sections ESP and Acer. In the recovery settings, respectively, select the sections on the SSD. The size of the partition will be less than the size of the SSD, but it is not terrible, after successfully booting from the SSD, you can then expand the partition with Acronis.
After recovery, we boot again through UEFI into our native Windows 8. Check that the partition on the SSD with the copied windows is displayed in the My Computer list (with the same letter as before), also check for the presence of the copied files.
4) Editing UEFI bootloader
Now the most difficult thing is to edit the UEFI bootloader in order to add a partition with copied Windows 8 to the SSD. As a result, both windows versions will be available, it will be possible to choose from which partition to load it (maybe it will be convenient for someone), but you can remove this option and load the partition with SSD by default.
We start the CMD console on behalf of the administrator (otherwise there will be no access).
The first is to copy the boot files to the partition we created. In the console "cmd" execute the command:
bcdboot c:\Windows /se:Where e: the letter of our SSD partition in the current Windows 8.
If everything went well, we continue.
Now you need to edit the UEFI bootloader (Windows Boot Manager), that is, add the copied partition to the boot list.
// bcdedit /copy {current} /d "Win8SSD" // bcdedit /v // , , - {ed97fee6-fa6f-11e2-56a7-084e31ce3863} 2 , e: SSD bcdedit /set {ed97fee6-fa6f-11e2-56a7-084e31ce3863} device partition=e: bcdedit /set {ed97fee6-fa6f-11e2-56a7-084e31ce3863} osdevice partition=e: Now our new section should appear in the download list. Shut down Windows, start the ultrabook, see the download list, choose our fad and enjoy many times the increased speed of work. The “DATA” section can be used to store data.
You can then assign the default boot from the SSD partition or remove the selection altogether. For example, typing WIN + R " msconfig ". You can also download Acronis and expand the partition to full size, or create a second partition on the free SSD space.
Similar actions can be performed with any other laptop with a mSATA connector, as long as the SSD is visible as an independent disk.
Source: https://habr.com/ru/post/193128/
All Articles