Core Data for iOS. Chapter number 3. Theoretical part
Good day, good day!
Today I want to start writing a series of lectures with practical tasks on the book “Pro Core Data for iOS” by Michael Privat and Robert Warner, which you can buy from this link. Each chapter will contain a theoretical and practical part.

Content:
')
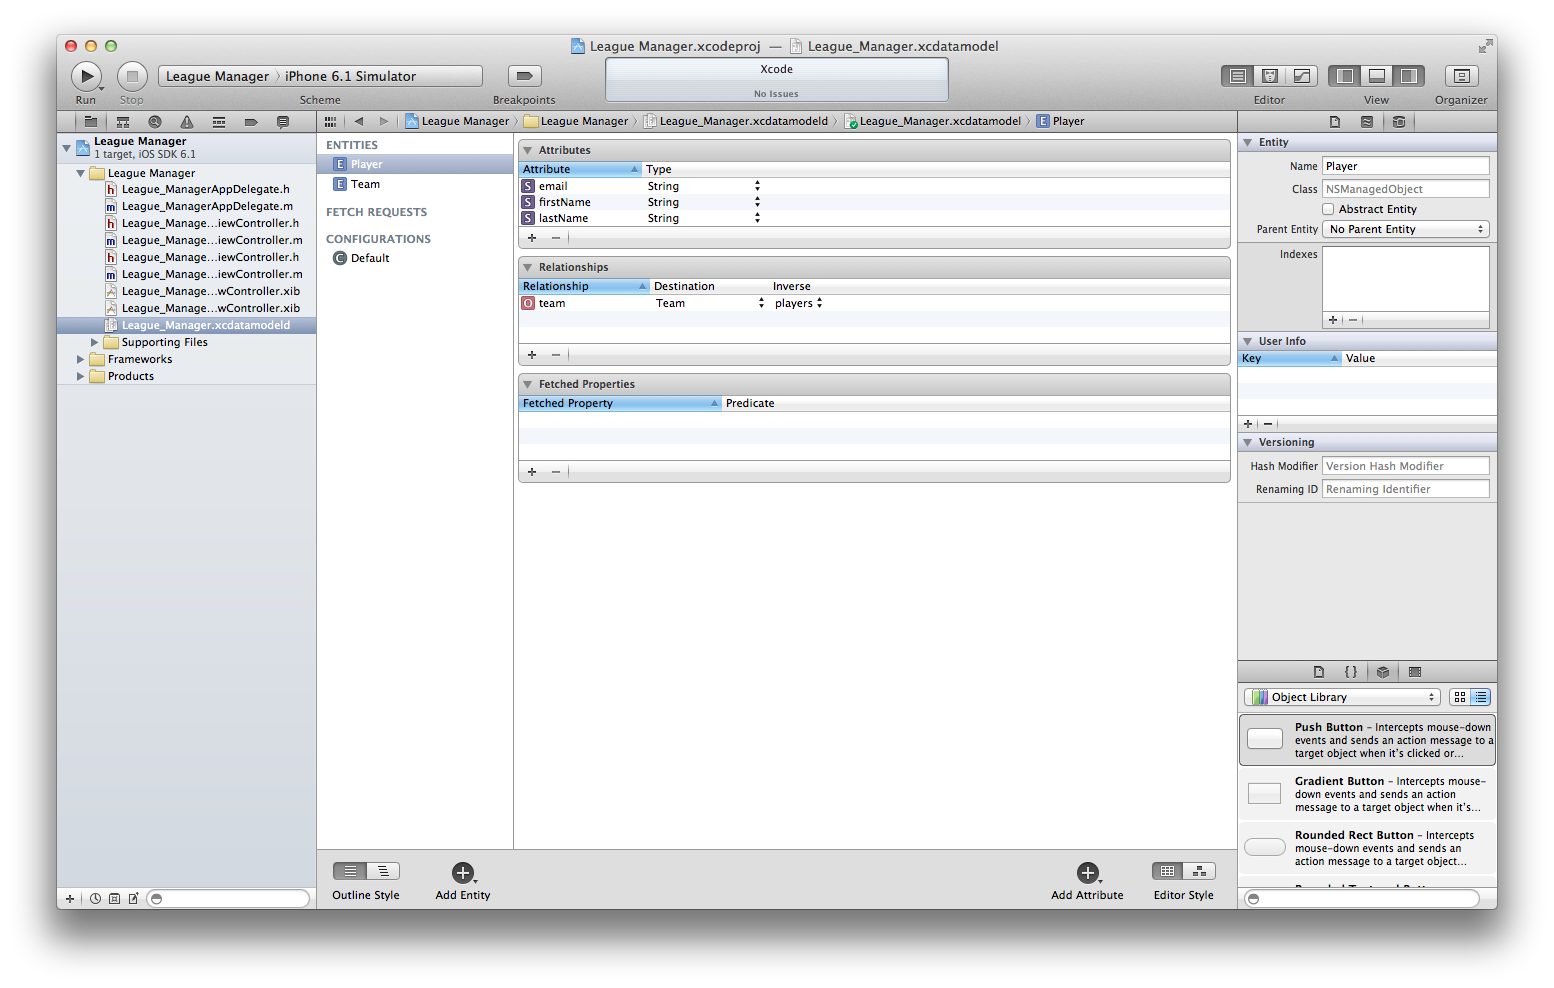
In this chapter, we will create an application with two tables and a one-to-many relationship between them. Imagine that you volunteered to follow the teams from the junior football league and their composition. In our data model there will be two tables: Team (stores information about the team name and the color of their form) and Player (stores information about the team player - mailbox, name and surname). It is clear that one team has many players, and the player belongs to the same team.
We will create this application first using SQLite as a storage, and then we will try to use other options (storage in memory and arbitrary storage (atomic store)).
Let's call our application League Manager and it will consist of 4 screens:
A screen with a list of teams displays locally saved football teams with the colors of their form. There is a

The add / edit football team screen consists of two fields for entering the team name and the color of their form. This screen is displayed after pressing the

A screen with a list of players displays all the players of a particular team. The transition to this screen is carried out after clicking on the blue arrow on the "List of commands" screen opposite each command:

As with the teams, when you click on

Now that we know what we have to do, we can proceed.
Launch the XCode and create a new project.

We call it LeagueManager and write book.coredata as the company identifier.

After creating the project:

At this stage of creating an application, the most important component and part is the creation of a data model. Open

Delete (pressing the
Start by creating a

Create two attributes for the
We get the following picture:

In order to set one attribute type to several attributes at once, all you need to do is select them and select the right type for the right:

Next, create an

To create a new relationship between

Now you need to create a connection on the part of the player (
After the creation of the data model is completed, it is necessary to start writing code to display this data. XCode automatically generates all the necessary code to display a list of commands; the next task will be to slightly adjust it to work with the entities of the
We need a method to add a command to the repository, let's add it to the
The code in
Open MasterViewController.m and correct the screen name as follows:
Now let's implement the method of adding a new command:
Now we will find a line like this:
and replace with:
Next, you need to make another small change to the existing code, replace this line:
on:
After creating a new object, we set its properties to the values that were passed:
After the object's properties have been changed, we need to save it, that's why the
Adjust another method as follows:
The table cells are still configured to display
Change this line:
on:
And we change the type of cells being created with such:
on:
In the generated code, the
While our application does little. It can not create a team, can not create a player. Now is the right time to launch the application for execution, to make sure that we are on the right path and everything works. If for some reason you have errors when building the application, then try to go through all the steps again, recheck the data model.
When you create an application from the
Delete the
After that we can safely delete all three
Create a new class, the parent of our class will be a

Let's call this class

Open
Open
If the application user wants to create a new command, then the aTeam parameter will be nil, and the
Now it remains to implement event handlers when you click on the Save and Cancel buttons:
The
After the code is written to interact with the elements of the user interface, we can proceed to the creation of this very user interface. Open

Before launching the application for execution, go back to the
Go to
It now remains to "associate" clicking on + with the action. Go to the
on that:
At this stage, the application can already create commands, but before launching the application for execution, I suggest adding the code to edit the commands right away:
Run the application for execution:

Now we can add commands, edit them. Add a few commands, in the list they will be sorted in lexicographical order.


You may notice that we can create teams with empty names or colors of forms. If this were a real application, then we needed to take some interim measures from bad user data. We deliberately left such a “mistake” with data verification, because in Chapter 5 we will study the ways of data validation.
Close the application, start again ... enjoy your work ... but, we finished only the work with the teams, and the players have yet to work. This is what we will do in the next section.
To implement the player management user interface, we need two screens and corresponding controllers: one to display the list of players in the team, and the second to add a new player or edit an existing one. In large part, these controllers are mirror copies of the controllers for working with commands, although they do not contain
First we will create a controller and a screen to display a list of team players. Create a new
The screen will have a + button for adding a new player. Let's declare the corresponding click handler method.
PlayerListViewController.h
Open the
The automatically generated
Adjust the viewWillAppear method: as follows:
The list of players in the table will be sorted alphabetically in a single section (section). In order to get a list of all players on a team, call the
Above there is a call to the
In order to display the list of players on the team, go back to MasterViewController.m and add a method that will handle clicking on an additional accessory (blue cell element):
Add import

The application is almost ready; the only thing worth realizing is adding / editing / deleting players.
Create a new controller (
PlayerViewController.h
Now open
In the method,
The next step is to implement button click handler methods:
There is no method
The delegate who will handle actions committed in
We now return to
Now we open
The final step is to create a custom screen for adding / editing a player. Select it

In order to display this screen it is necessary to return to the implementation of the method
We also need to handle clicking on the cells in the player list table. We find in the
On this, the implementation of the team and player management application is complete. Run the application. Add players, remove players, remove teams with players.
In the second chapter, we have already figured out how to work with
Keep your League Manager application running so you can switch between
Let's start by looking at what tables were created:
Create three teams: Crew (Blue), Fire (Red), Revolution (Green).
In a SQLite database, they will look something like this (depending on how many commands you have created and deleted):
As the quick check shows, there are no players in the League Manager application yet:
Open the list of players in the Crew team and add three new ones: Jordan Gordon, Pat Sprat, Bailey Staley. After adding players you will need to see them in the list.


Let's override the team in
Now add a new player to the Fire team and call it Terry Gary. We will display a list of all players of teams and the name of the team in which he plays:
Open the application, remove the Crew team's Pat Sprat player and re-request:
Finally, we’ll remove the Fire team, and it’s worth noting that not only the team itself, but also its only player Terry Gary has retired:
Do not be afraid to look under the hood Core Data.
In most cases, your application will use a database as a SQLite data warehouse, so understanding how Core Data works with it can help you avoid difficulties and improve application performance.
In the previous section, we built an application using Core Data and SQLite as a data warehouse. In this section we will discuss an alternative type of storage: storage in memory. Let's take a look at how you can change the type of data storage used.
It is easy to change the type of storage used; it’s enough only to
Here is what the modified method will look like
The data storage type has been changed to in-memory storage.
The first thing we will notice when the application is launched the next time is that all previously added data has disappeared. This happened because we changed the type of data storage and did not migrate data from the old to the new. In Chapter 8, we will look at how data can be migrated between two repositories.
The storage life cycle in memory begins when the Core Data stack is initialized and ends when the application is stopped.
Note
Reflecting on the different types of data storage, which are provided by default, it is difficult to think of a situation the first time in which it would be worth using in-memory storage, but there are such situations. For example, local caching of data received from a remote server. Imagine a situation where your application processes data from a remote server. If your application makes a lot of requests, it will be a good practice to speed up responses to these requests by choosing the most “responsive” type of storage. The remote server can transfer data in compressed form, on the mobile device will be unpacking and loading data into memory to speed up subsequent requests. In that case, you wantso that the data is updated each time (or updated with some frequency) and data loss when the application is shut down is not a problem.

When developing your next application using Core Data, consider using in-memory storage whenever your application does not need to store data between runs. In traditional applications in which it is necessary to store user data, this type of storage will not be popular.
The basic principle of Core Data is abstraction from the type of real storage. This abstraction allows you to change the default internal storage type (NSSQLiteStoreType, NSInMemoryStoreType, NSBinaryStoreType) without needing to change more than one row. In some cases, the default data warehouse may not suit your needs. In this case, Core Data has a present for you - the ability to create an arbitrary type of data storage yourself. In this section, we will create a new type of storage and use it in our League Manager application.
Before we dive into the implementation, it is worth remembering that Core Data allows you to create only atomicstorage types. The atomic type of storage is the type in which the save operation saves all data on each of its entire calls. Unfortunately, this restriction does not allow you to create and use something more efficient than a SQLite database. In this section, we will develop the file type of the repository, the data in it will be stored using the comma separator (CSV), and to separate the values we will use the vertical bar (|).
Custom data stores should be inherited from the

The user interacts with the layers
New custom data storage is responsible for transferring data between storage on the device and NSAtomicStoreCacheNodes, as well as transferring data between NSManagedObjects and NSAtomicStoreCacheNodes.
The first step in creating a custom data warehouse is to create a class for a new storage type. The custom storage that will be developed in this section will be fully in the class
CustomStore.h
CustomStore.m
All vaults in Core Data have a certain set of metadata that allows you to
To create unique identifiers, add the following class method:
In the example in this chapter, two files are necessary for the operation of a custom data store. The first file, which has the extension txt, contains the data itself; The second file that has the plist extension contains metadata. To solve the problem of loading and saving metadata, we will add another method and finish the implementation of the method
The following method saves a file with metadata:
Downloading metadata is a little more difficult, because in the case of the first download (access) to the repository, you need to create a file with metadata along with an empty data file (txt in our case). Core Data expects to receive from the metadata repository and type the UUID, which allow to determine the order, how to work with this type of storage, so you must set the values for the keys
With the metadata load / save methods available, we can complete the initialization method of the custom data store as follows:
In order for our custom data warehouse to work as it should, we need to implement three additional methods. The first method creates a new referring object for the passed one
The second method, which is useful to us, creates an instance of the
The implementation
Today I want to start writing a series of lectures with practical tasks on the book “Pro Core Data for iOS” by Michael Privat and Robert Warner, which you can buy from this link. Each chapter will contain a theoretical and practical part.
Content:
- Chapter number 1. Getting Started ( Practical Part )
- Chapter number 2. Digest Core Data ( practical part )
- Chapter number 3. Data storage: SQLite and other options
- Chapter 4 Creating a data model
- Chapter number 5. We work with data objects
- Chapter number 6. Processing Result Sets
- Chapter number 7. Performance tuning and memory usage
- Chapter number 8. Version Control and Migration
- Chapter number 9. Managing tables using NSFetchedResultsController
- Chapter number 10. Using Core Data in Advanced Applications
')
Introduction
In this chapter, we will create an application with two tables and a one-to-many relationship between them. Imagine that you volunteered to follow the teams from the junior football league and their composition. In our data model there will be two tables: Team (stores information about the team name and the color of their form) and Player (stores information about the team player - mailbox, name and surname). It is clear that one team has many players, and the player belongs to the same team.
We will create this application first using SQLite as a storage, and then we will try to use other options (storage in memory and arbitrary storage (atomic store)).
Interface
Let's call our application League Manager and it will consist of 4 screens:
- Command list
- Add / Edit Team
- List of players
- Add / Edit Player
A screen with a list of teams displays locally saved football teams with the colors of their form. There is a
+ button on the screen to add a new command and an Edit button to delete. Here is the screen:The add / edit football team screen consists of two fields for entering the team name and the color of their form. This screen is displayed after pressing the
+ button on the "Command List" screen to add a new command, or when you click on one of the commands from the list to edit it.A screen with a list of players displays all the players of a particular team. The transition to this screen is carried out after clicking on the blue arrow on the "List of commands" screen opposite each command:
As with the teams, when you click on
+ , a screen for adding a new player to the team appears, and when you click on Edit you can edit the player information.Now that we know what we have to do, we can proceed.
Using SQLite as Storage
Launch the XCode and create a new project.
We call it LeagueManager and write book.coredata as the company identifier.
After creating the project:
At this stage of creating an application, the most important component and part is the creation of a data model. Open
*.xcdatamodeld in the xcode:Delete (pressing the
Delete key) an existing Event entity that is not useful to us.Start by creating a
Team entity:Create two attributes for the
Team entity:- name (String)
- uniformColor (String)
We get the following picture:
In order to set one attribute type to several attributes at once, all you need to do is select them and select the right type for the right:
Next, create an
Player entity with three attributes:- firstName (String)
- lastName (String)
- email (string)
One-to-many relationship
To create a new relationship between
Team and Player entities, you must first select the Team entity and in the Relationships section, click + and name the new communication players , for the Destination select the Player entity. On the right, set the “To-Many Relationship” flag with the selected players connection. For the delete rule, select Cascade (when deleting a team, all players of the team will be automatically deleted).Now you need to create a connection on the part of the player (
Player entity). Add a Player entity connection called team , select Team in the Destination field, and select players in the Invers field (after that, don’t forget to set the Inverse field for the players connection in the Team entity)User Interface Building
After the creation of the data model is completed, it is necessary to start writing code to display this data. XCode automatically generates all the necessary code to display a list of commands; the next task will be to slightly adjust it to work with the entities of the
Team , and not the Event .We need a method to add a command to the repository, let's add it to the
MasterViewController.m file, without having forgotten to describe it in MasterViewController.h .The code in
MasterViewController.h now looks like this: #import <UIKit/UIKit.h> #import <CoreData/CoreData.h> @interface MasterViewController : UITableViewController <NSFetchedResultsControllerDelegate> @property (nonatomic, strong) NSFetchedResultsController *fetchedResultsController; @property (nonatomic, strong) NSManagedObjectContext *managedObjectContext; - (void)insertTeamWithName:(NSString *)name uniformColor:(NSString *)uniformColor; - (void)saveContext; @end Open MasterViewController.m and correct the screen name as follows:
self.title = NSLocalizedString(@"League Manager", @"League Manager"); Now let's implement the method of adding a new command:
- (void)insertTeamWithName:(NSString *)name uniformColor:(NSString *)uniformColor { NSManagedObjectContext *context = [self.fetchedResultsController managedObjectContext]; NSEntityDescription *entity = [[self.fetchedResultsController fetchRequest] entity]; NSManagedObject *newManagedObject = [NSEntityDescription insertNewObjectForEntityForName:[entity name] inManagedObjectContext:context]; [newManagedObject setValue:name forKey:@"name"]; [newManagedObject setValue:uniformColor forKey:@"uniformColor"]; [self saveContext]; } Now we will find a line like this:
NSEntityDescription *entity = [NSEntityDescription entityForName:@"Event" inManagedObjectContext:self.managedObjectContext]; and replace with:
NSEntityDescription *entity = [NSEntityDescription entityForName:@"Team" inManagedObjectContext:self.managedObjectContext]; Next, you need to make another small change to the existing code, replace this line:
NSSortDescriptor *sortDescriptor = [[NSSortDescriptor alloc] iniWithKey:@"timestamp" ascending:NO]; on:
NSSortDescriptor *sortDescriptor = [[NSSortDescriptor alloc] iniWithKey:@"name" ascending:NO]; After creating a new object, we set its properties to the values that were passed:
[newManagedObject setValue:name forKey:@"name"]; [newManagedObject setValue:uniformColor forKey:@"uniformColor"]; After the object's properties have been changed, we need to save it, that's why the
saveContext method is saveContext . - (void)saveContext { NSManagedObjectContext *context = [self.fetchedResultsController managedObjectContext]; NSError *error = nil; if(![context save:&error]){ NSLog(@"Unresolved error %@, %@", error, [error userInfo]); abort(); } } Adjust another method as follows:
- (void)tableView:(UITableView *)tableView commitEditingStyle:(UITableViewCellEditingStyle)editingStyle forRowAtIndexPath:(NSIndexPath *)indexPath { if (editingStyle == UITableViewCellEditingStyleDelete) { [self saveContext]; } } Table setup
The table cells are still configured to display
Event entities, instead of the required Team entities. We need to display two components in one cell of the table: the name of the team and the color of the form in which this team plays. In order to achieve this, you must first change the style of the displayed table cell, as well as the CellIdentifier identifier used in the cellForRowAtIndexPath: method.Change this line:
static NSString* CellIdentifier = @"Cell"; on:
static NSString* CellIdentifier = @"TeamCell"; And we change the type of cells being created with such:
cell = [[UITableViewCell alloc] initWithStyle:UITableViewCellStyleDefault reuseIdentifier:CellIdentifier]; on:
cell = [[UITableViewCell alloc] initWithStyle:UITableViewCellStyleValue1 reuseIdentifier:CellIdentifier]; In the generated code, the
configureCell:atIndexPath: method is present, in which the cell is actually configured for display. But in the current form, the method works with the essence of the Event , and not the Team , so you need to make some adjustments. - (void)configureCell:(UITableViewCell *)cell atIndexPath:(NSIndexPath *)indexPath { NSManagedObject *managedObject = [self.fetchedResultsController objectAtIndexPath:indexPath]; cell.textLabel.text = [[managedObject valueForKey:@"name"] description]; cell.detailTextLabel.text = [[managedObject valueForKey:@"uniformColor"] description]; cell.accessoryType = UITableViewCellAccessoryDetailDisclosureButton; } Team building
While our application does little. It can not create a team, can not create a player. Now is the right time to launch the application for execution, to make sure that we are on the right path and everything works. If for some reason you have errors when building the application, then try to go through all the steps again, recheck the data model.
When you create an application from the
Master-Details View Application template, another controller is created called DetailViewController . You can use this class, but since we need to display information about the team and players, it is better to get rid of this controller and create new controllers with appropriate names.Delete the
#import DetailViewController.h line from MasterViewController.m . Find the tableView:didSelectRowAtIndexPath: method and clean its body. As follows: - (void)tableView:(UITableView *)tableView didSelectRowAtIndexPath:(NSIndexPath *)indexPath { } After that we can safely delete all three
DetailViewController (.h, .m, .xib). If we start the application and click on the + button, the application crashes. This + is still bound to the insertNewObject: method that we deleted. We need to attach to this button the ability to create a new team, or rather, to show a modal window with fields for entering information (team name and form color) about the new team. The same window will be used to edit existing commands when you click on a cell with a command on the command list screen.Create a new class, the parent of our class will be a
UIViewController :Let's call this class
TeamViewController and don't forget to tick the With XIB for user interface option.Open
TeamViewController.h . In League Manager, the MasterViewController class manages NSManagedObjectContext , which means in TeamViewController will need a reference to this object management environment and the corresponding initialization method. Since this controller will be responsible for editing the information about the command, during initialization it is worth passing the command object (for this we also need to create a property and add it to the initialization method). The user interface of the command to add / edit a command will contain two text fields - for the name of the command and the color of their form, for them you must create the corresponding properties in TeamViewController . On this screen there will also be two buttons - the save button (Save) of the new command and the Cancel button (Cancel). In TeamViewController should be handler methods for pressing these buttons.TeamViewController.h #import <UIKit/UIKit.h> @class MasterViewController; @interface TeamViewController : UIViewController { IBOutlet UITextField *name; IBOutlet UITextField *uniformColor; NSManagedObject *team; MasterVIewController *masterController; } @property (nonatomic, retain) UITextField *name; @property (nonatomic, retain) UITextField *uniformColor; @property (nonatomic, retain) NSManagedObject *team; @property (nonatomic, retain) MasterViewController *masterController; - (IBAction)save:(id)sender; - (IBAction)cancel:(id)sender; - (id)initWithMasterController:(MasterViewController *)aMasterController team:(NSManagedObject *)aTeam; @end Open
TeamViewController.m , import MasterViewController.h , delete the initWithNibName: , add synthesize for name , team and masterController . Add this initialization method: - (id)initWithMasterController:(MasterController *)aMasterController team:(NSManagedObject *)aTeam { if((self = [super init])){ self.masterController = aMasterController; self.team = aTeam; } return self; } If the application user wants to create a new command, then the aTeam parameter will be nil, and the
TeamViewController.m controller will be responsible for creating a new NSManagedObject object. In the case, if the user selects one of the existing commands for editing, it is up to the controller to fill in the text fields on the screen with relevant data from the command object (the name of the command and the color of the form). We will add the last functionality to the viewDidLoad method: - (void)viewDidLoad{ [super viewDidLoad]; if(team != nil){ name.text = [team valueForKey:@"name"]; uniformColor.text = [team valueForKey:@"uniformColor"]; } } Now it remains to implement event handlers when you click on the Save and Cancel buttons:
- (IBAction)save:(id)sender { if(masterController != nil){ if(team != nil){ [team setValue:name.text forKey:@"name"]; [team setValue:uniformColor.text forKey:@"uniformColor"]; [masterController saveContext]; } else { [masterController insertNewTeamWithName:name.text uniformColor:uniformColor.text]; } } [self dismissModalViewControllerAnimated:YES]; } The
cancel: method cancel: simply removes the command edit / add window.TeamViewController.m #import "TeamViewController.h" #import "MasterViewController.h" @implementation TeamViewController @synthesize name; @synthesize uniformColor; @synthesize team; @synthesize masterController; - (id)initWithMasterController:(MasterController *)aMasterController team:(NSManagedObejct *)aTeam { if((self = [super init])){ self.masterController = aMasterController; self.team = aTeam; } return self; } - (void)didReceiveMemoryWarning{ [super didReceiveMemoryWarning]; } #pragma mark - View lifecycle - (void)viewDidLoad{ [super viewDidLoad]; if(team != nil){ name.text = [team valueForKey:@"name"]; uniformColor.text = [team valueForKey:@"uniformColor"]; } } - (void)viewDidUnload{ [super viewDidUnload]; } - (BOOL)shouldAutorotateToInterfaceOrientation:(UIInterfaceOrientation)interfaceOrientation { return (interfaceOrientation == UIInterfaceOrientationPortrait); } #pragma mark - Button handlers - (IBAction)save:(id)sender{ if(masterController != nil){ if(team != nil){ [team setValue:name.text forKey:@"name"]; [team setValue:uniformColor.text forKey:@"uniformColor"]; [masterController saveContext]; } else { [masterController insertTeamWithName:name.text uniformColor:uniformColor.text]; } } [self dismissModalViewControllerAnimated:YES]; } - (IBAction)cancel:(id)sender{ [self dismissModalViewControllerAnimated:YES]; } @end After the code is written to interact with the elements of the user interface, we can proceed to the creation of this very user interface. Open
TeamViewController.xib , it should be empty from the beginning. We install there two inscriptions, two text entry fields and two buttons, we connect the actions of the buttons with the corresponding handler methods. The final view is something like this:Before launching the application for execution, go back to the
MasterViewController and add the code to display a screen with information about the command. We should display the edit command screen in two cases: 1) the user clicked on + 2) the user clicked on the command from the list. Let's start by pressing the + button. Declare a new method in MasterViewController.h : - (void)showTeamView; Go to
MasterViewController.m , import TeamViewController.h and implement the above method as follows: - (void)showTeamView{ TeamViewController *teamViewController = [[TeamViewController alloc] initWithMasterController:self team:nil]; [self presentModalViewController:teamViewController animated:YES]; } It now remains to "associate" clicking on + with the action. Go to the
viewDidLoad method and replace this code here: UIBarButtonItem *addButton = [[UIBarButtonItem alloc] initWithBarButtonSystemItem:UIBarButtonSystemItemAdd target:self action:@selector(insertNewObject)]; on that:
UIBarButtonItem *addButton = [[UIBarButtonItem alloc] initWithBarButtonSystemItem:UIBarButtonSystemItemAdd target:self action:@selector(showTeamView)]; At this stage, the application can already create commands, but before launching the application for execution, I suggest adding the code to edit the commands right away:
- (void)tableView:(UITableView *)tableView didSelectRowAtIndexPath:(NSIndexPath)indexPath{ NSManagedObject *team = [[self fetchedResultsController] objectAtIndexPath:indexPath]; TeamViewController *teamViewController = [[TeamViewController alloc] initWithMasterController:self team:team]; [self presentModalViewController:teamViewController animated:YES]; } Run the application for execution:
Now we can add commands, edit them. Add a few commands, in the list they will be sorted in lexicographical order.
You may notice that we can create teams with empty names or colors of forms. If this were a real application, then we needed to take some interim measures from bad user data. We deliberately left such a “mistake” with data verification, because in Chapter 5 we will study the ways of data validation.
Close the application, start again ... enjoy your work ... but, we finished only the work with the teams, and the players have yet to work. This is what we will do in the next section.
User interface for managing players
To implement the player management user interface, we need two screens and corresponding controllers: one to display the list of players in the team, and the second to add a new player or edit an existing one. In large part, these controllers are mirror copies of the controllers for working with commands, although they do not contain
NSFetchedResultsController and the rest of the code for working with Core Data, instead they delegate interaction with Core Data MasterViewController .First we will create a controller and a screen to display a list of team players. Create a new
PlayerListViewController controller, set its parent class UITableViewController and uncheck the “With XIB for user interface” option. Open the file PlayerListViewController.h . This class is responsible for displaying the list of players on the team, which means that a reference to the team object is necessary in this class. Also, given the fact that this class delegates interaction with Core Data to the MasterViewController controller, a reference to the controller itself is also needed.The screen will have a + button for adding a new player. Let's declare the corresponding click handler method.
PlayerListViewController.h
#import <UIKit/UIKit.h> @class MasterViewController; @interface PlayerListViewController : UITableVIewController { NSManagedObject *team; MasterViewController *masterViewController; } @property (nonatomic, retain) NSManagedObject *team; @property (nonatomic, retain) MasterViewController *masterController; - (id)initWithMasterController:(MasterViewController *)aMasterController team:(NSManagedObject *)aTeam; - (void)showPlayerView; - (NSArray *)sortPlayers; @end Open the
PlayerListViewController.m file and import MasterVIewController.h , synthesize the team and masterController . Change the generated method initWithStyle: to initWithMasterController: which takes two properties and saves as follows: - (id)initWithMasterController:(MasterVIewController *)aMasterVIewController team:(NSManagedObject *)aTeam { if((self = [super init])){ self.masterController = aMasterController; self.team = aTeam; } return self; } The automatically generated
viewDidLoad method is viewDidLoad as follows: - (void)viewDidLoad{ [super viewDidLoad]; self.title = @"Player"; UIBarButtonItem *addButton = [[UIBarButtonItem alloc] initWithBarButtonSystemItem:UIBarButtonSystemItemAdd target:self action:@selector(showPlayerView)]; self.navigationItem.rightBarButtonItem = addButton; } showPlayerView ’ll leave the showPlayerView method empty for now: - (void)showPlayerView{ } Adjust the viewWillAppear method: as follows:
- (void)viewWillAppear:(BOOL)animated{ [super viewWillAppear:animated]; [self.tableView reloadData]; } The list of players in the table will be sorted alphabetically in a single section (section). In order to get a list of all players on a team, call the
valueForKey:@"players" method of the team object, which will return NSSet* players to us. Below is the code to customize the table display: - (NSUInteger)numberOfSectionInTableView:(UITableView *)tableView { return 1; } - (NSInteger)tableView:(UITableVIew *)tableView numberOfRowsInSection:(NSInteger)section { return [(NSSet *)[team valueForKey:@"players"] count]; } - (UITableViewCell *)tableView:(UITableVIew *)tableView cellForRowAtIndexPath:(NSIndexPath *)indexPath { static NSString *CellIdentifier = @"PlayerCell"; UITableViewCell *cell = [tableView dequeueReusableCellWithIdentifier:CellIdentifier]; if(cell == nil){ cell = [[UITableViewCell alloc] initWithStyle:UITableViewCellStyleValue1 reuseIdentifier:CellIdentifier]; } NSManagedObject *player = [[self sortPlayers] objectAtIndex:indexPath.row]; cell.textLabel.text = [NSString stringWithFormat:@"%@ %@", [[player valueForKey:@"firstName"] description], [[player valueForKey:@"lastName"] description]]; cell.detailTextLabel.text = [[player valueForKey:@"email"] description]; return cell; } Above there is a call to the
sortPlayers method, which returns a sorted array of players: - (NSArray *)sortPlayers{ NSSortDescriptor *sortLastNameDescriptor = [[NSSortDescriptor alloc] initWithKey:@"lastName" ascending:YES]; NSArray *sortDescriptors = [NSArray arrayWithObjects:sortLastNameDescriptor, nil]; return [[(NSSet *)[team valueForKey:@"players"] allObjects] sortedArrayUsingDescriptors:sortDescriptors]; } In order to display the list of players on the team, go back to MasterViewController.m and add a method that will handle clicking on an additional accessory (blue cell element):
- (void)tableView:(UITableVIew *)tableView accessoryButtonTappedForRowWithIndexPath:(NSIndexPath *)indexPath{ NSManagedObject *team = [self.fetchedResultsController objectAtIndexPath:indexPath]; PlayerListViewController *playerListViewController = [[PlayerListViewController alloc] initWithMasterController:self team:team]; [self.navigationController pushViewController:playerListViewController animated:YES]; } Add import
PlayerListViewController.h to MasterViewController.m . Now build and run the application. In the list of teams, we see previously created teams, when clicking on the accessory button, a list of players of the selected team opens (while the lists of players are empty, because we have not implemented the addition of a new player).Adding, editing and deleting players
The application is almost ready; the only thing worth realizing is adding / editing / deleting players.
Create a new controller (
UIViewController ) with the corresponding XIB and call it PlayerViewController . It will be similar to TeamViewController , but will contain three fields: lastName , firstName and email . The controller also contains a link to MasterViewController in order to be able to use the previously written methods for working with Core Data. There will also be two more properties: the teams in which the player plays and the player himself. If the player's object is nil , then PlayerViewController knows that it is necessary to create a new player, otherwise - edit the player's data. On the screen we will have three buttons: save, cancel and delete. When requesting the removal of a player, we will request confirmation from the user in the form of a UIActionSheeta mapping, so it is imperative that PlayerViewController implement the UIActionSheetDelegate protocol UIActionSheetDelegate .PlayerViewController.h
#import <UIKit/UIKit.h> @class MasterViewController; @interface PlayerViewController : UIViewController <UIActionSheetDelegate> { IBOutlet UITextField *firstName; IBOutlet UITextField *lastName; IBOutlet UITextField *email; NSManagedObject *team; NSManagedObject *player; MasterViewController *masterViewController; } @property (nonatomic, retain) UITextField *firstName; @property (nonatomic, retain) UITextField *lastName; @property (nonatomic, retain) UITextField *email; @property (nonatomic, retain) NSManagedObject *team; @property (nonatomic, retain) NSManagedObject *player; @property (nonatomic, retain) MasterViewController *masterController; - (IBAction)save:(id)sender; - (IBAction)cancel:(id)sender; - (IBAction)confirmDelete:(id)sender; - (id)initWithMasterController:(MasterViewController *)aMasterController team:(NSManagedObject *)aTeam player:(NSManagedObject *)aPlayer; @end Now open
PlayerViewController.m, import MasterViewController.hand add @synthesizefor all properties from the interface. Add an initialization method to PlayerVIewController.mthat will receive an instance of the class MasterViewController, a team and possibly a player object. - (id)initWithMasterController:(MasterViewController *)aMasterController team:(NSManagedObject *)aTeam player:(NSManagedObject *)aPlayer{ if((self = [super init])){ self.masterController = aMasterController; self.team = team; self.player = player; } return self; } In the method,
viewDidLoadadd the code to fill in the text fields with the player's data, if it is not equal nil. - (void)viewDidLoad { [super viewDidLoad]; if(player != nil){ firstName.text = [player valueForKey:@"firstName"]; lastName.text = [player valueForKey:@"lastName"]; email.text = [player valueForKey:@"email"]; } } The next step is to implement button click handler methods:
- (IBAction)save:(id)sender{ if(masterController != nil){ if(player != nil){ [player setValue:firstName.text forKey:@"firstName"]; [player setValue:lastName.text forKey:@"lastName"]; [player setValue:email.text forKey:@"email"]; } else { [masterController insertPlayerWithTeam:team firstName:firstName.text lastName:lastName.text email:email.text]; } } [self dismissModelViewControllerAnimated:YES]; } - (IBAction)cancel:(id)sender{ [self dismissModalViewControllerAnimated:YES]; } There is no method
insertPlayerWithTeam:firstName:lastName:email:in the controller MasterViewControlleryet, but we will write it in just a couple of minutes. First, we implement the confirmDelete:method that is called when you click on the “Delete” button. This method will not immediately remove the player, but he will ask the user for confirmation to perform this action (this is done in order to avoid accidental clicks and deletions of the players). Here is what the method will look like confirmDelete:: - (IBAction)confirmDelete:(id)sender{ if(player != nil){ UIActionSheet *confirm = [[UIActionSheet alloc] initWithTitle:nil delegate:self cancelButtonTitle:@"Cancel" destructiveButtonTitle:@"Delete Player" otherButtonTitles:nil]; confirm.actionSheetStyle = UIActionSheetStyleBlackTranslucent; [confirm showInView:self.view]; } } The delegate who will handle actions committed in
UIActionSheetwill be the current class. When you click on the button, the UIActionSheetmethod will be called clickedButtonAtIndex:, which means you need to implement it. In the method there will be a check on which button was pressed and, if the button is Delete, then the method (which we will later implement) of the player’s removal will be called: - (void)actionSheet:(UIActionSheet *)actionSheet clickedButtonAtIndex:(NSInteger)buttonIndex{ if(buttonIndex == 0 && masterController != nil){ [masterController deletePlayer:player]; [self dismissModalViewControllerAnimated:YES]; } } We now return to
MasterViewController.hand declare two methods that we have not yet implemented, but have already used: - (void)insertPlayerWithTeam:(NSManagedObject *)team firstName:(NSString *)firstName lastName:(NSString *)lastName email:(NSString *)email; - (void)deletePlayer:(NSManagedObject *)player; Now we open
MasterViewController.mand implement the methods: - (void)insertPlayerWithTeam:(NSManagedObject *)team firstName:(NSString *)firstName lastName:(NSString *)lastName email:(NSString *)email{ NSManagedObjectContext *context = [self.fetchedResultsController managedObjectContext]; NSManagedObject *player = [NSEntityDescription insertNewObjectForEntityForName:@"Player" inManagedObjectContext:context]; [player setValue:firstName forKey:@"firstName"]; [player setValue:lastName forKey:@"lastName"]; [player setValue:email forKey:@"email"]; [player setValue:team forKey:@"team"]; [self saveContext]; } - (void)deletePlayer:(NSManagedObject *)player{ NSManagedObjectContext *context = [self.fetchedResultsController managedObjectContext]; [context deleteObject:player]; [self saveContext]; } The final step is to create a custom screen for adding / editing a player. Select it
PlayerViewController.xib, bring it to the look shown in the image below and connect all the Actions with the corresponding buttons.In order to display this screen it is necessary to return to the implementation of the method
showPlayerView:that we previously used. Import to PlayerListViewController.mfile PlayerViewController.h. - (void)showPlayerVIew{ PlayerVIewController *playerViewController = [[PlayerVIewController alloc] initWithMasterController:masterController team:team player:nil]; [self presentModalViewController:playerVIewController animated:YES]; } We also need to handle clicking on the cells in the player list table. We find in the
PlayerListViewController.mautomatically generated method didSelectRowAtIndexPath:and bring it to the following form: - (void)tableView:(UITableVIew *)tableVIew didSelectRowAtIndexPath:(NSIndexPath *)indexPath{ NSManagedObject *player = [[self sortPlayers] objectAtIndex:indexPath.row]; PlayerViewController *playerViewController = [[PlayerVIewController alloc] initWithMasterController:masterController team:team player:player]; [self presentModalVIewController:playerViewController animated:YES]; } On this, the implementation of the team and player management application is complete. Run the application. Add players, remove players, remove teams with players.
Validation of storage data
In the second chapter, we have already figured out how to work with
sqlite3to study the structure of the database that Core Data generates. At the end of the section on working with SQLite storages, we will search our database League_Manager.sqlite3and start sqlite3passing the name of our database as an input parameter. sqlite3 ./5.0/Applications/CE79C20B-4CBF-47C3–9E7C- 9EC24FA22488/Documents/League_Manager.sqlite Keep your League Manager application running so you can switch between
sqlite3them and them, and see what happens.Let's start by looking at what tables were created:
sqlite> .tables ZPLAYER ZTEAM Z_METADATA Z_PRIMARYKEY ZPLAYERstores entity data Player; ZTEAM- stores entity data Team.Create three teams: Crew (Blue), Fire (Red), Revolution (Green).
In a SQLite database, they will look something like this (depending on how many commands you have created and deleted):
sqlite> select * from ZTEAM; 1|2|3|Crew|Blue 2|2|1|Fire|Red 3|2|1|Revolution|Green As the quick check shows, there are no players in the League Manager application yet:
sqlite> select * from ZPLAYER; Open the list of players in the Crew team and add three new ones: Jordan Gordon, Pat Sprat, Bailey Staley. After adding players you will need to see them in the list.
Let's override the team in
sqlite3displaying all players in the application: sqlite> select * from ZPLAYER; 1|1|1|1|Jordan|Gordan|jgordon@example.com 2|1|1|1|Pat|Sprat|psprat@example.com 3|1|1|1|Bailey|Staley|bstaley@example.com Now add a new player to the Fire team and call it Terry Gary. We will display a list of all players of teams and the name of the team in which he plays:
sqlite> select ZTEAM.ZNAME, ZPLAYER.ZFIRSTNAME, ZPLAYER.ZLASTNAME from ZTEAM, ZPLAYER where ZTEAM.Z_PK = ZPLAYER.ZTEAM; Crew|Jordan|Gordon Crew|Pat|Sprat Crew|Bailey|Staley Fire|Terry|Gary Open the application, remove the Crew team's Pat Sprat player and re-request:
sqlite> select ZTEAM.ZNAME, ZPLAYER.ZFIRSTNAME, ZPLAYER.ZLASTNAME from ZTEAM, ZPLAYER where ZTEAM.Z_PK = ZPLAYER.ZTEAM; Crew|Jordan|Gordon Crew|Bailey|Staley Fire|Terry|Gary Finally, we’ll remove the Fire team, and it’s worth noting that not only the team itself, but also its only player Terry Gary has retired:
sqlite> select ZTEAM.ZNAME, ZPLAYER.ZFIRSTNAME, ZPLAYER.ZLASTNAME from ZTEAM, ZPLAYER where ZTEAM.Z_PK = ZPLAYER.ZTEAM; Crew|Jordan|Gordon Crew|Bailey|Staley Do not be afraid to look under the hood Core Data.
In most cases, your application will use a database as a SQLite data warehouse, so understanding how Core Data works with it can help you avoid difficulties and improve application performance.
In-memory persistent store usage
In the previous section, we built an application using Core Data and SQLite as a data warehouse. In this section we will discuss an alternative type of storage: storage in memory. Let's take a look at how you can change the type of data storage used.
It is easy to change the type of storage used; it’s enough only to
NSPersistentStoreCoordinatorspecify a different type when creating it NSSQLiteStoreType.Here is what the modified method will look like
persistentStoreCoordinator:in the League_ManagerAppDelegate.mfile: - (NSPersistentStoreCoordinator *)persistentStoreCoordinator { if(_persistentStoreCoordinator != nil) return _persistentStoreCoordinator; // NSURL *storeURL = [[self applicationDocumentsDirectory] URLByAppendingPathComponent:@"League_Manager.sqlite"]; NSError *error = nil; _persistentStoreCoordinator = [[NSPersistentStoreCoordinator alloc] initWithManagedObjectModel:[self managedObjectModel]]; if(![_persistentStoreCoordinator addPersistentStoreWithType:NSInMemoryStoreType configuration:nil URL:nil options:nil error:&error]){ NSLog(@"Unresolved error %@, %@", error, [error userInfo]); abort(); } return _persistentStoreCoordinator; } The data storage type has been changed to in-memory storage.
The first thing we will notice when the application is launched the next time is that all previously added data has disappeared. This happened because we changed the type of data storage and did not migrate data from the old to the new. In Chapter 8, we will look at how data can be migrated between two repositories.
The storage life cycle in memory begins when the Core Data stack is initialized and ends when the application is stopped.
Note
Starting with iOS 4 and the introduction of multitasking, switching to another application does not necessarily lead to the termination of your application. Instead of completing, our application continues to work in the background, and therefore the data in the memory continues to remain.
Reflecting on the different types of data storage, which are provided by default, it is difficult to think of a situation the first time in which it would be worth using in-memory storage, but there are such situations. For example, local caching of data received from a remote server. Imagine a situation where your application processes data from a remote server. If your application makes a lot of requests, it will be a good practice to speed up responses to these requests by choosing the most “responsive” type of storage. The remote server can transfer data in compressed form, on the mobile device will be unpacking and loading data into memory to speed up subsequent requests. In that case, you wantso that the data is updated each time (or updated with some frequency) and data loss when the application is shut down is not a problem.
When developing your next application using Core Data, consider using in-memory storage whenever your application does not need to store data between runs. In traditional applications in which it is necessary to store user data, this type of storage will not be popular.
Developing your own storage type
The basic principle of Core Data is abstraction from the type of real storage. This abstraction allows you to change the default internal storage type (NSSQLiteStoreType, NSInMemoryStoreType, NSBinaryStoreType) without needing to change more than one row. In some cases, the default data warehouse may not suit your needs. In this case, Core Data has a present for you - the ability to create an arbitrary type of data storage yourself. In this section, we will create a new type of storage and use it in our League Manager application.
Before we dive into the implementation, it is worth remembering that Core Data allows you to create only atomicstorage types. The atomic type of storage is the type in which the save operation saves all data on each of its entire calls. Unfortunately, this restriction does not allow you to create and use something more efficient than a SQLite database. In this section, we will develop the file type of the repository, the data in it will be stored using the comma separator (CSV), and to separate the values we will use the vertical bar (|).
Custom data stores should be inherited from the
NSAtomicStoreclass (subclass NSPersistentStore) that provides the capabilities (methods) necessary to work with the data. To better understand how this works, imagine the two inner layers inside the Core Data Framework, as shown in the image below:The user interacts with the layers
NSManagedObjectand NSManagedObjectContext. The second layer directly stores the data and contains the data stores and data warehouse coordinator. In the case of custom storage types, the data storage layer also contains NSAtomicStoreCacheNode, which stores objects containing the data itself. Attitude NSAtomicStoreCacheNodetowards NSAtomicStorethe same as NSManagedObjectk NSManagedObjectContext.Initialization of custom storage
New custom data storage is responsible for transferring data between storage on the device and NSAtomicStoreCacheNodes, as well as transferring data between NSManagedObjects and NSAtomicStoreCacheNodes.
The first step in creating a custom data warehouse is to create a class for a new storage type. The custom storage that will be developed in this section will be fully in the class
CustomStore. Add a new class to the League Manager that will inherit from the NSAtomicStore.CustomStore.h
#import <Foundation/Foundation.h> @interface CustomStore : NSAtomicStore { } @end CustomStore.m
#import "CustomStore.h" @implementation CustomStore #pragma mark - NSPersistentStore - (NSString *)type { return [[self metadata] objectForKey:NSStoreTypeKey]; } - (NSString *)identifier { return [[self metadata] objectForKey:NSStoreUUIDKey]; } - (id)initWithPersistentStoreCoordinator:(NSPersistentStoreCoordinator *)coordinator configurationName:(NSString *)configurationName URL:(NSURL *)url options:(NSDictionary *)options { self = [super initWithPersistentStoreCoordinator:coordinator configurationName:configurationName URL:url options:options]; return self; } + (NSDictionary *)metadataForPersistentStoreWithURL:(NSURL *)url error:(NSError **)error { return nil; } #pragma mark - NSAtomicStore - (BOOL)load:(NSError **)error { return YES; } - (id)newReferenceObjectForManagedObject:(NSManagedObject *)managedObject { return nil; } - (NSAtomicStoreCacheNode *)newCacheNodeForManagedObject:(NSManagedObject *)managedObject { return nil; } - (BOOL)save:(NSError **)error { return YES; } - (void)updateCacheNode:(NSAtomicStoreCacheNode *)node fromManagedObject:(NSManagedObject *)managedObject { } @end All vaults in Core Data have a certain set of metadata that allows you to
NSPersistentStoreCoordinator'manage different types of vaults. The NSPersistentStoremetadata is presented in the form of a dictionary NSDictionary. The values of the two keys are of particular interest: NSStoreTypeKeyand NSStoreUUIDKey. The value for the key NSStoreTypeKeymust be a unique string identifying the type of storage, and NSStoreUUIDKeythe storage itself.To create unique identifiers, add the following class method:
+ (NSString *)makeUUID { CFUUIDRef uuidRef = CFUUIDCreate(NULL); CFStringRef uuidStringRef = CFUUIDCreateString(NULL, uuidRef); CFRelease(uuidRef); NSString *uuid = [NSString stringWithString:(__bridge NSString *)uuidStringRef]; CFRelease(uuidStriingRef); return uuid; } In the example in this chapter, two files are necessary for the operation of a custom data store. The first file, which has the extension txt, contains the data itself; The second file that has the plist extension contains metadata. To solve the problem of loading and saving metadata, we will add another method and finish the implementation of the method
metadataForPersistentStoreWithURL:error:.The following method saves a file with metadata:
+ (void)writeMetadata:(NSDictionary *)metadata toURL:(NSURL *)url { NSString *path = [[url relativePath] stringByAppendingString:@".plist"]; [metadata writeToFile:path atomically:YES]; } Downloading metadata is a little more difficult, because in the case of the first download (access) to the repository, you need to create a file with metadata along with an empty data file (txt in our case). Core Data expects to receive from the metadata repository and type the UUID, which allow to determine the order, how to work with this type of storage, so you must set the values for the keys
NSStoreTypeKey, NSStoreUUIDKey. Find the method metadataForPersistentStoreWithURL:error:and change its body so that it checks for the presence of the metadata file and, if there is no such file, it was created (with the specified keys) along with an empty storage file (text file). + (NSDictionary *)metadataForPersistentStoreWithURL:(NSURL *)url error:(NSError **)error { // determine the filename for metadata file NSString *path = [[url relativePath] stringByAppendingString:@".plist"]; if(![[NSFileManager defaultManager] fileExistsAtPath:path]) { // create a dictionary and store the store type key (CustomStore) // and the UUID key NSMutableDictionary *metadata = [NSMutableDictionary dictionary]; [metadata setValue:@"CustomStore" forKey:NSStoreTypeKey]; [metadata setValue:[CustomStore makeUUID] forKey:NSStoreUUIDKey]; // write the metadata to the .plist file [CustomStore writeMetadata:metadata toURl:url]; // write an empty data file [@"" writeToURL:url atomically:YES encoding:[NSString defaultCStringEncoding] error:nil]; NSLog(@"Created new store at %@", path); } return [NSDictionary dictionaryWithContentsOfFile:path]; } With the metadata load / save methods available, we can complete the initialization method of the custom data store as follows:
- (id)initWithPersistentStoreCoordinator:(NSPersistentStoreCoordinator *)coordinator configurationName:(NSString *)configurationName URL:(NSURL *)url options:(NSDictionary *)options { self = [super initWithPersistentStoreCoordinator:coordinator configurationName:configurationName URL:url options:options]; NSDictionary *metadata = [CustomStore metadataForPersistentStoreWithURL:[self URL] error:nil]; [self setMetadata:metadata]; return self; } Relationship between NSManagedObject and NSAtomicStoreCacheNode
In order for our custom data warehouse to work as it should, we need to implement three additional methods. The first method creates a new referring object for the passed one
NSManagedObject'. The referencing objects are unique identifiers for each NSAtomicStoreCacheNode'(like the primary key, the relationship is the same as NSObjectIDfor NSManagedObject). Since a custom repository is responsible for translating between NSManagedObject'to NSAtomicStoreCacheNode, it must be able to create a referring object for those just created NSManagedObject'. To do this, we use the UUID again: - (id)newReferenceObjectForManagedObject:(NSManagedObject *)managedObject { NSString *uuid = [CustomStore makeUUID]; return uuid; } The second method, which is useful to us, creates an instance of the
NSAtomicStoreCacheNodeclass for the corresponding NSManagedObjectobject. When a new one NSManagedObjectis created and the framework needs to save it, the method is called newReferenceObjectForManagedObject:. NSAtomicCachekeeps track of relationships between NSObjectIDand referencing objects. When Core Data saves NSManagedObjects to local storage, a method is invoked newCacheNodeForManagedObject:that, as can be seen from its name, creates a new instance NSAtomicStoreCacheNodethat serves as an analogue of NSManagedObject. - (NSAtomicStoreCacheNode *)newCacheNodeForManagedObject:(NSManagedObject *)managedObject { NSManagedObjectID *oid = [managedObject objectID]; id referenceID = [self referenceObjectForObjectID:oid]; NSAtomicStoreCacheNode* node = [self nodeForReferenceObject:referenceID andObjectID:oid]; [self updateCacheNode:node fromManagedObject:managedObject]; return node; } The implementation
newCacheNodeForManagedObject:searches for a referencing object that was created for the corresponding NSManagedObject object and creates a new NSAtomicStoreCacheNode with copying all the fields from the NSManagedObject instance.Source: https://habr.com/ru/post/192960/
All Articles