Simplify the life of the administrator, associate the user name and computer name in automatic mode in the AD directory
Good afternoon, Habr!
Probably, all system administrators had a problem determining the user's computer name. That is, we know the name of the employee, but what is his computer, without a clue. And, often, trying to force a user to determine the name of a computer causes torture. They instead call the username, mail, phone number, anything, but not the computer name. And an attempt to explain to the user where the information on the system is located causes an employee’s batthert and fierce hatred. You could, of course, write some utility that allows you to display the computer name on the desktop or anywhere else in a visible place, but for this you need to explain each time where this information is located. Slightly simplifies the task, but does not solve it completely. Moreover, I am inclined to think that the user and everything should not know the name of the computer on which he is sitting. As a result, it was decided to make the definition of the computer name modern, convenient, correct and, most importantly, automatic.
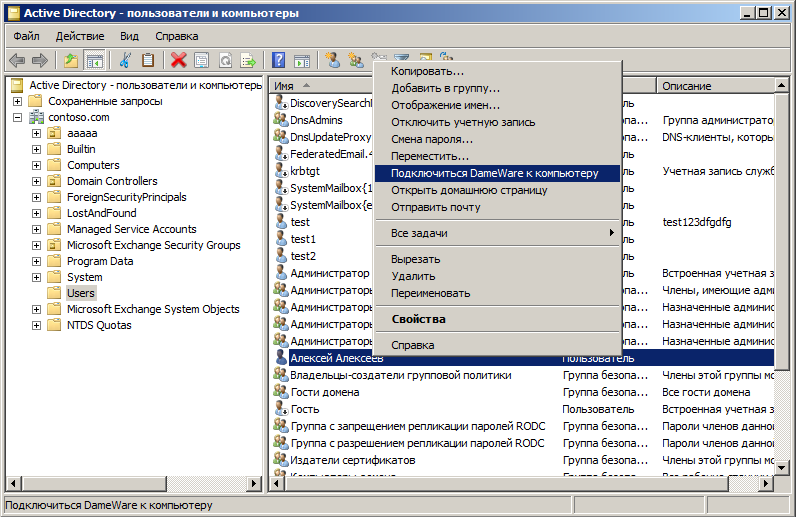
Something like this might look like connecting to a computer. With that, the snap-in does not even have to be opened with an administrative account. For those who are interested in how it all works and how to do it in your infrastructure, welcome to Cat.
To do this, you need to understand what AD is, understand at least roughly the structure of objects in AD, understand the work of scripts, and also love cats.
The script launched from under the user determines the name of the computer on which he runs, and on his own behalf of the current user writes the value of the attribute in itself in the AD directory. Then the administrator is free to decide what to do with this attribute value. In this article I will give an example of PowerShell scripts and an example of adding a context menu item to the Active Directory Users and Computers snap-in (hereinafter referred to as ADUC).
Many did not go far and were not wise using publicly available for recording, for example, the user’s “Web Page” option is available for writing by default. However, I did not like this idea, I wanted to create a specialized attribute for a user who would not have a dual purpose and did not require a compromise. And then who knows how the situation will develop in the future and will require the use of this attribute, and he is already busy ...
So, in order to create a new attribute in the schema, you must first add a snap. On a computer with the remote administration package installed, or on a domain controller, you need to run regsvr32 schmmgmt.dll as a local administrator. It is difficult to say why this snap-in is not registered by default, apparently so that, because of ignorance, they did not screw it up. Nevertheless, we can add it by registering a DLL. After that, open the Active Directory Schema snap-in and go to the Attributes section. Create a new attribute. Here, of course, I have to warn that attributes are not a place for experiments and they are created once and for all, it is impossible to delete an attribute or rename. This warning is in all places where an attribute is added, but still :) To add a new attribute, you also need the rights of the Schema Administrator . If your administrative user has Enterprise Administrator rights, then this is more than enough.
To add a new attribute, you will need to enter the OID. This is a unique object identifier. You can read about it in Google, I will not go deep, but I will say that it must be unique. The intersection of OID is unacceptable and if it is driven in by anyone, then there is a possibility that there will be unsolvable problems in the future. OID usually starts from 1.2.840.113556 and then tsiferki. I especially did not bother, because the third number (840) is the country code, and the fourth is the company code (Microsoft), I entered the non-existing country code 800 and generated 2 random numbers through a dot. A list of countries can be found here . In fact, for good, in this case it is necessary to contact ITU-T and request a unique OID, but the answer never came to me and I did not get into the bottle and created it on the basis of random numbers. Then I found a script that generates a relatively unique identifier, but it was too late :))
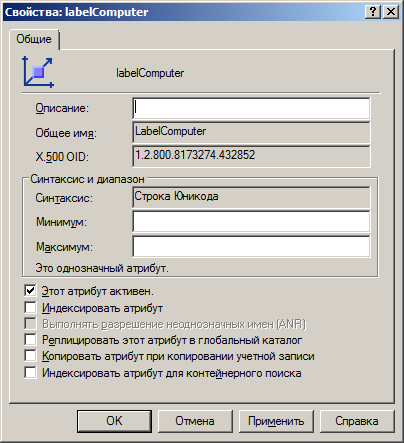
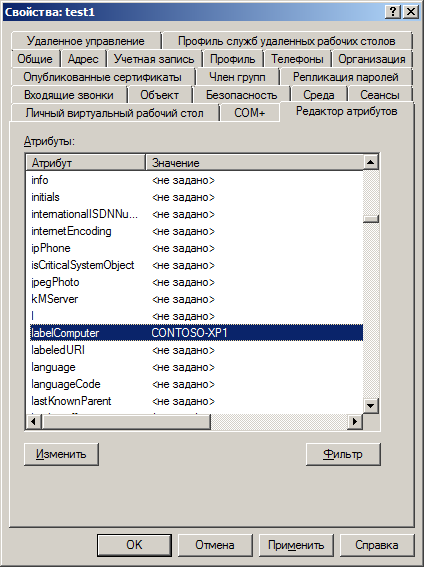
In general, with OID decided. Next we need to specify the syntax attribute. In my configuration, this is a Unicode String . Also, of course, you need an attribute name. In this example, I will use the name LabelComputer , in the working configuration it is better to come up with something better.
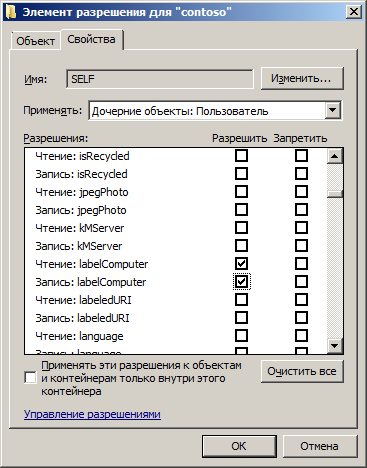
After we have created an attribute, we need to add it to the class. Select the user class and add our new attribute in the Attributes mortgage. Now the user with the necessary rights will have the right to write this attribute in the user. By default, these rights are owned by an Account operator or higher. But we are interested in the situation when the user himself could edit this attribute. For such purposes, there is a user named SELF , who personifies himself. We need to give permissions for all users to the SELF user to write the LabelComputer attribute. Since inheritance has not been canceled yet, we go to as high as necessary and change the rights. I propose to change the rights to the entire domain, for us it will be dc = contoso, dc = com , we enter the security settings of the domain object in the ADUC snap- in . Enter the permission tab and click the Advanced button. Add permissions for the SELF user and allow him to read and write the LabelComputer attribute. The attribute in the list, by the way, does not appear immediately after its creation. It takes some time from the creation of the attribute to the moment we can see it in the list of assignment of rights and in the properties of the attributes of the user.
')
As a result, we created an attribute, rights assigned. Go to the working stage, you need to add the computer name to the attribute value.
VBscript is used for this. As practice shows, Microsoft is not trying to make PowerShell a replacement for VBS. It's a pity. For such tasks, VBS is faster and more versatile.
Script that writes data to the current user:
The script is simple and primitive. The script and the model, however, can be expanded, save not only the computer, but, for example, time for relevance, but in this example I will not touch this.
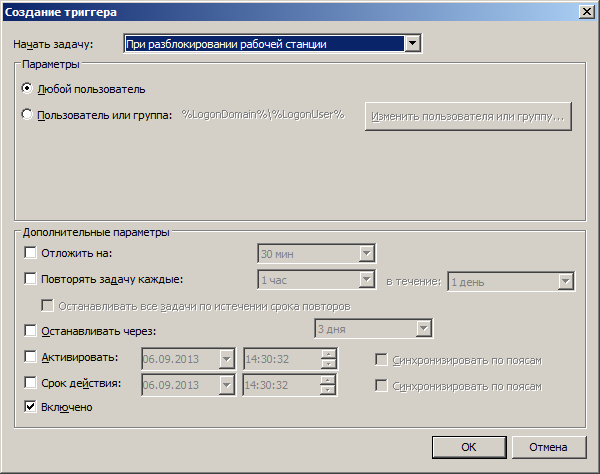
The script using group policy is assigned to run during Logon. But not only. It is possible that a person is logged on two computers, I want the information to be relevant anyway, even in this case. To do this, we add the execution of the script to the scheduler with the trigger on the computer unlock event.
In this case, even if the login was executed on several computers, the last one that was unlocked will be recorded as actual. There is only one disappointment. This method works exclusively on Vista + computers. That is, in XP it is impossible to put such a trigger in the scheduler. And unfortunately, VBS also does not allow to determine whether the computer is locked or not. Otherwise, it would be possible to run the script once every 15 minutes, checking whether the computer is locked or not. In VBS, you can only determine by subjective signs, for example, by entries in the Security Security Event Log, but then, at a minimum, you will need to give a regular user rights to view this log. This is inconvenient, poorly applicable, and in general XP is getting smaller, this group of computers can be ignored, the Logon script will be enough for them.
Since we want to mark not every input, but only the one that is local, we need to exclude the launch of the Logon script on terminal and other servers that are not related to local computers. I achieved this by turning on the closure of group policy in the merge mode and applying the group policy object to the area of personal computers, servers in which there is no. The method, I agree, is bad enough and wasting resources, it is better to use the closure of group policy only when it is definitely necessary, and not for all computers. But perhaps this will be the next stage of improvement. Nevertheless, in this way we clearly limit on which computers the group policies we need are executed with a Logon script and scheduler settings.
The main task is completed. We are starting to see that information about the current computer is starting to appear in users.
Now we need to do something with this data. For example, make a convenient sign with which users are sitting on which computers. Or see which users do not have the value in the attribute, despite the recent login to the system, to see if the group policies are executed in the system, for example, or the user for some reason lacks the rights to write the attribute value to his user. This happens if the user has disabled rights inheritance, for example.
I wrote 3 PowerShell scripts to help the work.
This script makes a beautiful table in which only users will be displayed, the display name, login and last login date. Here we can look at suspicious users and then try to understand why, despite the recent log-in, the computer name is still missing.
This script is similar to the previous one, but shows a list of tagged users. Allows you to estimate the relative number of tagged users.
Well and, directly, search. Like search occurs on all the main parameters of the user. Returns the table found.
For all scripts, the output can be done not in the Format-Table, but in Export-CSV and create a CSV file right away and analyze it already in some spreadsheet editor.
{{picture from Leonardo Di Caprio from the movie Start}}
Scripts are beautiful, but I want more automation. And I wanted to, when clicked on the context menu, an automatic connection to the computer by a program for remote control of DameWare occurred . Of course, you can run any convenient program, you can thus remotely restart, for example, the machine, if necessary. Nevertheless, consider the example of DameWare .
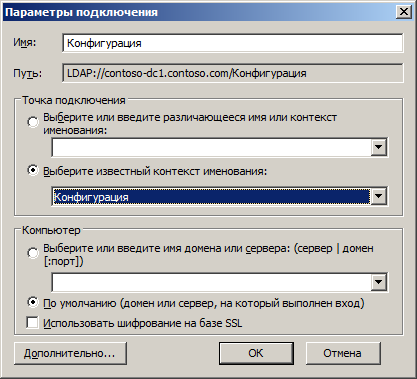
The context menu settings of the ADUC snap- in are not locally, as it may first appear, but, again, in the AD directory. In order to add a new item, you must use the AD configuration editor, ADSI Edit utility. You must connect to an AD configuration.
The required attribute to change is in the object.
CN = user-Display, CN = 419, CN = DisplaySpecifiers, CN = Configuration, DC = contoso, DC = com . Moreover, CN = 419 is, as it is not difficult to guess, a language. If you need to change the parameter for ADUC English-language equipment, then CN = 419 must be changed to CN = 409 .
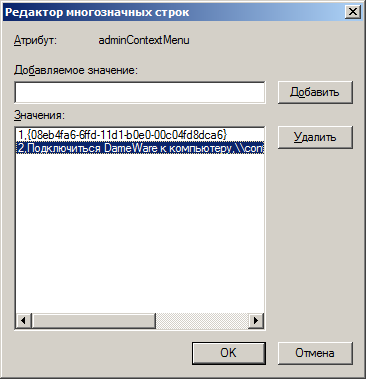
Add an item to the adminContextMenu . The first is, as far as I understand, the sorting number, the second is the name itself and the third is, in fact, the address of the object to be executed. Parameters are separated by commas. After restarting ADUC for user objects, the newly created item will appear in the context menu. The script will run under the rights of the user on whose behalf the snap-in was launched. In total, when the program is started from the context menu of the ADUC, 2 values are passed to the script or program in the parameters, these are the object DN and the object type. We are interested only in the first parameter, by which we find the user name in the script.
This script runs the Damware program with the credentials of contoso \ LocalAdmin. This user was previously added to the list of local administrators on users' computers. In fact, the parameters -u :, -p: and -d: can be excluded and then DameWare will run on behalf of the current user. If you have local administrator rights on the user's computers, then it will be easier.
In the future, I would like to develop this so that to transfer the telephony of the technical support department to software SIP phones and adapt the whole scheme of work for the program so that when an incoming call all the necessary selections are made and the employee immediately appears on the screen all the information about the caller. And happiness will come!
Despite the fact that no unique knowledge is described here, I hope that, at a minimum, examples of scripts will help novice administrators in understanding this area :) All this can be continued to improve, add new attributes, add a label not only to the user, but also to the computer to add the Timestamp , save the latest computers, etc. Each company may have its own needs.
Probably, all system administrators had a problem determining the user's computer name. That is, we know the name of the employee, but what is his computer, without a clue. And, often, trying to force a user to determine the name of a computer causes torture. They instead call the username, mail, phone number, anything, but not the computer name. And an attempt to explain to the user where the information on the system is located causes an employee’s batthert and fierce hatred. You could, of course, write some utility that allows you to display the computer name on the desktop or anywhere else in a visible place, but for this you need to explain each time where this information is located. Slightly simplifies the task, but does not solve it completely. Moreover, I am inclined to think that the user and everything should not know the name of the computer on which he is sitting. As a result, it was decided to make the definition of the computer name modern, convenient, correct and, most importantly, automatic.
Something like this might look like connecting to a computer. With that, the snap-in does not even have to be opened with an administrative account. For those who are interested in how it all works and how to do it in your infrastructure, welcome to Cat.
To do this, you need to understand what AD is, understand at least roughly the structure of objects in AD, understand the work of scripts, and also love cats.
General principle
The script launched from under the user determines the name of the computer on which he runs, and on his own behalf of the current user writes the value of the attribute in itself in the AD directory. Then the administrator is free to decide what to do with this attribute value. In this article I will give an example of PowerShell scripts and an example of adding a context menu item to the Active Directory Users and Computers snap-in (hereinafter referred to as ADUC).
Create an attribute
Many did not go far and were not wise using publicly available for recording, for example, the user’s “Web Page” option is available for writing by default. However, I did not like this idea, I wanted to create a specialized attribute for a user who would not have a dual purpose and did not require a compromise. And then who knows how the situation will develop in the future and will require the use of this attribute, and he is already busy ...
So, in order to create a new attribute in the schema, you must first add a snap. On a computer with the remote administration package installed, or on a domain controller, you need to run regsvr32 schmmgmt.dll as a local administrator. It is difficult to say why this snap-in is not registered by default, apparently so that, because of ignorance, they did not screw it up. Nevertheless, we can add it by registering a DLL. After that, open the Active Directory Schema snap-in and go to the Attributes section. Create a new attribute. Here, of course, I have to warn that attributes are not a place for experiments and they are created once and for all, it is impossible to delete an attribute or rename. This warning is in all places where an attribute is added, but still :) To add a new attribute, you also need the rights of the Schema Administrator . If your administrative user has Enterprise Administrator rights, then this is more than enough.
To add a new attribute, you will need to enter the OID. This is a unique object identifier. You can read about it in Google, I will not go deep, but I will say that it must be unique. The intersection of OID is unacceptable and if it is driven in by anyone, then there is a possibility that there will be unsolvable problems in the future. OID usually starts from 1.2.840.113556 and then tsiferki. I especially did not bother, because the third number (840) is the country code, and the fourth is the company code (Microsoft), I entered the non-existing country code 800 and generated 2 random numbers through a dot. A list of countries can be found here . In fact, for good, in this case it is necessary to contact ITU-T and request a unique OID, but the answer never came to me and I did not get into the bottle and created it on the basis of random numbers. Then I found a script that generates a relatively unique identifier, but it was too late :))
In general, with OID decided. Next we need to specify the syntax attribute. In my configuration, this is a Unicode String . Also, of course, you need an attribute name. In this example, I will use the name LabelComputer , in the working configuration it is better to come up with something better.
After we have created an attribute, we need to add it to the class. Select the user class and add our new attribute in the Attributes mortgage. Now the user with the necessary rights will have the right to write this attribute in the user. By default, these rights are owned by an Account operator or higher. But we are interested in the situation when the user himself could edit this attribute. For such purposes, there is a user named SELF , who personifies himself. We need to give permissions for all users to the SELF user to write the LabelComputer attribute. Since inheritance has not been canceled yet, we go to as high as necessary and change the rights. I propose to change the rights to the entire domain, for us it will be dc = contoso, dc = com , we enter the security settings of the domain object in the ADUC snap- in . Enter the permission tab and click the Advanced button. Add permissions for the SELF user and allow him to read and write the LabelComputer attribute. The attribute in the list, by the way, does not appear immediately after its creation. It takes some time from the creation of the attribute to the moment we can see it in the list of assignment of rights and in the properties of the attributes of the user.
')
Marking
As a result, we created an attribute, rights assigned. Go to the working stage, you need to add the computer name to the attribute value.
VBscript is used for this. As practice shows, Microsoft is not trying to make PowerShell a replacement for VBS. It's a pity. For such tasks, VBS is faster and more versatile.
Script that writes data to the current user:
On Error Resume Next Set objSysInfo = CreateObject("ADSystemInfo") Set objNetwork = CreateObject("WScript.Network") Set objUser = GetObject("LDAP://" & objSysInfo.UserName) objUser.Put "LabelComputer", objNetwork.ComputerName objUser.SetInfo The script is simple and primitive. The script and the model, however, can be expanded, save not only the computer, but, for example, time for relevance, but in this example I will not touch this.
The script using group policy is assigned to run during Logon. But not only. It is possible that a person is logged on two computers, I want the information to be relevant anyway, even in this case. To do this, we add the execution of the script to the scheduler with the trigger on the computer unlock event.
In this case, even if the login was executed on several computers, the last one that was unlocked will be recorded as actual. There is only one disappointment. This method works exclusively on Vista + computers. That is, in XP it is impossible to put such a trigger in the scheduler. And unfortunately, VBS also does not allow to determine whether the computer is locked or not. Otherwise, it would be possible to run the script once every 15 minutes, checking whether the computer is locked or not. In VBS, you can only determine by subjective signs, for example, by entries in the Security Security Event Log, but then, at a minimum, you will need to give a regular user rights to view this log. This is inconvenient, poorly applicable, and in general XP is getting smaller, this group of computers can be ignored, the Logon script will be enough for them.
Since we want to mark not every input, but only the one that is local, we need to exclude the launch of the Logon script on terminal and other servers that are not related to local computers. I achieved this by turning on the closure of group policy in the merge mode and applying the group policy object to the area of personal computers, servers in which there is no. The method, I agree, is bad enough and wasting resources, it is better to use the closure of group policy only when it is definitely necessary, and not for all computers. But perhaps this will be the next stage of improvement. Nevertheless, in this way we clearly limit on which computers the group policies we need are executed with a Logon script and scheduler settings.
Sample PowerShell script for data collection
The main task is completed. We are starting to see that information about the current computer is starting to appear in users.
Now we need to do something with this data. For example, make a convenient sign with which users are sitting on which computers. Or see which users do not have the value in the attribute, despite the recent login to the system, to see if the group policies are executed in the system, for example, or the user for some reason lacks the rights to write the attribute value to his user. This happens if the user has disabled rights inheritance, for example.
I wrote 3 PowerShell scripts to help the work.
Search users without values
Import-Module ActiveDirectory Get-ADObject -filter {(sAMAccountType -eq "805306368") -and (LabelComputer -notlike "*")} -Properties DisplayName,GivenName,SN,LabelComputer,cn,sAMAccountName,lastLogonTimestamp, OperatingSystem -SearchBase "OU= ,DC=contoso,dc=com" | Select-Object @{Expression={$_.DisplayName};Label=" "},@{Expression={$_.sAMAccountName};Label=""}, @{label=" ";expression={[datetime]::FromFileTime($_.lastLogonTimestamp)}} | Sort-Object " "| Format-Table -Autosize Read-Host " . ..." This script makes a beautiful table in which only users will be displayed, the display name, login and last login date. Here we can look at suspicious users and then try to understand why, despite the recent log-in, the computer name is still missing.
All computers are tagged
Import-Module ActiveDirectory Get-ADObject -filter {(sAMAccountType -eq "805306368") -and (LabelComputer -like "*")} -Properties DisplayName,GivenName,SN,LabelComputer,cn,sAMAccountName,lastLogon -SearchBase "OU= ,DC=contoso,dc=com" | Select-Object @{Expression={$_.DisplayName};Label=" "},@{Expression={$_.sAMAccountName};Label=""}, @{Expression={$_."LabelComputer"};Label=" "},@{label=" ";expression={[datetime]::FromFileTime($_.lastLogon)}} | Sort-Object " " | Format-Table -Autosize Read-Host " . ..." This script is similar to the previous one, but shows a list of tagged users. Allows you to estimate the relative number of tagged users.
Search computer name by user
Import-Module ActiveDirectory $exit = 0 do { Write-Host " : , , , , . ." $us = Read-Host -Prompt " " $find = "" $find += '*' + $us + '*' write-host = $find Get-ADObject -filter {(sAMAccountType -eq "805306368") -and ((GivenName -like $find ) -or (sn -like $find ) -or (cn -like $find ) -or (DisplayName -like $find ) -or (LabelComputer -like $find ) -or (sAMAccountName -like $find ))} -Properties DisplayName,GivenName,SN,LabelComputer,cn,sAMAccountName | Select-Object @{Expression={$_.DisplayName};Label=" "},@{Expression={$_.sAMAccountName};Label=""},@{Expression={$_."LabelComputer"};Label=" "} | Format-Table -Autosize } While ($us -ne "") Well and, directly, search. Like search occurs on all the main parameters of the user. Returns the table found.
For all scripts, the output can be done not in the Format-Table, but in Export-CSV and create a CSV file right away and analyze it already in some spreadsheet editor.
{{picture from Leonardo Di Caprio from the movie Start}}
Add item to snap
Scripts are beautiful, but I want more automation. And I wanted to, when clicked on the context menu, an automatic connection to the computer by a program for remote control of DameWare occurred . Of course, you can run any convenient program, you can thus remotely restart, for example, the machine, if necessary. Nevertheless, consider the example of DameWare .
The context menu settings of the ADUC snap- in are not locally, as it may first appear, but, again, in the AD directory. In order to add a new item, you must use the AD configuration editor, ADSI Edit utility. You must connect to an AD configuration.
The required attribute to change is in the object.
CN = user-Display, CN = 419, CN = DisplaySpecifiers, CN = Configuration, DC = contoso, DC = com . Moreover, CN = 419 is, as it is not difficult to guess, a language. If you need to change the parameter for ADUC English-language equipment, then CN = 419 must be changed to CN = 409 .
Add an item to the adminContextMenu . The first is, as far as I understand, the sorting number, the second is the name itself and the third is, in fact, the address of the object to be executed. Parameters are separated by commas. After restarting ADUC for user objects, the newly created item will appear in the context menu. The script will run under the rights of the user on whose behalf the snap-in was launched. In total, when the program is started from the context menu of the ADUC, 2 values are passed to the script or program in the parameters, these are the object DN and the object type. We are interested only in the first parameter, by which we find the user name in the script.
On Error Resume Next Set WshShell = CreateObject("WScript.Shell") set fs=createobject("Scripting.FileSystemObject") Dim CompName Dim RunCMD Dim FilePath Set objAD = GetObject(Wscript.arguments.Item(0)) CompName = objAD.Get ("LabelComputer") If CompName = "" Then WScript.Echo " " If CompName = "" Then WScript.quit If MsgBox (" " & CompName & "?",vbOKCancel+vbQuestion,"?") = vbCancel Then WScript.quit If fs.FileExists ("C:\Program Files\DameWare\DameWare Mini Remote Control 7.5\DWRCC.exe") Then FilePath = """C:\Program Files\DameWare\DameWare Mini Remote Control 7.5\DWRCC.exe""" RunCMD = FilePath &" -c: -h: -x: -m:" & CompName & " -u:LocalAdmin -p:1072206713 -d:contoso" RetCode = WshShell.Run (RunCMD,5) This script runs the Damware program with the credentials of contoso \ LocalAdmin. This user was previously added to the list of local administrators on users' computers. In fact, the parameters -u :, -p: and -d: can be excluded and then DameWare will run on behalf of the current user. If you have local administrator rights on the user's computers, then it will be easier.
In the future, I would like to develop this so that to transfer the telephony of the technical support department to software SIP phones and adapt the whole scheme of work for the program so that when an incoming call all the necessary selections are made and the employee immediately appears on the screen all the information about the caller. And happiness will come!
Despite the fact that no unique knowledge is described here, I hope that, at a minimum, examples of scripts will help novice administrators in understanding this area :) All this can be continued to improve, add new attributes, add a label not only to the user, but also to the computer to add the Timestamp , save the latest computers, etc. Each company may have its own needs.
Source: https://habr.com/ru/post/192818/
All Articles