Step 4. Configuring video card and mouse support
Once we have enabled and configured localization - it's time to take on the device.
There are two ways to install video card drivers:
1. Find drivers in Synaptic, install and register in the necessary configuration files.
2. Download Envy and give it all set up.
I tend to the second point. Why? I somehow tried to customize myself. He suffered for a long time, wherever he knew, he ordered, but the effects were not included. With Envy, everything worked perfectly: apparently, the author of this package very well studied this aspect.
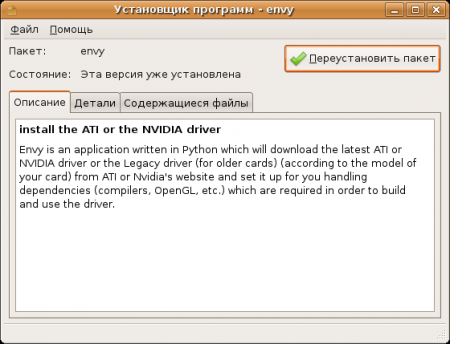
Let's start the installation. Download Envy. Envy comes in a deb package. It can be installed in two ways:
a) Open the folder with the package, double-click and click the “Install Package” button.
')
b) Open the console, go to the folder where we saved Envy and execute dpkg -i (package name).
sudo -s
cd '/ home / me / downloads /'
dpkg -i envy_0.9.10-0ubuntu1_all.deb
Please pay attention to the second method. Packages have dependencies. That is, some packages may depend on others and cannot be installed without them. When installing a package, the package manager searches the repositories for packages that this package depends on. There are situations when we download a set of packages that are dependent on each other, and there are cross-dependencies (A uses B, B uses A) or cyclic dependencies (A uses B, B uses B, B uses A), then double-clicking we do not install. Use the dpkg command.
Examples of using:
dpkg -i A.deb B.deb C.deb
In this case, we specifically specify the necessary packages for installation.
dpkg -i * .deb
Here we install all the packages.
Another thing to note is that before many code examples for the terminal I am writing the command “sudo -s”, which forces you to enter a password. This command gives this terminal session administrator rights that are required when installing packages, editing important files, etc. In fact, it changes the user to the administrator, so note that many programs running from this console will assume that you are the root user and will use its settings.
Run Envy:
sudo envy -g
Choose our video card and start the installation.
Installation takes place automatically.
Installation is complete, we restart the computer.
Before upgrading to the next version of Ubuntu (from 7.10 to 8.04), you should run the command sudo envy --uninstall-all , upgrade the system, reboot and start the installation of the drivers again using the envy ( sudo envy -g ).
Probably many of us have a 5-button mouse. We'll talk about the 7-button later when we know more, although this instruction is compatible with them. By default, only 5 mouse functions are used: pressing the left mouse button, pressing the right mouse button, pressing the third (middle) mouse button, turning the wheel forward, turning the wheel back. Therefore, we cannot use forward and backward functions. Correct the situation.
Open the file /etc/X11/xorg.conf with administrator rights (this means that you need to run sudo gedit /etc/X11/xorg.conf ). Enter at the end of the file:
# Add
Section "InputDevice"
Identifier "5 button mouse"
Driver "mouse"
Option "CorePointer"
Option "Device" "/ dev / input / mice"
Option "Protocol" "ExplorerPS / 2"
Option "Buttons" "7"
Option "ZAxisMapping" "6 7"
Option "Resolution" "100"
Endsection
Find the string
InputDevice "Configured Mouse"
Commenting on it (in this case it means that you need to add the symbol # at the beginning of the line) and add the following line after it:
Inputdevice "5 button mouse"
At the same time enable compiz support. Comment out the line
Composite "0"
And after it we add
Composite "1"
Remember that we have edited the /etc/X11/xorg.conf file. If Ubuntu stops changing after the changes, then we can, in GRUB (the operating system loader, boot before Ubuntu), have time to press ESC and go into recovery mode, where we can reopen the /etc/X11/xorg.conf file for editing (for example, nano /etc/X11/xorg.conf ) and restore it to its original state, because we did not delete anything, but only added the settings. Keep this in mind in the future. Remember all the settings files that you modify and edit them so that you can restore them to their original state, or make copies before editing.
Install the imwheel package (support package for non-standard mouse buttons):
sudo apt-get install imwheel
Open the / etc / X11 / imwheelrc file with administrator rights and write there:
". *"
None, Up, Alt_L | Left
None, Down, Alt_L | Right
Open the file /etc/X11/Xsession.d/57xmodmap as an administrator and write there:
#! / bin / sh
xmodmap -e "pointer = 1 2 3 6 7 4 5"
We execute sudo chmod + x /etc/X11/Xsession.d/57xmodmap (this is how we gave the script the right to be executed; we will talk about rights later).
Done! We can reboot.
If you have any additions, I’ll happily improve the article.
Manual: Step Back , Step Forward , Content
Installing video card drivers
There are two ways to install video card drivers:
1. Find drivers in Synaptic, install and register in the necessary configuration files.
2. Download Envy and give it all set up.
I tend to the second point. Why? I somehow tried to customize myself. He suffered for a long time, wherever he knew, he ordered, but the effects were not included. With Envy, everything worked perfectly: apparently, the author of this package very well studied this aspect.
Let's start the installation. Download Envy. Envy comes in a deb package. It can be installed in two ways:
a) Open the folder with the package, double-click and click the “Install Package” button.
')
b) Open the console, go to the folder where we saved Envy and execute dpkg -i (package name).
sudo -s
cd '/ home / me / downloads /'
dpkg -i envy_0.9.10-0ubuntu1_all.deb
Please pay attention to the second method. Packages have dependencies. That is, some packages may depend on others and cannot be installed without them. When installing a package, the package manager searches the repositories for packages that this package depends on. There are situations when we download a set of packages that are dependent on each other, and there are cross-dependencies (A uses B, B uses A) or cyclic dependencies (A uses B, B uses B, B uses A), then double-clicking we do not install. Use the dpkg command.
Examples of using:
dpkg -i A.deb B.deb C.deb
In this case, we specifically specify the necessary packages for installation.
dpkg -i * .deb
Here we install all the packages.
Another thing to note is that before many code examples for the terminal I am writing the command “sudo -s”, which forces you to enter a password. This command gives this terminal session administrator rights that are required when installing packages, editing important files, etc. In fact, it changes the user to the administrator, so note that many programs running from this console will assume that you are the root user and will use its settings.
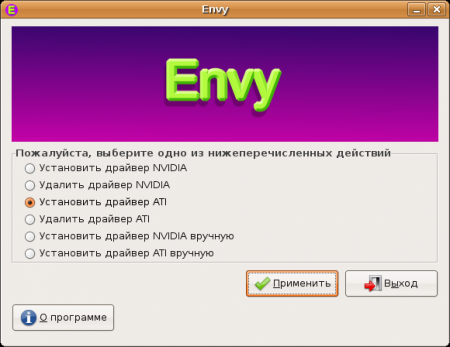
Run Envy:
sudo envy -g
Choose our video card and start the installation.
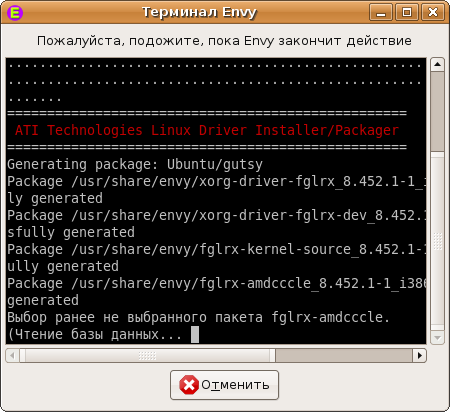
Installation takes place automatically.
Installation is complete, we restart the computer.
Before upgrading to the next version of Ubuntu (from 7.10 to 8.04), you should run the command sudo envy --uninstall-all , upgrade the system, reboot and start the installation of the drivers again using the envy ( sudo envy -g ).
Mouse setting
Probably many of us have a 5-button mouse. We'll talk about the 7-button later when we know more, although this instruction is compatible with them. By default, only 5 mouse functions are used: pressing the left mouse button, pressing the right mouse button, pressing the third (middle) mouse button, turning the wheel forward, turning the wheel back. Therefore, we cannot use forward and backward functions. Correct the situation.
Open the file /etc/X11/xorg.conf with administrator rights (this means that you need to run sudo gedit /etc/X11/xorg.conf ). Enter at the end of the file:
# Add
Section "InputDevice"
Identifier "5 button mouse"
Driver "mouse"
Option "CorePointer"
Option "Device" "/ dev / input / mice"
Option "Protocol" "ExplorerPS / 2"
Option "Buttons" "7"
Option "ZAxisMapping" "6 7"
Option "Resolution" "100"
Endsection
Find the string
InputDevice "Configured Mouse"
Commenting on it (in this case it means that you need to add the symbol # at the beginning of the line) and add the following line after it:
Inputdevice "5 button mouse"
At the same time enable compiz support. Comment out the line
Composite "0"
And after it we add
Composite "1"
Remember that we have edited the /etc/X11/xorg.conf file. If Ubuntu stops changing after the changes, then we can, in GRUB (the operating system loader, boot before Ubuntu), have time to press ESC and go into recovery mode, where we can reopen the /etc/X11/xorg.conf file for editing (for example, nano /etc/X11/xorg.conf ) and restore it to its original state, because we did not delete anything, but only added the settings. Keep this in mind in the future. Remember all the settings files that you modify and edit them so that you can restore them to their original state, or make copies before editing.
Install the imwheel package (support package for non-standard mouse buttons):
sudo apt-get install imwheel
Open the / etc / X11 / imwheelrc file with administrator rights and write there:
". *"
None, Up, Alt_L | Left
None, Down, Alt_L | Right
Open the file /etc/X11/Xsession.d/57xmodmap as an administrator and write there:
#! / bin / sh
xmodmap -e "pointer = 1 2 3 6 7 4 5"
We execute sudo chmod + x /etc/X11/Xsession.d/57xmodmap (this is how we gave the script the right to be executed; we will talk about rights later).
Done! We can reboot.
If you have any additions, I’ll happily improve the article.
Manual: Step Back , Step Forward , Content
Source: https://habr.com/ru/post/19258/
All Articles