GWT-Platform basics of working with presenters
Good day to all!
I am a beginner Java programmer, and it just so happens that I begin my career with developing a serious application on GWT. On Habré there are quite a few articles on the topic of GWT, but for some reason there is absolutely no information about the wonderful GWT-Platform framework. You can get acquainted with this framework in detail here , and I will tell you briefly about the basics of work using the example of a simple application.
Our application will contain a navigation bar with buttons for switching the current view. And also two columns in which we will insert the necessary content depending on the situation. I made two columns for clarity. In real life, I would need one of course.
If you click on the button in the Navbar, it will open either the left side of the application, or the right side with meaningless text.
')
By default, the left column opens, which contains a button for calling a dialog box for entering a first and last name. After pressing the confirmation button, this data is transferred to the right column and displayed.


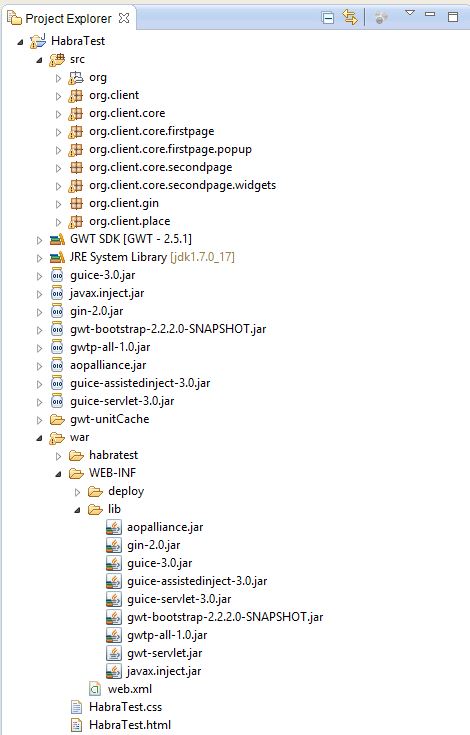
So, first we need to create a GWT project in the IDE. To work with GWTP, we will need to add to the library project: guice-2.0.jar, guice-3.0.jar, gwtp-all-1.0.jar, aopalliance.jar, guice-assistedinject-3.0.jar. I also added gwt-bootstrap-2.2.2.0-SNAPSHOT.jar to add “beauty” to the application.
You can install the plugin in the Eclipse gwt-platform. It makes life much easier. With it, you can create both new projects and presenter-view bundles. Downloading this link: plugin.gwt-platform.googlecode.com/hg/update
Let's start:
You need to create a client module and Ginjector. If you create an application using a plugin, they will be created automatically:
In the configure () method, we will bin our presenters with interfaces and implement the twist.
Next, our entry point: Here we tell our placemanager to go to the current page (place). That is, if we have entered a token in the address bar of the browser that defines the required place, then we will get there. Of course, provided that we have access. (For example GateKeeper may be responsible for this).
I will not focus on work with place. On Habré already had a lot of great articles on GWT. For example this one .
I will show you how to create small GWT applications without using place (more precisely, with one place).
To begin with, let's create the main presenter of our application:
Note that we injected in the FirstPagePresenter constructor firstPagePresenter, SecondPagePresenter secondPagePresenter.
This will be the presenter - widgets representing the left and right parts of the application (that is, in the theory of individual pages);
There are three main types of presenters in GWTP:
Presenter-place is used to create separate pages of the application, to navigate through which you can use the so-called tokens added in the address bar of the browser.
Each such presenter must contain an annotation that indicates which token is attached to the presenter.
In our case, we use only one such presenter.
To change the "pages" we will use the system of slots and presenter widgets placed in slots.
Presenter widget is a presenter that is not necessarily a singleton. It may have many independent instances.
Thanks to the slot system, we can endlessly invest presenters inside other presenters. To place the widget presenter in another presenter, we need to define slots in the parent presenter and override the setInSlot () method in the view of the parent presenter.
In the MainPagePresenter class, you can see that the slot is just an Object:
In the appropriate view, we define the rules for inserting presenters into the slot:
Everything is quite simple: setInSlot () takes a presenter and its corresponding slot.
We simply indicate in which widget to put this presenter. In this case, these are the two bootstrap columns leftColumn and rightColumn.
Although I will repeat in this case, it would be more appropriate to put everything in one column to simulate the transition through pages.
Further, our presenter widgets and their view:
Please note that I have injected some FirstPagePopupPresenter firstPagePopupPresenter. (The code will be lower). This is our form popup. Similarly, you can inject any presenter widgets in any quantity and with any nesting. The main thing is not to break the hierarchy.
There is nothing particularly interesting about the view, except that it inherits the ViewWithUiHandlers typed class.
Since we don’t want to violate the principles of MVP, we cannot turn to the presenter directly from the view (on the contrary we can). For this we use interfaces. About pushing a button, we report using getUiHandlers (). OnShowFormBtnClicked ();
getUiHandlers () returns the FirstPageUiHandlers interface to us, in which we specify the methods that should be implemented in the corresponding presenter. Naturally, the presenter must implement this interface, and the MyView interface embedded in it must inherit the typed HasUiHandlers interface. And the main thing is not to forget in the presenter to assign yourself as the handler for the view events - getView (). SetUiHandlers (this);
Next, the presenter and the corresponding view of the second page:
There is especially nothing interesting and new for the developer on GWT. Communication between presenters occurs through standard events (GwtEvent).
And finally popup with the form:
As you can see, popup is also a presenter widget, but its view interface should inherit PopupView. And the main panel of the view must necessarily be PopupPanel, well, or the successor of this class. Another difference from the usual presenter widgets - to show the pop-up on the page does not need a slot and a panel to insert. It is enough to use the addToPopupSlot () method;
Also, uibinder is used in all bundles of presentations. I do not post the corresponding * ui.xml files. There is basically nothing interesting for GWT-developers.
The project itself will be available for some time at this address.
And so now let's go over the project to describe what is happening and how the presenters are connected with each other:
When loading the MainPagePresenter in the overridden onBind () method, we immediately put the first page presenter in the slot:
(About the life cycle of presenters and methods onBind (), onUnbind, onReveal (), onReset (), onHide () I would like to tell in the next article.)
Accordingly, a FirstPagePresenter view appears on the left side of the screen. When clicking on a button, we call the implementation of the onShowFormBtnClicked () method in the FirstPagePresenter described in the FirstPageUiHandlers interface
Call:
in FirstPagePresenter 'e, the following happens:
We network the presenter popup in the slot. As I already mentioned, slot popaps do not need to be defined. The only condition is that the presenter from which the popup is called must itself be in the slot of the parent, and so on along the chain. The second parameter in the addToPopupSlot () method indicates whether the popup is centered in the application window (the method has several overloads and this parameter is generally optional).
After the pop-up appears in the window, we can enter some data there and click the confirmation button. Further, according to a similar scheme, I twist the popup via getUiHandlers () calls the handler in its presenter, and he in turn throws an event to which the FirstPagePresenter is signed (for someone interested, I could tell you about the events in GWT in the next article) :
First, in the showForm () method, we remove the popup from the slot:
Then we throw a new event (now it is FirstPageEvent) further. Our MainPagePresenter is signed:
After receiving it, the MainPagePresenter removes the first page from the slot and inserts the second one:
Further, it already sends MainPageEvent. Not only the name and surname, but also Action.
Our SecondPagePresenter after receiving the event in the onMainPageEvent () method decides what to show on the page. In this case, these are ordinary widgets without presenters.
That's all. It may seem to some that there is too much code for such simple actions, but:
Also, for sure, some will be indignant - why such long chains of event transmission? However, it can be noted that after receiving the event, the presenter performs any operations before sending the next one. For example, it removes unnecessary more presenters or processes somehow the received data.
In general, I hope this note will be useful to someone and he will turn his eyes towards the GWT-Platform.
PS: I apologize for some of the confusion of the story and possible mistakes. This is my first post on IT topics. Reasonable criticism and advice are very welcome.
I am a beginner Java programmer, and it just so happens that I begin my career with developing a serious application on GWT. On Habré there are quite a few articles on the topic of GWT, but for some reason there is absolutely no information about the wonderful GWT-Platform framework. You can get acquainted with this framework in detail here , and I will tell you briefly about the basics of work using the example of a simple application.
Our application will contain a navigation bar with buttons for switching the current view. And also two columns in which we will insert the necessary content depending on the situation. I made two columns for clarity. In real life, I would need one of course.
If you click on the button in the Navbar, it will open either the left side of the application, or the right side with meaningless text.
')
By default, the left column opens, which contains a button for calling a dialog box for entering a first and last name. After pressing the confirmation button, this data is transferred to the right column and displayed.
So, first we need to create a GWT project in the IDE. To work with GWTP, we will need to add to the library project: guice-2.0.jar, guice-3.0.jar, gwtp-all-1.0.jar, aopalliance.jar, guice-assistedinject-3.0.jar. I also added gwt-bootstrap-2.2.2.0-SNAPSHOT.jar to add “beauty” to the application.
You can install the plugin in the Eclipse gwt-platform. It makes life much easier. With it, you can create both new projects and presenter-view bundles. Downloading this link: plugin.gwt-platform.googlecode.com/hg/update
Let's start:
You need to create a client module and Ginjector. If you create an application using a plugin, they will be created automatically:
In the configure () method, we will bin our presenters with interfaces and implement the twist.
public class ClientModule extends AbstractPresenterModule { @Override protected void configure() { install(new DefaultModule(ClientPlaceManager.class)); bindPresenter(MainPagePresenter.class, MainPagePresenter.MyView.class, MainPageView.class, MainPagePresenter.MyProxy.class); bindConstant().annotatedWith(DefaultPlace.class).to(NameTokens.main); } } @GinModules({ DispatchAsyncModule.class, ClientModule.class }) public interface ClientGinjector extends Ginjector { EventBus getEventBus(); PlaceManager getPlaceManager(); Provider<MainPagePresenter> getMainPagePresenter(); } Next, our entry point: Here we tell our placemanager to go to the current page (place). That is, if we have entered a token in the address bar of the browser that defines the required place, then we will get there. Of course, provided that we have access. (For example GateKeeper may be responsible for this).
public class HabraTest implements EntryPoint { private final ClientGinjector ginjector = GWT.create(ClientGinjector.class); @Override public void onModuleLoad() { DelayedBindRegistry.bind(ginjector); ginjector.getPlaceManager().revealCurrentPlace(); } } I will not focus on work with place. On Habré already had a lot of great articles on GWT. For example this one .
I will show you how to create small GWT applications without using place (more precisely, with one place).
To begin with, let's create the main presenter of our application:
public class MainPagePresenter extends Presenter<MainPagePresenter.MyView, MainPagePresenter.MyProxy> implements MainPageUiHandlers, FirstPageEvent.Handler{ public interface MyView extends View, HasUiHandlers<MainPageUiHandlers> { } // public final static Object SLOT_FIRST_PAGE = new Object(); public final static Object SLOT_SECOND_PAGE = new Object(); // private FirstPagePresenter firstPagePresenter; private SecondPagePresenter secondPagePresenter; @ProxyStandard @NameToken(NameTokens.main) public interface MyProxy extends ProxyPlace<MainPagePresenter> { } private EventBus eventBus; private final PlaceManager placeManager; // @Inject public MainPagePresenter(final EventBus eventBus, final MyView view, FirstPagePresenter firstPagePresenter, SecondPagePresenter secondPagePresenter, final MyProxy proxy, final PlaceManager placeManager) { super(eventBus, view, proxy); this.placeManager = placeManager; this.firstPagePresenter = firstPagePresenter; this.secondPagePresenter = secondPagePresenter; this.eventBus = eventBus; // getView().setUiHandlers(this); eventBus.addHandler(FirstPageEvent.getType(), this); } // @Override protected void revealInParent() { RevealRootContentEvent.fire(this, this); } @Override protected void onBind() { super.onBind(); // getView().setInSlot(SLOT_FIRST_PAGE, firstPagePresenter); } // MainPageView @Override public void onRightBtnClicked() { showRightContent(); MainPageEvent mainPageEvent = new MainPageEvent( MainPageEvent.Action.SHOW_LOREM_IPSUM); eventBus.fireEvent(mainPageEvent); } // @Override public void onLeftBtnClicked() { showLeftContent(); } public void showLeftContent() { removeFromSlot(SLOT_SECOND_PAGE, secondPagePresenter); getView().setInSlot(SLOT_FIRST_PAGE, firstPagePresenter); } public void showRightContent() { removeFromSlot(SLOT_FIRST_PAGE, firstPagePresenter); getView().setInSlot(SLOT_SECOND_PAGE, secondPagePresenter); } @Override public void onFirstPageEvent(FirstPageEvent event) { // , showRightContent(); MainPageEvent mainPageEvent = new MainPageEvent( MainPageEvent.Action.SHOW_FORM_RESULT, event.getFirstName(), event.getLastName()); eventBus.fireEvent(mainPageEvent); } } Note that we injected in the FirstPagePresenter constructor firstPagePresenter, SecondPagePresenter secondPagePresenter.
This will be the presenter - widgets representing the left and right parts of the application (that is, in the theory of individual pages);
There are three main types of presenters in GWTP:
- Recenters that are also place
- Recenters widgets (PresenterWidget)
- Presenter widgets representing a popup window
Presenter-place is used to create separate pages of the application, to navigate through which you can use the so-called tokens added in the address bar of the browser.
Each such presenter must contain an annotation that indicates which token is attached to the presenter.
In our case, we use only one such presenter.
To change the "pages" we will use the system of slots and presenter widgets placed in slots.
Presenter widget is a presenter that is not necessarily a singleton. It may have many independent instances.
Thanks to the slot system, we can endlessly invest presenters inside other presenters. To place the widget presenter in another presenter, we need to define slots in the parent presenter and override the setInSlot () method in the view of the parent presenter.
In the MainPagePresenter class, you can see that the slot is just an Object:
public final static Object SLOT_FIRST_PAGE = new Object(); public final static Object SLOT_SECOND_PAGE = new Object(); In the appropriate view, we define the rules for inserting presenters into the slot:
public class MainPageView extends ViewWithUiHandlers<MainPageUiHandlers> implements MainPagePresenter.MyView { // @UiField HTMLPanel main; // @UiField ResponsiveNavbar navbar; // @UiField Button firstPageBtn, secondPageBtn; private static MainPageViewUiBinder uiBinder = GWT .create(MainPageViewUiBinder.class); interface MainPageViewUiBinder extends UiBinder<Widget, MainPageView> { } // @UiField Column leftColumn, rightColumn; @Inject public MainPageView() { uiBinder.createAndBindUi(this); navbar.setInverse(true); // firstPageBtn.addClickHandler(new ClickHandler() { @Override public void onClick(ClickEvent event) { getUiHandlers().onLeftBtnClicked(); } }); secondPageBtn.addClickHandler(new ClickHandler() { @Override public void onClick(ClickEvent event) { getUiHandlers().onRightBtnClicked(); } }); } @Override public Widget asWidget() { return main; } // @Override public void setInSlot(Object slot, IsWidget content) { if(slot == MainPagePresenter.SLOT_FIRST_PAGE ) { leftColumn.add(content); } else if(slot == MainPagePresenter.SLOT_SECOND_PAGE ){ rightColumn.add(content); } else { super.setInSlot(slot, content); } } // @Override public void removeFromSlot(Object slot, IsWidget content) { if(slot == MainPagePresenter.SLOT_FIRST_PAGE ) { leftColumn.remove(content); } else if(slot == MainPagePresenter.SLOT_SECOND_PAGE ){ rightColumn.remove(content); } else { super.removeFromSlot(slot, content); } } } Everything is quite simple: setInSlot () takes a presenter and its corresponding slot.
We simply indicate in which widget to put this presenter. In this case, these are the two bootstrap columns leftColumn and rightColumn.
Although I will repeat in this case, it would be more appropriate to put everything in one column to simulate the transition through pages.
Further, our presenter widgets and their view:
public class FirstPagePresenter extends PresenterWidget<FirstPagePresenter.MyView> implements FirstPageUiHandlers, PopupEvent.Handler{ public interface MyView extends View, HasUiHandlers<FirstPageUiHandlers> { } // FirstPagePopupPresenter firstPagePopupPresenter; EventBus eventBus; @Inject public FirstPagePresenter(final EventBus eventBus, final MyView view, FirstPagePopupPresenter firstPagePopupPresenter ) { super(eventBus, view); this.firstPagePopupPresenter = firstPagePopupPresenter; this.eventBus = eventBus; getView().setUiHandlers(this); // PopupEvent eventBus.addHandler(PopupEvent.getType(), this); } @Override public void onShowFormBtnClicked() { // showForm(true); } private void showForm(boolean show) { if(show){ addToPopupSlot(firstPagePopupPresenter, true); firstPagePopupPresenter.getView().show(); } else { removeFromPopupSlot(firstPagePopupPresenter); } } @Override public void onPopupEvent(PopupEvent event) { showForm(false); eventBus.fireEvent(new FirstPageEvent(event.getFirstName(), event.getLastName())); } } Please note that I have injected some FirstPagePopupPresenter firstPagePopupPresenter. (The code will be lower). This is our form popup. Similarly, you can inject any presenter widgets in any quantity and with any nesting. The main thing is not to break the hierarchy.
public class FirstPageView extends ViewWithUiHandlers<FirstPageUiHandlers> implements FirstPagePresenter.MyView { private final Widget widget; @UiField Button showFormBtn; public interface Binder extends UiBinder<Widget, FirstPageView> { } @Inject public FirstPageView(final Binder binder) { widget = binder.createAndBindUi(this); showFormBtn.addClickHandler(new ClickHandler() { @Override public void onClick(ClickEvent event) { getUiHandlers().onShowFormBtnClicked(); } }); } @Override public Widget asWidget() { return widget; } } There is nothing particularly interesting about the view, except that it inherits the ViewWithUiHandlers typed class.
Since we don’t want to violate the principles of MVP, we cannot turn to the presenter directly from the view (on the contrary we can). For this we use interfaces. About pushing a button, we report using getUiHandlers (). OnShowFormBtnClicked ();
public interface FirstPageUiHandlers extends UiHandlers{ void onShowFormBtnClicked(); } getUiHandlers () returns the FirstPageUiHandlers interface to us, in which we specify the methods that should be implemented in the corresponding presenter. Naturally, the presenter must implement this interface, and the MyView interface embedded in it must inherit the typed HasUiHandlers interface. And the main thing is not to forget in the presenter to assign yourself as the handler for the view events - getView (). SetUiHandlers (this);
Next, the presenter and the corresponding view of the second page:
public class SecondPagePresenter extends PresenterWidget<SecondPagePresenter.MyView> implements MainPageEvent.Handler { public interface MyView extends View { void showLoremIpsum(); void showFormInfo(String firstName, String lastName); } EventBus eventBus; @Inject public SecondPagePresenter(final EventBus eventBus, final MyView view) { super(eventBus, view); this.eventBus = eventBus; eventBus.addHandler(MainPageEvent.getType(), this); } @Override public void onMainPageEvent(MainPageEvent event) { switch(event.getAction()) { case SHOW_FORM_RESULT: showFormInfoWidget(event.getFirstName(), event.getLastName()); break; case SHOW_LOREM_IPSUM: showLoremIpsumWidget(); break; default: break; } } private void showLoremIpsumWidget() { getView().showLoremIpsum(); } private void showFormInfoWidget(String firstName, String lastName) { getView().showFormInfo( firstName, lastName); } public class SecondPageView extends ViewImpl implements SecondPagePresenter.MyView { private final Widget widget; @UiField FlowPanel contentPanel; public interface Binder extends UiBinder<Widget, SecondPageView> { } @Inject public SecondPageView(final Binder binder) { widget = binder.createAndBindUi(this); } @Override public Widget asWidget() { return widget; } @Override public void showLoremIpsum() { contentPanel.clear(); contentPanel.add(new LoremIpsumWidget()); } @Override public void showFormInfo(String firstName, String lastName) { contentPanel.clear(); contentPanel.add(new FormInfoWidget(firstName, lastName)); } } There is especially nothing interesting and new for the developer on GWT. Communication between presenters occurs through standard events (GwtEvent).
And finally popup with the form:
public class FirstPagePopupPresenter extends PresenterWidget<FirstPagePopupPresenter.MyView> implements PopupUiHandlers { public interface MyView extends PopupView , HasUiHandlers<PopupUiHandlers>{ } EventBus eventBus; @Inject public FirstPagePopupPresenter(final EventBus eventBus, final MyView view) { super(eventBus, view); this.eventBus = eventBus; getView().setUiHandlers(this); } @Override public void onSubmitBtnClicked(String firstName, String lastName) { eventBus.fireEvent(new PopupEvent(firstName, lastName)); } } public class FirstPagePopupView extends PopupViewWithUiHandlers<PopupUiHandlers> implements FirstPagePopupPresenter.MyView { @UiField PopupPanel main; @UiField Button submitBtn; @UiField TextBox firstName, lastName; public interface Binder extends UiBinder<Widget, FirstPagePopupView> { } @Inject public FirstPagePopupView(final EventBus eventBus, final Binder binder) { super(eventBus); binder.createAndBindUi(this); main.setAnimationEnabled(true); main.setModal(true); main.setGlassEnabled(true); submitBtn.addClickHandler(new ClickHandler() { @Override public void onClick(ClickEvent event) { getUiHandlers().onSubmitBtnClicked(firstName.getValue(), lastName.getValue()); } }); } @Override public Widget asWidget() { return main; } } As you can see, popup is also a presenter widget, but its view interface should inherit PopupView. And the main panel of the view must necessarily be PopupPanel, well, or the successor of this class. Another difference from the usual presenter widgets - to show the pop-up on the page does not need a slot and a panel to insert. It is enough to use the addToPopupSlot () method;
Also, uibinder is used in all bundles of presentations. I do not post the corresponding * ui.xml files. There is basically nothing interesting for GWT-developers.
The project itself will be available for some time at this address.
And so now let's go over the project to describe what is happening and how the presenters are connected with each other:
When loading the MainPagePresenter in the overridden onBind () method, we immediately put the first page presenter in the slot:
@Override protected void onBind() { super.onBind(); getView().setInSlot(SLOT_FIRST_PAGE, firstPagePresenter); } (About the life cycle of presenters and methods onBind (), onUnbind, onReveal (), onReset (), onHide () I would like to tell in the next article.)
Accordingly, a FirstPagePresenter view appears on the left side of the screen. When clicking on a button, we call the implementation of the onShowFormBtnClicked () method in the FirstPagePresenter described in the FirstPageUiHandlers interface
Call:
showFormBtn.addClickHandler(new ClickHandler() { @Override public void onClick(ClickEvent event) { getUiHandlers().onShowFormBtnClicked(); } }); in FirstPagePresenter 'e, the following happens:
addToPopupSlot(firstPagePopupPresenter, true); We network the presenter popup in the slot. As I already mentioned, slot popaps do not need to be defined. The only condition is that the presenter from which the popup is called must itself be in the slot of the parent, and so on along the chain. The second parameter in the addToPopupSlot () method indicates whether the popup is centered in the application window (the method has several overloads and this parameter is generally optional).
After the pop-up appears in the window, we can enter some data there and click the confirmation button. Further, according to a similar scheme, I twist the popup via getUiHandlers () calls the handler in its presenter, and he in turn throws an event to which the FirstPagePresenter is signed (for someone interested, I could tell you about the events in GWT in the next article) :
@Override public void onPopupEvent(PopupEvent event) { showForm(false); eventBus.fireEvent(new FirstPageEvent(event.getFirstName(), event.getLastName())); } First, in the showForm () method, we remove the popup from the slot:
removeFromPopupSlot(firstPagePopupPresenter); Then we throw a new event (now it is FirstPageEvent) further. Our MainPagePresenter is signed:
@Override public void onFirstPageEvent(FirstPageEvent event) { // , showRightContent(); MainPageEvent mainPageEvent = new MainPageEvent( MainPageEvent.Action.SHOW_FORM_RESULT, event.getFirstName(), event.getLastName()); eventBus.fireEvent(mainPageEvent); } After receiving it, the MainPagePresenter removes the first page from the slot and inserts the second one:
public void showRightContent() { removeFromSlot(SLOT_FIRST_PAGE, firstPagePresenter); getView().setInSlot(SLOT_SECOND_PAGE, secondPagePresenter); } Further, it already sends MainPageEvent. Not only the name and surname, but also Action.
Our SecondPagePresenter after receiving the event in the onMainPageEvent () method decides what to show on the page. In this case, these are ordinary widgets without presenters.
@Override public void onMainPageEvent(MainPageEvent event) { switch(event.getAction()) { case SHOW_FORM_RESULT: showFormInfoWidget(event.getFirstName(), event.getLastName()); break; case SHOW_LOREM_IPSUM: showLoremIpsumWidget(); break; default: break; } } That's all. It may seem to some that there is too much code for such simple actions, but:
- We do not violate the principles of MVP - a view should not know anything about its presenter
- Dividing the application into modules, the code becomes reusable and more flexible.
Also, for sure, some will be indignant - why such long chains of event transmission? However, it can be noted that after receiving the event, the presenter performs any operations before sending the next one. For example, it removes unnecessary more presenters or processes somehow the received data.
In general, I hope this note will be useful to someone and he will turn his eyes towards the GWT-Platform.
PS: I apologize for some of the confusion of the story and possible mistakes. This is my first post on IT topics. Reasonable criticism and advice are very welcome.
Source: https://habr.com/ru/post/192262/
All Articles