New Vogue. Now banana
We screw the hardware console to Transcend WiFi SDHC
Card pumped
Once again, manufacturers of glands please us hakablenymi glands. With that, if earlier Americhip was pleased only by the residents of Moscow, and we delivered it to the regions on our own, today Transcend has pleased the whole world with a megachackly device.
Let's continue the glorious tradition and tell you how to fasten the hardware console to this card.
')
I can immediately say, the post does not claim to originality. But for many it can be useful, according to this and write.
After reading the post about hacking these cards, I flew a bullet and bought it. Strangely enough, I had a rake with an attempt to break it through the web-interface. Firstly, computers (laptops) with a reader run under Windows (this is not my omission, just relatives, well, they don’t want to switch to god-friendly linux). And secondly, for some reason, inserting a card into the laptop, joining the network, she stubbornly refused to let herself in, giving an error! I set up the card through the bucket to cling to the router. From there, through the router I tried to download from a normal computer. But, alas ... Even it was not possible to just run the script 192.168.11.254/cgi-bin/kcard_login.pl and see the log / pass. Frankly, I did not try very hard. For!
I immediately tuned in to create a hardware console. Why do we need it? The hardware console, firstly, immediately gives us a full root without dancing with a tambourine, and secondly (which is more important) gives us access to the u-boot bootloader (analog of the comp BIOS), and so we can change the firmware, restore linux even if we we will lock it in with our malicious experiments, etc. In comparison with which the access that was obtained here is a warm-up, and is suitable for those who are not friends with the solder.
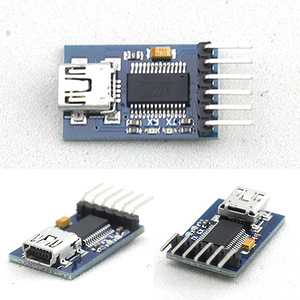
For all executions we need: USB-to-UART. What is it and what to eat, read in my article UART and what it is eaten with . I specially ordered a bunch of handkerchief with ft232rl on ebee especially for any experiments.
ft232rl ebay photo
Next, you need a knife to open the card. Personally, I use an old hacksaw blade, sharpened in a semicircle.

Tool
Also, for complete happiness, you will need straight arms and a soldering iron with a thin sting.
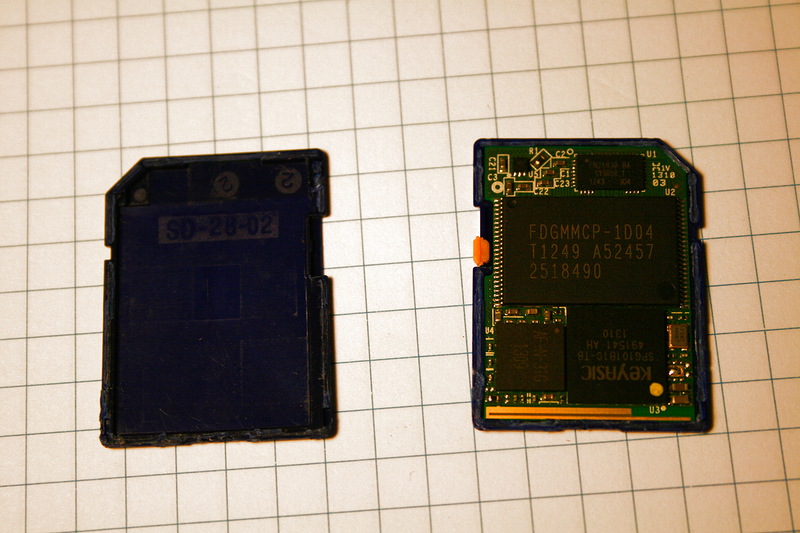
We open the card. It is convenient to begin to open it from the side opposite to the contacts. There is a knife, and allows you to push the edges. No need to be afraid, plastic is simply glued together and easily separated from each other. After 5 minutes of meticulous dragging, this should be brought to our attention!
Taki giblets
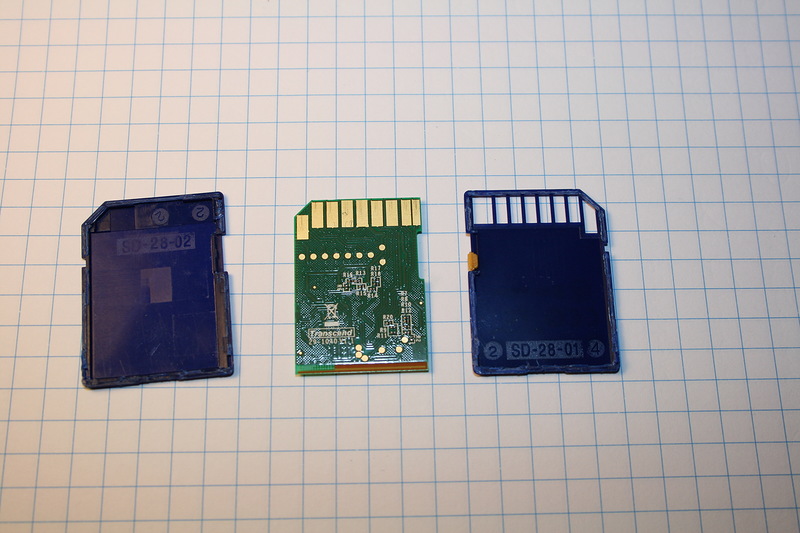
Oh, here it is, the holy of holies looks like. And now let's shake it out, but let's see what is on the other side.
but on the other hand
According to this topic, pinout of contacts looks like this
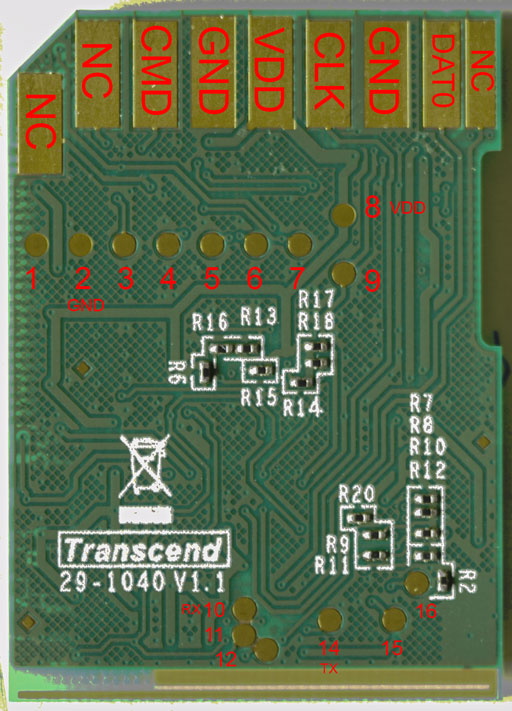
Pinout
Accordingly, we take the thinnest wire, and solder to the pad of the RX and TX, after they have been smeared with flux and tinned. Do not smear flux from your tooth;). I am still silent about GND, for we have several other plans.
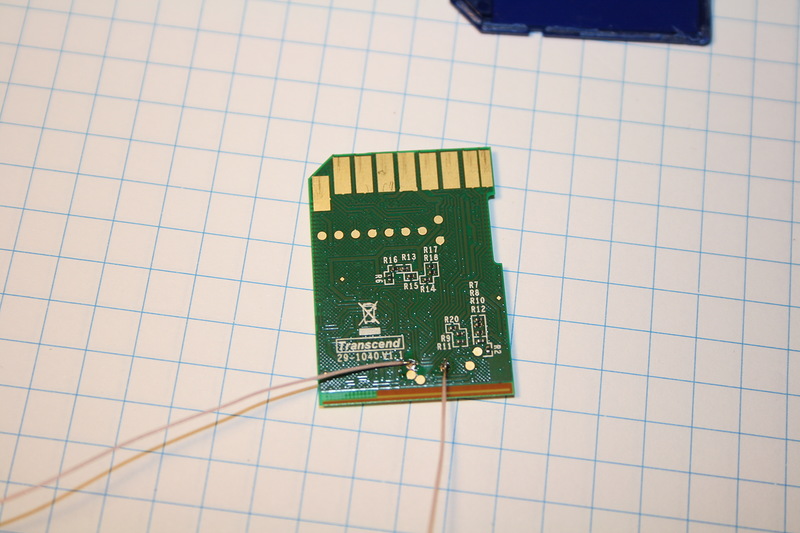
Soldered rx and tx
Since I was aiming, after the execution I would receive a card that can be inserted into the reader of the laptop, I had to have it closed with the case. And to the distant GND pad, soldering the wire was not comme il faut. Experienced, using a multimeter, it was logically established that for capacitors on the other side of the board, one part is ground. There and should solder the wire GND.

The land in the photo, the land in the photo is visible ...
After that, you can make a slot for the wires on the back of the case, and grab the card with masking tape in the back and in the slot of the write protection switch (as if specially made for this purpose!).
Then we solder these wires to the ft232rl scarf: rx on tx, tx on rx, gnd on gnd, respectively. Looking ahead, I want to say that I didn’t start everything right away, and I had to swap rx and tx. It is not clear whether I nakosyachil (unlikely), or on the original picture jamb (which is more likely).
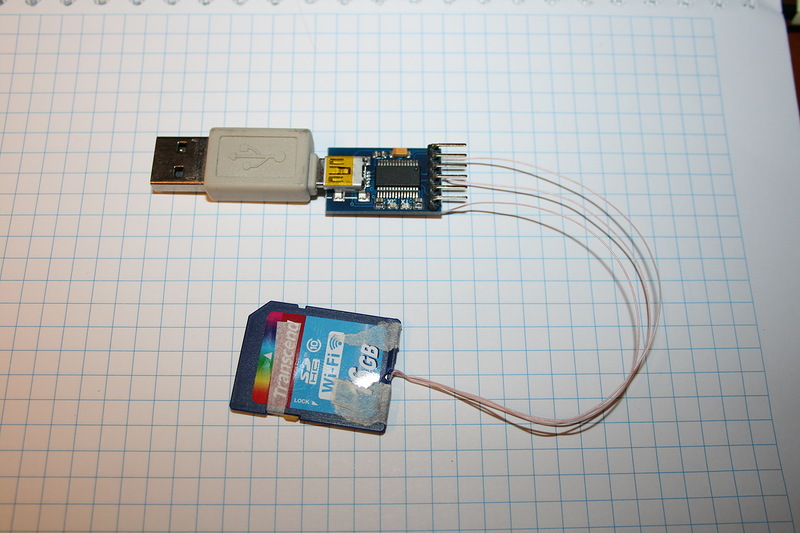
The result should be like in the photo in the entry page. We cling ft232rl-shawl to USB, we start a terminalka and we expose an operation mode 38400 8N1, without control of a stream. Insert the card into the card reader, and enjoy!

First start!
Everything is working!!! After which I replaced busybox, etc. Everything, you can now do the most perverted things with the card !!!
Good luck with your experiments!
ZY The post was written in priests, before work. He is full of errors, write a personal message - correct!
Card pumped
Once again, manufacturers of glands please us hakablenymi glands. With that, if earlier Americhip was pleased only by the residents of Moscow, and we delivered it to the regions on our own, today Transcend has pleased the whole world with a megachackly device.
Let's continue the glorious tradition and tell you how to fasten the hardware console to this card.
')
I can immediately say, the post does not claim to originality. But for many it can be useful, according to this and write.
After reading the post about hacking these cards, I flew a bullet and bought it. Strangely enough, I had a rake with an attempt to break it through the web-interface. Firstly, computers (laptops) with a reader run under Windows (this is not my omission, just relatives, well, they don’t want to switch to god-friendly linux). And secondly, for some reason, inserting a card into the laptop, joining the network, she stubbornly refused to let herself in, giving an error! I set up the card through the bucket to cling to the router. From there, through the router I tried to download from a normal computer. But, alas ... Even it was not possible to just run the script 192.168.11.254/cgi-bin/kcard_login.pl and see the log / pass. Frankly, I did not try very hard. For!
I immediately tuned in to create a hardware console. Why do we need it? The hardware console, firstly, immediately gives us a full root without dancing with a tambourine, and secondly (which is more important) gives us access to the u-boot bootloader (analog of the comp BIOS), and so we can change the firmware, restore linux even if we we will lock it in with our malicious experiments, etc. In comparison with which the access that was obtained here is a warm-up, and is suitable for those who are not friends with the solder.
Let's get started Rubbing sweaty hands!
For all executions we need: USB-to-UART. What is it and what to eat, read in my article UART and what it is eaten with . I specially ordered a bunch of handkerchief with ft232rl on ebee especially for any experiments.
ft232rl ebay photo
Next, you need a knife to open the card. Personally, I use an old hacksaw blade, sharpened in a semicircle.
Tool
Also, for complete happiness, you will need straight arms and a soldering iron with a thin sting.
We open the card. It is convenient to begin to open it from the side opposite to the contacts. There is a knife, and allows you to push the edges. No need to be afraid, plastic is simply glued together and easily separated from each other. After 5 minutes of meticulous dragging, this should be brought to our attention!
Taki giblets
Oh, here it is, the holy of holies looks like. And now let's shake it out, but let's see what is on the other side.
but on the other hand
The most important thing is implementation.
According to this topic, pinout of contacts looks like this
Pinout
Accordingly, we take the thinnest wire, and solder to the pad of the RX and TX, after they have been smeared with flux and tinned. Do not smear flux from your tooth;). I am still silent about GND, for we have several other plans.
Soldered rx and tx
Since I was aiming, after the execution I would receive a card that can be inserted into the reader of the laptop, I had to have it closed with the case. And to the distant GND pad, soldering the wire was not comme il faut. Experienced, using a multimeter, it was logically established that for capacitors on the other side of the board, one part is ground. There and should solder the wire GND.
The land in the photo, the land in the photo is visible ...
After that, you can make a slot for the wires on the back of the case, and grab the card with masking tape in the back and in the slot of the write protection switch (as if specially made for this purpose!).
Then we solder these wires to the ft232rl scarf: rx on tx, tx on rx, gnd on gnd, respectively. Looking ahead, I want to say that I didn’t start everything right away, and I had to swap rx and tx. It is not clear whether I nakosyachil (unlikely), or on the original picture jamb (which is more likely).
The result should be like in the photo in the entry page. We cling ft232rl-shawl to USB, we start a terminalka and we expose an operation mode 38400 8N1, without control of a stream. Insert the card into the card reader, and enjoy!
First start!
Everything is working!!! After which I replaced busybox, etc. Everything, you can now do the most perverted things with the card !!!
Good luck with your experiments!
ZY The post was written in priests, before work. He is full of errors, write a personal message - correct!
Source: https://habr.com/ru/post/192200/
All Articles