Installation Guide and Guide for Web Deploy in Windows Server 2008 R2
In this guide, we will configure Web Deploy in a Windows Server 2008 R2 environment for easy deployment of applications from Visual Studio with one mouse click. Web Deploy allows you to customize the publication by a user who does not have administrator rights.
Web Deploy can be installed in two ways (I just had to).
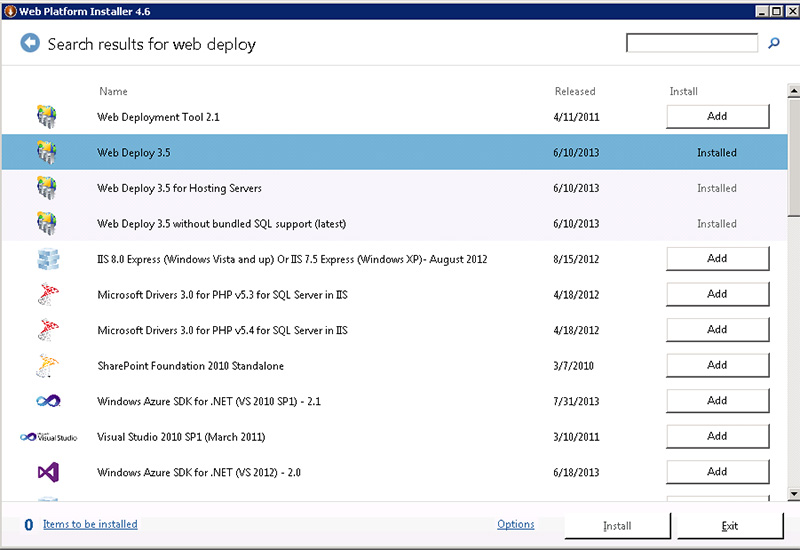
The first way is through the Web Platform Installer . It must be downloaded and installed on the server. Then open and select such items as: Web Deploy, Web Deploy for Hosting Servers and IIS Recommendated Configuration (not visible in the screenshot)

')
Packages installed via WPI include additional components, some may not like it. However, for newcomers, this path will be the easiest.
You need to download the Web Deploy installation file (for today version 3.5) and install it. During manual installation, you will need to manually install the necessary IIS services. This is done through the server control panel: Roles> IIS> Add Role Services

You must select and install the following:
After all installations in the panel IIS Manager should appear Features: Management Service, Management Service Delefation. If you install Web Deploy manually, you need to enable IIS remote management in the Management Service:

After all the actions, the menu item should have appeared.

Create a non-administrator user and set a complex password for it. We also give him the right to write to the site folder in wwwroot.
Next, set up a remote publication:

We get:
You can check the settings by going to the address in the browser that we specified in the publication settings of the form: http://111.111.111.111:8172/msdeploy.axd - the browser should offer to authorize or write that the service is found, but we are not authorized.
Also need to check:
If the publication is not configured or problems arise, you can enable logs ( Enabling Web Management Service Failed Request Tracing )
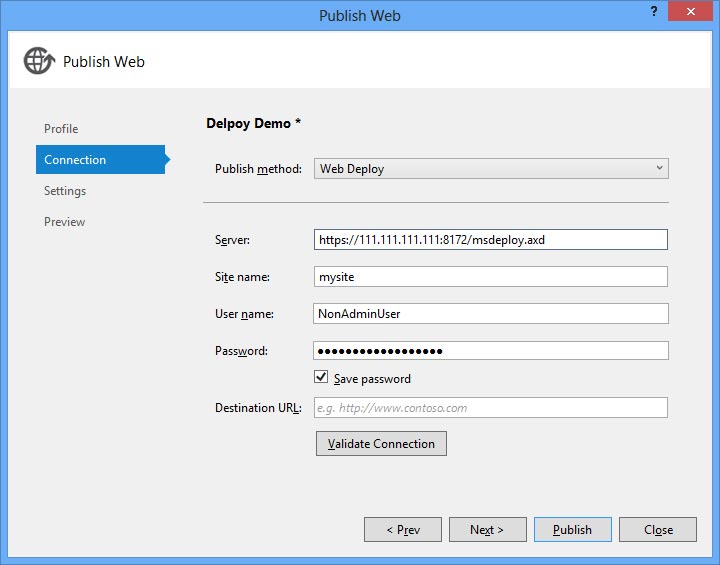
After successful setup on the server side, you need to set up publishing in Visual Studio. To do this, create a publication profile, in the publishing method, select Web Deploy.

In the next step, select the Release configuration . You can also specify a connection string with which VS will replace it when it is published (I have not tried it). You will get a convenient publication of the solution in 1 click:

Important : the site name should be the same as it is displayed in IIS Management.
Important : If you installed a signed SSL certificate on a remote server, make sure that you check the “Allow untrusted certificate” checkbox. By default, Web Deploy will install a certificate for you to be unique, but it will be self-signed.
There is also a setting that allows you to specify "Leave extra files or not." Web deployment will only copy changed files since the last publication.
Web Deploy provides a powerful and flexible tool for automated deployment of ASP.NET applications to a remote server. In addition, it allows you to publish not only files but also database schemas and update scripts and ACL parameter settings scripts ( Access Control List )
You can use Visual Studio to automatically publish solutions to the server, or you can create the Web Deploy Package and manually install the necessary updates on the server.
I hope with this guide it will be easier to publish your sites.
Installing Web Deploy
Web Deploy can be installed in two ways (I just had to).
Web Platform Installer
The first way is through the Web Platform Installer . It must be downloaded and installed on the server. Then open and select such items as: Web Deploy, Web Deploy for Hosting Servers and IIS Recommendated Configuration (not visible in the screenshot)

')
Packages installed via WPI include additional components, some may not like it. However, for newcomers, this path will be the easiest.
Installation via msi
You need to download the Web Deploy installation file (for today version 3.5) and install it. During manual installation, you will need to manually install the necessary IIS services. This is done through the server control panel: Roles> IIS> Add Role Services

You must select and install the following:
- Logging tools
- Management Service (IIS Management Console may be needed)
After all installations in the panel IIS Manager should appear Features: Management Service, Management Service Delefation. If you install Web Deploy manually, you need to enable IIS remote management in the Management Service:

Setting up a site for remote publishing
After all the actions, the menu item should have appeared.

Create a non-administrator user and set a complex password for it. We also give him the right to write to the site folder in wwwroot.
Next, set up a remote publication:

- Choose a user with whom we will publish our site;
- Specify the URL for publication. This should be the external IP of the server with the default port 8172 open. When installed via WPI, a rule is created in the Firewall and the port is opened.
- Specify the place where to save the settings file.
- Click Setup
We get:
Publish enabled for 'WIN-9APS8Q11R9V\InDeploy'
Granted 'WIN-9APS8Q11R9V\InDeploy' full control on 'C:\inetpub\wwwroot\mysite'
Successfully created settings file 'C:\Users\Administrator\Desktop\WIN-9APS8Q11R9V_InDeploy.PublishSettings'
You can check the settings by going to the address in the browser that we specified in the publication settings of the form: http://111.111.111.111:8172/msdeploy.axd - the browser should offer to authorize or write that the service is found, but we are not authorized.
Also need to check:
- The msdepsvc service is running in autorun and is running now
net stop msdepsvc & net start msdepsvc - Similarly, the service wmsvc
net stop wmsvc & net start wmsvc - It is also necessary to clarify whether ping is possible up to port 80 (for the Web Deployment Agent Service (MsDepSvc)) and 8172 for the Web Management Service (WmSvc, handler).
If the publication is not configured or problems arise, you can enable logs ( Enabling Web Management Service Failed Request Tracing )
Setting up Web Deploy publishing in Visual Studio
After successful setup on the server side, you need to set up publishing in Visual Studio. To do this, create a publication profile, in the publishing method, select Web Deploy.

In the next step, select the Release configuration . You can also specify a connection string with which VS will replace it when it is published (I have not tried it). You will get a convenient publication of the solution in 1 click:

Important : the site name should be the same as it is displayed in IIS Management.
Important : If you installed a signed SSL certificate on a remote server, make sure that you check the “Allow untrusted certificate” checkbox. By default, Web Deploy will install a certificate for you to be unique, but it will be self-signed.
There is also a setting that allows you to specify "Leave extra files or not." Web deployment will only copy changed files since the last publication.
Summary
Web Deploy provides a powerful and flexible tool for automated deployment of ASP.NET applications to a remote server. In addition, it allows you to publish not only files but also database schemas and update scripts and ACL parameter settings scripts ( Access Control List )
You can use Visual Studio to automatically publish solutions to the server, or you can create the Web Deploy Package and manually install the necessary updates on the server.
I hope with this guide it will be easier to publish your sites.
Links
Source: https://habr.com/ru/post/192150/
All Articles