Developer iOS Notes: Sharing Experience, Part 2
Hello, dear readers Habr!
This article is the second part of the series "Notes iOS developer."
Content:
- Part 1: Working with Files; Template Singleton; Work with Audio; Work with Video; In-app purchases
- Part 2: Own popups (Popups); How to use Modal Segue in the Navigation Controller; Core Graphics; Work with UIWebView and ScrollView
- Part 3: Life without Autolayout; Splash Screen; Work with device orientation in iOS 6+; Shifting the contents of a UITextField
- Part 4: Google Analytics; Push Notifications; PSPDFKit; Login to the app via Facebook; Tell friends - Facebook, Twitter, Email
- Part 5: Core Data; UITableView and UICollectionView
We will deal with customizable pop-up windows at the end of the article, as this is a rather extensive topic. In the meantime, everything else.
How to use Modal Segue in the Navigation Controller
And so, you have a problem: the client does not like the standard Navigation Controller transition - “overlapping to the right” - and he wants the new screen, for example, to appear “screen rotation from the bottom”. We immediately see a solution to the problem: change the Segue view to Modal. Everything would be fine, but here only the logic of the Navigation Controller with its hierarchy of screens is broken; and as a result, the application crashes. That is, now we need Modal Segue, but with Push Segue functions. I suspect that there are ways to solve this problem more simply, but I suggest just writing a subclass of UIStoryboardSegue. The only thing we have to change is the .m file of our class. Or rather, the perform method:
Push me!
- (void) perform{ // , UIViewController *src = (UIViewController *) self.sourceViewController; UIViewController *dst = (UIViewController *) self.destinationViewController; // [UIView transitionFromView:src.view toView:dst.view duration:1 options:UIViewAnimationOptionTransitionFlipFromBottom completion:nil]; // Navigation Controller'a [UIView transitionFromView:src.navigationItem.titleView toView:dst.navigationItem.titleView duration:1 options:UIViewAnimationOptionTransitionFlipFromBottom completion:nil]; // Push Segue [src.navigationController pushViewController:dst animated:NO]; } Instead of UIViewAnimationOptionTransitionFlipFromBottom, you can put any style of transition that is close to the heart of your client.
That's all! How simple, you say. Now we can specify Custom style for any Storyboard Segue, specify our new class and get Navigation Controller Segue with its type of transition.
')
Core graphics
At one point, your client got tired of kicking the designer every time you need to change the width of the button by 5 pixels (after all, the designer drew a separate picture for each button). Make your own button with rounded edges and a frame around with QuartzCore.framework. Again, as with singleton, it’s more like a snippet, speeding up work on a project.
In fact, this approach can be used with any subclass of UIView (UIButton is exactly what it is). We rewrite the awakeFromNib method of our UIView:
- (void)awakeFromNib { [super awakeFromNib]; self.layer.cornerRadius = 5.0f; self.layer.masksToBounds = YES; self.layer.borderColor = [UIColor whiteColor].CGColor; self.layer.borderWidth = 1.0f; } It's simple. First, with inheritance, we need to execute our code after the superclass has finished its work. So we call the same method, but on the superclass. Secondly, we set the radius of rounding of the corners of the layer of our view and force the layer to obey the specified mask. Thirdly, we set the frame color (CGColor, of course) and its thickness.
I know that some expected deep work with a graphic context, but then they are quick cheat sheets for a freelancer - when a new task with Core Graphics appears, then we will write articles.
Work with UIWebView and ScrollView
We already have a UIWebView, let's load the content into it:
NSString *htmlString; NSString *cssString; <... ...> htmlString = [NSString stringWithFormat:@"<style>%@</style>%@", cssString, htmlString]; NSURL *url = [[NSURL alloc] initFileURLWithPath:pathToApplicationDirectory]; [self hideOverscrollShadowsForWebView:webView]; [webView loadHTMLString:htmlString baseURL:url]; Just got a web page with our style and html. To hide unpleasant gray shadows during the UIWebView overscroll, we used the following method:
/*! , UIWebView \param webView WebView, */ - (void)hideOverscrollShadowsForWebView:(UIWebView *)webView { id scrollview = [webView.subviews objectAtIndex:0]; for (UIView *subview in [scrollview subviews]) if ([subview isKindOfClass:[UIImageView class]]) subview.hidden = YES; webView.backgroundColor = [UIColor clearColor]; } We hide all child views in Scrollview belonging to our UIWebView. And also set a transparent background.
You can say only one thing about UIScrollView: never forget to set the contentSize property, and you will be happy.
Own popups (Popups)
It's time to talk about the giant of this article. This time, the client needed the ability to quickly and without your participation change the type of pop-up windows. Well, for the cause!
Let's talk a little about the theory, about how we all turn.
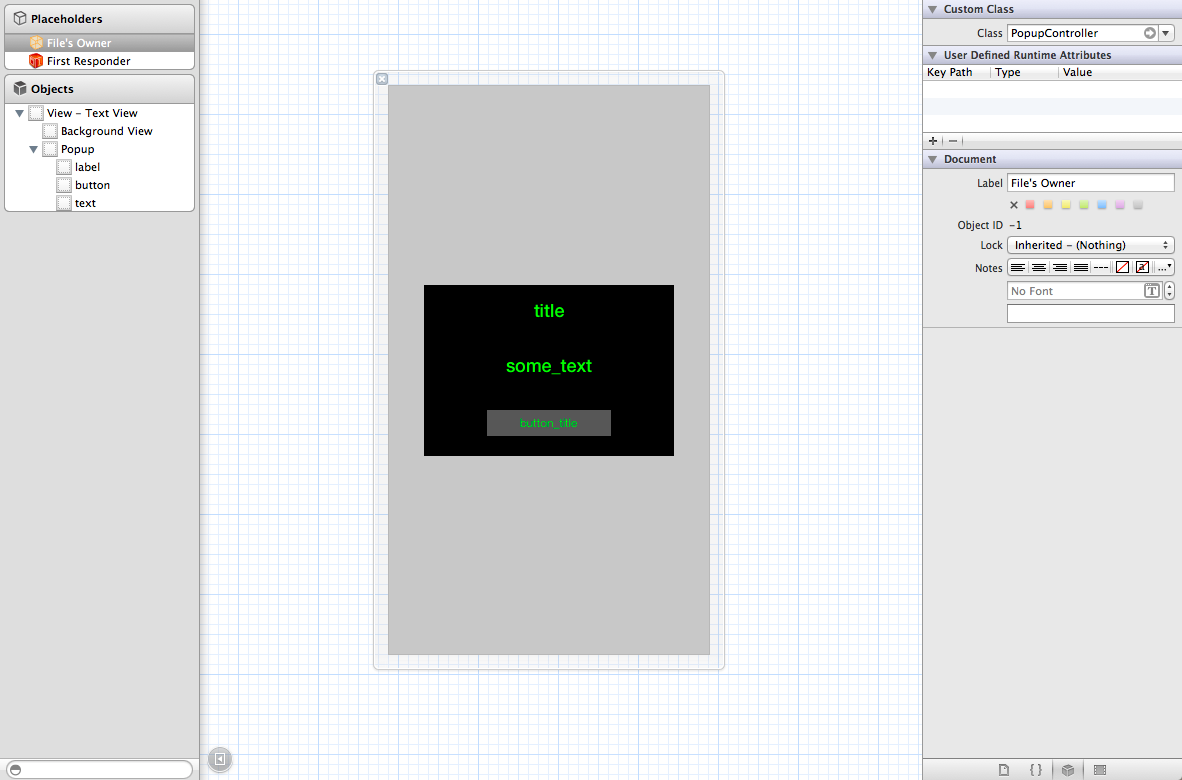
In Storyboard, we are unlikely to implement a full pop-up window, but we can create a separate PopupView.xib file!
And as a model, we will create three classes PopupView, PopupController, PopupControllerDelegate.
First, build your pop-up window layout as in the screenshot. Note that in our case, File's Owner will be an object of the PopupController class, and View itself will be an object of the PopupView class. Background View is a translucent light gray UIView.
Let's look first at the implementation of PopupView.h :
Push me!
#import <UIKit/UIKit.h> @interface PopupView : UIView @property (strong, nonatomic) IBOutlet UIView *backgroundView; @property (strong, nonatomic) IBOutlet UIView *innerPopupView; @property (strong, nonatomic) IBOutlet UILabel *popupTitleLabel; @property (strong, nonatomic) IBOutlet UILabel *popupTextLabel; @property (strong, nonatomic) IBOutlet UIButton *popupButton; @end We just hooked all user interface elements into the code; We did not change PopupView.m, we left the standard generated code.
We have a popup template, now we need to skillfully use it. Create a PopupController.
PopupController.h :
Push me!
#import <Foundation/Foundation.h> #import "PopupControllerDelegate.h" #import "PopupView.h" @interface PopupController : NSObject // UIViewController, PopupView @property (strong, nonatomic) UIViewController<PopupControllerDelegate> *delegate; // . ! @property (strong, nonatomic) NSMutableArray *activePopups; - (IBAction)touchedButton:(UIButton *)sender; - (id)initWithDelegate:(UIViewController<PopupControllerDelegate> *)delegate; - (void)showHelloWorldPopup; - (void)dismissAllPopups; @end All we did was set up the properties we needed and public methods of initialization, showing a simple pop-up window, closing all the pop-up windows. And also added a small Action for the button inside the popup window in the PopupController.
PopupController.m :
Push me!
#import "PopupController.h" @implementation PopupController - (id)initWithDelegate:(UIViewController<PopupControllerDelegate> *)delegate { self = [super init]; if (self) { // self.activePopups = [NSMutableArray array]; // self.delegate = delegate; } return self; } - (void)showHelloWorldPopup { PopupView *popup = [self popupFromRestorationID:@"text"]; [self configurePopup:popup]; [self showPopup:popup]; } - (IBAction)touchedButton:(UIButton *)sender { [self.delegate touchedPopupButton:sender]; } - (void)dismissAllPopups { for (UIView *popup in activePopups) { [self hidePopup:popup]; } } <...> During initialization, we immediately set a delegate for our class.
I divided the showHelloWorldPopup method code into three other methods to make it easier to read: we initialize the pop-up window, configure it and show it.
When a user touches a button on a pop-up window, we notify our delegate.
The dismissAllPopups method simply traverses all pop-up windows in the general array and closes each.
Let's add the missing methods:
Push me!
<...> - (PopupView *)popupFromRestorationID:(NSString *)restorationID { // .xib NSArray *allViews = [[NSBundle mainBundle] loadNibNamed:@"PopupView.xib" owner:self options:nil]; // for (PopupView *view in allViews) { // restorationIdentifier , , , if ([view.restorationIdentifier isEqualToString:restorationID]) { view.alpha = 0.0f; [self.delegate.view addSubview:view]; return view; } } // ! return nil; } - (void)showPopup:(PopupView *)popup { // innerPopupView 50% [popup.innerPopupView setTransform:CGAffineTransformMakeScale(0.5, 0.5)]; // [UIView animateWithDuration:0.2f animations:^{ // popup.alpha = 1.0f; // 100% [popup.innerPopupView setTransform:CGAffineTransformMakeScale(1.0, 1.0)]; }]; // [popup.backgroundView addGestureRecognizer:[[UITapGestureRecognizer alloc] initWithTarget:self action:@selector(dismissAllPopups)]]; // [activePopups addObject:popup]; } - (void)hidePopup:(UIView *)popup { // [UIView animateWithDuration:0.2f animations:^{ // popup.alpha = 0.0f; } completion:^(BOOL finished){ // ViewController'a [popup removeFromSuperview]; }]; // , [activePopups removeObject:popup]; } - (void)configurePopup:(PopupView *)popup forName:(NSString *)name { // popup.popupTitleLabel.text = @"Popup Title"; // popup.popupTextLabel.text = @"Hello World!"; // [self setTitle:@"Okay"]; } - (void)setTitle:(NSString *)title forButton:(UIButton *)button { [button setTitle:title forState:UIControlStateNormal]; [button setTitle:title forState:UIControlStateSelected]; [button setTitle:title forState:UIControlStateHighlighted]; [button setTitle:title forState:UIControlStateDisabled]; } @end All the tricks in turn:
- Animations using UIView: everything that is written in the animations: block will be gradually executed over the specified time. The code from the completion block : executes instantly, immediately after the animations block :
- When the user clicks on the gray dimming, the pop-up window immediately disappears.
- If you simply set the button text for one state, for others the text will not change, so the setTitle: forButton method: changes the button text for all states at once
By creating a similar architecture of pop-up windows, we enable the client to change the appearance of windows without our participation. Let the client change the color, size, location of elements - as long as he does not touch the connection with the code, everything will work as it should.
Well, and lastly, I will show how our class works. We add PopupControllerDelegate.h :
#import <Foundation/Foundation.h> @protocol PopupControllerDelegate @required - (void)touchedPopupButton:(UIButton *)sender; @end Any UIViewController on which a pop-up window may appear should be able to handle the events of this window, respond to the PopupControllerDelegate protocol.
For example, we want to show HelloWorld a window after loading our view, which responds to the required protocol and which already has an initialized popupController object. Add the following code to viewDidAppear:
[popupController showHelloWorldPopup]; And add a popup event handler:
- (void)touchedPopupButton:(UIButton *)sender { // [popupController dismissAllPopups]; } Conclusion
Thank you for reading to the end!
The second part of the article was written at the Domodedovo airport before flying to Vancouver. It's late at night, I run out of coffee. Please understand
The following articles will be even more interesting topics: sharing content on social networks, PSPDFKit, Push Notifications.
Source: https://habr.com/ru/post/192100/
All Articles