Video calls between Aastra 8000i terminals via IP-PBX Asterisk
This article will discuss the desktop video terminal Aastra 8000i Desktop Media Phone. The terminal is part of the Aastra BluStar Ecosystem family and is well integrated with other products from Aastra - Aastra A400 and Aastra MX-ONE telephone exchanges. However, we will consider the option of interaction of these terminals with third-party IP-PBX for the organization of three-way video conferencing and video point-to-point communication.

This terminal has a lot of specific moments in the configuration. When using the 8000i with communication platforms from Aastra, all the nuances are already taken into account when configuring subscribers of the appropriate type, since the station is ready to interact with these devices and in fact tunes the Aastra 8000i terminals by itself.
')
In our laboratory, we tried to understand the nuances of the configuration and connect the device to an arbitrary IP-PBX, in particular to FreePBX ( Asterisk ).
The main difficulty in preparing the terminal for interaction with the IP station is that it must take some of its settings from the configuration file lying on the configuration server. Thus, before starting the configuration, we need to have the following:
The configuration server can be servers that support one of the protocols: TFTP, FTP, HTTP or HTTPS.
Our laboratory unit includes:
After switching on and initial loading the terminal, go to the main menu of the device: APP MENU → TOOLS → TERMINAL IDENTITY .

Here we need to enter the following network parameters for our terminal:
After that, you should decide where the terminal will need to take its tinctures from. Aastra 8000i can download configuration information using the following protocols:
The main nuance is that the first three protocols (HTTP, HTTPS, FTP) must be deployed with mandatory authorization (i.e. a simple FTP server with an anonymous user will not work). For each Aastra 8000i terminal, you will need to have a separate user on the corresponding server with the same username and password on your system in order for it to pick up its individual settings. Therefore, in our laboratory, we chose the option with TFTP, because it does not provide for authorization, there is no need to create users, and all the settings files are in the same folder.
Thus, in the next line of the configuration server we indicate the address of the TFTP server:
tftp: //172.31.31.250/bs , where 172.31.31.250 is the IP address of our tftp server, bs is the folder on it where all the configuration files are located.
After all this, you must click done , and the terminal will offer to restart to apply the entered parameters.
Each time the Aastra 8000i terminal is launched, the device contacts the address specified in the configuration server line (according to the appropriate protocol, in our case it is tftp). Each terminal expects to find four configuration files at this address. These files must have the following names:
Next, we consider in more detail the four files required to configure the Aastra 8000i terminal, with the MAC address E06995DDF6DB, with the SIP username 107, the password Aastra123, which must register with the SIP-registrar with the address 172.19.19.30, when using a tftp server with 172.31.31.250:
Aastra.cfg file

8000i.cfg file

File E06995DDF6DB.cfg

File 107.cfg

On our virtual server running vmware ESXi 5.1, installed FreePBX Asterisk v.11.2.1.


The system has three SIP accounts - 100, 101, 107 .
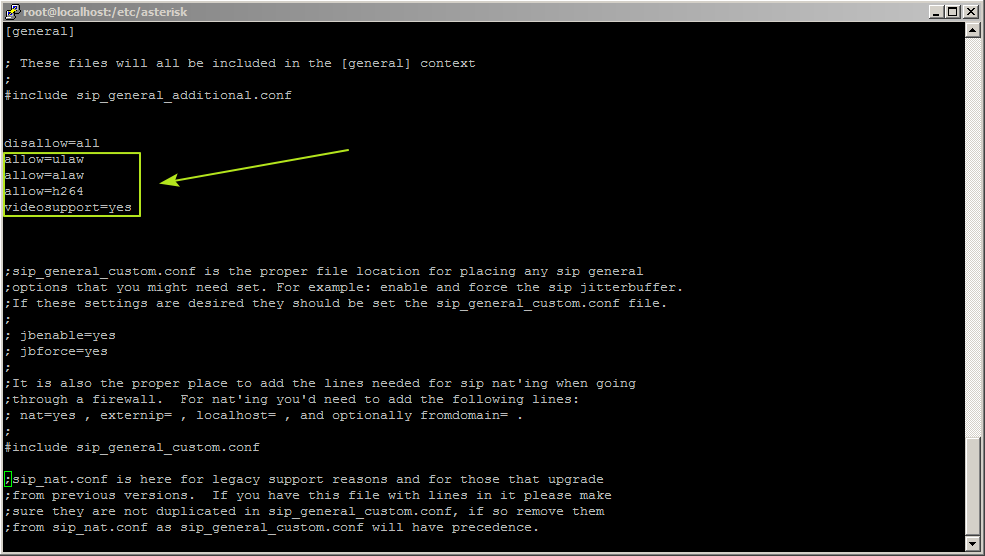
Next, you need to make sure that the sip.conf file, in the [general] section, contains options for supporting video transmission:
Now you can reboot the video terminal Blustar 8000i, and register it on our IP-PBX.

Thus, by registering three sip-users at our PBX, we can organize a three-way video conferencing. In addition, the devices work as ordinary SIP-phones with all available functions.
The ability to transfer video between terminals Aastra 8000i, when switching through Asterisk, was achieved only on the latest versions of FreePBX, which support the H.264 video codec.
This terminal has a lot of specific moments in the configuration. When using the 8000i with communication platforms from Aastra, all the nuances are already taken into account when configuring subscribers of the appropriate type, since the station is ready to interact with these devices and in fact tunes the Aastra 8000i terminals by itself.
')
In our laboratory, we tried to understand the nuances of the configuration and connect the device to an arbitrary IP-PBX, in particular to FreePBX ( Asterisk ).
The main difficulty in preparing the terminal for interaction with the IP station is that it must take some of its settings from the configuration file lying on the configuration server. Thus, before starting the configuration, we need to have the following:
- a working IP-PBX with free SIP accounts and support for the H.264 codec
- elevated configuration server (TFTP)
The configuration server can be servers that support one of the protocols: TFTP, FTP, HTTP or HTTPS.
Our laboratory unit includes:
- Video terminals: Aastra 8000i (with current firmware version 4.2.0-1260)
- FreePBX: Asterisk v 11.2.1 (deployed on a virtual machine running vmware ESXi 5.1)
Step 1. Terminal network settings
After switching on and initial loading the terminal, go to the main menu of the device: APP MENU → TOOLS → TERMINAL IDENTITY .
Here we need to enter the following network parameters for our terminal:
- IP address: 172.31.31.132
- Net mask: 255.255.255.0
- Default gateway: 172.31.31.3
- Primary DNS: 8.8.8.8
After that, you should decide where the terminal will need to take its tinctures from. Aastra 8000i can download configuration information using the following protocols:
- HTTP
- Https
- FTP
- Tftp
The main nuance is that the first three protocols (HTTP, HTTPS, FTP) must be deployed with mandatory authorization (i.e. a simple FTP server with an anonymous user will not work). For each Aastra 8000i terminal, you will need to have a separate user on the corresponding server with the same username and password on your system in order for it to pick up its individual settings. Therefore, in our laboratory, we chose the option with TFTP, because it does not provide for authorization, there is no need to create users, and all the settings files are in the same folder.
Thus, in the next line of the configuration server we indicate the address of the TFTP server:
tftp: //172.31.31.250/bs , where 172.31.31.250 is the IP address of our tftp server, bs is the folder on it where all the configuration files are located.
After all this, you must click done , and the terminal will offer to restart to apply the entered parameters.
Step 2. Preparing configuration files
Each time the Aastra 8000i terminal is launched, the device contacts the address specified in the configuration server line (according to the appropriate protocol, in our case it is tftp). Each terminal expects to find four configuration files at this address. These files must have the following names:
- aastra.cfg - contains configuration information that applies to all Blustar 8000i terminals.
- 8000i.cfg - contains information for a specific model (8000i).
- <mac-address> .cfg - contains information about the configuration of a specific Blustar 8000i device. The file name consists of the mac address of the terminal.
- user.cfg - contains information related to user configuration that is not configured via the Blustar 8000i terminal (i.e., SIP authentication, proxy settings, registrar settings, etc.). The * .cfg file can be edited even when the user is already logged in, but the changes will not take effect until the next restart.
Next, we consider in more detail the four files required to configure the Aastra 8000i terminal, with the MAC address E06995DDF6DB, with the SIP username 107, the password Aastra123, which must register with the SIP-registrar with the address 172.19.19.30, when using a tftp server with 172.31.31.250:
Aastra.cfg file
8000i.cfg file
File E06995DDF6DB.cfg
File 107.cfg
Step 3. Setting FreePBX options
On our virtual server running vmware ESXi 5.1, installed FreePBX Asterisk v.11.2.1.
The system has three SIP accounts - 100, 101, 107 .
Next, you need to make sure that the sip.conf file, in the [general] section, contains options for supporting video transmission:
- videosupport = yes
- allow = h264
Now you can reboot the video terminal Blustar 8000i, and register it on our IP-PBX.
Thus, by registering three sip-users at our PBX, we can organize a three-way video conferencing. In addition, the devices work as ordinary SIP-phones with all available functions.
PS
The ability to transfer video between terminals Aastra 8000i, when switching through Asterisk, was achieved only on the latest versions of FreePBX, which support the H.264 video codec.
Source: https://habr.com/ru/post/191976/
All Articles