Pixel-perfect layout of Android layouts
Developing an Android application interface is not an easy task. We have to take into account the variety of resolutions and pixel densities (DPI). Under the cat practical advice on the layout of the design of Android applications in Layout, which coincides with the layout on one device and on the rest stretches without obvious design violations: the fonts go beyond borders; huge empty places and other artifacts.
UPD: Post controversial, but many valuable tips in the comments
')
UPD: I am truly sorry, I, as a marketer, did not fully understand the topic and did not convey the most important idea of the post. This method was used on the project, where the customer provided the design and its requirement was that it looked the same as possible on all devices. Proceeding from this, such a method of layout appeared, it is controversial and not always suitable.
Many thanks to the commentators for correcting me and expressing their point of view on the correct layout. If you do not need an absolute coincidence of layouts, a summary of tips from the comments:
If necessary, take a look at our idea in the post.
On the iPhone, the layout is set absolutely and just under the two screens of the iPhone 4 and iPhone 5. We draw two layouts, write the application and impose semi-transparent screenshots on the layouts. There are no problems, the designer’s will is clear, and the developer, tester, or even the build server can verify that it is executed.
Under Android, we have two problems: you cannot draw an infinite number of layouts and you cannot compare an infinite number of devices with a finite number of layouts. Designers are checking by hand. Developers often have no idea how to properly stretch elements and scale fonts. The number of iterations tends to infinity.
To arrange the chaos, we came to the following layout algorithm. Layouts are drawn and implanted under any flagship full-hd phone. The rest is beautifully adapted. The finished application is checked by the designer on popular models of smartphones. The method works for all phones, for tablets (> 6.5 inches) separate layouts and layout are required.
At hand, I only have Nexus 4, let's take its screen characteristics for example.
Layouts of an unreal portfolio application that we will impose (full-size on click).


The main layout is done via nested LinearLayout. The dimensions of elements and blocks in pixels are transferred from the layout to weight and weightSum, respectively. Indenting impose FrameLayout or in the right places add Gravity .
For example, we will impose a cell of the list of applications:

Next we need a lot of DisplayMetrics-magic, we will write for it a static helper.
1184 is the height of the Nexus 4 without buttons, 768 is the width. These values are used to find out how many times the height and width of the device on which the application is running differ from the reference one.
The approach with weightSum is not acceptable for scrolling elements, their internal size along the scroll is not limited. For the layout of ScrollView and List we need to set their sizes in the code (130 is the height of the list item).
And then you can use the trick with weightSum.
The size of the application icons is given in the code:
Where 240 is the height of the list item, 20 is the height of the top and bottom indents.
Android does not provide a unit of measure proportional to the size of the screen. Font sizes are calculated based on the device diagonal:
Yes, the font sizes will have to be set in the code (36 font size in pixels on the original layout).
1. Use Nine-patch wherever possible, where not possible - redraw the design.
2. Simple elements draw using Shape
3. Avoid scaling images at runtime.
Nine-patch is a graphical resource containing meta-information about how it should be stretched. Read more in the documentation Android or Habré .
Nine-patch needs to be cut under all dpi: ldpi mdpi tvdpi hdpi, xhdpi, xxhdpi. Scaling resources while the application is running is bad, and scaling Nine-Patch results in unexpected artifacts. In no case do not set indents indents in Nine-patch, they are made out by separate layout elements in order to stretch proportionally to the content.

If the resource is easily decomposed into simple geometric shapes and gradients it is better to use xml-shape instead of cutting. For example, let's draw a background frame around the project in the list that we cut above as a Nine-patch.

Scaling graphics by Android is a time consuming and memory-intensive operation. Pictures inside Android are processed as bitmap. For example, our logo in the size of 500x500 from splashscreen will be unpacked into a bitmap of 1 Mb in size ( 4 bytes per pixel ), while scaling it creates another bitmap, say in 500kb. Or 1.5 MB of available 24 MB per process . We have repeatedly faced a lack of memory in projects rich in graphics.
Therefore, pictures that can not be described by either Nine-patch or Shape, I suggest to deliver in the application as a huge resource in the nodpi folder and when you first start to scale the image to the desired size and cache the result. This will allow us to speed up the application (not counting the first run) and reduce memory consumption.
For complex resources downloadable from the server (application icons on our layouts) is ideal if the server will give pictures of any size. As, for example, done on the project Stream . The application calculates the desired size of the picture for the screen of the smartphone where it is running, and requests them from the server.
PS tips are invented and the basis of the post is written by our Android guru Lesha, thank you very much!
How do you recommend to lay out layouts for Android? How many layouts does the designer draw? How do you handle graphic resources?
Subscribe to our blog (button on the right above). Every Thursday, interesting articles about mobile development, marketing and business of a mobile studio. Next article (September 5) "C # async on iOS and Android"
UPD: Post controversial, but many valuable tips in the comments
')
UPD: I am truly sorry, I, as a marketer, did not fully understand the topic and did not convey the most important idea of the post. This method was used on the project, where the customer provided the design and its requirement was that it looked the same as possible on all devices. Proceeding from this, such a method of layout appeared, it is controversial and not always suitable.
Many thanks to the commentators for correcting me and expressing their point of view on the correct layout. If you do not need an absolute coincidence of layouts, a summary of tips from the comments:
- Android Design in Action: Responsive Design video in English as the design of Android applications should stretch
- Supporting Multiple Screens basic information about the different sizes of screens of Android devices, DPI and how to adapt applications for multiple screens.
- Designing for Multiple Screens three great lessons from Google about the support for different screen resolutions and DPI, I recommend to start with it.
- silentnuke font scaling tip
Use different font sizes for different screen resolutions.
in values \ dimens.xml text_size = 16sp
in values-sw600dp \ dimens.xml text_size = 20sp
in values-sw720dp \ dimens.xml text_size = 24sp
If necessary, take a look at our idea in the post.
On the iPhone, the layout is set absolutely and just under the two screens of the iPhone 4 and iPhone 5. We draw two layouts, write the application and impose semi-transparent screenshots on the layouts. There are no problems, the designer’s will is clear, and the developer, tester, or even the build server can verify that it is executed.
Under Android, we have two problems: you cannot draw an infinite number of layouts and you cannot compare an infinite number of devices with a finite number of layouts. Designers are checking by hand. Developers often have no idea how to properly stretch elements and scale fonts. The number of iterations tends to infinity.
To arrange the chaos, we came to the following layout algorithm. Layouts are drawn and implanted under any flagship full-hd phone. The rest is beautifully adapted. The finished application is checked by the designer on popular models of smartphones. The method works for all phones, for tablets (> 6.5 inches) separate layouts and layout are required.
At hand, I only have Nexus 4, let's take its screen characteristics for example.
Layouts of an unreal portfolio application that we will impose (full-size on click).
Layout
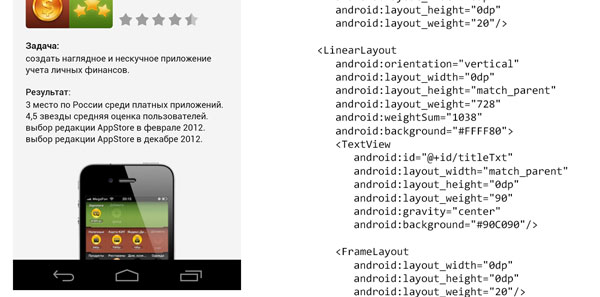
The main layout is done via nested LinearLayout. The dimensions of elements and blocks in pixels are transferred from the layout to weight and weightSum, respectively. Indenting impose FrameLayout or in the right places add Gravity .
For example, we will impose a cell of the list of applications:
<FrameLayout xmlns:android="http://schemas.android.com/apk/res/android" android:layout_width="match_parent" android:layout_height="match_parent"> <!-- 488 = 768 - 40 ( ) - 40 ( ) - 200 ( ) --> <LinearLayout android:id="@+id/appLstItemLayout" android:orientation="horizontal" android:layout_width="0dp" android:layout_height="0dp" android:gravity="center" android:weightSum="488" android:background="@drawable/bg_item"> <ImageView android:id="@+id/appImg" android:layout_width="wrap_content" android:layout_height="match_parent" android:adjustViewBounds="true" android:src="@drawable/square"/> <FrameLayout android:layout_width="0dp" android:layout_height="0dp" android:layout_weight="20"/> <!-- 130 = - 40 ( ) --> <LinearLayout android:orientation="vertical" android:layout_width="0dp" android:layout_height="match_parent" android:layout_weight="428" android:gravity="center" android:weightSum="130"> <FrameLayout android:layout_width="0dp" android:layout_height="0dp" android:layout_weight="55"/> <TextView android:id="@+id/titleTxt" android:layout_width="match_parent" android:layout_height="wrap_content" android:gravity="bottom"/> <FrameLayout android:layout_width="0dp" android:layout_height="0dp" android:layout_weight="10"/> <ru.touchin.MySimpleAndAwesomeRatingBar android:id="@+id/appRatingBar" android:layout_width="match_parent" android:layout_height="wrap_content" android:layout_gravity="center_vertical"/> <FrameLayout android:layout_width="0dp" android:layout_height="0dp" android:layout_weight="25"/> </LinearLayout> </LinearLayout> </FrameLayout> Next we need a lot of DisplayMetrics-magic, we will write for it a static helper.
public class S { private static final int ORIGINAL_VIEW_WIDTH = 768; private static final int ORIGINAL_VIEW_HEIGHT = 1184; private static final int ORIGINAL_VIEW_DIAGONAL = calcDiagonal(ORIGINAL_VIEW_WIDTH, ORIGINAL_VIEW_HEIGHT); private static int mWidth; private static int mHeight; private static int mDiagonal; private static float mDensity; static { DisplayMetrics metrics = TouchinApp.getContext().getResources().getDisplayMetrics(); mWidth = metrics.widthPixels; mHeight = metrics.heightPixels; mDiagonal = calcDiagonal(mWidth, mHeight); mDensity = metrics.density; } public static int hScale(int value){ return (int)Math.round(value * mWidth / (float) ORIGINAL_VIEW_WIDTH); } public static int vScale(int value){ return (int)Math.round(value * mHeight / (float) ORIGINAL_VIEW_HEIGHT); } public static int dScale(int value){ return (int)Math.round(value * mDiagonal / (float) ORIGINAL_VIEW_DIAGONAL); } public static int pxFromDp(int dp){ return (int)Math.round(dp * mDensity); } private static int calcDiagonal(int width, int height){ return (int)Math.round(Math.sqrt(width * width + height * height)); } } 1184 is the height of the Nexus 4 without buttons, 768 is the width. These values are used to find out how many times the height and width of the device on which the application is running differ from the reference one.
ScrollView and List
The approach with weightSum is not acceptable for scrolling elements, their internal size along the scroll is not limited. For the layout of ScrollView and List we need to set their sizes in the code (130 is the height of the list item).
if (view == null) { view = mInflater.inflate(R.layout.item_app_list, viewGroup, false); view.setLayoutParams(new AbsListView.LayoutParams (ViewGroup.LayoutParams.MATCH_PARENT, S.dScale(130))); } And then you can use the trick with weightSum.
Pictures
The size of the application icons is given in the code:
view.findViewById(R.id.appImg).setLayoutParams(new LinearLayout.LayoutParams(S.dScale(240) - S.pxFromDp(20), S.dScale(240) - S.pxFromDp(20))); Where 240 is the height of the list item, 20 is the height of the top and bottom indents.
Fonts
Android does not provide a unit of measure proportional to the size of the screen. Font sizes are calculated based on the device diagonal:
textSizePx = originalTextSizePx * (deviceDiagonalPx / originalDeviceDiagonalPx ) Yes, the font sizes will have to be set in the code (36 font size in pixels on the original layout).
titleTxt.setTextSize(TypedValue.COMPLEX_UNIT_PX, S.dScale(36)); Graphics Tips
1. Use Nine-patch wherever possible, where not possible - redraw the design.
2. Simple elements draw using Shape
3. Avoid scaling images at runtime.
Nine-patch is a graphical resource containing meta-information about how it should be stretched. Read more in the documentation Android or Habré .
Nine-patch needs to be cut under all dpi: ldpi mdpi tvdpi hdpi, xhdpi, xxhdpi. Scaling resources while the application is running is bad, and scaling Nine-Patch results in unexpected artifacts. In no case do not set indents indents in Nine-patch, they are made out by separate layout elements in order to stretch proportionally to the content.
Shape
If the resource is easily decomposed into simple geometric shapes and gradients it is better to use xml-shape instead of cutting. For example, let's draw a background frame around the project in the list that we cut above as a Nine-patch.
<layer-list xmlns:android="http://schemas.android.com/apk/res/android" > <!-- "shadow" --> <item> <shape android:shape="rectangle" > <corners android:radius="5px" /> <solid android:color="#08000000"/> </shape> </item> <item android:bottom="1px" android:right="1px" android:left="1px" android:top="1px"> <shape android:shape="rectangle" > <corners android:radius="4px" /> <solid android:color="#10000000"/> </shape> </item> <item android:bottom="2px" android:right="2px" android:left="2px" android:top="2px"> <shape android:shape="rectangle" > <corners android:radius="3px" /> <solid android:color="#10000000"/> </shape> </item> <item android:bottom="3px" android:right="3px" android:left="3px" android:top="3px"> <shape android:shape="rectangle"> <corners android:radius="2px" /> <solid android:color="#ffffff"/> </shape> </item> </layer-list> Pictures
Scaling graphics by Android is a time consuming and memory-intensive operation. Pictures inside Android are processed as bitmap. For example, our logo in the size of 500x500 from splashscreen will be unpacked into a bitmap of 1 Mb in size ( 4 bytes per pixel ), while scaling it creates another bitmap, say in 500kb. Or 1.5 MB of available 24 MB per process . We have repeatedly faced a lack of memory in projects rich in graphics.
Therefore, pictures that can not be described by either Nine-patch or Shape, I suggest to deliver in the application as a huge resource in the nodpi folder and when you first start to scale the image to the desired size and cache the result. This will allow us to speed up the application (not counting the first run) and reduce memory consumption.
For complex resources downloadable from the server (application icons on our layouts) is ideal if the server will give pictures of any size. As, for example, done on the project Stream . The application calculates the desired size of the picture for the screen of the smartphone where it is running, and requests them from the server.
http://<secret_domain>/media/img/movies/vposter/plain/22741680/< px>_< px>.jpg PS tips are invented and the basis of the post is written by our Android guru Lesha, thank you very much!
How do you recommend to lay out layouts for Android? How many layouts does the designer draw? How do you handle graphic resources?
Subscribe to our blog (button on the right above). Every Thursday, interesting articles about mobile development, marketing and business of a mobile studio. Next article (September 5) "C # async on iOS and Android"
Source: https://habr.com/ru/post/191910/
All Articles