Raspberry Pi in the hands of an amateur or home rocking torrent
 Good day, comrades.
After a month of using RasPi *, I matured to write instructions for beginners on how to turn RasPi into a home mini torrent rocking server.
And now I present to your attention a three-step instruction.
Step one. Training.
For the server, and work in general, we will need:
- memory card*
- Power Supply
- microUSB cable to power the board
- HDMI cable or AV cable
- Usb keyboard
- Portable Hard Drive*
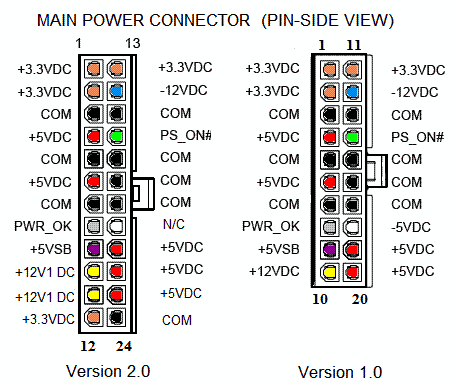 |  |
| The RasPi itself doesn’t eat much, but we’ll have a hard drive connected, which means we need more powerful power . More specifically, a voltage of 5 volts and a current of 2 amps . I took the usual power supply from the computer. On my PSU was a 20-pin main power connector . For the board, you need a +5 VSB contact, purple in the picture. I connected two USB to it - one will power the board and the other hard drive. In the photo, from the purple wire is powered to two USB, blue - ground, two closed connectors - so that the PSU works without a motherboard. (?)Hint: Usually, the red wire on the USB is power, the black is ground. | |
I connected my board via AV to the TV tuner on the computer.
Step two. Installing the distribution on the map and setting.
To install, we need the Win32DiskImager utility. You can download from here .
And the image of the Raspbian “wheezy” system. You can download from here .
')
(!) There is an image of an already installed system with a configured torrent. You can only put on a card with a capacity of at least 8Gb. You can download it from here , but it’s better to install a clean system.
So let's get started:
- Connect the memory card to the computer
- Run Win32DiskImager
- In the Image File field, enter the path in the downloaded Raspbian “wheezy” image *
- Select the letter of your card in the Device section.
- Click the Write button and wait until the image has been written.
- Safely remove the card
Now insert the memory card in RasPi and run. As a result, this menu appears before us:
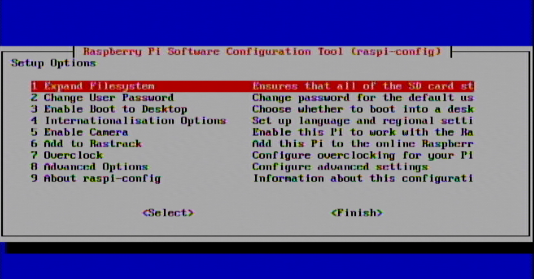
Consider its points:
- Expand Filesystem - increase the size of the main partition for the entire map. We start right away.
- Change User Password - set an account password. The default account is “pi”.
- Enable Boot to Desktop - boot into the graphical interface. You can disable, because everything is done through the console.
- Internationalization Options - setting the system language. Russian is present.
- Enable Camera - enable / disable camera support.
- Add to Rastrack - add your device to the common database. Not necessary.
- Overclock - increase processor power. It is better not to touch, although nothing terrible will happen. (?)
- Advanced Options - advanced settings.
- Overscan - configure the departure sweep.
- Hostname is the name of your mini-server on the network.
- Memoy Split - memory allocation for the graphics processor (?) . If the graph. interface disabled - 16Mb.
- SSH - remote control. Enable.
- Update - update the current distribution.
- About raspi-config - information about this settings menu.
After changing the settings you need, click Finish * .
The system goes into reboot, and then asks to enter the user name - "pi" and password. If you have not set your own, then the default password is “raspberry”.
Step three. Installing a torrent and connecting HDD.
First, increase the size of the swap *
Enter:
| sudo nano / etc / dphys-swapfile |
Now mount the disk.
Since I sometimes disable the portable HDD from the RasPi and use it for its intended purpose, I have it in the NTFS file system. What is not good, because we are on Linux, then the disk must be in the linux file system, but then the HDD will be unavailable in windows.You can independently format the disk to another file system according to the instructions located here .
Let's go back to the mount.
1. Enter into the console:
| sudo apt-get install ntfs-3g |
2. Create a folder to mount the HDD
| sudo mkdir / mnt / usb_hdd |
3. We give full access to the folder to all groups.
| sudo chmod 777 / mnt / usb_hdd |
4. Open the file:
| sudo nano / etc / fstab |
5. Register at the end of the file:
| / dev / sda1 / mnt / usb_hdd ntfs-3g defaults, rw 0 1 |
And press [Ctrl + O ], then [Enter] and exit [Ctrl + X].
Install the Transmission torrent client.
In the console:
sudo apt-get install transmission-daemon Now we change the settings, but for this the torrent needs to be stopped:
sudo /etc/init.d/transmission-daemon stop Now open the configuration file: sudo nano /etc/transmission-daemon/settings.json Basic options:
|
After changing the settings, press [Ctrl + O ], then [Enter] and exit [Ctrl + X]. And run the Transmission command:
sudo /etc/init.d/transmission-daemon start Now reboot:
sudo reboot How to manage the torrent?
You can access the web interface for this you need to enter in the address bar of the browser the RasPi ip-address and, through a colon, the transmission port. For example: http://192.168.1.42:9091 You can also use the program Transmission Remote GUI (there is below).
It also needs to register the IP and port. And also login and password, if you set their request in the settings of the transmission earlier.
Afterword.
What if there is no network and cable is plugged in?
You can check the availability of the network using the ping command.For example:
ping habrahabr.ru You can exit with the command [Ctrl + C].
If nothing happens, then you have no network. Then we write:
sudo nano /etc/network/interfaces And we change
iface eth0 inet dhcp on
iface eth0 inet static and add after this:
address 192.168.1.42 netmask 255.255.255.0 gateway 192.168.1.1 address - IP address
netmask - subnet mask
gateway - the main gateway
Commands:
sudo - placed in front of the teams, and runs them on behalf of the administrator. {return}sudo reboot - reboot.
sudo halt - shutdown.
Ctrl + C - exit from an open console program.
Shift + Ins - paste text into the console.
Ctrl + Ins - copy selected text from the console.
Up and down arrows - scroll through previously typed commands.
nano is a console text editor. {return}
sudo apt-get install [package name] - package installation * . {return}
sudo mkdir [folder name] - create a folder. {return}
sudo chmod [value] - change group permissions for a folder. [more] {return}
sudo raspi-config - open system settings.
The list of programs for managing RasPi from Windows:
- WinSCP is a client for connecting to the file system of our mini-server via SFTP. [Download]
- PuTTY is a client for remote connection to the OS console via SSH protocol. [Download]
- Transmission Remote GUI - a graphical client for remote control transmission GUI. [Download]
Source: https://habr.com/ru/post/191854/
All Articles