Custom layouts. Part 2. CellLayout
Hello again, colleagues.
And again, I came to you with the topic of custom markup. This time, I decided to do some kind of “cellular” markup.
The meaning is simple: the entire area of the container is divided into a grid of square cells of the same size, and each descendant can take arbitrary cells on this grid. Using a similar marking it is possible to make a beautiful mosaic of buttons or pictures, without resorting to the numerous enclosed layouts. And, since this is a layout specially sharpened for this purpose, it will work very quickly.
Before we begin our main task - the measurement and positioning of descendants, we need to ask what properties they will possess.
Each of our descendants will have the following properties:
')
Let's define these properties in xml:
We also defined the global properties of our layout'a - the number of columns ( columns ) and the indentation inside the cell ( spacing ).
Well, let's get started. Create a ViewGroup inheritor, let's call it CellLayout.
The first thing we want to do is our own LayoutParams, which will contain the previously defined attributes, and which will be assigned to all descendants of our container.
LayoutParams is a special container of attributes that is passed to each descendant of the container. Each container can define its own non-standard attributes for descendants (for example, RelativeLayout introduces a lot of layout_ * attributes available to descendants, such as layout_toLeftOf). Therefore, each type of container can extend the base set. The base set is implemented in ViewGroup.LayoutParams (layout_width, layout_height). In addition, there is also a slightly expanded version - MarginLayoutParams, which adds margins.
Nothing special, as you can see, is not here. A subclass of ViewGroup.LayoutParams storing our properties and loading them from XML.
Now, we want to ask our container to pass an instance of this particular class to all its descendants. To do this, override several methods ViewGroup:
In general, I think the names of the methods speak for themselves.
Now that we have defined and implemented the attributes of the descendants, we need to add the dimension of our component and all its descendants. To do this, we will override the onMeasure method.
Before we continue, I have to tell you a little about the onMeasure method and its features so that there are no further questions. As you might guess, this is the method where we measure our component, as well as all its descendants. But there are features.
He has two of them:
At the entrance to onMeasure do not come the width and height, and the so-called specifications of the width and height, be they wrong. The specification here is a number in which two numbers are encoded - the size of the corresponding side, as well as its “mode”. Of course, it depends on what we pass to the layout_width and layout_height of our component. The mode is one of three options, as we have to use the size passed by the ancestor when measuring our component. There are three of them:
We will have the following measurement strategy:
Let's see how I implemented it:
ready, our component now changes its height depending on what we put into it. But where are the descendants? We will add them in the next step: layout.
The next step is the layout. It runs in the wonderful onLayout method. Everything is much simpler here - we go through each of our kids and position it in the right cell.
As you can see, everything is quite simple.
Suddenly, that's all. At the exit, we got a simple layout, which allows us to place elements relative to the grid. Let's look at an example:
Result:

Hooray, kind of what we wanted.
As you can see, creating your own layout is not a difficult task, as it may seem. Of course, I by no means urge you to reinvent your bikes, but sometimes it becomes necessary, and it’s better to know how it works than not to know, isn’t it?
As usual, all the sources are available on my github .
I am also there, just for fun, I added animated mixing of elements. The mood was good.
Thanks for attention.
EDIT : After the article was published, the reader contacted me and said that the Androids launcher uses a similar layout manager, which is even called the same.
I give a link, maybe someone will come in handy.
https://github.com/chrislacy/LauncherJellyBean/blob/master/src/com/launcherjellybean/android/CellLayout.java .
And again, I came to you with the topic of custom markup. This time, I decided to do some kind of “cellular” markup.
The meaning is simple: the entire area of the container is divided into a grid of square cells of the same size, and each descendant can take arbitrary cells on this grid. Using a similar marking it is possible to make a beautiful mosaic of buttons or pictures, without resorting to the numerous enclosed layouts. And, since this is a layout specially sharpened for this purpose, it will work very quickly.
Descendant properties
Before we begin our main task - the measurement and positioning of descendants, we need to ask what properties they will possess.
Each of our descendants will have the following properties:
- left - left cell
- top - top cell
- cellsWidth - the number of horizontal cells
- cellsHeight - the number of cells in the vertical
')
Let's define these properties in xml:
<resources> <declare-styleable name="CellLayout"> <attr name="columns" format="integer" /> <attr name="spacing" format="dimension" /> <attr name="layout_left" format="integer" /> <attr name="layout_top" format="integer" /> <attr name="layout_cellsWidth" format="integer" /> <attr name="layout_cellsHeight" format="integer" /> </declare-styleable> </resources> We also defined the global properties of our layout'a - the number of columns ( columns ) and the indentation inside the cell ( spacing ).
LayoutParams
Well, let's get started. Create a ViewGroup inheritor, let's call it CellLayout.
The first thing we want to do is our own LayoutParams, which will contain the previously defined attributes, and which will be assigned to all descendants of our container.
LayoutParams is a special container of attributes that is passed to each descendant of the container. Each container can define its own non-standard attributes for descendants (for example, RelativeLayout introduces a lot of layout_ * attributes available to descendants, such as layout_toLeftOf). Therefore, each type of container can extend the base set. The base set is implemented in ViewGroup.LayoutParams (layout_width, layout_height). In addition, there is also a slightly expanded version - MarginLayoutParams, which adds margins.
public static class LayoutParams extends ViewGroup.LayoutParams { int top = 0; int left = 0; int width = 1; int height = 1; public LayoutParams(Context context, AttributeSet attrs) { super(context, attrs); TypedArray a = context.obtainStyledAttributes(attrs, R.styleable.CellLayout); left = a.getInt(R.styleable.CellLayout_layout_left, 0); top = a.getInt(R.styleable.CellLayout_layout_top, 0); height = a.getInt(R.styleable.CellLayout_layout_cellsHeight, -1); width = a.getInt(R.styleable.CellLayout_layout_cellsWidth, -1); a.recycle(); } public LayoutParams(ViewGroup.LayoutParams params) { super(params); if (params instanceof LayoutParams) { LayoutParams cellLayoutParams = (LayoutParams) params; left = cellLayoutParams.left; top = cellLayoutParams.top; height = cellLayoutParams.height; width = cellLayoutParams.width; } } public LayoutParams() { this(MATCH_PARENT, MATCH_PARENT); } public LayoutParams(int width, int height) { super(width, height); } } Nothing special, as you can see, is not here. A subclass of ViewGroup.LayoutParams storing our properties and loading them from XML.
Now, we want to ask our container to pass an instance of this particular class to all its descendants. To do this, override several methods ViewGroup:
public ViewGroup.LayoutParams generateLayoutParams(AttributeSet attrs) { return new CellLayout.LayoutParams(getContext(), attrs); } protected boolean checkLayoutParams(ViewGroup.LayoutParams p) { return p instanceof CellLayout.LayoutParams; } protected ViewGroup.LayoutParams generateLayoutParams(ViewGroup.LayoutParams p) { return new CellLayout.LayoutParams(p); } protected ViewGroup.LayoutParams generateDefaultLayoutParams() { return new LayoutParams(); } In general, I think the names of the methods speak for themselves.
Measurement
Now that we have defined and implemented the attributes of the descendants, we need to add the dimension of our component and all its descendants. To do this, we will override the onMeasure method.
Before we continue, I have to tell you a little about the onMeasure method and its features so that there are no further questions. As you might guess, this is the method where we measure our component, as well as all its descendants. But there are features.
He has two of them:
- We must call the setMeasuredDimension (width, height); method, where width and height are our dimensions.
- Input data are transmitted to him in a rather interesting way.
At the entrance to onMeasure do not come the width and height, and the so-called specifications of the width and height, be they wrong. The specification here is a number in which two numbers are encoded - the size of the corresponding side, as well as its “mode”. Of course, it depends on what we pass to the layout_width and layout_height of our component. The mode is one of three options, as we have to use the size passed by the ancestor when measuring our component. There are three of them:
- EXACTLY is simple. This is either a clearly defined size (for example, layout_width = "100dp"), or match_parent, then we will receive the size of the corresponding side of the ancestor.
- AT_MOST - indicates that our component can be no more than a specified value. For example, if it has layout_width = ”wrap_content” and the ancestor has a fixed width, then AT_MOST <ancestor width>
- UNSPECIFIED - when it is impossible to determine the height. Used by some containers like ScrollView, and, in general, allows ancestors to grow in a given direction without limit.
We will have the following measurement strategy:
- Horizontally, in case the ancestor specifies dimensions as AT_MOST or EXACTLY, we use the size that is strictly specified by the ancestor. It is a bit more difficult if the ancestor sets the size to UNSPECIFIED. The problem is that we cannot calculate the width without knowing the size of the cell, which in turn is calculated as the width / number of cells in a row given by the ancestor. So, I decided that if we do not have an ancestor-defined width, we will use 48dp as the cell size and calculate the width for this basis.
- Vertically, since our component will most likely be used inside the ScrollView and get UNSPECIFIED, in this case, we will define the lowest child on the Y axis and set the border as its lower boundary. Otherwise, we will simply grow no more than what our ancestor gives us. Since our component does not support internal scrolling, anything that is not UNSPECIFIED does not make much sense.
Let's see how I implemented it:
onLayout
protected void onMeasure(int widthMeasureSpec, int heightMeasureSpec) { int widthMode = MeasureSpec.getMode(widthMeasureSpec); int heightMode = MeasureSpec.getMode(heightMeasureSpec); int width = 0; int height = 0; if (widthMode == MeasureSpec.AT_MOST || widthMode == MeasureSpec.EXACTLY) { width = MeasureSpec.getSize(widthMeasureSpec); cellSize = (float) (getMeasuredWidth() - getPaddingLeft() - getPaddingRight()) / (float) columns; } else { cellSize = TypedValue.applyDimension(TypedValue.COMPLEX_UNIT_DIP, DEFAULT_CELL_SIZE, getResources() .getDisplayMetrics()); width = (int) (columns * cellSize); } int childCount = getChildCount(); View child; int maxRow = 0; for (int i = 0; i < childCount; i++) { child = getChildAt(i); LayoutParams layoutParams = (LayoutParams) child.getLayoutParams(); int top = layoutParams.top; int w = layoutParams.width; int h = layoutParams.height; int bottom = top + h; int childWidthSpec = MeasureSpec.makeMeasureSpec((int) (w * cellSize) - spacing * 2, MeasureSpec.EXACTLY); int childHeightSpec = MeasureSpec.makeMeasureSpec((int) (h * cellSize) - spacing * 2, MeasureSpec.EXACTLY); child.measure(childWidthSpec, childHeightSpec); if (bottom > maxRow) { maxRow = bottom; } } int measuredHeight = Math.round(maxRow * cellSize) + getPaddingTop() + getPaddingBottom(); if (heightMode == MeasureSpec.EXACTLY) { height = MeasureSpec.getSize(heightMeasureSpec); } else if (heightMode == MeasureSpec.AT_MOST) { int atMostHeight = MeasureSpec.getSize(heightMeasureSpec); height = Math.min(atMostHeight, measuredHeight); } else { height = measuredHeight; } setMeasuredDimension(width, height); } ready, our component now changes its height depending on what we put into it. But where are the descendants? We will add them in the next step: layout.
Layout
The next step is the layout. It runs in the wonderful onLayout method. Everything is much simpler here - we go through each of our kids and position it in the right cell.
protected void onLayout(boolean changed, int l, int t, int r, int b) { int childCount = getChildCount(); View child; for (int i = 0; i < childCount; i++) { child = getChildAt(i); LayoutParams layoutParams = (LayoutParams) child.getLayoutParams(); int top = (int) (layoutParams.top * cellSize) + getPaddingTop() + spacing; int left = (int) (layoutParams.left * cellSize) + getPaddingLeft() + spacing; int right = (int) ((layoutParams.left + layoutParams.width) * cellSize) + getPaddingLeft() - spacing; int bottom = (int) ((layoutParams.top + layoutParams.height) * cellSize) + getPaddingTop() - spacing; child.layout(left, top, right, bottom); } } As you can see, everything is quite simple.
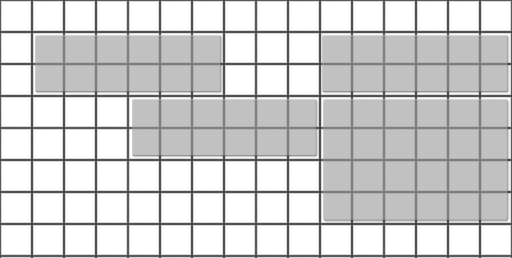
Result
Suddenly, that's all. At the exit, we got a simple layout, which allows us to place elements relative to the grid. Let's look at an example:
Loose layout
<ScrollView xmlns:android="http://schemas.android.com/apk/res/android" xmlns:tools="http://schemas.android.com/tools" xmlns:cl="http://schemas.android.com/apk/res/com.evilduck.celllayout" android:layout_width="match_parent" android:layout_height="wrap_content" tools:ignore="HardcodedText" > <com.evilduck.celllayout.CellLayout android:id="@+id/cell_layout" android:layout_width="match_parent" android:layout_height="wrap_content" cl:columns="4" cl:spacing="1dp" tools:context=".MainActivity" > <TextView android:layout_width="wrap_content" android:layout_height="wrap_content" cl:layout_cellsHeight="1" cl:layout_cellsWidth="1" cl:layout_left="0" cl:layout_top="0" android:background="#00FF00" android:text="View 1" /> <TextView android:layout_width="wrap_content" android:layout_height="wrap_content" cl:layout_cellsHeight="1" cl:layout_cellsWidth="3" cl:layout_left="1" cl:layout_top="0" android:background="#FFFF00" android:text="View 2" /> <TextView android:layout_width="wrap_content" android:layout_height="wrap_content" cl:layout_cellsHeight="1" cl:layout_cellsWidth="1" cl:layout_left="1" cl:layout_top="1" android:background="#FFFFFF" android:text="View 3" /> <TextView android:layout_width="wrap_content" android:layout_height="wrap_content" cl:layout_cellsHeight="1" cl:layout_cellsWidth="1" cl:layout_left="0" cl:layout_top="1" android:background="#00FFF0" android:text="View 4" /> <TextView android:layout_width="wrap_content" android:layout_height="wrap_content" cl:layout_cellsHeight="1" cl:layout_cellsWidth="2" cl:layout_left="2" cl:layout_top="1" android:background="#00FA00" android:text="View 5" /> <TextView android:layout_width="wrap_content" android:layout_height="wrap_content" cl:layout_cellsHeight="2" cl:layout_cellsWidth="3" cl:layout_left="0" cl:layout_top="2" android:background="#AAFFAA" android:text="View 5" /> <TextView android:layout_width="wrap_content" android:layout_height="wrap_content" cl:layout_cellsHeight="2" cl:layout_cellsWidth="1" cl:layout_left="3" cl:layout_top="2" android:background="#45CCdd" android:text="View 6" /> <TextView android:layout_width="wrap_content" android:layout_height="wrap_content" cl:layout_cellsHeight="3" cl:layout_cellsWidth="1" cl:layout_left="0" cl:layout_top="4" android:background="#FF00FF" android:text="View 7" /> <TextView android:layout_width="wrap_content" android:layout_height="wrap_content" cl:layout_cellsHeight="3" cl:layout_cellsWidth="1" cl:layout_left="1" cl:layout_top="4" android:background="#FFFF00" android:text="View 8" /> <TextView android:layout_width="wrap_content" android:layout_height="wrap_content" cl:layout_cellsHeight="3" cl:layout_cellsWidth="1" cl:layout_left="2" cl:layout_top="4" android:background="#00FF00" android:text="View 9" /> <TextView android:layout_width="wrap_content" android:layout_height="wrap_content" cl:layout_cellsHeight="1" cl:layout_cellsWidth="1" cl:layout_left="3" cl:layout_top="4" android:background="#FFFF00" android:text="View 10" /> <TextView android:layout_width="wrap_content" android:layout_height="wrap_content" cl:layout_cellsHeight="1" cl:layout_cellsWidth="1" cl:layout_left="3" cl:layout_top="5" android:background="#FFFFFF" android:text="View 11" /> <TextView android:layout_width="wrap_content" android:layout_height="wrap_content" cl:layout_cellsHeight="1" cl:layout_cellsWidth="1" cl:layout_left="3" cl:layout_top="6" android:background="#555555" android:text="View 12" /> </com.evilduck.celllayout.CellLayout> </ScrollView> Result:
Hooray, kind of what we wanted.
Conclusion
As you can see, creating your own layout is not a difficult task, as it may seem. Of course, I by no means urge you to reinvent your bikes, but sometimes it becomes necessary, and it’s better to know how it works than not to know, isn’t it?
As usual, all the sources are available on my github .
I am also there, just for fun, I added animated mixing of elements. The mood was good.
Thanks for attention.
EDIT : After the article was published, the reader contacted me and said that the Androids launcher uses a similar layout manager, which is even called the same.
I give a link, maybe someone will come in handy.
https://github.com/chrislacy/LauncherJellyBean/blob/master/src/com/launcherjellybean/android/CellLayout.java .
Source: https://habr.com/ru/post/191842/
All Articles