Installing and using Archipel for managing virtual machines
I want to share a convenient way to create and manage virtual machines in graphical mode for OS Linux.
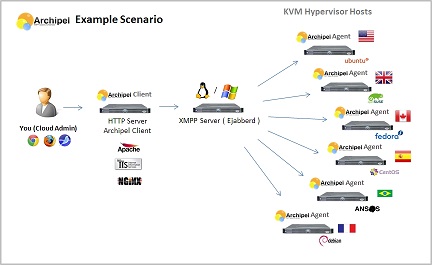
Archipel is a scalable solution for managing virtual machines and hypervisors using a graphical interface. Archipel allows you to conveniently manage as several virtual machines on one server, as well as hundreds of virtual machines hosted on dozens of servers in different data centers.
Archipel uses the XMPP protocol as an exchange system between its subsystems. More information can be found on the project website archipelproject.org
Archipel is a very simple application, it’s enough to install
$ easy_install archipel-agent && archipel-initinstall But in order for everything to work, you need to make some preliminary adjustments.
To work, archipel requires an installed and running XMPP server (ejabberd) and any web server for hosting the Archipel Agent (UI).
We will install Archipel in a single-server version on Ubuntu 12.04 LTS, in our case, ejabberd, nginx and virtual machines will be located on the same server. In more serious projects, all this can be spread across different servers.
Install and configure XMPP
We need to install ejabberd version 2.1.6 or higher with the mod_admin_extra and ejabberd_xmlrpc modules enabled (optional).
Install ejabberd from the repository:
$ aptitude install ejabberd The mod_admin_extra module is already included in the delivery, so you do not need to install it separately.
')
We configure ejabberd for work of archipel.
By default, in debian / Ubuntu, the ejabberd settings are sharpened for a simple “chat server”, and they are not quite suitable for our tasks where a full-featured XMPP server is required.
To work, you must have the correct FQDN (full domain name). To avoid further rakes, it is highly desirable to install it before configuring ejabberd and match the hostname.
For example, we will use the FQDN of archipel.example.com . When installing, be sure to replace this address with the address of your server.
echo archipel.example.com > /etc/hostname hostname -b -F /etc/hostname Also do not forget to change / etc / hosts according to your address.
Make sure that the server is available at the specified address from the server and your computer.
ping archipel.example.com Save a copy of the ejabberd configuration file
mv /etc/ejabberd/ejabberd.cfg /etc/ejabberd/ejabberd.cfg.orig The ejabberd.cfg file itself is reduced to the following form:
Hidden text
%%% %%% ejabberd configuration file %%% %%% Archipel Sample Configuration %%% ======================= %%% OVERRIDE STORED OPTIONS %% loglevel: Verbosity of log files generated by ejabberd. {loglevel, 3}. %%% ================ %%% SERVED HOSTNAMES %% CHANGE FQDN to your FQDN {hosts, ["FQDN"]}. %%% =============== %%% LISTENING PORTS {listen, [ %% If you have compiled the ejabberd-xmlrpc, uncomment the following line %% {4560, ejabberd_xmlrpc, []}, {5222, ejabberd_c2s, [ {access, c2s}, starttls, {certfile, "/etc/ejabberd/ejabberd.pem"}, {max_stanza_size, 65536000} ]}, {5269, ejabberd_s2s_in, [ {max_stanza_size, 65536000} ]}, {5280, ejabberd_http, [ http_bind, http_poll, web_admin ]}, %% Make a SSL version of the BOSH service {5281, ejabberd_http, [ http_bind, http_poll, tls,{certfile, "/etc/ejabberd/ejabberd.pem"} ]} ]}. %%% =============== %%% S2S {route_subdomains, s2s}. {s2s_use_starttls, true}. {s2s_default_policy, allow}. {s2s_certfile, "/etc/ejabberd/ejabberd.pem"}. %%% ============== %%% AUTHENTICATION {auth_method, internal}. %%% =============== %%% TRAFFIC SHAPERS {shaper, normal, {maxrate, 1000}}. {shaper, fast, {maxrate, 50000}}. %%% ==================== %%% ACCESS CONTROL LISTS %% CHANGE FQDN to your FQDN {acl, admin, {user, "admin", "FQDN"}}. {acl, local, {user_regexp, ""}}. %% if you HAVE NOT compiled ejabberd-xmlrpc module, you %% Need to declare all your hypervisors as ejabberd admin %% The hypervisor JID is defined in archipel.conf. By default it %% it is hypervisor@FQDN {acl, admin, {user, "hypervisor", "FQDN"}}. %% {acl, admin, {user, "hypervisor-x", "FQDN"}}. %% {acl, admin, {user, "hypervisor-n", "FQDN"}}. %%% ============ %%% ACCESS RULES {access, max_user_sessions, [{10, all}]}. {access, local, [{allow, local}]}. {access, c2s, [{deny, blocked}, {allow, all}]}. {access, c2s_shaper, [{none, admin}, {none, all}]}. {access, s2s_shaper, [{fast, all}]}. {access, announce, [{allow, admin}]}. {access, configure, [{allow, admin}]}. {access, muc_admin, [{allow, admin}]}. {access, muc, [{allow, all}]}. {access, muc_create, [{allow, local}]}. {access, pubsub_createnode, [{allow, all}]}. %%% ================ %%% DEFAULT LANGUAGE {language, "en"}. %%% ======= %%% REGISTRATION {access, register, [{allow, all}]}. {registration_timeout, infinity}. %%% ======= %%% MODULES {modules, [ {mod_adhoc, []}, {mod_announce, [{access, announce}]}, % requires mod_adhoc {mod_caps, []}, {mod_configure,[]}, {mod_disco, []}, {mod_http_bind,[ {max_inactivity, 480} % timeout value for the BOSH, usefull for a large number of VM ]}, {mod_irc, []}, {mod_last, []}, {mod_muc, [ {access, muc}, {access_create, muc_create}, {access_persistent, muc_create}, {access_admin, muc_admin} ]}, {mod_offline, []}, {mod_privacy, []}, {mod_private, []}, {mod_pubsub, [ % requires mod_caps {access_createnode, pubsub_createnode}, {ignore_pep_from_offline, true}, {last_item_cache, false}, {plugins, ["flat", "hometree", "pep"]}, {max_items_node, 1000} ]}, {mod_register, [ {access, register} ]}, {mod_roster, []}, {mod_shared_roster,[]}, {mod_time, []}, {mod_vcard, []}, {mod_version, []}, {mod_admin_extra, []} ]}. In the ejabberd.cfg file, we change all occurrences of the FQDN to your server address.
sed –i 's/FQDN/archipel.example.com/' /etc/ejabberd/ejabberd.cfg Create a new self-signed certificate for ejabberd. Be sure to include your FQDN in the Common Name request.
openssl req -new -x509 -newkey rsa:1024 -days 3650 -keyout /etc/ejabberd/privkey.pem -out /etc/ejabberd/ejabberd.pem openssl rsa -in /etc/ejabberd/privkey.pem -out /etc/ejabberd/privkey.pem cat /etc/ejabberd/privkey.pem >> /etc/ejabberd/ejabberd.pem rm /etc/ejabberd/privkey.pem After that, run ejabberd
service ejabberd start If ejabberd does not start - check the presence of the beam process in the list of running processes. If necessary, kill this process.
There is also an error when changing the hostname after the first launch of ejabberd. In this case, you need to clear the / var / lib / ejabberd / directory and restart the ejabbed service.
You can check the performance using ejabberdctl:
$ ejabberdctl status The node ejabberd@archipel is started with status: started ejabberd 2.1.10 is running in that node Create an administrator account (the name is desirable to use admin):
$ ejabberdctl register admin archipel.example.com yourpassword We are done with configuring ejabberd and now we can proceed to install the Archipel agent
Archipel Agent.
The work of the Archipel agent is meaningless without the means of virtualization and the hypervisor that it will manage.
For work we need:
- Modern distribution with KVM support
- qemu
- libvirt (0.8.7+)
- python 2.7+
- qemu-img
- python-imaging
- numpy
Install the dependencies:
aptitude install python-libvirt libvirt-bin libvirt0 python-imaging python-numpy qemu-utils python-pip qemu-kvm python-sqlalchemy-ext And the agent himself:
easy_install archipel-agent archipel-initinstall Create pubsub nodes:
archipel-tagnode --jid=admin@archipel.example.com --password=YOURPASSWORD --create archipel-rolesnode --jid=admin@archipel.example.com --password=YOURPASSWORD --create archipel-adminaccounts --jid=admin@archipel.example.com --password=YOURPASSWORD --create Here admin and YOURPASSWORD need to be replaced with your data that was entered when creating the administrator account.
Now you need to check the file /etc/archipel/archipel.conf, especially to pay attention to the line xmpp_server, it should match with your FQDN.
We try to start the agent:
/etc/init.d/archipel start If the launch fails, you can start the agent manually using the
runarchipel , so errors will be visible.Agent logs are stored in the
/var/log/archipel/archipel.log fileIf the launch was successful, our agent will be added to the list of connected jabber users:
$ ejabberdctl connected_users archipel.example.com@archipel.example.com/archipel.example.com To check the correctness of the work, you can perform an extended test:
archipel-testxmppserver --jid=admin@FQDN --password=YOURPASSWORD If you do not have the xmlrpc - 8 module installed test and then run with errors. It will not affect further work.
Client installation.
The Archipel client is written entirely in Javascript. It does not require any server languages such as php, python, java or databases to work. Simply unpack the archive and place it in the web server folder.
You can also use the public version of the client, available at app.archipelproject.org .
For example, we will install nginx and place the files on our server. Instead of nginx there can be any http server, and it does not have to be located on the same server as the agent.
# aptitude install nginx cd /usr/share/nginx/www/ wget http://nightlies.archipelproject.org/latest-archipel-client.tar.gz tar zxf latest-archipel-client.tar.gz Now you can open the Archipel client in the browser:
archipel.example.com/ArchipelThis page should display:

For Jabber ID, enter admin@archipel.example.com and the administrator password.
Do not forget to replace archipel.example.com everywhere with your server address !!!
After logging in, you can start creating virtual machines.
Installing Windows Server 2008R2 as a guest OS
For example, let's try to create a virtual machine with Windows Server 2008 R2.
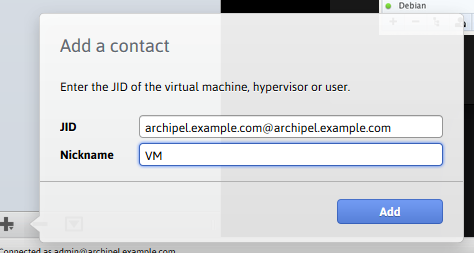
First of all, we need to add a hypervisor account to our contact list.
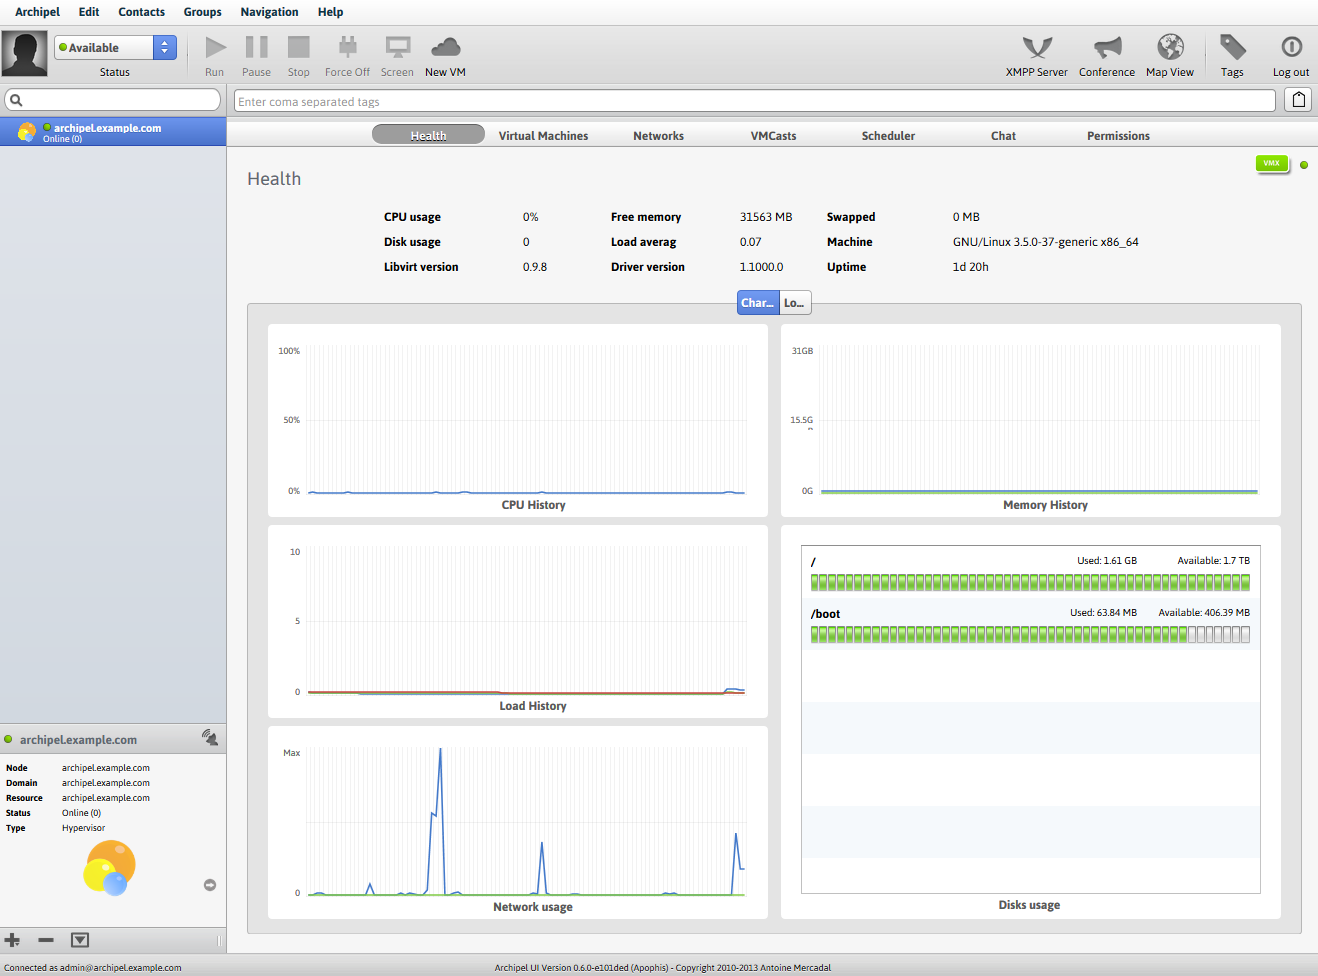
After adding, when selecting an agent in the list, this status of the server with download schedules will be visible:
To create a new virtual machine, select the necessary agent, go to the Virtual Machines item, at the bottom, press the button with “+”. In the window that appears, fill in the data. Fields are informational and are not required, unless you specify the name of the machine - it will be generated automatically. After creating the account, the virtual machine will ask to authorize it. I advise you to give authorization permission.
After that, you can select a new virtual machine in the contact list and go to its configuration.
In the settings you can specify the size of RAM (Definition> Basics> Memory), the number of processors (Definition> Basics> Virtual CPUs), the boot order (Definition> Basics> Boot from); add virtual disks cd / dvd (Definition> Virtual Medias), virtual networks (Definition> Virtual Nics), disks (Disks) and others. You can also make snapshots and connect via a virtual console to a computer.
Virtual network settings are in the agent, Networks menu.
After changing the settings to save them, click on the Validate button.
To start the test server, we will add a new network with the type Nat, in this case the virtual machine will go online with the IP address of the host. If you want to allocate a separate IP for a virtual machine, you can use Bridge mode.
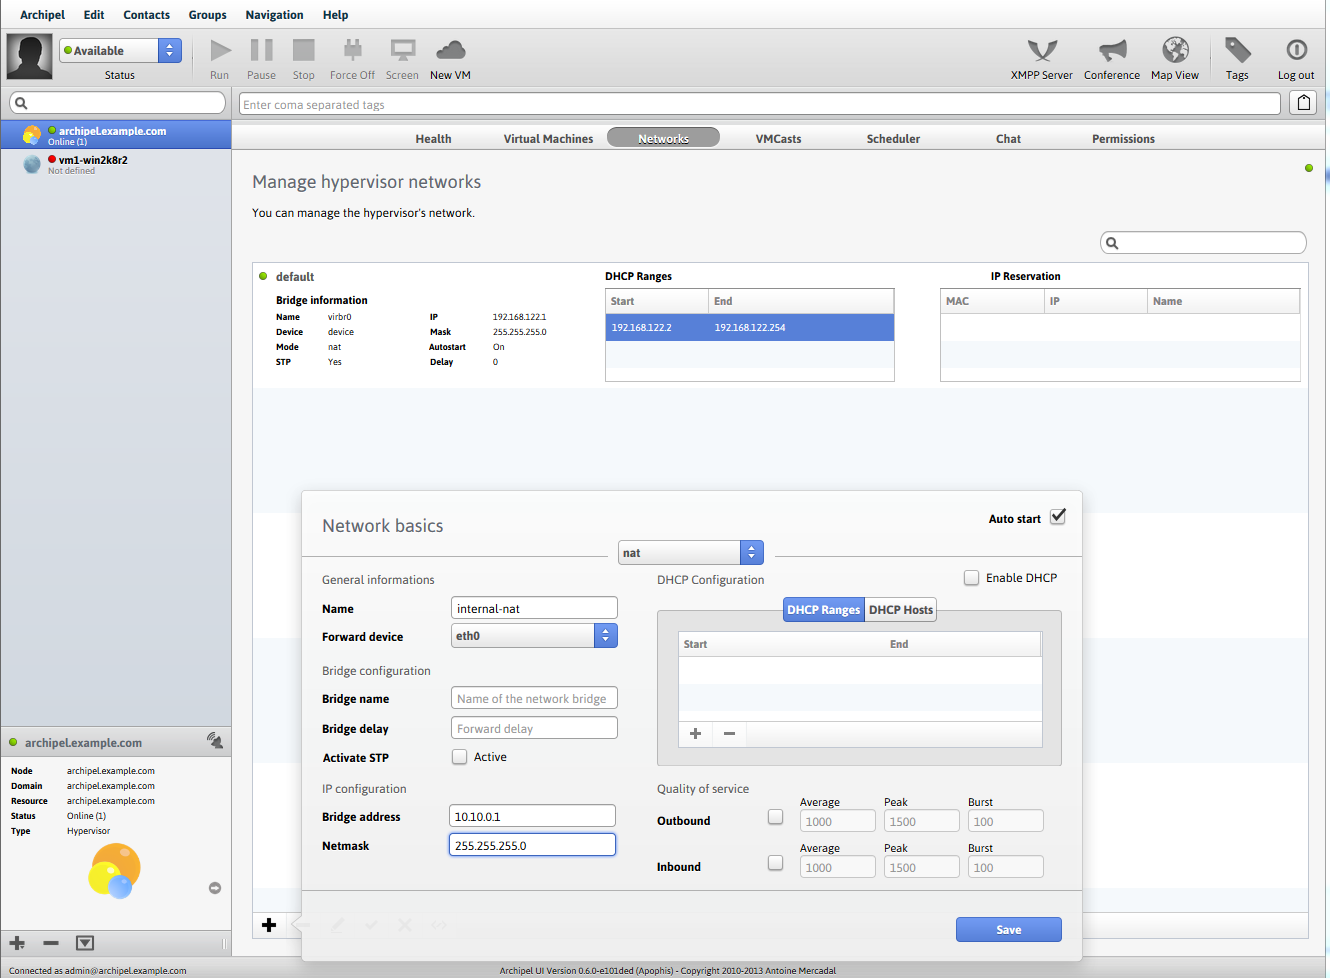
Do not forget to start the network (select the network and click the checkmark button at the bottom of the list)
Add a system disk
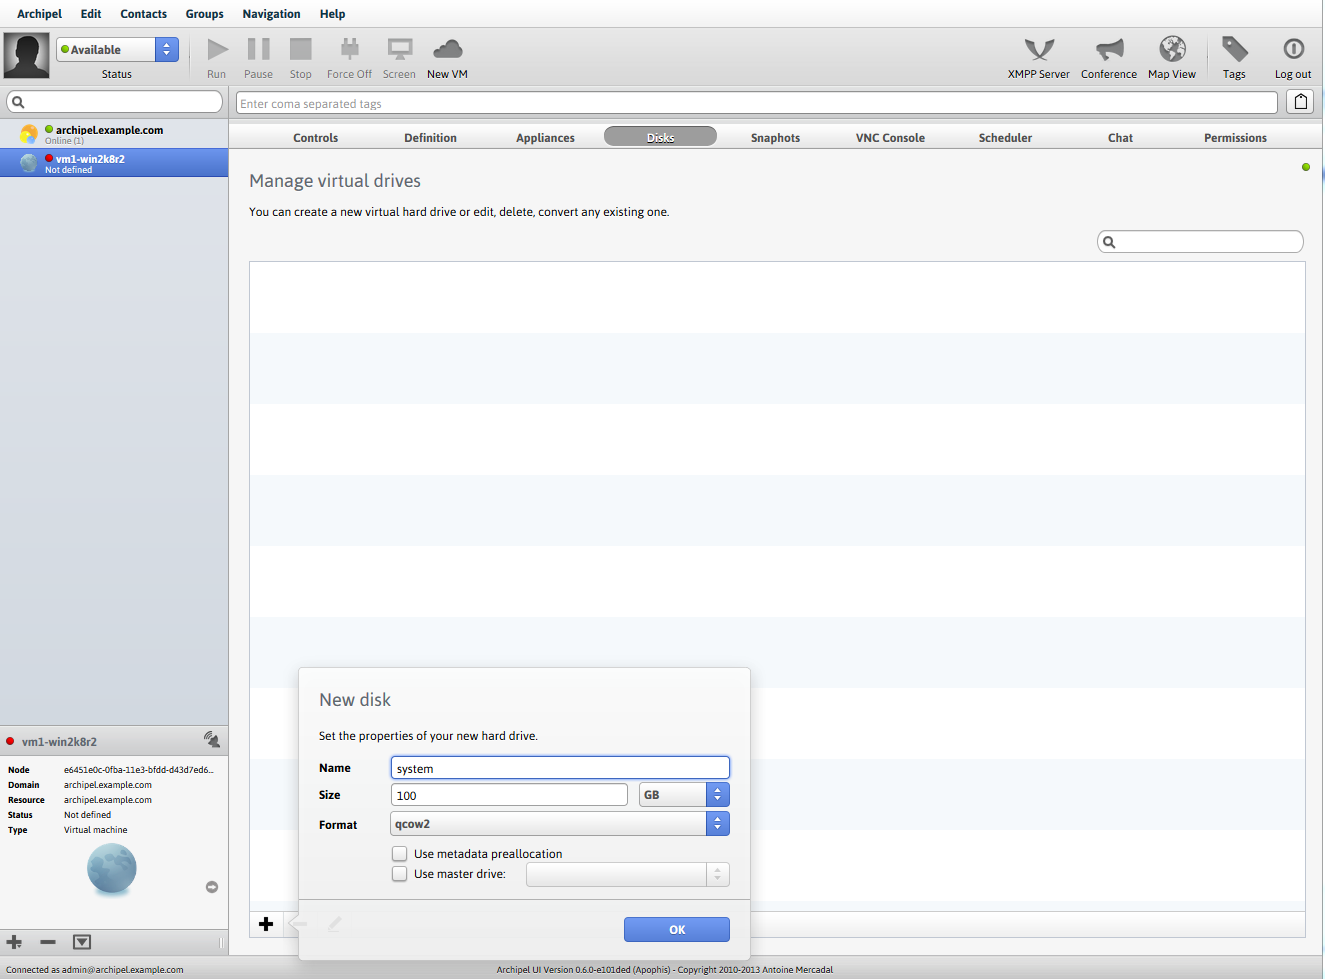
All disks and images are stored in the / vm / folder on the hypervisor computer.
Pre-add to the / vm / iso / iso-images of windows server and virtio drivers (available at alt.fedoraproject.org/pub/alt/virtio-win/latest/images/bin )
In Definition> Virtual Medias we connect the following disks:
- Drive type: disk, source type: file, source: “your created disk”, bus: virtio, target: vda
- Drive type: cdrom, source type: file, source: iso with distribution, bus: ide, target: hdc
- Drive type: cdrom, source type: file, source: iso with virtio, bus: usb , target: hde
We use USB for the second cdrom due to the fact that only 1 IDE channel is supported.
In Virtual Nics create a network card:
Type: Network, Source: the name of the created network with nat, Model: virtio
After that, you can start the virtual machine (Controls> Start) and connect to the VNC Console
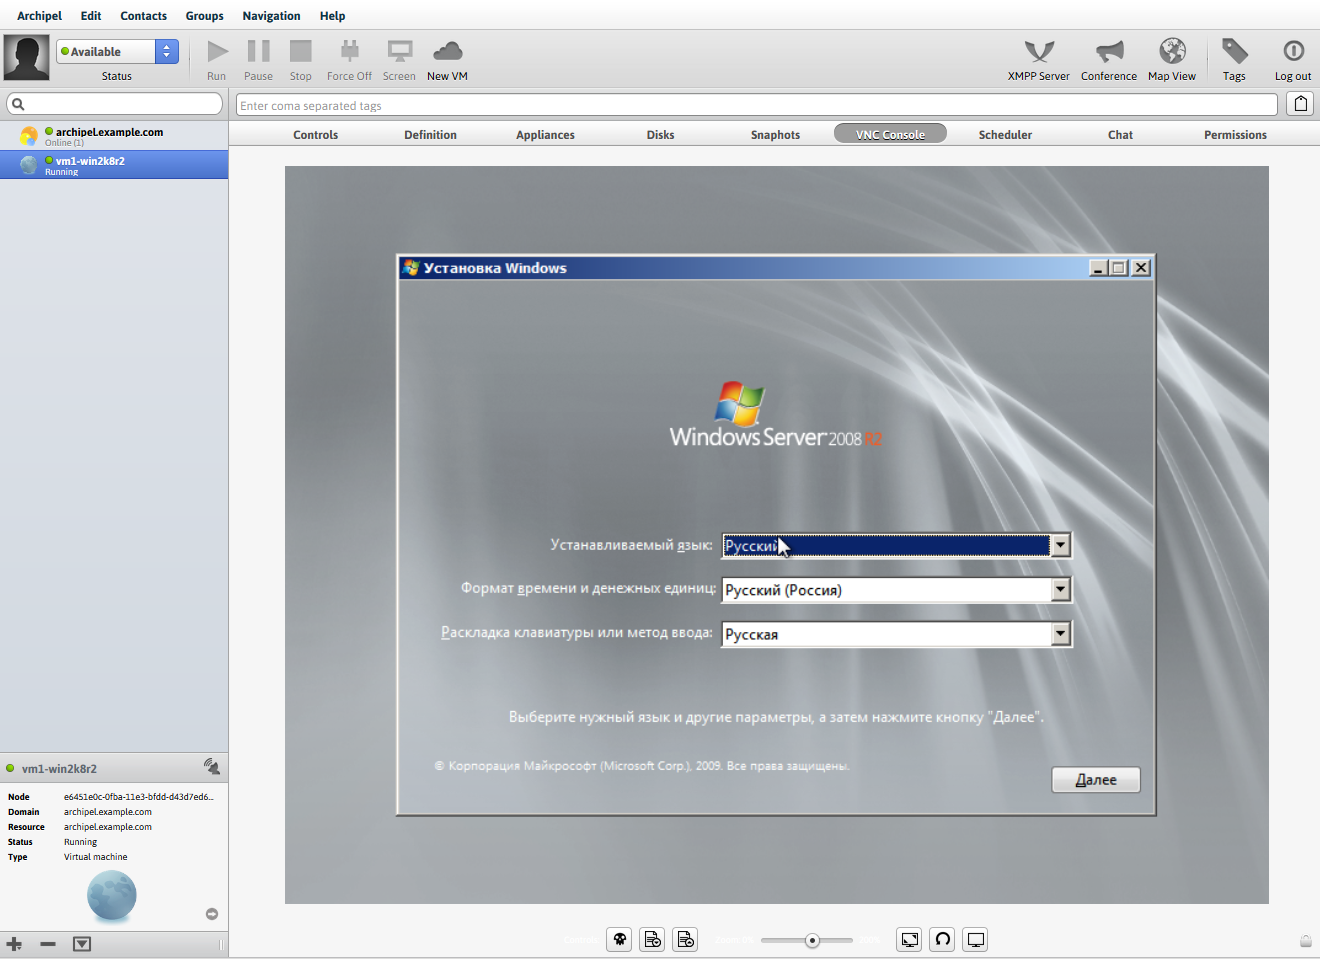
Windows 2008 R2 knows nothing about virtio, so we connected the second cdrom with the drivers and now we can download them.
In the list of drivers, select Red Hat VirtIO SCSI Controller, after they are loaded, a system disk appears on which you can install Windows.
Further installation takes place as usual. After installation, do not forget to add another 2 drivers from the virtio: Network and Baloon disk (needed to change memory)
It remains to give access to the services of a virtual machine using port mapping or installing and configuring vpn, but this is a topic for other articles.
Source: https://habr.com/ru/post/191764/
All Articles