Create a Zoomquilt
I wanted to continue the series of posts about all sorts of interesting self-reference gizmos and I decided to write about the Zoomquilt genre. I did a search, I saw that one post on Habré already exists. I thought and thought and decided that I would write a post anyway, but it will be technical, about the technology of creating Zoomquilt.
For a start, about the genre itself. It's easier to show than to tell.
zoomquilt.org
')
zoomquilt2.madmindworx.com/zoomquilt2.swf
www.syfy.com/tinman/oz
www.deviantart.com/art/kopfsalat-digital-edition-30069104
We are approaching the picture and instead of seeing pixels the size of a fist at some point, we see the following picture, we repeat the procedure many times (in fact, it looks like one quite smooth process and if the artists did a good job, then the “joints” we we will not see at all) and eventually we arrive at the original picture. In general, multikvayny, only for artists.
And how is such a thing done? Of course, you can draw it all frame by frame, moreover, some talented animators would have done it well. But practically in all existing works of this genre it is indicated that these are fruits of collective creativity. Usually there is a team of artists, a project coordinator and a programmer who actually assembles it all together and writes an interface.
Next on the creation technology. Under the cut a lot of pictures.
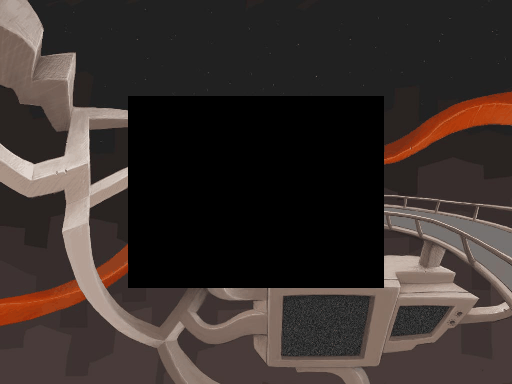
I began to look for information on the technology of creation and I was lucky. I came across the original images of which was the very first Zoomquilt. Here is one of them:

Each “source” is an image of 1024 * 768 in the middle of which there is a black rectangle 512 * 384 in size.
To begin with, let's deal with the build of zoomquilt from these “sources”. Let's turn the pictures into full-fledged frames of the future animation.
It is clear that the black rectangle in the center of the image must be replaced by the next image in the list (the first image is as follows for the last image), reduced to the appropriate sizes, and before replacing, you must do the same procedure with the next image, etc. It smells like infinite recursion without a stop condition, but fortunately, the images are discrete and it is impossible to draw anything smaller than a pixel. The black rectangle in the center of the picture will decrease until it disappears completely and at this point the replacement can be stopped.
From the received frames, of course, you can collect animation

But it will be intermittent, because only key frames are involved
For each keyframe, you can create by approximating several intermediate ones.
The final version was too heavy to insert into the article, but it differs little from the original video.
This is all wonderful, we can already assemble from the finished one, but someone must draw the “source code”, so that all the transitions are so smooth that it is not clear where one picture ends and another begins.
And everything happens, as I understand it, like this:
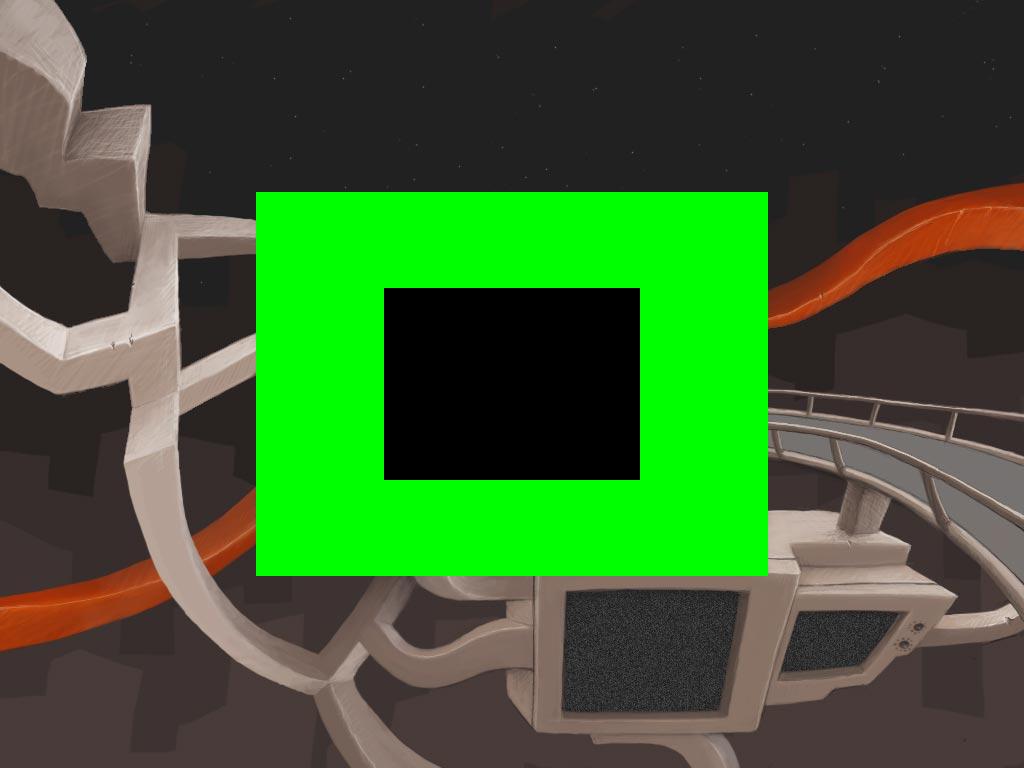
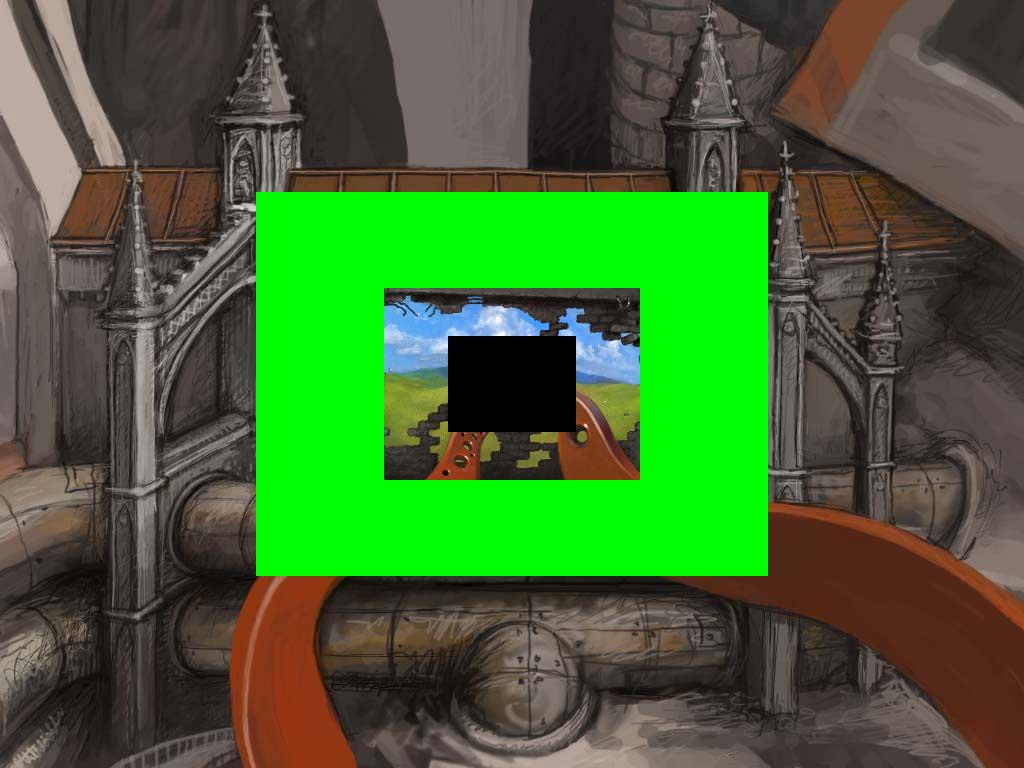
First, the project coordinator gives one or several artists the following image:

Artists should fill the entire green zone and should not touch the black one (they can touch it more precisely, but everything that they draw there will not be taken into account during assembly). Then, when the artists finish the work, each of the paintings can be transferred to two artists. One gets the picture in this form:
Another, in this:
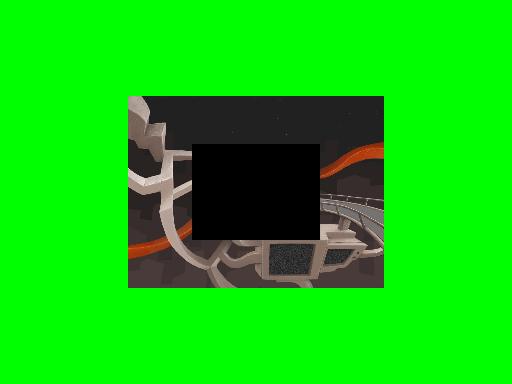
Please note that the dimensions of the green rectangles are the same in both paintings, because the artist delivers the contents of this rectangle to the coordinator (well, or rather the coordinator cuts the necessary part from the sent picture).
When a sufficient number of paintings are typed (minimum - 2, maximum is not limited), the coordinator will give out to several (probably the strongest in the project) artists (their number is equal to the number of artists who received empty paintings at the beginning of the work) paintings like this:
This closes the circle, the uroboros quietly digests the tail, and we enthusiastically look at the next piece.
Here is the code that I wrote for this article, I wrote all forty minutes on my knee, so if someone writes humanly, I will insert it here with pleasure and gratitude.
It has all the necessary functions to create your Zoomquilt. If something is not clear, ask.
If there are artists who wish, write in a personal, I can be a coordinator, we will make a habrazvilt :).
If anyone knows more works in this genre, send links.
Thanks for attention.
For a start, about the genre itself. It's easier to show than to tell.
zoomquilt.org
')
zoomquilt2.madmindworx.com/zoomquilt2.swf
www.syfy.com/tinman/oz
www.deviantart.com/art/kopfsalat-digital-edition-30069104
We are approaching the picture and instead of seeing pixels the size of a fist at some point, we see the following picture, we repeat the procedure many times (in fact, it looks like one quite smooth process and if the artists did a good job, then the “joints” we we will not see at all) and eventually we arrive at the original picture. In general, multikvayny, only for artists.
And how is such a thing done? Of course, you can draw it all frame by frame, moreover, some talented animators would have done it well. But practically in all existing works of this genre it is indicated that these are fruits of collective creativity. Usually there is a team of artists, a project coordinator and a programmer who actually assembles it all together and writes an interface.
Next on the creation technology. Under the cut a lot of pictures.
I began to look for information on the technology of creation and I was lucky. I came across the original images of which was the very first Zoomquilt. Here is one of them:
Each “source” is an image of 1024 * 768 in the middle of which there is a black rectangle 512 * 384 in size.
To begin with, let's deal with the build of zoomquilt from these “sources”. Let's turn the pictures into full-fledged frames of the future animation.
It is clear that the black rectangle in the center of the image must be replaced by the next image in the list (the first image is as follows for the last image), reduced to the appropriate sizes, and before replacing, you must do the same procedure with the next image, etc. It smells like infinite recursion without a stop condition, but fortunately, the images are discrete and it is impossible to draw anything smaller than a pixel. The black rectangle in the center of the picture will decrease until it disappears completely and at this point the replacement can be stopped.
From the received frames, of course, you can collect animation
But it will be intermittent, because only key frames are involved
For each keyframe, you can create by approximating several intermediate ones.
The final version was too heavy to insert into the article, but it differs little from the original video.
This is all wonderful, we can already assemble from the finished one, but someone must draw the “source code”, so that all the transitions are so smooth that it is not clear where one picture ends and another begins.
And everything happens, as I understand it, like this:
First, the project coordinator gives one or several artists the following image:
Artists should fill the entire green zone and should not touch the black one (they can touch it more precisely, but everything that they draw there will not be taken into account during assembly). Then, when the artists finish the work, each of the paintings can be transferred to two artists. One gets the picture in this form:
Another, in this:
Please note that the dimensions of the green rectangles are the same in both paintings, because the artist delivers the contents of this rectangle to the coordinator (well, or rather the coordinator cuts the necessary part from the sent picture).
When a sufficient number of paintings are typed (minimum - 2, maximum is not limited), the coordinator will give out to several (probably the strongest in the project) artists (their number is equal to the number of artists who received empty paintings at the beginning of the work) paintings like this:
This closes the circle, the uroboros quietly digests the tail, and we enthusiastically look at the next piece.
Here is the code that I wrote for this article, I wrote all forty minutes on my knee, so if someone writes humanly, I will insert it here with pleasure and gratitude.
import PIL from PIL import Image from images2gif import writeGif X,Y = 1024,768 IMAGES_NUM = 46 def render_images(raw_images): cur_index=0 count = 0 while True: count+=1 if count == 100: break prev_index = cur_index - 1 if prev_index == -1: prev_index = len(raw_images)-1 cur_image = raw_images[cur_index] prev_image = raw_images[prev_index] prev_image.paste(cur_image.resize((X/2,Y/2)),(X/4,Y/4)) cur_index = prev_index def before_image(im): im1=Image.new("RGB",(X,Y),(0,255,0)) im1.paste(im.resize((X/2,Y/2)),(X/4,Y/4)) return im1 def after_image(im): im1 = im.copy() im1=im1.resize((X*2,Y*2)) im1.paste(new_image(),(X/2,Y/2)) return im1 def between_image(im1,im2): im = im1.copy() im=im.resize((X*2,Y*2)) im.paste(before_image(im2),(X/2,Y/2)) return im def new_image(): im1=Image.new("RGB",(X,Y),(0,255,0)) im1.paste(Image.new("RGB",(X/2,Y/2),(0,0,0)),(X/4,Y/4)) return im1 def between_frames(key_frame, number_of_frames): step_x = X/4/number_of_frames step_y = Y/4/number_of_frames l=[] for i in xrange(1,number_of_frames+1): x=step_x*i y=step_y*i l.append(key_frame.crop((x,y,x+(X-2*x),y+(Y-2*y))).resize((X,Y))) return l def crop_image(im): im1=im.copy() x,y=im.size black=Image.new("RGB",(X/2,Y/2),(0,0,0)),(X/4,Y/4) if x==X: im1.paste(black) elif x==X*2: im1=im1.crop((X/2,Y/2,X/2+X,Y/2+Y)) im1.paste(black) return im1 It has all the necessary functions to create your Zoomquilt. If something is not clear, ask.
If there are artists who wish, write in a personal, I can be a coordinator, we will make a habrazvilt :).
If anyone knows more works in this genre, send links.
Thanks for attention.
Source: https://habr.com/ru/post/190786/
All Articles