Creating patch on Wix with PatchWiz. Part 2

Good day to all! In my last article, I set the task of generating patches and began a review of the technology for creating them on Wix (using PatchWiz ). In the same place we came to the conclusion that for a complete solution of the problem, “something else” is needed. Welcome to Part 2, where I will describe our organizational and technical approaches with all the sources.
To begin with, I still say that I describe our approach, that is, my own experience and result, and not dogma.
So in order to avoid all the shortcomings mentioned last time, we had to develop rules for creating installations and a utility for creating patches.
')
Our organizational problem solving
We decided to do this: installations are assembled from merge modules .
A certain basic assembly (baseline) is selected, which includes modules with binaries that are mandatory for all. It is collected for each new version of the product. Moreover, if only the Build number has been changed, then a differential patch is created, where the base version is the previous one with the Build number = 0 (let's call them reference assemblies).

Circles on the time axis are the created assemblies. The reference assemblies are marked in blue, the assemblies in green, where a differential patch was additionally created based on the previous reference assembly. In addition, additionally, for the reference assemblies, a differential patch is also formed based on the previous reference assembly.
Thus, when a client requests the latest version from us, we check if he has an installed version now and what is its number. Further, either a complete assembly or patch is sent.
A similar scheme works with automatic updating: either msi or msp package comes from the server, which is installed using standard msiexec tools.
To understand the implementation of this mechanism consider the following solution.
Solution Overview
To begin with, we will look at the general structure of the solution (the folders themselves are named for clarity). Fully its source is laid out on GitHub , the link is at the end.
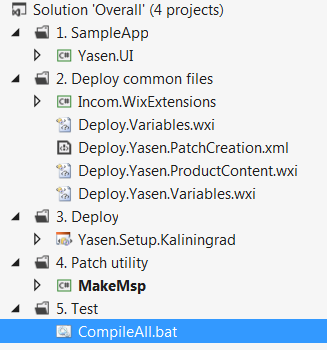
Folders contain:
1. Directly the application itself.
2. Shared files for collecting installations, including an extension for Wix .
3. Project installation application.
4. Utility for creating patches.
5. Batnik for the test.
Folder numbers reflect the order of actions required. Let's start.
Go in steps
Step 1. Write an application
In our case, this will be a simple console application “Hello, World!”, With which we will change the version.
Step 2. We write common parts for installations
Go through the files:
Deploy.Variables.wxi - common variables for all installations of the company:
<Include> <?define Manufacturer=""?> <?define ManufacturerUrl="http://company.ru"?> <?define Language="1049"?> <?define Codepage="1251"?> </Include> Deploy.Yasen.Variables.wxi is a common Wix file for all product installations:
<Include> <?define ProductName="" ?> <?define YasenProductCode="{06CABA42-492E-49CE-9849-F85E87442E99}"?> <?define YasenUpgradeCode="{BA8CCE3C-4267-4291-B330-16EE510F023B}"?> </Include> Why are we taking out separately product codes and updates? Because then we will need them in many places (in different projects of installations and a patch descriptor).Deploy.Yasen.ProductContent.wxi - a common file with various properties of installations.
<Include> <Package Id="$(var.PackageId)" InstallerVersion="200" Compressed="yes" Languages="$(var.Language)" SummaryCodepage="$(var.Codepage)" Comments=" $(var.ProductName)" Keywords=", , , , , " Description="$(var.Subject)" InstallScope="perMachine" /> <!-- --> <Property Id="MSIUSEREALADMINDETECTION" Value="1" /> <MajorUpgrade DowngradeErrorMessage =" " AllowDowngrades="no" /> <Upgrade Id='$(var.UpgradeCode)' > <UpgradeVersion OnlyDetect="no" Maximum="$(var.ProductVersion)" IncludeMaximum="no" Property="OLDERVERSIONBEINGUPGRADED" MigrateFeatures="yes" /> </Upgrade> <!-- Media --> <Media Id="1" Cabinet="media1.cab" EmbedCab="yes" /> </Include> In this file, we finally start using variables from previous files (they will be available here later when we create the main installation file). The required Media element is indicated and several additional ones are set (mainly concerning updates):
- MSIUSEREALADMINDETECTION - if = 1, then the real administrator rights will be requested (meaning through UAC).
- The MajorUpgrade element indicates the possibilities for Major upgrade , in our case the upgrade to the new version is allowed and the rollback to the old version is prohibited.
- Upgrade element - contains a description of possible upgrades.
- The UpgradeVersion element describes the conditions for detecting previous versions (by UpgradeCode ) and actions in case of their detection. Possible options (I don’t give everything):
Minimum - the minimum version that this installation can update.
Maximum - the maximum version that this installation can update.
IncludeMaximum - "inclusive" maximum version (by default - yes).
IncludeMinimum - "inclusive" minimum version.
Property - contains the name of some variable. In case if the corresponding product is found for the indicated versions, then their codes will be written to this variable through a ';'. The values of this variable can be further involved, for example, when performing CustomAction .
OnlyDetect - If = ' yes ', then the specified versions will only be detected and written to the specified properties, but they will not be uninstalled.
IgnoreRemoveFailure - informs whether to ignore errors when uninstalling the detected version.
In our case, UpgradeVersion is configured so that you can upgrade all previous versions within our UpgradeCode .
Go ahead : Deploy.Yasen.PatchCreation.xml - patch descriptor for this product.
<Include xmlns="http://schemas.microsoft.com/wix/2006/wi"> <?include Deploy.Variables.wxi?> <?include Deploy.Yasen.Variables.wxi?> <?define PatchDescription=" $(var.ProductName)"?> <PatchCreation Id="$(var.PatchId)" Codepage="$(var.Codepage)" CleanWorkingFolder="yes" OutputPath="patch.pcp" WholeFilesOnly="yes" > <PatchInformation Description="$(var.PatchDescription)" Comments="$(var.PatchDescription)" Manufacturer="$(var.Manufacturer)"/> <PatchMetadata AllowRemoval="yes" Description="$(var.PatchDescription)" ManufacturerName="$(var.Manufacturer)" TargetProductName="$(var.ProductName)" MoreInfoURL="$(var.ManufacturerUrl)" Classification="Update" DisplayName="$(var.PatchDescription) $(var.PatchVersion)"/> <Family DiskId="2" Name="$(var.Family)" SequenceStart="5000" > <UpgradeImage SourceFile="$(var.NewMsi)" Id="NewPackage" > <TargetImage SourceFile="$(var.BaseMsi)" Order="2" Id="BasePackage" IgnoreMissingFiles="no" Validation = "0x00000912" /> </UpgradeImage> </Family> <PatchSequence PatchFamily="$(var.PatchFamily)" Sequence="$(var.PatchVersion)" Supersede="yes" ProductCode="$(var.ProductCode)"/> </PatchCreation> </Include> We examined the PatchCreation structure in detail in Part 1. But here you can see at least 2 very important differences:- Validation attribute on the TargetImage element. It is this attribute that allows us to allow patch skipping. It is described in detail here . So, to allow multiple versions to be updated, you usually need to specify all of them ( using TargetImage elements), which in turn increases the size of the patch. Considering our requirements and organizational measures (the principle of versions), we managed to indicate only the previous support assembly and the Validation flag with a value of 912 . This value indicates that the following condition must be met to apply a patch to the installed product: UpgradeCode , ProductCode and magor and minor versions of the patch (to which you are updating) and the installed version must match (and the build number should not). Thus, skipping updates within the minor version will be allowed! High five! Validation can take a fairly wide range of values and you can get a very interesting effect. Enjoy!
- Also in the PatchCreation file, variables are used that have not been previously declared anywhere, for example: var.PatchFamily , var.PatchVersion . Their use will become clear to us at step 4.
And even in step 2 there is a certain project Incom.WixExtensions (in the folder). This is a project with an extension for Wix . It should logically be present here, and its use will become clear in step 3.
Step 3. We assemble the installation for some customer
First, we connect Wix files with variables that we declared before.
<?define WixCommonPath="$(var.ProjectDir)..\"?> <?include $(var.WixCommonPath)\Deploy.Variables.wxi?> <?include $(var.WixCommonPath)\Deploy.Yasen.Variables.wxi?> Then we will announce the software version and the current product codes and update lines.
<?define Subject=" "?> <?define ProductVersion="$(incom.FileVersion($(var.Yasen.UI.TargetPath)))"?> <?define UpgradeCode="$(var.YasenUpgradeCode)"?> <?define ProductCode="$(incom.ChangeGuid($(var.YasenProductCode),$(var.ProductVersion), 2))"?> Please note that UpgradeCode is used "as is", and some conversion is applied to the product code.
Using this transformation, we strive for the following goal: when changing the Build number, the Product Code should not change so that a differential patch can be created, and if you change the Major or Minor version, the Product Code should change (this was described in the first part). Accordingly, we do the following: we use the product code from a global variable and call the conversion function, indicating from which parts of the version the final version depends. With that, 1 - only from major , 2 - from major and minor , and then by analogy to the value 4.
The time has come for the Wix extension mentioned above.
Since the purpose of the article is not in the description of the technology for creating extensions for Wix (you can see here ), I will briefly summarize the essence: an extension is created for the preprocessor, which redefines the EvaluateFunction method. It will be called by Wix when using functions with the incom prefix.
In this method, we perform 2 functions:
• Get file version
• Universal Guid change feature
A piece of Wix extension code for computing functions
/// <summary> /// /// </summary> /// <param name="prefix"></param> /// <param name="function"> </param> /// <param name="args"></param> /// <returns> </returns> public override string EvaluateFunction(string prefix, string function, string[] args) { if (prefix == "incom") { switch (function.ToLower()) { case "fileversion": var ver = FileVersionInfo.GetVersionInfo(Path.GetFullPath(args[0])).FileVersion; Console.WriteLine(string.Format("Version of {0}: {1}", args[0], ver)); return ver; case "changeguid": var guid = Guid.Parse(args[0]).ToByteArray(); version = Version.Parse(args[1]); var major = BitConverter.GetBytes((Int16)((version.Major & 0xFF) ^ ((version.Major >> 16) & 0xFF))); var minor = BitConverter.GetBytes((Int16)((version.Minor & 0xFF) ^ ((version.Minor >> 16) & 0xFF))); var build = BitConverter.GetBytes((Int16)((version.Build & 0xFF) ^ ((version.Build >> 16) & 0xFF))); var revision = BitConverter.GetBytes((Int16)((version.Revision & 0xFF) ^ ((version.Revision >> 16) & 0xFF))); var len = 4; if (args.Length > 2) len = int.Parse(args[2]); if (len > 0) { guid[0] = major[0]; guid[1] = major[1]; } if (len > 1) { guid[2] = minor[0]; guid[3] = minor[1]; } if (len > 2) { guid[4] = build[0]; guid[5] = build[1]; } if (len > 3) { guid[6] = revision[0]; guid[7] = revision[1]; } return new Guid(guid).ToString(); } } return base.EvaluateFunction(prefix, function, args); } Thus, our codes behave predictably and depend on the product version. When we change the code a bit - we change the Build number (once every 2-3 weeks), something more serious - change the Minor number (about once every 2-3 months) to form a support assembly. When everything is rewritten, the Major number changes (about once every 3-4 years).
Let's go back to the wix files. Then everything is standard: using the variables declared above, we create the Product block, specify the files, components, features, use the Deploy.Yasen.ProductContent described in the previous step.
<Product Id="$(var.ProductCode)" Name="$(var.ProductName)" Language="$(var.Language)" Version="$(var.ProductVersion)" Manufacturer="$(var.Manufacturer)" UpgradeCode="$(var.UpgradeCode)" > <?include $(var.WixCommonPath)\Deploy.Yasen.ProductContent.wxi?> <Directory Id="TARGETDIR" Name="SourceDir"> <Directory Id="ProgramFilesFolder"> <Directory Id="APPLICATIONFOLDER" Name="$(var.ProductName)" DiskId="1" > <!-- Content --> <Component Id="Component1" Guid="{1F4A6EF3-4B65-4405-8E08-D750E5038C75}"> <File Id="File1" Name="content.txt" Source="..\..\Incom.Yasen.Content\content.txt"/> <File Id="File2" Name="Yasen.UI.exe" Source="$(var.Yasen.UI.TargetPath)"/> </Component> </Directory> </Directory> </Directory> <Feature Id="ClientSide" Title=" $(var.ProductName)" Level="1" Absent="disallow"> <ComponentRef Id="Component1"/> </Feature> </Product> Step 4. Create a patch
Now we have everything necessary to create installations of our product, and this can even be done, but our goal is patches.
As noted in Part 1, creating patches from the command line is quite troublesome, so at this step we are writing a new utility, MakeMsp , which performs these steps for us. Requirements for use will be as follows: the arguments indicate the basic assembly, the final assembly, the patch descriptor, and the path to the result.
Incom.MakeMsp.exe "YasenSetup1.msi" "YasenSetup1.0.1.msi" "Deploy.Yasen.PatchCreation.xml" "Patch.msp" In general, the algorithm is as follows:
1. Copy both msi to a temporary folder
A piece of copy code
Task.WaitAll( Task.Run( () => { Console.WriteLine("Start copying RTM..."); File.Copy(args[0], rtmFilePath, true); Console.WriteLine("Finished copying RTM..."); }) , Task.Run( () => { Console.WriteLine("Start copying latest..."); File.Copy(args[1], latestFilePath, true); Console.WriteLine("Finished copying latest..."); })); 2. Remember, in step 2, when creating a PatchCreation , did we use unknown variables? It is time to identify them. For this, the utility creates a temporary file with a Wix structure, where the values of these variables are written.
A piece of code to create a file with variables to create a patch
var productName = MsiReader.GetMSIParameters(latestFilePath, "ProductName"); var wixPachCreationReference = string.Format( @"<?xml version=""1.0"" encoding=""utf-8""?> <Wix xmlns='http://schemas.microsoft.com/wix/2006/wi'> <?define Family='{0}'?> <?define PatchFamily='{0}'?> <?define PatchId='{1}'?> <?define ProductCode='{2}'?> <?define PatchVersion='{3}'?> <?define BaseMsi='{4}'?> <?define NewMsi='{5}'?> <?include {6}?> </Wix>", new string(Transliterate(productName).Where(char.IsLetterOrDigit).Take(8).ToArray()), Guid.NewGuid().ToString(), MsiReader.GetMSIParameters(latestFilePath, "ProductCode"), MsiReader.GetMSIParameters(latestFilePath, "ProductVersion"), Path.Combine(rtmPath, "rtm.msi"), Path.Combine(latesPath, "last.msi"), Path.GetFullPath(args[2]) ); As PatchFamily , the product name with transliteration is used. PatchId - the new Guid. ProductCode , PatchVersion - extracted from the final msi , BaseMsi and NewMsi - the path to the temporary msi (copied to a temporary folder). At the end, include the file itself with PatchCreation .
3. Next, perform the compilation steps described in Part 1.
Administrative installation:
exec("msiexec", string.Format("/a \"{0}\" /qn TARGETDIR=\"{1}\\\"", rtmFilePath, rtmPath)); exec("msiexec", string.Format("/a \"{0}\" /qn TARGETDIR=\"{1}\\\"", latestFilePath, latesPath)); Compiling and creating a patch:
exec("candle", string.Format("\"{0}\" -out \"{1}\\patch.wixobj\"", Path.Combine(tempDir, "desc.xml"), tempDir)); exec("light", string.Format("\"{0}\\patch.wixobj\" -out \"{0}\\patch.pcp\"", tempDir)); exec("msimsp", string.Format("-s \"{0}\\patch.pcp\" -p \"{1}\" -l \"{0}\\msimsp.log\"", tempDir, args[3])); Step 5. Compile everything and everyone
Now we have everything we need: an installation project, extensions for Wix , a patch handle, a utility for creating a patch. It is time to put it all together.
To do this, at the root of the solution is the file CompileAll.bat , which will bring it all together (requires framework 4.0 ) and put the result in the Releases folder. You can see all this in the source.
Use of results
The result obtained after running CompileAll.bat .

Patch update
You can install version 1 simply by DblClick . Result:

You can also install a patch according to DblClick :

Viewing installed updates will show this:

Update full package
If we need to upgrade from version 1.0.0 to 1.0.1 using the full msi package, we will have to use the console with the following parameters:
msiexec /i YasenSetup1.0.1.msi REINSTALL=ALL REINSTALLMODE=vomus Here:
REINSTALL - Indicates which features will be reinstalled by this package when upgrading (we specify that all). If we do not specify this property, then when you try to start the package (and the old version installed), the message “Another version is already installed” will be displayed. ( details )
REINSTALLMODE is a property that indicates how exactly the reinstallation (update) of the files will take place. ( details ). In our case it is:
v - it is necessary to re-cache the package in the local storage. The fact is that for each product ( ProductCode ), Windows remembers the value of the Package.Id from which the product was shipped. If the product is already installed and an attempt is made to install even a package that is identical in content and version, but with a different Package.Id (just made a rebuild of the solution), then the cached value of Package.Id does not match the Package.Id of the new installation and a warning will be issued that another version. In the presence of " v " Package.Id will not be checked for compliance.
o - rewrite the file if the current version is less than new, or the file is missing.
m - overwrites registry keys ( HKEY_LOCAL_MACHINE and HKEY_CLASSES_ROOT )
u - overwrites registry keys ( HKEY_CURRENT_USER and HKEY_USERS )
s - rewrite all shortcuts and rewrite icon cache.
There are options for how to avoid this inconvenient way of updating and get work only on DblClick , but that's another story.
Summarize
So, the following steps were taken to solve the problem:
1) Developed special requirements for writing Wix installations for end users, which include:
a. Put all that is possible into common files, merge modules and use the include directive.
b. Generate Product.ProductCode based on base value.
2) Create a single project for generating patches.
3) Make a special utility that will help build patches.
The final result
Wix helps solve a big headache, for which he thanks a lot.
Of course, some things remained in the shadows, but the most important and valuable presented to the reader.
Thank.
References:
All sources on github
Source: https://habr.com/ru/post/190654/
All Articles