Continuous integration for the smallest
Are you still publishing a project manually? Then we go to you
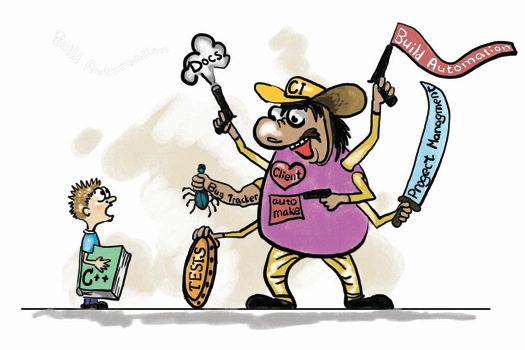
Under the guide, the CI implementation guideline for .NET projects from scratch, including:
- Automatic daily builds
- Problem Notifications
- Integration with bug tracker and version control system
- Product Versioning
- Database Versioning
- Automated calculations and backups
Let's start with what “continuous integration” is.
Continuous Integration (Continuous Integration) is the practice of software development, which is to perform frequent automated project builds to identify and solve integration problems as soon as possible.
From a practical point of view, this means that at any time you should have a “live, current version of the product” that you can test or demonstrate.
For this you need:
- For developers to contribute their code to VCS at least every day
- The product was assembled in automatic mode.
- Product display (including database update) was performed automatically.
- Product testing was done automatically (as far as possible)
Continuous Integration refers to agile practices. Agile involves an iterative process, with repeated repetition of the development cycle, testing and display of the product. Automation of routine processes avoids multiple routine tasks.
Work with VCS
First we need a test environment for testing the application. If the testing cycle is long enough, and development is fast, then it is reasonable to select a dev-environment as well. The structure of the VCS will reflect your surroundings.All developers work with the main development branch, then a certain version is fixed and merged into the test branch. From the test branch, a calculation is made on the test environment. Testing, making fixes and reverse merzh in dev. The tested version is sent to the release branch and is published from there to production. If there are any lapses on the production (unfortunately, this happens), we repair in the emergency mode from the production branch and again merge to the DEV-branch.
In the philosophy of GIT it will be a little different, since when working with GIT it is not customary to commit to master and even dev. Instead, a feature-stitch approach is practiced. You can read about git workflow here: habrahabr.ru/post/60030 . In general, all the proposed VCS structures pursue one goal: to avoid a situation when the development branch is not stable, but it is absolutely necessary to “fix” or “finish” something quickly and give everything. When choosing your structure, ask yourself the question “will I be able to give everything to production for one day and not break everything. If the answer is "yes", then the structure suits you.
')
In order not to miss the errors on production, you should make the test environment as much as the target environment as possible. Usually, the main difficulty is the dependence on third-party web services or other components and operations associated with real financial transactions.
Configurations
No matter how hard we try to make the environments identical, the configuration files will be different: test and real accounts, tokens, IDs, external web services, and more. .NET offers an excellent way to keep configurations up-to-date: configs transformations. For some reason, out of the box, they are included only in web applications. Fortunately, transformations are fairly easy to add to other applications.<UsingTask TaskName="TransformXml" AssemblyFile="$(MSBuildExtensionsPath32)\Microsoft\VisualStudio\v10.0\Web\Microsoft.Web.Publishing.Tasks.dll" /> <Target Name="AfterCompile" Condition="Exists('App.$(Configuration).config')"> <!--Generate transformed app config in the intermediate directory--> <TransformXml Source="App.config" Destination="$(IntermediateOutputPath)$(TargetFileName).config" Transform="App.$(Configuration).config" /> <!--Force build process to use the transformed configuration file from now on.--> <ItemGroup> <AppConfigWithTargetPath Remove="App.config" /> <AppConfigWithTargetPath Include="$(IntermediateOutputPath)$(TargetFileName).config"> <TargetPath>$(TargetFileName).config</TargetPath> </AppConfigWithTargetPath> </ItemGroup> </Target> Novice developers often fall into a stupor when debugging Web.config transformations on local machines: unlike App.config, they are stored at the application level and not in the bin folder, so the local assembly does not transform. Transformations are applied when publishing a project. If you really need to work around this limitation, you can create a Web.template.config file and add a transformation to the PostBuild application. Do not forget to remove the task transformation from the project, otherwise the transformation will be applied twice.
If the application uses other technologies, it is still better to have one main configuration file with general settings and additional configuration files for changing the reference config. This will save you from copy-paste the same settings.
Adding files that are not in the project to the calculation
<PropertyGroup> <CopyAllFilesToSingleFolderForPackageDependsOn> CustomCollectFiles; $(CopyAllFilesToSingleFolderForPackageDependsOn); </CopyAllFilesToSingleFolderForPackageDependsOn> </PropertyGroup> <Target Name="CustomCollectFiles"> <!-- Copy JavaScript files --> <ItemGroup> <CompressedScripts Include="Sources\**\*.js" /> <FilesForPackagingFromProject Include="%(CompressedScripts.Identity)"> <DestinationRelativePath>Sources\%(RecursiveDir)%(Filename)%(Extension)</DestinationRelativePath> </FilesForPackagingFromProject> </ItemGroup> <!-- Copy stylesheets --> <ItemGroup> <CompressedScripts Include="Sources\**\*.css" /> <FilesForPackagingFromProject Include="%(CompressedScripts.Identity)"> <DestinationRelativePath>Sources\%(RecursiveDir)%(Filename)%(Extension)</DestinationRelativePath> </FilesForPackagingFromProject> </ItemGroup> </Target> Product Versioning
.NET provides 2 attributes for versioning assemblies[assembly: AssemblyVersion ("1.0.0.0")]
[assembly: AssemblyFileVersion ("1.0.0.0")]
The first two digits are the major and minor version numbers. These numbers interpret the increment of functional change. The third digit is the so-called assembly number. Every day, while the version is in development, this version increases. And the last number is the revision number. This number is incremented every time you build a version on the build server during the day. Details on the versioning policy in .NET are written in the CLR book via C # Richter.
Automatic versioning can be configured in various ways. This topic is discussed in detail here: stackoverflow.com/questions/1126880/how-can-i-auto-increment-the-c-sharp-assembly-version-via-our-ci-platform-hudso .
Basic approaches
- Using a version of the form 1.0. *. * (Does not fit well with the build server)
- Using a single SharedAssemblyInfo file to manage the versions of all assemblies from that place (one file is created with the version number and “as a link” is added to all projects
- Use msbuild instead of AssemblyInfo file
- For TFS, you can use WWF-Activity
In my opinion the most convenient way is to use msbuild and set the value using the CI server:
<Major>1</Major> <Minor>0</Minor> <Build>$(BUILD_NUMBER)</Build> All modern CI solutions offer this variable at build time. In order for this approach to work, you need to add import msbuild task from msbuildtasks.tigris.org and add at the end of the project:
<Import Project="$(MSBuildExtensionsPath)\MSBuildCommunityTasks\MSBuild.Community.Tasks.Targets" Condition="Exists('$(MSBuildExtensionsPath)\MSBuildCommunityTasks\MSBuild.Community.Tasks.Targets')" /> <Target Name="BeforeBuild" Condition="Exists('$(MSBuildExtensionsPath)\MSBuildCommunityTasks\MSBuild.Community.Tasks.Targets')"> <Message Text="Version: $(Major).$(Minor).$(Build).$(Revision)" /> <AssemblyInfo CodeLanguage="CS" OutputFile="AssemblyFileInfo.cs" AssemblyFileVersion="$(Major).$(Minor).$(Build).$(Revision)" AssemblyConfiguration="$(Configuration)" Condition="$(Revision) != '' " /> </Target> Database Versioning
I do not know a single project in which I would not have to change the database. .NET offers the following solutions:SSDT project msdn.microsoft.com/ru-ru/data/tools.aspx
Pros: the process of creating and editing a database is reminiscent of how you would do it with Management Studio.Cons: the complexity of writing migration scripts. Since Incremental changes are built by the project itself; data security is ensured by pre-deploy and post-deploy scripts. You will have to rely on the presence / absence of fields in the database or “invent” the schema version table already implemented in the migration engines.
ECM7 Migrator code.google.com/p/ecm7migrator
Open source migration engine. The project supports Habrayuzer dima117 .Pros: different DBMS are supported, if something does not suit you, the code is open. Migrator is supported and overgrown with new features. And, perhaps most important, it supports multiple migration keys in one database. This can be very useful if your application is modular and supports plugins in one form or another. Each plugin can perform its migrations and still use one DB.
Cons: No Entity Framework Migrations Buns.
Entity Framework Migrations blogs.msdn.com/b/adonet/archive/2012/02/09/ef-4-3-code-based-migrations-walkthrough.aspx
Pros: works out of the box, automatically creates migrations by Db-context, understands commands from the visual studio console, migrations are published using the standard Publish from Visual Studio.Cons: depends on the Entity Framework.
I managed to try all 3 solutions. If you use EF, the choice is uniquely EF Migrations, for .NHibernate you can use ECM7 Migrator. The SSDT project is suitable for lovers of wizards and windows.
Application Publishing Automation
In 2012 studios, the web project publishing system was significantly improved. First of all it concerns publication profiles. If you publish the application in azure, then the profile can be simply downloaded from the portal. Otherwise, it will need to be created.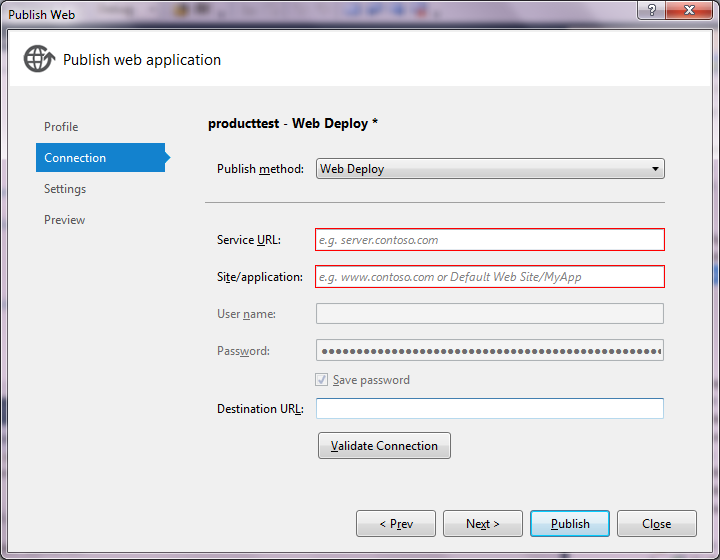
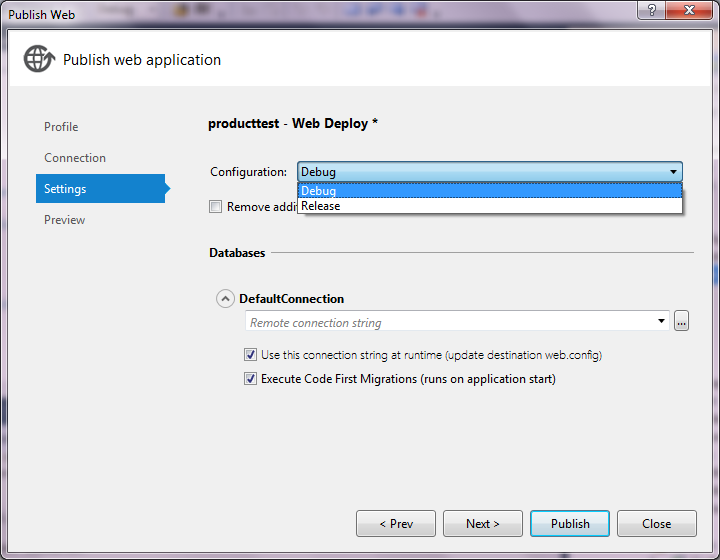
As you can see in the screenshots, in the latest version of WebDeploy, you can run EF migrations with just one tick. In addition, the publication from the studio can replace the connection string without the use of transformation.
Details about the transformation and publication is written in Troy Hunt in the article: www.troyhunt.com/2010/11/you-deploying-it-wrong-teamcity.html . Now we are interested in the fifth step of his guideline, namely, automatic publication using the build server: www.troyhunt.com/2010/11/you-deploying-it-wrong-teamcity_26.html . I am a big fan of TeamCity, so consider this particular CI.
Automate the publishing of Windows services
To automatically create windows services, the easiest way to use the command is sc: sc [<ServerName>] create|stop|start <ServiceName> binpath= <BinPath> start= demand The only subtle point is how to deliver the binaries to <BinPath>. This can be done in different ways: upload via FTP, use PowerShell, use xcopy / robocopy or rsync in a shared folder on the server. The choice depends on your network environment and security requirements.
TeamCity
Using the tools described above will save you time. Go ahead and install the build server. Download TeamCity: www.jetbrains.com/teamcity and launch the installer, click “OK” everywhere.The two basic concepts of TeamCity are “project” and “build.” The “project” corresponds to your solution, and by build is meant any meaningful set of actions on your project: be it building, running tests, laying out to the server, creating backups, and so on.
Automated display
The first step is to give the opportunity to upload a new version of the theme for which Visual Studio is not installed.The basic idea is to run the msbuild step with additional parameters, create a new Build Definition and select the first step Msbuild. The command line parameters must be passed:
/P:Configuration=%env.Configuration% /P:DeployOnBuild=True /P:DeployTarget=MSDeployPublish /P:MsDeployServiceUrl=https://%env.TargetServer%/MsDeploy.axd /P:AllowUntrustedCertificate=True /P:MSDeployPublishMethod=WMSvc /P:CreatePackageOnPublish=True /P:UserName=AutoDeploy\Administrator /P:Password=Passw0rd These parameters will indicate where to publish.
In order to publish migrations, an additional Command Line step will be required:
SET AssemblyName=MyMvc4App SET StartUpDirectory=MyMvc4App\bin\ SET ConnectionString=Server=tcp:XXXX.database.windows.net,1433;Database=XXXX;User ID=XXXX;Password=XXXX;Trusted_Connection=False;Encrypt=True;Connection Timeout=30;MultipleActiveResultSets=True SET ConnectionStringProvider=System.Data.SqlClient SET ConfigFilePath=%CD%\MyMvc4App\web.config SET MigrateExe=packages\EntityFramework.5.0.0\tools\migrate.exe %MigrateExe% %AssemblyName%.dll /startUpDirectory:%StartUpDirectory% /startUpConfigurationFile:"%ConfigFilePath%" /connectionProviderName:"%ConnectionStringProvider%" /connectionString:"%ConnectionString%" /verbose Save the build. Now anyone can post the latest version of VCS. Good practice to publish on a dev-stand every day before the start of the working day. Thus, you will catch integration problems as quickly as possible.
Rolling builds
Another good practice is to set up a trigger for a build build, which will simply start assembling your solution after each change in the repo or timer (for example, every 10 minutes), if a lot of developers are working on the project at the same time. Notifications should be connected to this build. TeamCity supports notifications by mail, jabber, using a plugin for VisualStudio and Tray-application. Choose an option to taste. I like the tray app. If the build is broken, you need to fix it urgently.How not to break the build
Whatever practices you enter, so that you do not, there is no way to give a 100% guarantee that developers will not contribute code to VCS that is not even going to. This issue should be resolved with the help of administrative measures: do not quit your job, without verifying that the build was assembled after your changes, who broke it and repairs it. In one company where I worked, the problem with too often a broken build was solved by the rule: broke the build - bring a cake. First, cakes were eaten every day, then stopped.Auto run tests
This step should be divided into 2: unit tests and integration and acceptance tests. This is important because unit tests should work on any environment. All external dependencies are replaced by fakes.Run unit tests
Everything is simple here. Choose Build Step “Nunit” or “MsTest”, enter the pattern **. Test * .dll, TeamCity will do the rest for you, provided that you use the .Tests pattern in the name of your test projects.Running integration and acceptance tests
These tests may depend on many factors and their launch may involve rolling backups or init scripts. You may want to build additional reports on the launch of such tests. It is better not to litter your project with display and create a special build for them. TeamCity allows you to create build chains. In Build triggers of a build with acceptance / integration tests, you can add a trigger that is triggered when the build is successfully completed with display. I described the creation of such a build to run acceptance tests in the topic: habrahabr.ru/post/182032 .Backups
Creating backups when displaying can also be automated. For file system backup, I personally did not find anything better than nnbackup: www.nncron.ru/index_ru.shtml . nnbackup -n 10 verz -i <Src> -o <Destination> -s -e –v The command creates a source folder in zip and copies the archive to the destination. Install nnbackup on target machines or call from the build server: a question of your preferences, the location of the build server, network costs and security.
You can back up the sql server using T-SQL
BACKUP DATABASE AdventureWorks2012 TO DISK='X:\SQLServerBackups\AdventureWorks1.bak', DISK='Y:\SQLServerBackups\AdventureWorks2.bak', DISK='Z:\SQLServerBackups\AdventureWorks3.bak' WITH FORMAT, MEDIANAME = 'AdventureWorksStripedSet0', MEDIADESCRIPTION = 'Striped media set for AdventureWorks2012 database; GO RESTORE DATABASE AdventureWorks FROM DISK='$(Backup)' Those. for automatic backup, you will need to add another Command Line step. Or you can use msbuild tasks from the same community package, and for nnbackup write your msbuild task.
You can go ahead and put a trigger to start an automatic rollback from backup, if acceptance tests have not passed. Then you will have a chain of builds: Layout "Acceptance Tests" Rollback from backup.
Integration with project management system and bug tracker
Up to this point, we have already done a lot of useful things. There was one unpleasant feature. The build server is still unrelated to our development process. He does not know anything about the tasks of the current iteration of development.TeamCity supports integration with YouTrack, Jira and Bugzilla. Integration is literally done in 2 clicks. After that, indicating the task number in the comments to the commit, you will see links to the corresponding tasks in the build information.
YouTrack supports reverse integration. Main advantage: YouTrack will automatically indicate the build number in which the bug or feature was closed.
Build artifacts
If your application is boxed, then you probably need to take care of creating installers or deploy packages for shipment to customers. Creating installers is a separate topic, I will not consider it within the framework of this topic. It is important that for a boxed product, an installer or publication package is the most important part of the release. This is exactly what the artifacts of the build are made up for.An artifact is any file that is a significant result of a build. For builds with installers, you can specify my-installer.exe or my-package.zip as a mask for build artifacts and TeamCity will display them in the corresponding tab.
This is where integration with Issue Tracker comes in handy. A tester or manager can look at the closed task, follow the link with the build and pick up the version with fixes from the build artifacts.
In conclusion, I want to add that the development process is purely individual for each team. These practices are the base. Further development of the toolkit should occur along with the development of the product. We develop software to make other people's lives better. It is reasonable to use the software in order to make it more comfortable for us to work.
Source: https://habr.com/ru/post/190412/
All Articles