We select the time using the new TimePickerDialog
Looking through the tape in my G +, I came across a message that the latest version of the Calendar application on Android devices uses a new dialog box for timing. By running the application on my Nexus 7 tablet with Android 4.3, I made sure that this is true. But as a developer I was more interested in the phrase that the source code for the dialog box is available at https://android.googlesource.com/platform/frameworks/opt/datetimepicker/+/master/ . I decided to dig deeper just for fun.
The article is designed for more or less experienced developers, so I will not chew much of the explanation.
I did not clone the Git-repository, but simply began to copy various classes and resources into my test project. To begin with, I created a new package in the project and copied all the classes from the src / com / android / datetimepicker / time / folder. Also copied two classes from the src / com / android / datetimepicker folder: Utils.java and AccessibleTextView.java. If you wish, you can copy other classes to yourself, but this is quite enough to create a time selection dialog. Then I copied all the necessary resources: strings, colors, sizes, themes and Russian localization. The final touch - in the manifest, you need to register permission to use the vibration motor.
This preparatory work is completed.
The new dialog box is based on the DialogFragment fragment. Sketch a simple markup with a single button with the android attribute : onClick = "onClick" , which will bring up a dialog box. And write the code:
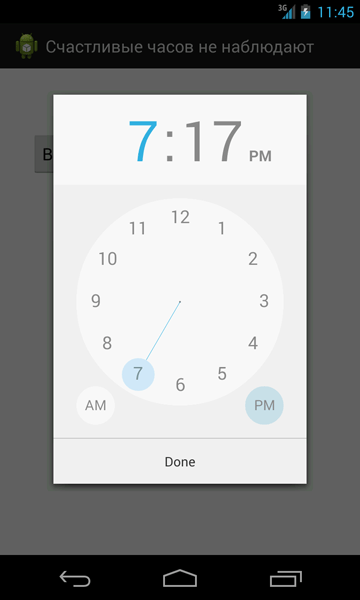
We try to run the application in the emulator:
')
Hurray, earned!
We switch the device to Russian and look at the result
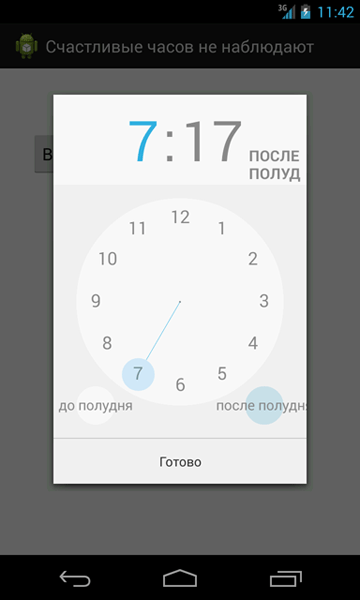
Frankly, not impressive - the letters do not fit. But on the other hand, I prefer the 24-hour format. Therefore, we change the last parameter of OnTimeSetListener from false to true and run the project again.

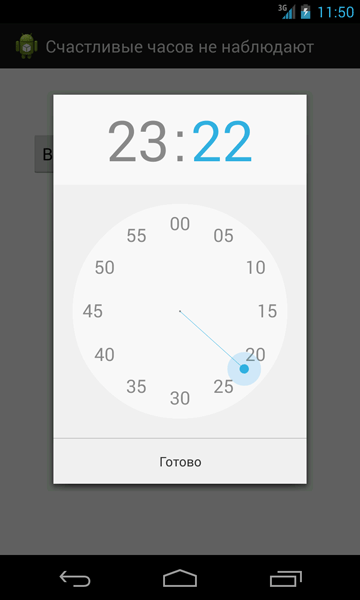
From the pictures it is not quite clear how this works, therefore I will explain in words. First, an hour circle appears with two inscribed circles of numbers. The inner circle is responsible for the hours of the first half of the day, the outer one - for the second half. When the user selects the desired hour and releases the finger, the hour circle with the help of animation changes to a minute circle, in which the numbers run at intervals of 5 minutes. The user can select an intermediate position between two divisions in order to select a more accurate time. If you need to switch back to the hour circle, then just “tap” on the clock (which is now in gray inactive color) in the upper part of the dialog.
If the time is selected finally, then click on the Finish button and return to the main activity. In my example, a Toast popup will report the selected time.
In my opinion, the new dialog box looks pretty. I would like this new product to be available as a separate library or built into the Android system. However, as you can see, if you wish, you yourself can implement this functionality in your projects.
Good luck to you programming!
The article is designed for more or less experienced developers, so I will not chew much of the explanation.
I did not clone the Git-repository, but simply began to copy various classes and resources into my test project. To begin with, I created a new package in the project and copied all the classes from the src / com / android / datetimepicker / time / folder. Also copied two classes from the src / com / android / datetimepicker folder: Utils.java and AccessibleTextView.java. If you wish, you can copy other classes to yourself, but this is quite enough to create a time selection dialog. Then I copied all the necessary resources: strings, colors, sizes, themes and Russian localization. The final touch - in the manifest, you need to register permission to use the vibration motor.
This preparatory work is completed.
The new dialog box is based on the DialogFragment fragment. Sketch a simple markup with a single button with the android attribute : onClick = "onClick" , which will bring up a dialog box. And write the code:
public void onClick(View v) { openDialog(); } void openDialog() { TimePickerDialog timepickerdialog = TimePickerDialog.newInstance( new OnTimeSetListener() { @Override public void onTimeSet(RadialPickerLayout view, int hourOfDay, int minute) { // TODO Auto-generated method stub Toast.makeText(getApplicationContext(), " " + hourOfDay + ":" + minute, Toast.LENGTH_LONG).show(); } }, 19, 17, false); timepickerdialog.show(getFragmentManager(), "myDialogFragment"); } We try to run the application in the emulator:
')
Hurray, earned!
We switch the device to Russian and look at the result
Frankly, not impressive - the letters do not fit. But on the other hand, I prefer the 24-hour format. Therefore, we change the last parameter of OnTimeSetListener from false to true and run the project again.
From the pictures it is not quite clear how this works, therefore I will explain in words. First, an hour circle appears with two inscribed circles of numbers. The inner circle is responsible for the hours of the first half of the day, the outer one - for the second half. When the user selects the desired hour and releases the finger, the hour circle with the help of animation changes to a minute circle, in which the numbers run at intervals of 5 minutes. The user can select an intermediate position between two divisions in order to select a more accurate time. If you need to switch back to the hour circle, then just “tap” on the clock (which is now in gray inactive color) in the upper part of the dialog.
If the time is selected finally, then click on the Finish button and return to the main activity. In my example, a Toast popup will report the selected time.
In my opinion, the new dialog box looks pretty. I would like this new product to be available as a separate library or built into the Android system. However, as you can see, if you wish, you yourself can implement this functionality in your projects.
Good luck to you programming!
Source: https://habr.com/ru/post/190230/
All Articles