We configure LAMP for work in Windows through VirtualBox
Hello.
An article from the category - Schaub for himself Bulo, but I think it will be interesting to many.
It began with the fact that it took me in PHP to work with an xlsx file, which, in essence, was renamed zip. And somehow it happened that I did not like Denver from the very beginning of learning PHP. Not that I didn’t like him at all, but even though I’m win_user most of the time, it turned out that I like to understand how it works and be able to self-tune. Therefore, Apache + PHP + MySQL configured on Windows independently. At first I put everything from exe and msi files, then somehow I switched to zip-packages and even began to understand what I was writing in conf and ini files. But zip under Windows did not want to work, while working perfectly under Ubuntu. Having picked up on “these your Internet sites” it became clear that zip under Windows is very dreary. Apparently, I'm just not mature enough to understand the actions described in the manuals, or use ready-made classes in php, but, again, with them, too, everything is not so smooth.
')
The conclusion is obvious - we put Ubuntu, raise LAMP and go ahead, with songs. Experience in the axis other than Windows seems to be there, but, as always, there is some "but". And, in this case, this is what I really like — Windows 8.
It seems that it’s not difficult to install two systems, but you have to reboot each time. And I do not like to turn off the computer, maximum - sleep mode for a laptop and hibernation for the hospital.
The second option is to install Ubuntu in VirtualBox, and if necessary, just minimize the window with the virtual. Almost perfect. At the hospital with 8 cores, of course, everything is fine, but on an ultrabook with the core i3 of the second generation and a frequency of 1300 MHz, everything is not so great.
Yes, and I like Sublime Text for Windows much more, especially visually.
Because there was a cunning plan:
1. Install Ubuntu-server in VirtualBox
2. Configure the site folder in samba
3. In Windows, connect the folder from Ubuntu as a network drive
Having rummaged in Google-Yandex, I found all the necessary information. And, on the one hand, everything works, everything is fine, but on the other hand, it will suddenly need to be reinstalled or someone wants to do the same. In general, I decided to put everything in one article and share it with the people.
VirtualBox you should already be installed. A little about the configuration of the virtual machine that I use on the above sounded ultrabook:
For installation, I chose Ubuntu-server 13.04. The installation is standard, I’ll dwell only on a couple of moments:
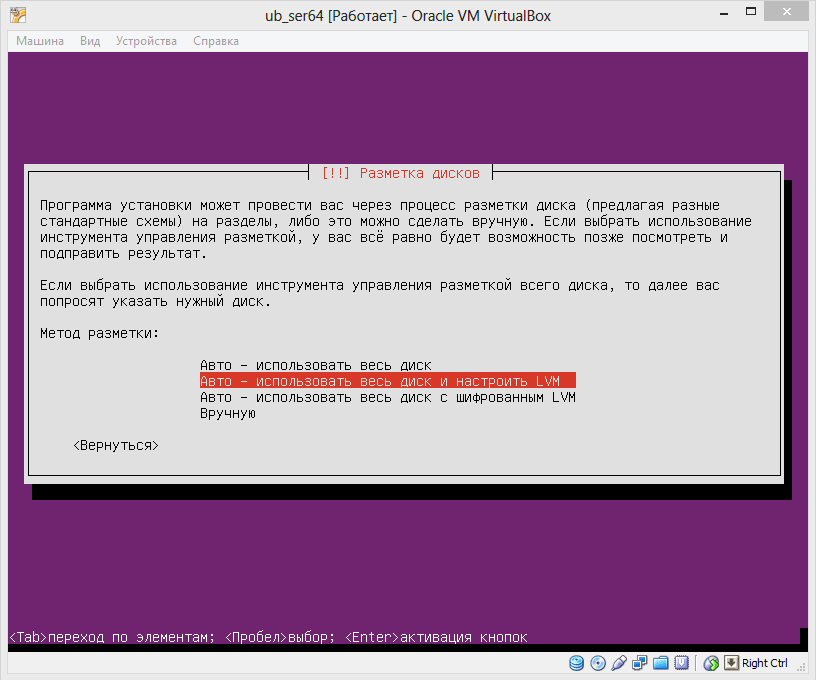
The disk immediately configured as LVM. If you further need to increase its capacity, this option is very convenient.
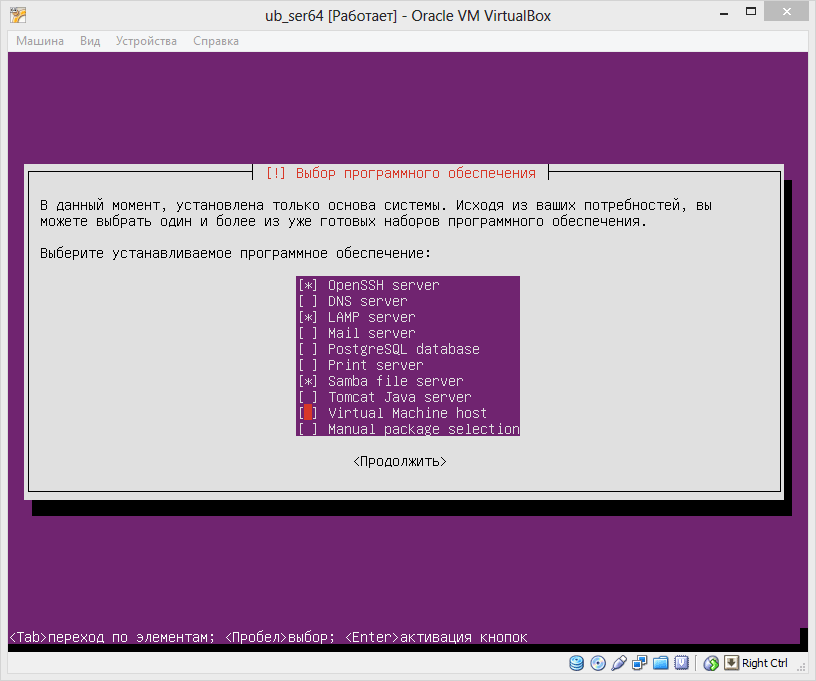
To then not customize manually, immediately select the desired components.
So we logged into the system for the first time. On the first screen, we are interested in what IP the system received.

In my case, this is 192.168.31.111.
Now you can run any SSH client and connect to a freshly installed system. All further work will go on SSH.
First check for updates:
until we bother with the asked questions, we answer all “yes”.
Now install webmin. You can simply download the deb package from the site, but this is inconvenient due to the need to manually install the dependencies, so we will connect the required repository.
Get and install the key:
Add the source:
Save <Ctrl + O and Enter> and exit <Ctrl + X>.
Updating:
and install:
The installation itself will tighten all dependencies, we only need to agree.
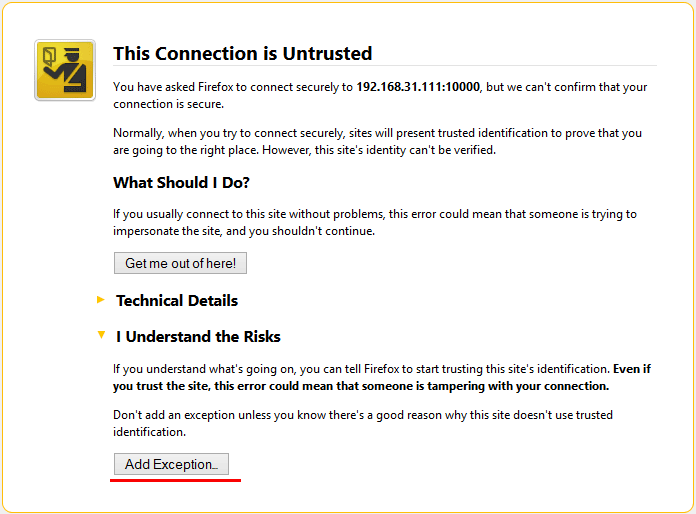
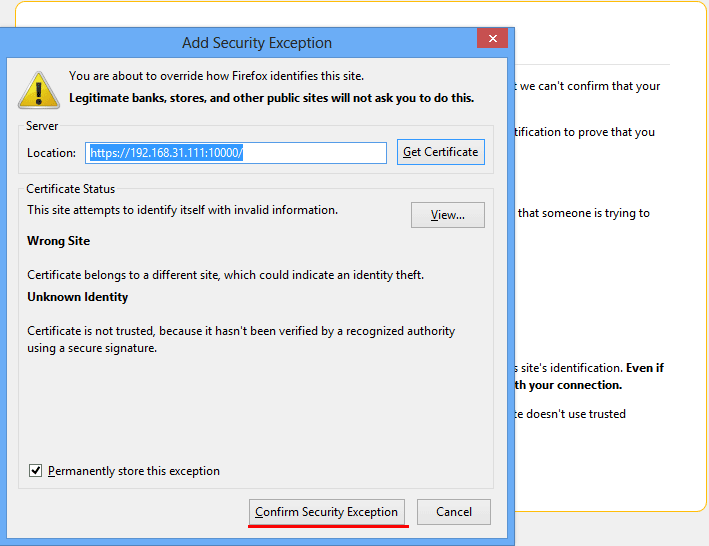
The installation was successful and now you can open our server in a windows-browser. In the address bar, enter 192.168.31.111:10000. The browser will take us to a secure connection (https).


And we get to the login / password entry page.

Let's go back to SSH. Now you can install an ftp server, for example, pure-ftpd:
Now if you type in your browser
That's all ftp server can be used.
Actually, it is already possible to start programming in PHP, but to upload files via ftp every time is not very convenient.
Therefore, I propose to configure the samba server and connect the folder from ubuntu to the windows machine as a normal network drive. Go to webmin, open Servers -> Samba Windows File Sharing.

Choose Windows Networking:
Fill in the fields:
Persist.
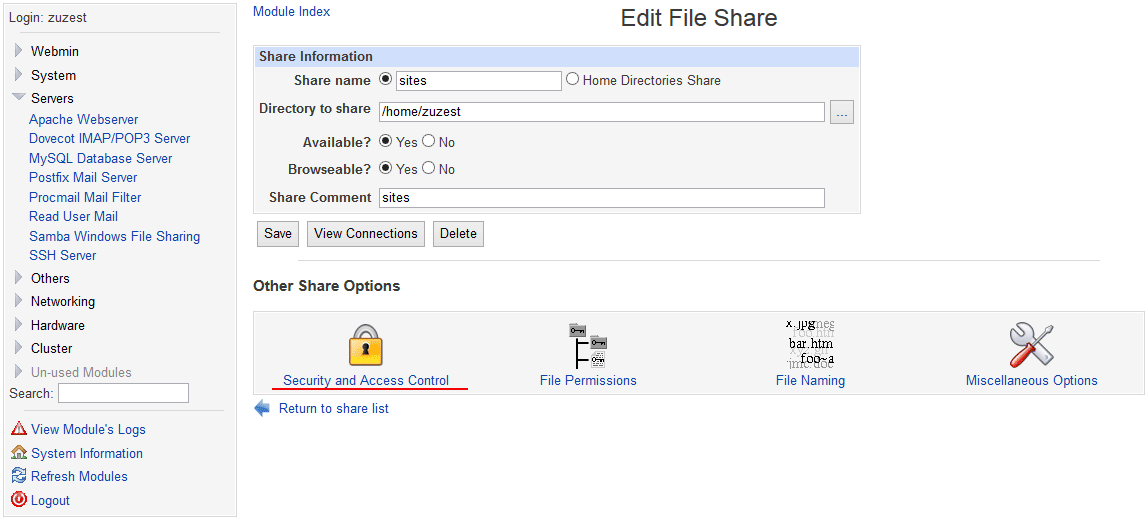
Next, click on the link to Create a new file share and create a new file share.
Here you need to fill in the following fields:
Click the Create button.
Now in the list of resources choose our newly created.

Select Security and Access Control.
Parameter Writable - set to yes, this we allowed to write files to our ball.
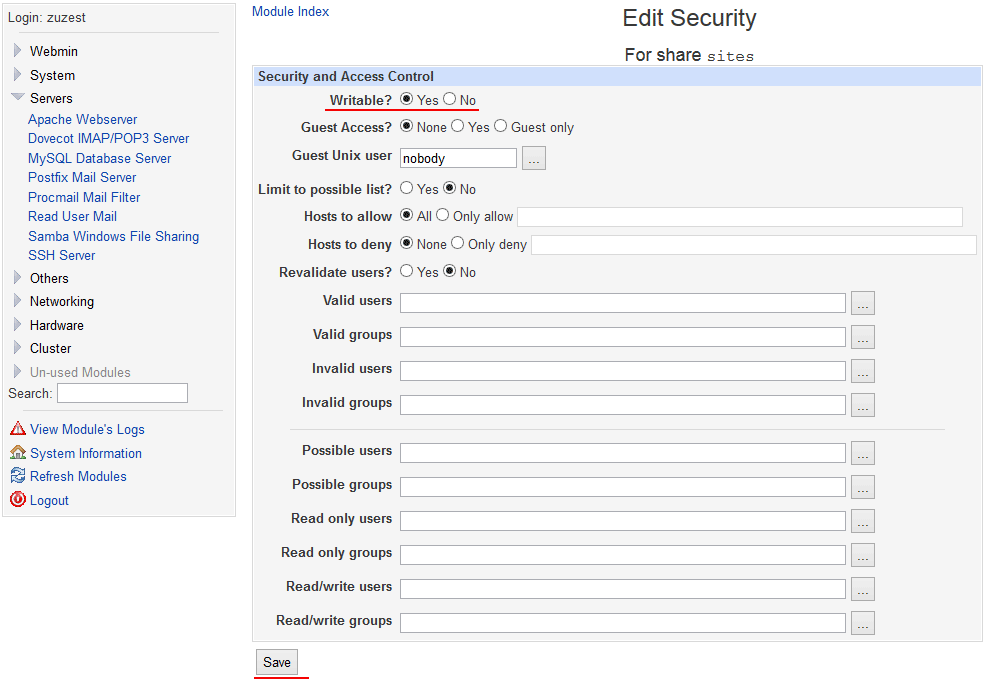
We save.
Return to Servers-> Samba Windows File Sharing and click Restart Samba Server.

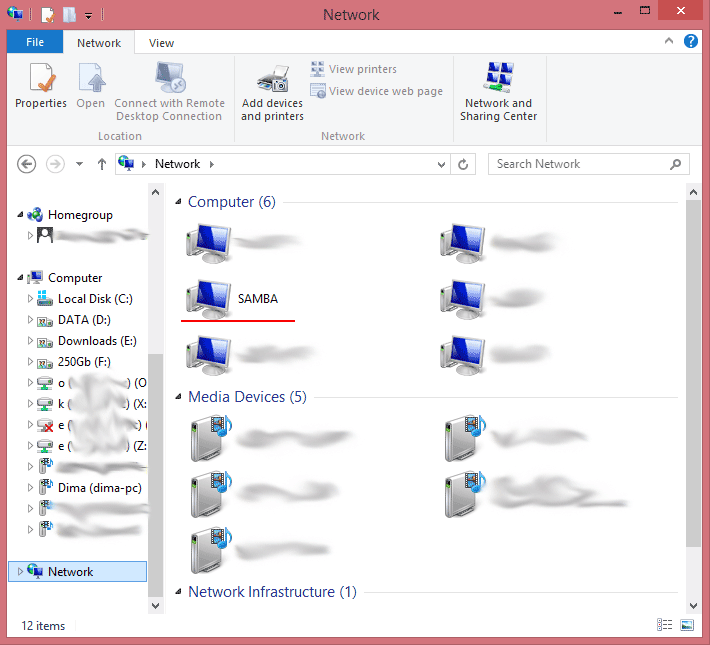
Everything, we can use our network drive.
Open the explorer <Win + E>, select the network connection .

Choose our server.
We select the shared folder.
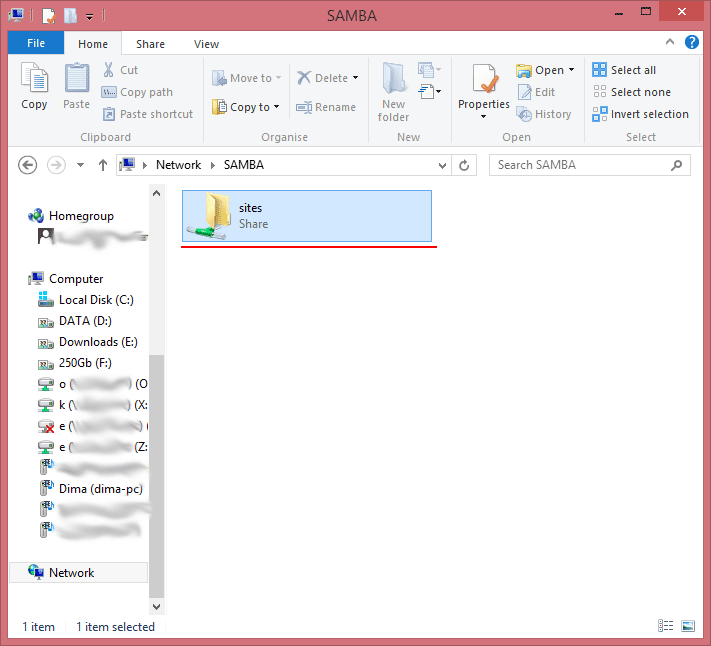
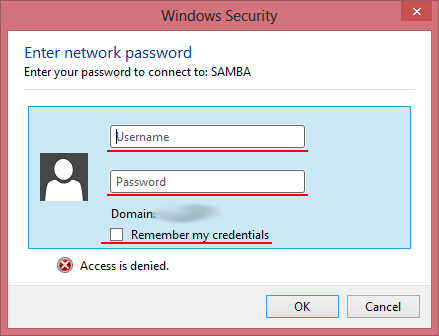
The system will ask us for a login / password. We will introduce them, and we will not forget to put a tick so that the system remembers us and no longer tormented by similar questions.
On this could and finish, but in windows it is customary to refer to the disks by name, so let's go back a step.
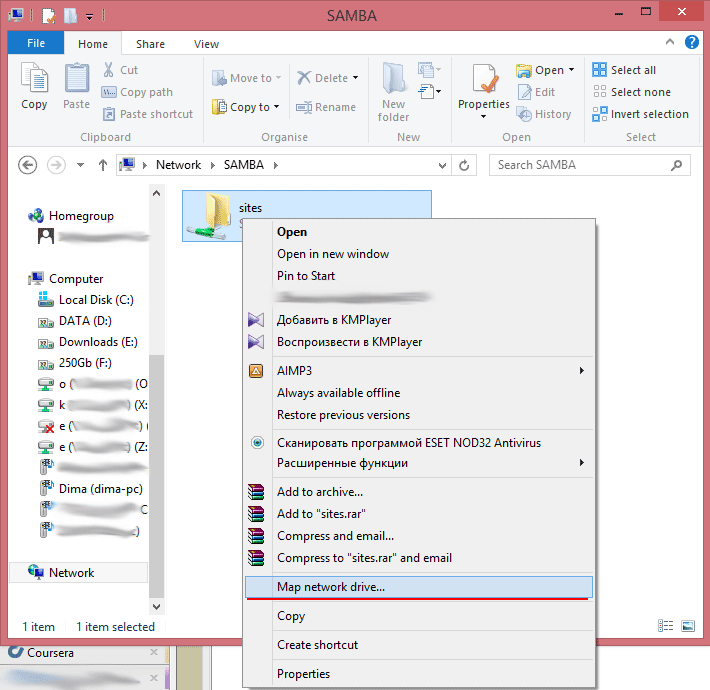
Now select the network folder with the right button. From the list that appears, select "connect a network drive."
By default, the system will offer the first free letter from the end of the alphabet, but you can choose any one you like, except for those with which local disks are assigned (though they will not be in the list). I have this letter "A."

Thus, when we open the <Ctrl + E> explorer again, we will see that the disk appeared in the initial list “my computer” and it has a letter.

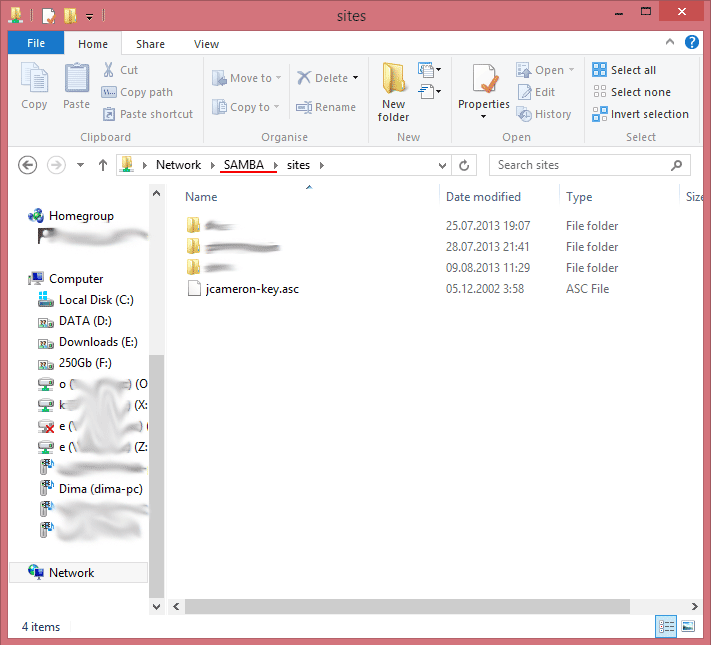
Now our folder will be available absolutely for all programs as a regular hard disk.
Wonderful. Everything works, but where are the files on our site? And this is what we will fix in the final part of our article.
First install phpMyAdmin. This can be done in two ways:
We will go the second way and install from the office. site. To do this, while we are still in windows, follow the link
It is time to return to SSH:
We opened a blank sheet in a text editor. Let's write the following into it:
where% USER% is replaced with your username, and phpmyadmin.dev is the name of our new site, on which phpmyadmin will actually work. Naturally, you can use any other name for the site.
Save the file, exit and tell apache about the newly created site:
Ubuntu tells us that apache is required to reload the configuration.
Now you need to inform the system about the new site, for this we will make changes to the hosts file:
In the first line of the opened file you will most likely see
Let's add the name of our site at the end of the line, separated by a space. As a result, the first line will look like this:
Save, exit.
Everything. The site is ready, but so far only Ubuntu knows about it. Before proceeding to configure Windows, create another site, for example test.dev .
For this, I propose to create a directory of sites:
and already in it test.dev:
Repeat the steps for phpmyadmin (only, replace phpmyadmin with test.dev ):
Save, exit.
Save, exit.
In order to explain windows about the existence of sites, it’s enough to put them in the hosts file (yes, yes, Windows also has such a file). The syntax of the Windows file is exactly the same as in Ubuntu. You can find it in the Windows / System32 / Drivers / etc folder. Open it in any text editor (most likely it will be necessary to open the editor with administrator rights). And append the line:
You can enter it into any part of the file (the beginning / end is at your discretion). Well, do not forget that the IP need to enter one that is assigned to Ubuntu.
Save, close.
It remains to update the DNS. Open the command prompt as administrator and execute:
Everything. Now type in the browser just added the name of the site and enjoy the result.
It remains only to enable the support of the CNC, for this we return to the webmin panel:
Open the Servers -> Apache Webserver menu and switch to the Global configuration tab:

Choose Configure Apache Modules

And put a tick in front of rewrite
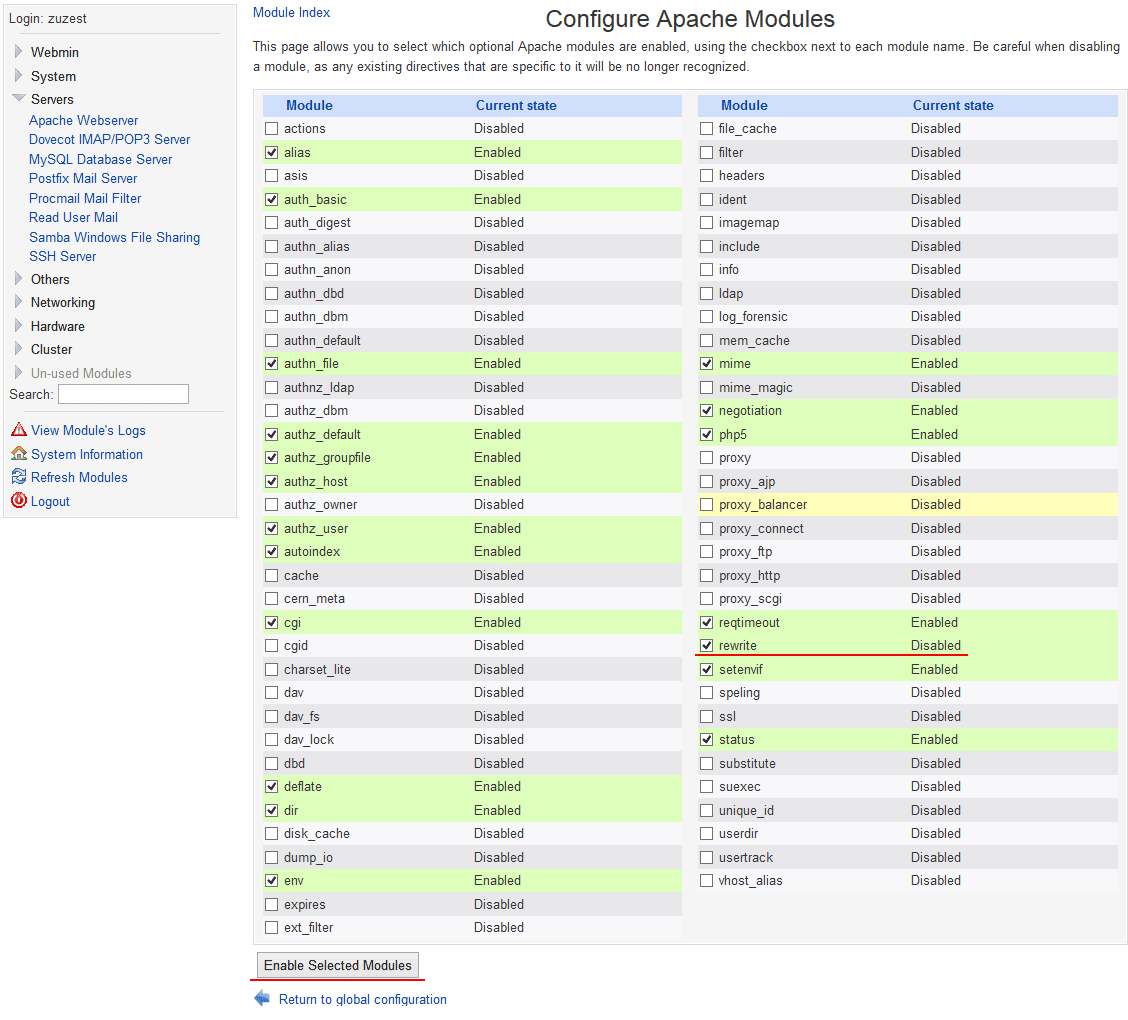
Click the button (below) Enable Selected Modules
Top right click on the queue:
And run again - Start Apache.

And finally, some tricks for easy operation:
Since in the Denwer set, the default display of PHP errors in the browser is set, and at the debugging stage, this is quite necessary information, I suggest not to bother with the php.ini settings, but simply add the following lines to the .htaccess file in the site root
In the same way, you can include other PHP options.
Such a server feels great even on a weak ultrabooked core i3, while absolutely not loading it. On my ultrabook, CPU usage rises to 5% when working in phpmyadmin.
Information was collected on requests to Google and Yandex, but most of them led to Habr.
UPD. If this instruction was useful to anyone, please note that there are some problems with the build of Ubuntu-server 13.10. A little later, when / if I figure it out, add another UPD.
An article from the category - Schaub for himself Bulo, but I think it will be interesting to many.
It began with the fact that it took me in PHP to work with an xlsx file, which, in essence, was renamed zip. And somehow it happened that I did not like Denver from the very beginning of learning PHP. Not that I didn’t like him at all, but even though I’m win_user most of the time, it turned out that I like to understand how it works and be able to self-tune. Therefore, Apache + PHP + MySQL configured on Windows independently. At first I put everything from exe and msi files, then somehow I switched to zip-packages and even began to understand what I was writing in conf and ini files. But zip under Windows did not want to work, while working perfectly under Ubuntu. Having picked up on “these your Internet sites” it became clear that zip under Windows is very dreary. Apparently, I'm just not mature enough to understand the actions described in the manuals, or use ready-made classes in php, but, again, with them, too, everything is not so smooth.
')
The conclusion is obvious - we put Ubuntu, raise LAMP and go ahead, with songs. Experience in the axis other than Windows seems to be there, but, as always, there is some "but". And, in this case, this is what I really like — Windows 8.
It seems that it’s not difficult to install two systems, but you have to reboot each time. And I do not like to turn off the computer, maximum - sleep mode for a laptop and hibernation for the hospital.
The second option is to install Ubuntu in VirtualBox, and if necessary, just minimize the window with the virtual. Almost perfect. At the hospital with 8 cores, of course, everything is fine, but on an ultrabook with the core i3 of the second generation and a frequency of 1300 MHz, everything is not so great.
Yes, and I like Sublime Text for Windows much more, especially visually.
Because there was a cunning plan:
1. Install Ubuntu-server in VirtualBox
2. Configure the site folder in samba
3. In Windows, connect the folder from Ubuntu as a network drive
Having rummaged in Google-Yandex, I found all the necessary information. And, on the one hand, everything works, everything is fine, but on the other hand, it will suddenly need to be reinstalled or someone wants to do the same. In general, I decided to put everything in one article and share it with the people.
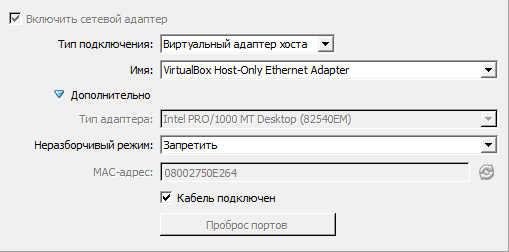
VirtualBox you should already be installed. A little about the configuration of the virtual machine that I use on the above sounded ultrabook:
- processor - 1 core
- RAM - select from 512Mb and to ... Based on the capabilities of your typewriter, I have 12Gb, therefore I allowed to take 2Gb
- hard drive - I did dynamic on 80Gb
- and for the network I chose the following
For installation, I chose Ubuntu-server 13.04. The installation is standard, I’ll dwell only on a couple of moments:
The disk immediately configured as LVM. If you further need to increase its capacity, this option is very convenient.
To then not customize manually, immediately select the desired components.
So we logged into the system for the first time. On the first screen, we are interested in what IP the system received.
In my case, this is 192.168.31.111.
Now you can run any SSH client and connect to a freshly installed system. All further work will go on SSH.
First check for updates:
sudo apt-get update sudo apt-get upgrade until we bother with the asked questions, we answer all “yes”.
Now install webmin. You can simply download the deb package from the site, but this is inconvenient due to the need to manually install the dependencies, so we will connect the required repository.
Get and install the key:
wget http://www.webmin.com/jcameron-key.asc sudo apt-key add jcameron-key.asc Add the source:
sudo nano /etc/apt/sources.list deb http://download.webmin.com/download/repository sarge contrib ( ) Save <Ctrl + O and Enter> and exit <Ctrl + X>.
Updating:
sudo apt-get update and install:
sudo apt-get install webmin The installation itself will tighten all dependencies, we only need to agree.
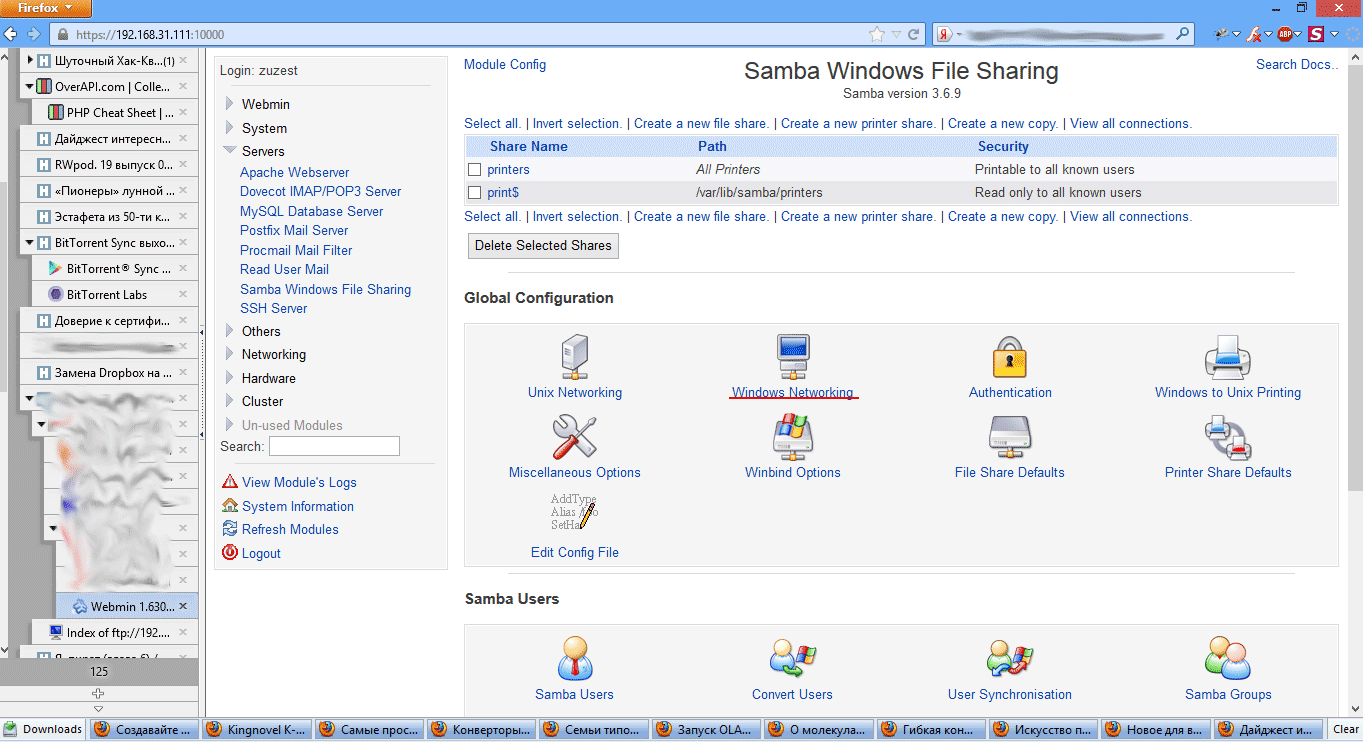
The installation was successful and now you can open our server in a windows-browser. In the address bar, enter 192.168.31.111:10000. The browser will take us to a secure connection (https).
And we get to the login / password entry page.
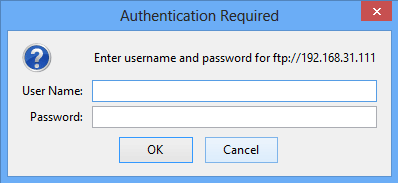
Let's go back to SSH. Now you can install an ftp server, for example, pure-ftpd:
sudo apt-get install pure-ftpd Now if you type in your browser
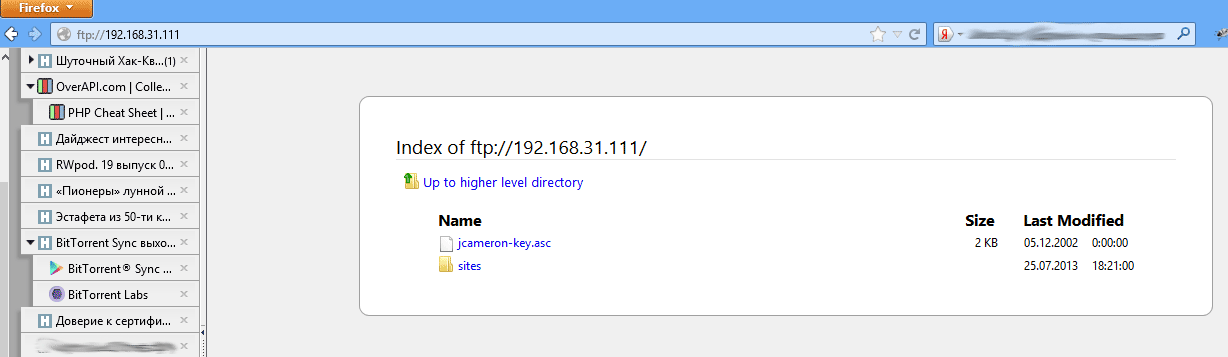
192.168.31.111 192.168.31.111 , you should have a window asking for your login / password.That's all ftp server can be used.
Actually, it is already possible to start programming in PHP, but to upload files via ftp every time is not very convenient.
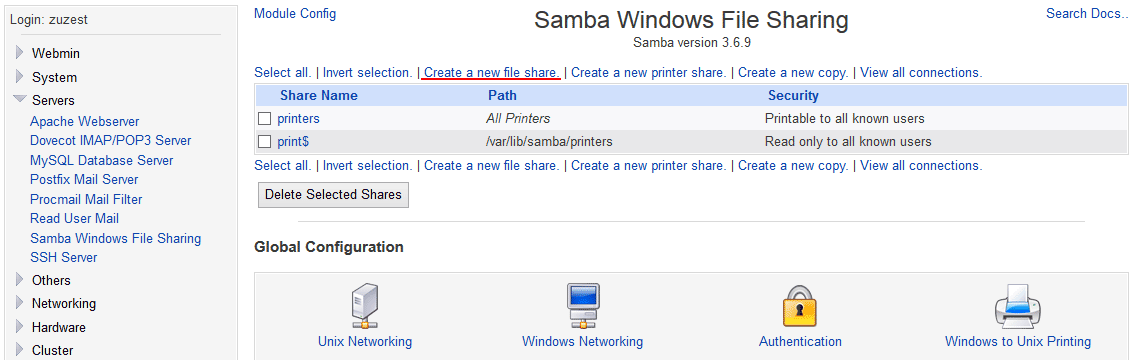
Therefore, I propose to configure the samba server and connect the folder from ubuntu to the windows machine as a normal network drive. Go to webmin, open Servers -> Samba Windows File Sharing.
Choose Windows Networking:
Fill in the fields:
- Workgroup (Workgroup)
- Server name - by this name the computer will be visible in the windows-network
- Security is the security level until we set it to the User level.
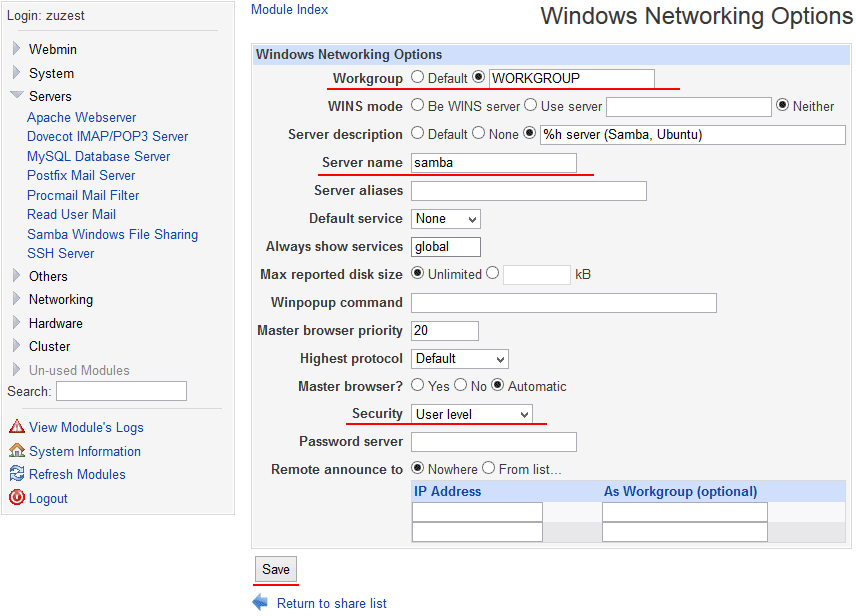
Persist.
Next, click on the link to Create a new file share and create a new file share.
Here you need to fill in the following fields:
- Share name - this will be the name of the network folder
- Directory to share - enter the directory to be shared
- Create with permissions - set the level of rights, I recommend until you bother and set the maximum level (777)
- Browseable - set it to yes, this is what we allow to show the shared resource, otherwise the path to the folder will need to be written with pens (for example, \\ samba \ sites).

Click the Create button.
Now in the list of resources choose our newly created.
Select Security and Access Control.
Parameter Writable - set to yes, this we allowed to write files to our ball.
We save.
Return to Servers-> Samba Windows File Sharing and click Restart Samba Server.
Everything, we can use our network drive.
Open the explorer <Win + E>, select the network connection .
Choose our server.
We select the shared folder.
The system will ask us for a login / password. We will introduce them, and we will not forget to put a tick so that the system remembers us and no longer tormented by similar questions.
On this could and finish, but in windows it is customary to refer to the disks by name, so let's go back a step.
Now select the network folder with the right button. From the list that appears, select "connect a network drive."
By default, the system will offer the first free letter from the end of the alphabet, but you can choose any one you like, except for those with which local disks are assigned (though they will not be in the list). I have this letter "A."
Thus, when we open the <Ctrl + E> explorer again, we will see that the disk appeared in the initial list “my computer” and it has a letter.
Now our folder will be available absolutely for all programs as a regular hard disk.
Wonderful. Everything works, but where are the files on our site? And this is what we will fix in the final part of our article.
First install phpMyAdmin. This can be done in two ways:
- the first option to install from the repository
sudo apt-get install phpmyadmin - and, the second option, download the archive from the official site
We will go the second way and install from the office. site. To do this, while we are still in windows, follow the link
www.phpmyadmin.net/home_page/index.php www.phpmyadmin.net/home_page/index.php and download the latest version ( 4.0.4.1 ). Next, go to our network drive and unpack the downloaded archive on it. For convenience, I recommend renaming the folder to something shorter, for example, phpmyadmin .It is time to return to SSH:
sudo nano /etc/apache2/sites-available/phpmyadmin.dev We opened a blank sheet in a text editor. Let's write the following into it:
<VirtualHost *:80> ServerName phpmyadmin.dev ServerAlias www.phpmyadmin.dev DocumentRoot /home/%USER%/phpmyadmin </VirtualHost> where% USER% is replaced with your username, and phpmyadmin.dev is the name of our new site, on which phpmyadmin will actually work. Naturally, you can use any other name for the site.
Save the file, exit and tell apache about the newly created site:
sudo a2ensite phpmyadmin.dev Ubuntu tells us that apache is required to reload the configuration.
sudo service apache2 reload Now you need to inform the system about the new site, for this we will make changes to the hosts file:
sudo nano /etc/hosts In the first line of the opened file you will most likely see
127.0.0.1 localhost Let's add the name of our site at the end of the line, separated by a space. As a result, the first line will look like this:
127.0.0.1 localhost phpmyadmin.dev Save, exit.
Everything. The site is ready, but so far only Ubuntu knows about it. Before proceeding to configure Windows, create another site, for example test.dev .
For this, I propose to create a directory of sites:
mkdir sites and already in it test.dev:
mkdir sites/test.dev Repeat the steps for phpmyadmin (only, replace phpmyadmin with test.dev ):
sudo nano /etc/apache2/sites-available/test.dev <VirtualHost *:80> ServerName test.dev ServerAlias www.test.dev DocumentRoot /home/%USER%/sites/test.dev </VirtualHost> Save, exit.
sudo a2ensite test.dev sudo service apache2 reload sudo nano /etc/hosts 127.0.0.1 localhost phpmyadmin.dev test.dev Save, exit.
In order to explain windows about the existence of sites, it’s enough to put them in the hosts file (yes, yes, Windows also has such a file). The syntax of the Windows file is exactly the same as in Ubuntu. You can find it in the Windows / System32 / Drivers / etc folder. Open it in any text editor (most likely it will be necessary to open the editor with administrator rights). And append the line:
192.168.31.111 phpmyadmin.dev test.dev You can enter it into any part of the file (the beginning / end is at your discretion). Well, do not forget that the IP need to enter one that is assigned to Ubuntu.
Save, close.
It remains to update the DNS. Open the command prompt as administrator and execute:
ipconfig /flushdns Everything. Now type in the browser just added the name of the site and enjoy the result.
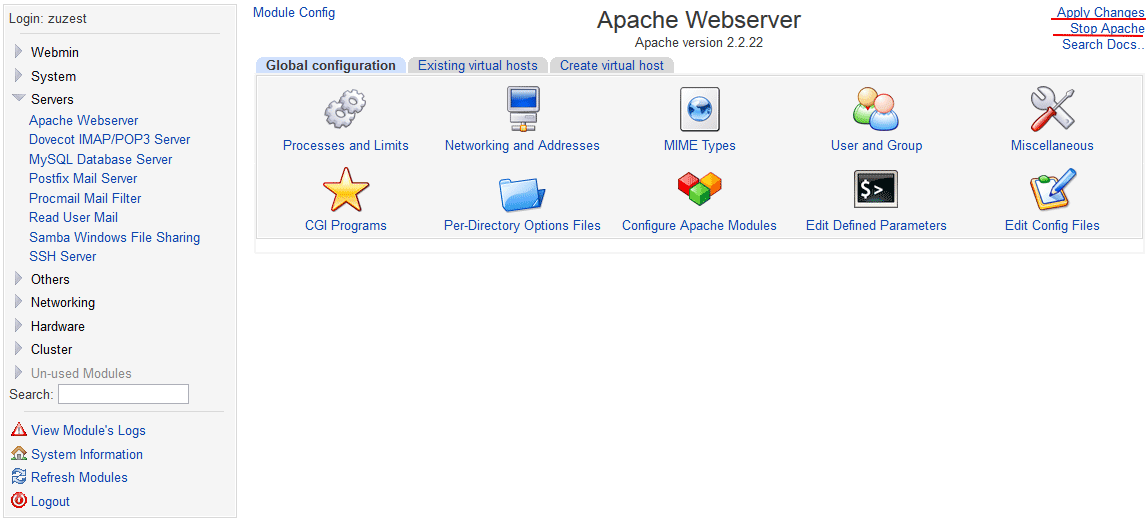
It remains only to enable the support of the CNC, for this we return to the webmin panel:
Open the Servers -> Apache Webserver menu and switch to the Global configuration tab:
Choose Configure Apache Modules
And put a tick in front of rewrite
Click the button (below) Enable Selected Modules
Top right click on the queue:
- Apply Changes
- Stop apache
And run again - Start Apache.
And finally, some tricks for easy operation:
Since in the Denwer set, the default display of PHP errors in the browser is set, and at the debugging stage, this is quite necessary information, I suggest not to bother with the php.ini settings, but simply add the following lines to the .htaccess file in the site root
php_flag display_errors on php_flag display_startup_errors on In the same way, you can include other PHP options.
Such a server feels great even on a weak ultrabooked core i3, while absolutely not loading it. On my ultrabook, CPU usage rises to 5% when working in phpmyadmin.
Information was collected on requests to Google and Yandex, but most of them led to Habr.
UPD. If this instruction was useful to anyone, please note that there are some problems with the build of Ubuntu-server 13.10. A little later, when / if I figure it out, add another UPD.
Source: https://habr.com/ru/post/190010/
All Articles