Basics of programming objects of the Smart Home in MajorDoMo

The MajorDoMo system combines various components, many of which are associated with reading or changing data. To organize the effective exchange of data between parts of the system, an object model was created. This model largely corresponds to the Paradigm of Object Oriented Programming (OOP) and people familiar with this paradigm will have no difficulty in understanding the existing model. However, knowledge of OOP principles is not necessary at all, since The model built into the system is rather simplified and can be used without a deep knowledge of any programming language or as the first step in learning this concept. The article describes the main components of this model.
Part 1. Theory.
Classes
A class is a description of the basic properties that all objects belonging to this class should have. A class is not an object and cannot by itself contain the values of these properties; it only describes the signs and variants of the behavior of objects. A physical analogy can be represented by the example of a simple classification - for example, the “Door to the bathroom” object may belong to the “Doors” class, while the “Doors” may have a description of the “Status” property (the door is open or closed), but the immediate value be set only for a specific object, but not for a class.
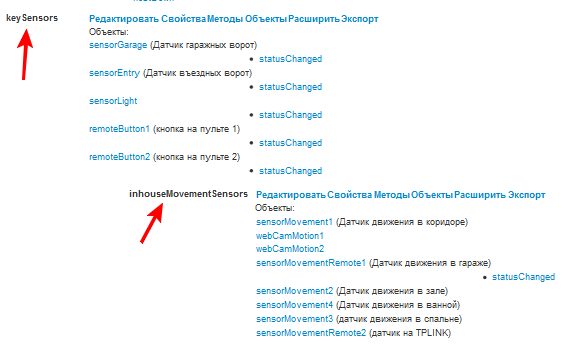
An important feature of classes is the ability to create subclasses that inherit all the properties and methods of the "parent" class, but at the same time capable of having their own properties and methods. Or having their own specific implementation of the "parent" methods.
')
Example:
Objects
An object is a state of a real (or virtual) object. Object properties can have specific values (for example, “status”, “temperature”, etc.). In addition, properties can be set in the object itself that complement the set of properties of the class to which the object belongs. Also, an object can implement its own implementation of the methods described in the class.
Example:

An object belonging to a class, which, in turn, is a subclass, inherits the properties and methods of all parent classes.
Properties
A property is a specific parameter that describes the state of an object. As it was already written above, classes can only describe properties (name, description, etc.), but the value of the property can be set only for a particular object.
Example (description of object class properties):
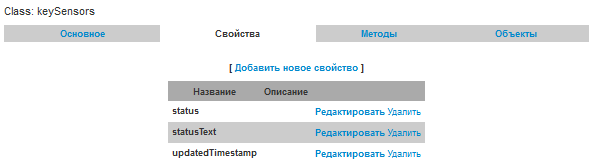
Example (setting / reading object property):
setGlobal('myObject.myProperty',12345); $value=getGlobal('myObject.myProperty'); Methods
Methods are a description of the possible actions of an object (or actions on an object). Returning to the physical analogy, you can specify that the class “Doors” can have the methods “Open” and “Close”, i.e. All objects of the class will also have this method and we can open the door by calling the "Door to the bathroom. Open" method. The implementation of the method itself is a script in the PHP programming language. In this case, part of the script may be setting the “Status” property to “Open”.
Example (object method):
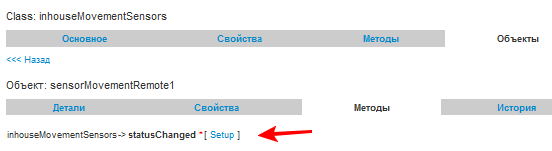
Example (method code):
if ($this->getProperty('status')) { say(" "); } Example (method call):
callMethod('myObject.myMethod',$params); // $params Part 2. Practice.
In the second part of the article, I will give an example of "embedding" real equipment into the MajorDoMo object system. As an example of the equipment, I will use the components of the nooLite system, which has been repeatedly presented at Habré , so many people know about the capabilities of these components. All the actions described below are performed in the MajorDoMo control panel in the Objects section without making changes to the source code or system configuration files.
So, for examples we will use:
- Several executive power modules (normal + adjustable / dimmable)
- USB transmitter for sending signals
Plan points:
- Create abstract classes for our tasks.
- Create more specific classes for supported hardware.
- Adding objects
- We manage!
Paragraph 1
We will build on the fact that in our Smart House there will often be a task of turning on / off any equipment, so we will get a Relays class with the status property (1/0 - on / off) at the very top level, as well as methods turnOff, turnOn, switch and refresh.
The turnOff method code (device shutdown):
$this->setProperty("status",0); Method code turnOn (turn on the device):
$this->setProperty("status",1); Switch method code (device switching):
$status=$this->getProperty("status"); if ($status) { $this->callMethod('turnOff'); } else { $this->callMethod('turnOn'); } Method code refresh (update device status):
$status=$this->getProperty("status"); if ($status) { $this->callMethod('turnOn'); } else { $this->callMethod('turnOff'); } We assume that this is a necessary minimum, which will be inherent in all managed objects.
Point 2
Next, we will add support for the nooLite equipment we need through the creation of a child class nooLite. It will differ from the parent one by the specific property of the channel (control channel of the executive module). In addition, a new sendCommand method will be added (command is sent) and the code for the turnOff and turnOn methods will be redefined.
The code for the new sendCommand method (sending a command to a Noolite device):
$cmdline='"c:\Program Files\nooLite\nooLiteCMD.exe" -api '.$params['command']; safe_exec($cmdline); The code for the redefined turnOff method is:
$this->setProperty("status",0); $this->callMethod("sendCommand",array('command'=>'-off_ch'.$this->getProperty("channel"))); The code for the override method turnOn:
$this->setProperty("status",1); $this->callMethod("sendCommand",array('command'=>'-on_ch'.$this->getProperty("channel"))); We do not touch the rest of the methods - they remain unchanged and work as they should with the new class (thanks to the PLO!).
Actually, now we can add arbitrarily many objects of a given class without additional expenses for programming the behavior of each of them.
Point 3
Add the object noo1, specifying in the description of the object that it is “Highlighting the ceiling in the living room”, go into setting its properties and specify the value of the property noo1.channel = 1, i.e. This power module is on the first control channel.
Point 4
Now we can enable / disable this module from any scenario with the following code:
callMethod('noo1.turnOn'); // callMethod('noo1.turnOff'); // Or, to register the management of this module from the menu in the following form:
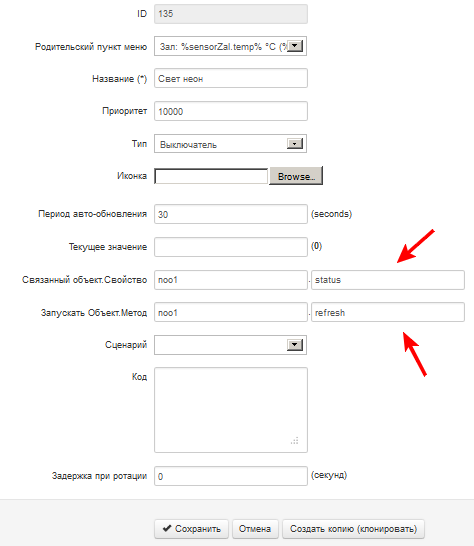
Having the result of this control:

Let us fix what we learned in passing points 2–4 to add one more device - a nooLite power unit with dimming support.
Point 2.
From the nooLite class created above, we will create a child class nooLiteDimmer, adding the additional brightness property to it. Also add a new dim method and rewrite the code of the methods refresh, turnOn, turnOff
The code for the new dim method is:
if ($params['value']) { $this->setProperty("brightness",$params['value']); $this->callMethod("refresh"); } The code for the overridden refresh method:
$value=$this->getProperty("brightness"); $this->callMethod("sendCommand",array('command'=>'-set_ch'.$this->getProperty("channel").' -'.$value)); if ($value>0) { $this->setProperty('status',1); } else { $this->setProperty('status',0); } The code for the redefined turnOff method is:
$this->setProperty("status",0); $this->setProperty("brightness",0); $this->callMethod("refresh"); The code for the override method turnOn:
$this->setProperty("status",1); $this->setProperty("brightness",100); $this->callMethod("refresh"); Point 3.
It is almost the same as the previous version - add the noo2 object, set the control channel (2) in the properties. The object is ready.
Clause 4
The noo2 object can be controlled in the same way as noo1, but other than that we can use the dim method to set the brightness:
callMethod('noo2.dim',array('value'=>50)); // 50% To control the lamp in the menu, create the following element:

The type of control for the user is already given above in the example of control of a conventional power unit.
In the Nootechnique there is still such a three-channel dimmer to control the RGB-illumination:
I will leave its integration behind the scenes (or, if you like, as a “homework”), but as a result of simple manipulations like those described above, you can get this interface:

Instead of an afterword
The object system is especially convenient to use when we have a number of objects of the same type (for example, sensors or actuators) with the same properties and behaviors. At the same time, we can define one class and add only objects with different names or some particular features, but at the same time have only one implementation of the behavior script described in the class method.
In addition, all available modules that provide the connection of the system with specific “iron” (and not so) protocols allow you to specify the “binding” of the parameters of the supported equipment to the properties or methods of certain objects, which allows you to have the current state of all connected systems (SNMP, ZWave, 1-wire, etc.).
Well, at the very end, I would like to say that it is easiest to study many things with examples of specific implementations, for which a special project CONNECT was launched, with the help of which you can exchange ready-made configurations of your Smart Home. Using my profile as an example, I show the components used, the configuration of the control menu, the scripts created, the MajorDoMo classes and objects. The profile does not publish information about the values of properties of objects and, of course, there is no possibility to control the equipment - all information is provided for informational purposes only.
Successful automation!
Source: https://habr.com/ru/post/189900/
All Articles