Arduino watchdog or automatic RESET in case of a hang

It will be about how to keep the Arduino always in working condition. The watchdog mechanism is built into Atmega controllers, but unfortunately, not every Arduino bootloader handles this function correctly. Let's try to deal with this problem.
So what is a watchdog? In simple words, it is a built-in timer for a certain time (up to 8 seconds, depending on the chip), which can be started programmatically. As soon as the timer “hits” to zero, the controller gives the correct reset signal (RESET) and the whole device goes into hard reset. Most importantly, this timer can be reset to the initial state also programmatically.
- The correct reset signal is long enough for the controller to start to overload. Sometimes there is a temptation to connect any Arduino digital output to the RST input and set it to 0 when you need to reboot. This is a bad approach to solving the problem, because such a signal may not be enough in time, although it is possible that in some cases this will also work ..
- hard reset is a real reboot that occurs when you press the RESET button. The fact is that there is also the notion of soft restart - this is a program transition to the 0th address. In principle, this is also a useful thing, but with the help of it it is impossible to overload a hung Ethernet controller or a flashing LCD.
In short, the built-in watchdog is just what you need and without additional circuits, soldering and connections.
Watchdog functions
To use the Watchdog functions, you need to connect the standard library to the project:
#include <avr/wdt.h> Now we have the following three functions:
')
1. Start watchdog timer:
wdt_enable(WDTO_8S); /* WDTO_15MS WDTO_30MS WDTO_60MS WDTO_120MS WDTO_250MS WDTO_500MS WDTO_1S WDTO_2S WDTO_4S WDTO_8S */ The timer will count as much as specified in the constant. After this time, a reboot will occur.
2. Reset watchdog timer:
wdt_reset(); I think it is clear why this function is needed - until you call it, the controller will not reset. As soon as the system hangs and this function is no longer called, then after a specified period of time, a reboot will occur.
3. Disable watchdog:
wdt_disable(); Disable the watchdog timer.
Actually, this could have been the end of our watchdog tale ... but the fact is that it all works only in the Arduino Uno, and on the Arduino Mega, Mini and Nano it all works exactly the opposite, i.e. does not work at all :)
Why watchdog does not work on most modern Arduino boards
The fact is that after the reboot, which was caused by the watchdog, the controllers of the latest releases leave the watchdog enabled for a minimum period , i.e. 15ms. This is necessary so that the program somehow finds out that the previous reboot was by watchdog. Therefore, the primary task of the loader (or your program, if it starts first) is to save information that the reboot was “unexpected” and immediately turn off the watchdog. If this is not done, the system will go into the bootloop, i.e. will be forever overloaded.
As you know, in Arduino there is a special loader, which is performed first of all after a system reboot. And, unfortunately, the standard loader does not reset the watchdog! Thus, the system enters a brutal bootloop (“crazy led” state, in which the LED on pin 13 flashes like crazy).
It looks like this:
Ways to solve the problem
If you look at the source code of the standard bootloader (they are in the platform delivery), then the watchdog disconnect code is (!), But this code is conditional compilation and, apparently, the standard bootloader is compiled without watchdog support. At least in the platform package version 1.5.2 (the last at the time of writing the article) this is the case.
To solve the problem, I even read the mans of the platform itself (:) and it seems that this problem is described there and even the code that should make everyone happy is given:
uint8_t mcusr_mirror __attribute__ ((section (".noinit"))); void get_mcusr(void) __attribute__((naked)) __attribute__((section(".init3"))); void get_mcusr(void){ mcusr_mirror = MCUSR; MCUSR = 0; wdt_disable(); } This describes the get_mcusr () function, which should be called immediately after a reset. This is achieved by the macro "__attribute __ ((section (". Init3 ")))". I tried to prescribe this function in all sections that are possible - yes, it does start up before the setup () function from the sketch, but, unfortunately, much later than 15ms (the minimum watchdog constant) after resetting ...
In short, no matter how I dug the Internet in search of an easy solution to the problem, nothing was found. I found only one way to make watchdog work - to flash the bootloader ... which we will do now.
Watchdog health check
Before you flash something, you need to check - suddenly your Arduino supports watchdog. For this, I wrote a small sketch for the test. Just fill it up, open the port monitor and see what happens.
Testing for watchdog
#include <avr/wdt.h> void setup() { wdt_disable(); // bootloop Serial.begin(9600); Serial.println("Setup.."); Serial.println("Wait 5 sec.."); delay(5000); // , bootloop wdt_enable (WDTO_8S); // 8 . Serial.println("Watchdog enabled."); } int timer = 0; void loop(){ // Serial if(!(millis()%1000)){ timer++; Serial.println(timer); digitalWrite(13, digitalRead(13)==1?0:1); delay(1); } // wdt_reset(); } After rebooting (or connecting the monitor to the port), the built-in LED will blink, indicating that the bootloader has started. Next in the setup section, the watchdog is turned on with a timer for 8 seconds. After that, the LED will count us this time and a reboot should occur.
Then the most interesting begins - if the reboot has happened and everything repeats in the same sequence, then you have the Arduino in hand, in which the watchdog correctly processes the bootloader. If, after a reboot, the LED on the 13th pin starts to blink endlessly, then the bootloader does not support watchdog. Here, even the reset button does not help. For subsequent firmware, you need to disconnect the board from the power supply and, after switching on, have time to flash it before the first reboot.
I tested 4 types of boards and only the loader in Arduino Uno worked as it should:

Results on the monitor
Watchdog is not supported by the loader: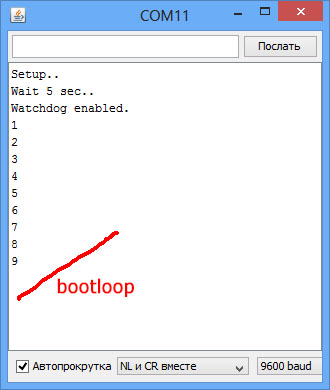 | Watchdog is supported by the loader: |
What is the easiest way to flash a new bootloader?
You can flash the bootloader in Arduino with the help of separate programmers, or you can build your programmer with the help of the same Arduino. Those. Any Arduino board can be turned into a programmer, filling in a special sketch there.
I will not in this article describe all the wisdom of creating a programmer based on the Arduino, because This topic is described in some detail on the Internet . As a programmer, I used the Arduino Uno. As you know, the firmware is produced through a separate ICSP connector, which is on almost all the boards. In the case of the Arduino Pro Mini firmware, which does not have an ICSP, the connection is made directly to the pins .
Connection for firmware bootloader

Where can I get a bootloader that supports watchdog?
This chapter is reminiscent of dancing with a tambourine, and most likely you can make everything somehow easier, but, alas, I could not do it any other way.
It is recommended to use the loaders from the optiboot package. In principle, these loaders go into the installation of the Arduino platform itself, but it is better to download and install the latest version of optiboot from here . The installation is in two steps (perhaps this can be done somehow differently):
- The bootloaders \ optiboot folder is overwritten in C: \ Program Files (x86) \ Arduino \ hardware \ arduino \ avr \ bootloaders \ optiboot
- The boards.txt file is appended to the file C: \ Program Files (x86) \ Arduino \ hardware \ arduino \ avr \ boards.txt
Naturally, the Arduino platform installation folder may be different.
Then the development environment is overloaded and in the Service / Board menu you can observe new boards marked [optiboot]. Unfortunately, when choosing these boards, there are some incomprehensible compilation errors and all sorts of other oddities appear ... therefore we make it even easier. Open the file C: \ Program Files (x86) \ Arduino \ hardware \ arduino \ avr \ boards.txt in any text editor and change the following lines:
For Arduino Nano:
menu.cpu.nano.atmega328.bootloader.file = optiboot / optiboot_atmega328.hex
For Arduino Mini:
menu.cpu.mini.atmega328.bootloader.file = optiboot / optiboot_atmega328.hex
The next problem is that the optiboot bootloader for the Arduino Mega does not exist in nature, because Mega has more memory and uses a different protocol. Therefore, we use a standard but modified bootloader, which is downloaded from here . The file is renamed to stk500boot_v2_mega2560_2.hex and written to the folder C: \ Program Files (x86) \ Arduino \ hardware \ arduino \ avr \ bootloaders \ stk500v2.
Next, we change the following line in the already familiar boards.txt file:
mega2560.bootloader.file = stk500v2 / stk500boot_v2_mega2560_2.hex
Do not worry that the file of the modified firmware for Mega is 2 times smaller than the standard one - so it seems to be.
Flashing process
After all the changes, you can flash the loaders by choosing the usual boards (not [optiboot]!) In the board menu. In this case, exactly those hex files that we specified in the board.txt file will be flashed.
The firmware process may not start and an error is issued:
avrdude: stk500_getsync(): not in sync: resp=0x00 To solve this problem, open the programmer's sketch and in the setup section select another serial port speed.
While filling in the Arduino Mega, an error may appear that should be ignored:
avrdude: verification error, first mismatch at byte 0x3e000 0x0d != 0xff avrdude: verification error; content mismatch Final manipulations
Optiboot loaders have one more feature - they increase the speed of loading sketches, so when using boards with optiboot, you need to make the appropriate changes to the boards.txt:
For Arduino Nano:
menu.cpu.nano.atmega328.upload.speed = 115200
For Arduino Mini:
menu.cpu.mini.atmega328.upload.speed = 115200
The previous port speed is also better to remember, because It will need to be used on boards with standard loaders. If such changes are not made, an error will be generated during the sketching process, such as this:
avrdude: stk500_getsync(): not in sync: resp=0x00 Links, literature
Package optiboot
Firmware bootloader
How to flash bootloader in Arduino Pro Mini
Source: https://habr.com/ru/post/189744/
All Articles