ActionBar on Android 2.1+ using SupportLibrary
Hello, Habrahabr!
I recently wrote that Google added ActionBar support to its Support Library. I think it's worth telling how to use it. Under the cut - instructions for the correct import of the library into your project and the main points of using the SupportActionBar.
In order for our ActionBar to be visible on older devices, you need to inherit the theme of the application from Theme.AppCompat . By itself, it will not come from anywhere, so you need to create a library project (the original English manual for Eclipse and Android Studio is here (see Adding libraries with resources )):
1. First you need to make sure that we have the latest version of the Support Library downloaded. To do this, open the SDK Manager and scroll to the bottom, to the Extras folder. It has the item Android Support Library - we need it. Update it to the latest version (now rev. 18), if you haven’t done so before.
2. Updated? Well done. Now click File> New> In the Android folder, select the Android Project from existing code .
3. Click the Browse button ... and look for the folder we need. The path to it is something like this: <your SDK> / extras / android / support / v7 / appcompat /. Select the item that appears in the list and click Finish.
4. Now you should have a project android-support-v7-appcompat in Project Explorer. Open it, in the libs / folder on both .jar files, right-click and click Build Path> Add to Build Path .
5. Right-click on the project, select Build Path> Configure Build Path.
6. On the Build Path page in the Order and Export tab, mark the two newly added .jar files and uncheck Android Dependencies .
7. Click OK to save the changes. That's it - the library is ready for use!
Now create a project of your application, which we will do. The name is SupportActionBarDemo, the package is com.habrahabr.sabd, the minimum API level is 7 (these are library requirements). Create an Activity, name - MainActivity, layout - main.
Now right-click on this project and click Properties . On the Android page, under the Library heading, click Add and select android-support-v7-appcompat in the appeared window, then OK and OK again to save the changes. Now the library has been added to the project!
')
First of all, go to res / values / styles.xml , res / values-v11 / styles.xml , res / values-v14 / styles.xml (thanks to DeusModus ) and write
Now ActionBar will be visible on any version of android.
Open res / values / strings.xml and add the strings:
Open res / menus / main.xml and write there:
Pay attention to the attributes xmlns: sabd = " schemas.android.com/apk/res-auto " and sabd: showAsAction - without them, the ActionBar will work incorrectly. Icons are random, do not matter. I still write what the attribute sabd: showAsAction means :
always - the element will always be visible, if there is not enough space, the title will not be shown completely.
ifRoom - the element will be visible only if there is room for it.
never - the item will never be visible, to display it, you must press the Menu button on the device or the Overflow button on the ActionBar in the absence of the first
withText element will be shown only with its title
collapseActionView - the element can be collapsed into a button or unfold the full width of the Actionbar by pressing, then I will give an example
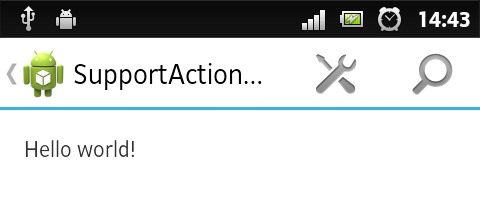
Now let's start writing the code directly. The first step in the Activity code is to replace the extends Activity on the extends ActionBarActivity and add it to the import. In recent versions of ADT, when the Activity is created, the onCreateOptionsMenu (Menu menu) method is automatically created, in which we create the menu:
Run the application and see our ActionBar:

Item 2 was not displayed, as there was not enough space for it. Item 3 will not be visible under any circumstances, because we set the sabd attribute : showAsAction = “never” . You can reach them using the "Menu" button on the device.
You can handle pressing the menu items in the same place as before - in the onOptionsItemSelected (MenuItem item) method. You can handle clicks on the application icon in the same method, it has the ID android.R.id.home. To add an Up Button to the ActionBar , use the ActionBar.setDisplayHomeAsUpEnabled method (boolean showHomeAsUp) :
Sometimes you need to do a search, for example, in Google Play. ActionView comes to the rescue. Open res / menu / main.xml and delete the last 3 elements - we do not need them, but they will take up space. Instead, add one new one:
The sabd attribute : actionViewClass = “android.support.v7.widget.SearchView” indicates which View will be used instead of the usual one. The text collapseActionView in the sabd: showAsAction attribute indicates that the ActionView can be collapsed into a button or be expanded to its full width by pressing. To use it in Activity, change the MainActivity code:
Run the application and see:
Click the search button:
By the way, the keyboard appears automatically. You can exit the search mode by clicking the Up button on the left side of the ActionBar or by pressing the hardware button back.
In the onQueryTextChange () method, we get the text from the input field when the user types the next letter. In the onQueryTextSubmit (String text) method, we are given the text that the user is looking for. SearchView has such useful methods:
setQuery (CharSequence query, boolean submit) - changes the text in the input field to the one that is passed to it, optionally makes it finite (starts searching)
getQuery () - returns the text that is now in the input field
setQueryHint (CharSequence hint) - changes the hint to the one that is passed to it
getQueryHint () - returns a hint
setSuggestionsAdapter (CursorAdapter adapter) - adds a drop-down list, as in AutoCompleteTextView
getSuggestionsAdapter () - returns the adapter of this list
setOnCloseListener (SearchView.OnCloseListener listener) - puts a close handler on it
setOnSuggestionListener (SearchView.OnSuggestionListener listener) - puts on it a handler for clicking on a drop-down list item
And the guys from Google are great, they do not forget about the support of the old versions of their OS. For example, fragments, ViewPager and NavigationDrawer with API v4 are available, Actionbar - with API v7. Although it seems to me that all this was done for the sake of Android 2.3, and earlier platforms - so, for the company.
I would be glad if this article will help someone :-)
Part 2 - Navigation with tabs and drop-down list
Part 3 - Additional Functions
I recently wrote that Google added ActionBar support to its Support Library. I think it's worth telling how to use it. Under the cut - instructions for the correct import of the library into your project and the main points of using the SupportActionBar.
Import Library
In order for our ActionBar to be visible on older devices, you need to inherit the theme of the application from Theme.AppCompat . By itself, it will not come from anywhere, so you need to create a library project (the original English manual for Eclipse and Android Studio is here (see Adding libraries with resources )):
1. First you need to make sure that we have the latest version of the Support Library downloaded. To do this, open the SDK Manager and scroll to the bottom, to the Extras folder. It has the item Android Support Library - we need it. Update it to the latest version (now rev. 18), if you haven’t done so before.
2. Updated? Well done. Now click File> New> In the Android folder, select the Android Project from existing code .
3. Click the Browse button ... and look for the folder we need. The path to it is something like this: <your SDK> / extras / android / support / v7 / appcompat /. Select the item that appears in the list and click Finish.
4. Now you should have a project android-support-v7-appcompat in Project Explorer. Open it, in the libs / folder on both .jar files, right-click and click Build Path> Add to Build Path .
5. Right-click on the project, select Build Path> Configure Build Path.
6. On the Build Path page in the Order and Export tab, mark the two newly added .jar files and uncheck Android Dependencies .
7. Click OK to save the changes. That's it - the library is ready for use!
Create application
Now create a project of your application, which we will do. The name is SupportActionBarDemo, the package is com.habrahabr.sabd, the minimum API level is 7 (these are library requirements). Create an Activity, name - MainActivity, layout - main.
Now right-click on this project and click Properties . On the Android page, under the Library heading, click Add and select android-support-v7-appcompat in the appeared window, then OK and OK again to save the changes. Now the library has been added to the project!
')
Simple example
First of all, go to res / values / styles.xml , res / values-v11 / styles.xml , res / values-v14 / styles.xml (thanks to DeusModus ) and write
<style name="AppBaseTheme" parent="@style/Theme.AppCompat.Light" > . . . Now ActionBar will be visible on any version of android.
Open res / values / strings.xml and add the strings:
<string name="action_item_1">Item 1</string> <string name="action_item_2">Item 2</string> <string name="action_item_3">Item 3</string> Open res / menus / main.xml and write there:
<menu xmlns:android="http://schemas.android.com/apk/res/android" xmlns:sabd="http://schemas.android.com/apk/res-auto" > <item android:id="@+id/action_settings" android:title="@string/action_settings" android:icon="@android:drawable/ic_menu_add" sabd:showAsAction="always" /> <item android:id="@+id/action_item_1" android:title="@string/action_item_1" android:icon="@android:drawable/ic_menu_delete" sabd:showAsAction="ifRoom" /> <item android:id="@+id/action_item_2" android:title="@string/action_item_2" android:icon="@android:drawable/ic_menu_add" sabd:showAsAction="ifRoom|withText" /> <item android:id="@+id/action_item_3" android:title="@string/action_item_3" android:icon="@android:drawable/ic_menu_add" sabd:showAsAction="never" /> </menu> Pay attention to the attributes xmlns: sabd = " schemas.android.com/apk/res-auto " and sabd: showAsAction - without them, the ActionBar will work incorrectly. Icons are random, do not matter. I still write what the attribute sabd: showAsAction means :
always - the element will always be visible, if there is not enough space, the title will not be shown completely.
ifRoom - the element will be visible only if there is room for it.
never - the item will never be visible, to display it, you must press the Menu button on the device or the Overflow button on the ActionBar in the absence of the first
withText element will be shown only with its title
collapseActionView - the element can be collapsed into a button or unfold the full width of the Actionbar by pressing, then I will give an example
Now let's start writing the code directly. The first step in the Activity code is to replace the extends Activity on the extends ActionBarActivity and add it to the import. In recent versions of ADT, when the Activity is created, the onCreateOptionsMenu (Menu menu) method is automatically created, in which we create the menu:
import android.os.Bundle; import android.support.v7.app.ActionBarActivity; import android.view.Menu; public class MainActivity extends ActionBarActivity { @Override public void onCreate(Bundle savedInstanceState) { super.onCreate(savedInstanceState); setContentView(R.layout.main); } @Override public boolean onCreateOptionsMenu(Menu menu) { getMenuInflater().inflate(R.menu.main, menu); return true; } @Override public boolean onOptionsItemSelected(MenuItem item) { Log.d("MENU", "Cliced MenuItem is " + item.getTitle()); return super.onOptionsItemSelected(item); } } Run the application and see our ActionBar:
Item 2 was not displayed, as there was not enough space for it. Item 3 will not be visible under any circumstances, because we set the sabd attribute : showAsAction = “never” . You can reach them using the "Menu" button on the device.
You can handle pressing the menu items in the same place as before - in the onOptionsItemSelected (MenuItem item) method. You can handle clicks on the application icon in the same method, it has the ID android.R.id.home. To add an Up Button to the ActionBar , use the ActionBar.setDisplayHomeAsUpEnabled method (boolean showHomeAsUp) :
Search
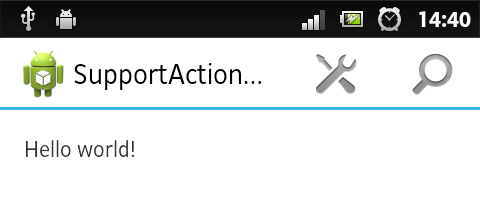
Sometimes you need to do a search, for example, in Google Play. ActionView comes to the rescue. Open res / menu / main.xml and delete the last 3 elements - we do not need them, but they will take up space. Instead, add one new one:
<item android:id="@+id/action_search" android:title="@string/action_search" android:icon="@android:drawable/ic_menu_search" sabd:showAsAction="always|collapseActionView" sabd:actionViewClass="android.support.v7.widget.SearchView" /> The sabd attribute : actionViewClass = “android.support.v7.widget.SearchView” indicates which View will be used instead of the usual one. The text collapseActionView in the sabd: showAsAction attribute indicates that the ActionView can be collapsed into a button or be expanded to its full width by pressing. To use it in Activity, change the MainActivity code:
import android.os.Bundle; import android.support.v4.view.MenuItemCompat; import android.support.v7.app.ActionBarActivity; import android.support.v7.widget.SearchView; import android.support.v7.widget.SearchView.OnQueryTextListener; import android.view.Menu; import android.view.MenuItem; public class MainActivity extends ActionBarActivity implements OnQueryTextListener { @Override protected void onCreate(Bundle savedInstanceState) { super.onCreate(savedInstanceState); setContentView(R.layout.main); } @Override public boolean onCreateOptionsMenu(Menu menu) { getMenuInflater().inflate(R.menu.main, menu); MenuItem searchItem = menu.findItem(R.id.action_search); SearchView searchView = (SearchView) MenuItemCompat.getActionView(searchItem); searchView.setQueryHint(""); searchView.setOnQueryTextListener(this); return true; } @Override public boolean onOptionsItemSelected(MenuItem item) { Log.d("MENU", "Cliced MenuItem is " + item.getTitle()); return super.onOptionsItemSelected(item); } public boolean onQueryTextChange(String text_new) { Log.d("QUERY", "New text is " + text_new); return true; } public boolean onQueryTextSubmit(String text) { Log.d("QUERY", "Search text is " + text); return true; } } Run the application and see:
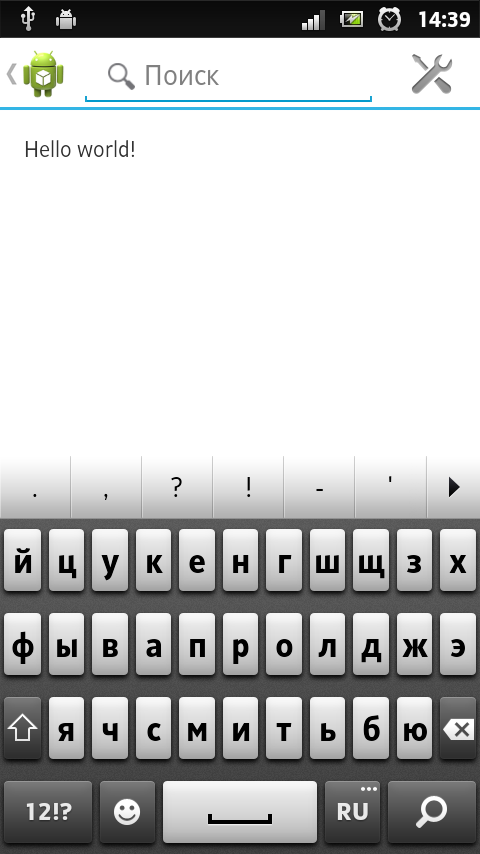
Click the search button:
By the way, the keyboard appears automatically. You can exit the search mode by clicking the Up button on the left side of the ActionBar or by pressing the hardware button back.
In the onQueryTextChange () method, we get the text from the input field when the user types the next letter. In the onQueryTextSubmit (String text) method, we are given the text that the user is looking for. SearchView has such useful methods:
setQuery (CharSequence query, boolean submit) - changes the text in the input field to the one that is passed to it, optionally makes it finite (starts searching)
getQuery () - returns the text that is now in the input field
setQueryHint (CharSequence hint) - changes the hint to the one that is passed to it
getQueryHint () - returns a hint
setSuggestionsAdapter (CursorAdapter adapter) - adds a drop-down list, as in AutoCompleteTextView
getSuggestionsAdapter () - returns the adapter of this list
setOnCloseListener (SearchView.OnCloseListener listener) - puts a close handler on it
setOnSuggestionListener (SearchView.OnSuggestionListener listener) - puts on it a handler for clicking on a drop-down list item
Conclusion
And the guys from Google are great, they do not forget about the support of the old versions of their OS. For example, fragments, ViewPager and NavigationDrawer with API v4 are available, Actionbar - with API v7. Although it seems to me that all this was done for the sake of Android 2.3, and earlier platforms - so, for the company.
I would be glad if this article will help someone :-)
Part 2 - Navigation with tabs and drop-down list
Part 3 - Additional Functions
Source: https://habr.com/ru/post/189680/
All Articles