ActionBar on Android 2.1+ using the Support Library. Part 2 - Navigation
Hi, Habr!
In the previous article, I talked about adding a Support Library to your project and gave a simple example of SupportActionBar. But very often ActionBar is used not only as a substitute for the menu, but also as a way to navigate the application. Under the cut it is written how to implement it.
ActionBar has 3 ways to navigate:
NAVIGATION_MODE_STANDART - in fact, not navigation at all, just an ActionBar with elements;
NAVIGATION_MODE_LIST - instead of the title drop-down list;
NAVIGATION_MODE_TABS - tabs under the ActionBar.
Let's not create anything, but take the project from the previous article . Let's create a new class - ScreenFragment , it will be analogous to different screens of the application:
')
I did not create a separate xml markup file, it is not really needed here. We take the screen number from the arguments and insert it into the programmatically created TextView, which we then show.
Change the onCreate () method code and add another one to the MainActivity :
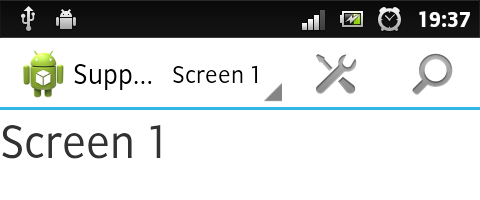
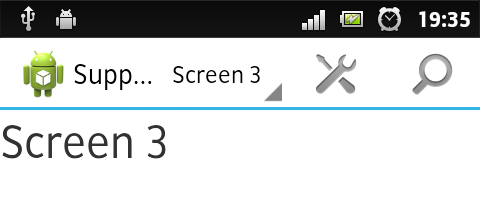
In onCreate, we tell ActionBar that we will use the navigation method - a list, and prepare an adapter for it, and assign an event handler. It has only one method - onNavigationItemSelected (int position, long id) . It is called when the user selects any item in the drop-down list. Here we create a new ScreenFragment and give it a screen number so that it can show it. Then we start FragmentTransaction and add this fragment to the View with id = android.support.v7.appcompat.R.id.action_bar_activity_content. This is the FrameLayout where our layout from setContentView () is added. Run the application and select various screens:
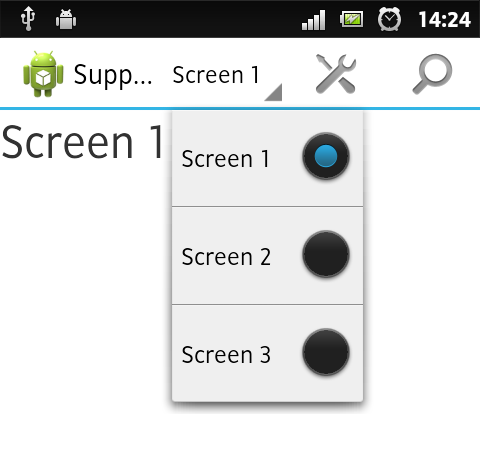
As a markup for the elements of the drop-down list, I use the system layout, but it does not look very nice. Therefore, it is better to use your own. The Adapter.setDropDownViewResource () method is responsible for adding it.
To change the way tabs are navigated, let's tweak MainActivity :
You also need to make the MainActivity ... implements ... TabListener . This is a tab clicker. He has as many as 3 methods:
onTabUnselected (Tab tab, FragmentTransaction ft) - called when the current tab is closed;
onTabSelected (Tab tab, FragmentTransaction ft) - called when a new tab opens (triggered immediately after the previous one);
onTabReselected (Tab tab, FragmentTransaction ft) - when the user clicks on an already open tab:
Here we no longer need to create FragmentTransaction, it is given to us initially (it is assumed that we will work with fragments). But for this FragmentTransaction, you cannot call the addToBackStack () and commit () methods. We also have a pressed tab, from which we can pull out everything we need - text, icon, position, etc.
Tabs can be assigned to your View, if the system does not suit you - setCustomView (int layoutResId)
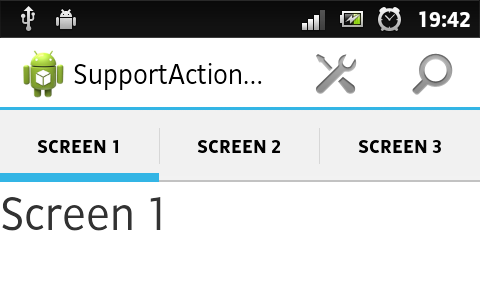
Run the application, click on the tabs:
By the way, if there are a lot of tabs, then their titles can be scrolled horizontally (as on Google Play), but the svayp doesn’t work below the titles.
Most likely, when you click on an already selected navigation item, there is no need to change anything on the screen. Well, with tabs everything is clear - do not touch the onTabReselected () method and that's it. And what about the list? It's very simple: add a variable to MainActivity
And change the code onNavigationItemSelected (int position, long id) :
Now a new screen will open only if you select a non-open navigation item
Different tabs usually contain different content, and the menu for it should be different. The guys from google made this opportunity. Further I will show everything on the example of tabs. Add the following code to ScreenFragment :
Create three files in the res / menu / folder:
screen_1.xml :
screen_2.xml :
screen_3.xml :
Change onTabSelected () :
Now we need to remove (or better comment out) the onCreateOptionsMenu method - it will only interfere with us now. And the onOptionsItemSelected () in MainActivity will also be corrected:
Now I’ll explain that I’m here. The fact is that in the fragment, you can also create a menu. To make it visible, you need to call the Fragment.setHasOptionsMenu (true) method. If we create a menu not in the Activity, but in a fragment, the onOptionsItemSelected () method is called first in the MainActivity , and only then in the ScreenFragment if false is returned in the Activity. Here, instead of if there should be a switch / case , at the end of each case - return true; This means that we have already processed the click and do not need to call onOptionsItemSelected in the fragment. For example, on each tab there is a menu item "Settings". In order not to type the code in each fragment, when you click on this item, we return true . Then onOptionsItemSelected () is called only in Activity, where we can open a new SettingsActivity, for example. If you start the program and press the Menu button on the device on different tabs, different elements will be displayed.
When you click on the menu items in the logs will be not only their name, but in which class the clicks were processed. And you can generally create a separate xml file in the res / menu / folder with this very element, Settings, and in the MainActivity in the onCreateOptionsMenu () method, create a menu from this file. Then the 2 menus will merge, and both items will be visible.
It often happens that when switching between tabs, the status of the content on them should be maintained. For this, fragments have a special method - setRetainInstance (boolean retain) . If you pass it true in the parameter, the fragment will not be re-created. To check this, rewrite the onTabSelected () method in MainActivity :
Well, in general, and all that I wanted to say. The article turned out great, but hopefully useful)
Part 1 - Adding Support Library to a project, simple example, search
Part 3 - Additional Functions
In the previous article, I talked about adding a Support Library to your project and gave a simple example of SupportActionBar. But very often ActionBar is used not only as a substitute for the menu, but also as a way to navigate the application. Under the cut it is written how to implement it.
Navigation methods
ActionBar has 3 ways to navigate:
NAVIGATION_MODE_STANDART - in fact, not navigation at all, just an ActionBar with elements;
NAVIGATION_MODE_LIST - instead of the title drop-down list;
NAVIGATION_MODE_TABS - tabs under the ActionBar.
Drop-down list
Let's not create anything, but take the project from the previous article . Let's create a new class - ScreenFragment , it will be analogous to different screens of the application:
')
import android.os.Bundle; import android.support.v4.app.Fragment; import android.view.LayoutInflater; import android.view.View; import android.view.ViewGroup; import android.widget.TextView; public class ScreenFragment extends Fragment { @Override public View onCreateView(LayoutInflater inflater, ViewGroup container, Bundle savedInstanceState) { TextView tv = new TextView(getActivity()); tv.setText("Screen " + getArguments().getInt(MainActivity.key_screen_number)); tv.setTextSize(30); return tv; } } I did not create a separate xml markup file, it is not really needed here. We take the screen number from the arguments and insert it into the programmatically created TextView, which we then show.
Change the onCreate () method code and add another one to the MainActivity :
public static final String key_screen_number = "key_screen_number"; ActionBar ab; FragmentTransaction ft; ScreenFragment screen_fragment; @Override public void onCreate(Bundle savedInstanceState) { super.onCreate(savedInstanceState); ab = getSupportActionBar(); ab.setNavigationMode(ActionBar.NAVIGATION_MODE_LIST); String[] screens = new String[] {"Screen 1", "Screen 2", "Screen 3"}; ArrayAdapter<String> sp_adapter = new ArrayAdapter<String>(this, android.R.layout.simple_spinner_item, screens); sp_adapter.setDropDownViewResource(android.R.layout.simple_spinner_dropdown_item); ab.setListNavigationCallbacks(sp_adapter, this); selected_list_item_position = -1; ab.setSelectedNavigationItem(0); } public boolean onNavigationItemSelected(int position, long id) { ft = getSupportFragmentManager().beginTransaction(); screen_fragment = new ScreenFragment(); Bundle args = new Bundle(); args.putInt(key_screen_number, position + 1); screen_fragment.setArguments(args); ft.replace(android.support.v7.appcompat.R.id.action_bar_activity_content, screen_fragment); ft.commit(); return true; } In onCreate, we tell ActionBar that we will use the navigation method - a list, and prepare an adapter for it, and assign an event handler. It has only one method - onNavigationItemSelected (int position, long id) . It is called when the user selects any item in the drop-down list. Here we create a new ScreenFragment and give it a screen number so that it can show it. Then we start FragmentTransaction and add this fragment to the View with id = android.support.v7.appcompat.R.id.action_bar_activity_content. This is the FrameLayout where our layout from setContentView () is added. Run the application and select various screens:
As a markup for the elements of the drop-down list, I use the system layout, but it does not look very nice. Therefore, it is better to use your own. The Adapter.setDropDownViewResource () method is responsible for adding it.
Tabs
To change the way tabs are navigated, let's tweak MainActivity :
public void onCreate(Bundle savedInstanceState) { super.onCreate(savedInstanceState); ab = getSupportActionBar(); ab.setNavigationMode(ActionBar.NAVIGATION_MODE_TABS); Tab tab = ab.newTab(); tab.setText("Screen 1"); tab.setTabListener(this); ab.addTab(tab, 0, true); tab = ab.newTab(); tab.setText("Screen 2"); tab.setTabListener(this); ab.addTab(tab, 1, false); tab = ab.newTab(); tab.setText("Screen 3"); tab.setTabListener(this); ab.addTab(tab, 2, false); } You also need to make the MainActivity ... implements ... TabListener . This is a tab clicker. He has as many as 3 methods:
onTabUnselected (Tab tab, FragmentTransaction ft) - called when the current tab is closed;
onTabSelected (Tab tab, FragmentTransaction ft) - called when a new tab opens (triggered immediately after the previous one);
onTabReselected (Tab tab, FragmentTransaction ft) - when the user clicks on an already open tab:
public void onTabUnselected(Tab tab, FragmentTransaction ft) { } public void onTabSelected(Tab tab, FragmentTransaction ft) { screen_fragment = new ScreenFragment(); Bundle args = new Bundle(); args.putInt(key_screen_number, tab.getPosition() + 1); screen_fragment.setArguments(args); ft.replace(android.support.v7.appcompat.R.id.action_bar_activity_content, screen_fragment); } public void onTabReselected(Tab tab, FragmentTransaction ft) { } Here we no longer need to create FragmentTransaction, it is given to us initially (it is assumed that we will work with fragments). But for this FragmentTransaction, you cannot call the addToBackStack () and commit () methods. We also have a pressed tab, from which we can pull out everything we need - text, icon, position, etc.
Tabs can be assigned to your View, if the system does not suit you - setCustomView (int layoutResId)
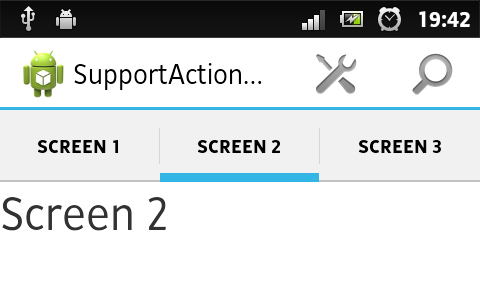
Run the application, click on the tabs:
By the way, if there are a lot of tabs, then their titles can be scrolled horizontally (as on Google Play), but the svayp doesn’t work below the titles.
Addition to the “Drop-down list”
Most likely, when you click on an already selected navigation item, there is no need to change anything on the screen. Well, with tabs everything is clear - do not touch the onTabReselected () method and that's it. And what about the list? It's very simple: add a variable to MainActivity
private int selected_list_item_position; And change the code onNavigationItemSelected (int position, long id) :
public boolean onNavigationItemSelected(int position, long id) { if (position != selected_list_item_position) { ft = getSupportFragmentManager().beginTransaction(); screen_fragment = new ScreenFragment(); Bundle args = new Bundle(); args.putInt(key_screen_number, position + 1); screen_fragment.setArguments(args); ft.replace(android.support.v7.appcompat.R.id.action_bar_activity_content, screen_fragment); ft.commit(); selected_list_item_position = position; return true; } return false; } Now a new screen will open only if you select a non-open navigation item
Menu
Different tabs usually contain different content, and the menu for it should be different. The guys from google made this opportunity. Further I will show everything on the example of tabs. Add the following code to ScreenFragment :
public static final String key_menu_resource = "key_menu_resource"; @Override public void onCreateOptionsMenu(Menu menu, MenuInflater inflater) { super.onCreateOptionsMenu(menu, inflater); inflater.inflate(getArguments().getInt(key_menu_resource), menu); } @Override public boolean onOptionsItemSelected(MenuItem item) { super.onOptionsItemSelected(item); Log.d("MENU", "Cliced MenuItem is " + item.getTitle() + " (from ScreenFragment)"); return true; } Create three files in the res / menu / folder:
screen_1.xml :
<menu xmlns:android="http://schemas.android.com/apk/res/android" > <item android:id="@+id/item1" android:title="Item 1" android:icon="@android:drawable/ic_menu_add"/> <item android:id="@+id/settings" android:title="Settings" android:icon="@android:drawable/ic_menu_edit"/> </menu> screen_2.xml :
<menu xmlns:android="http://schemas.android.com/apk/res/android" > <item android:id="@+id/item2" android:title="Item 2" android:icon="@android:drawable/ic_menu_camera"/> <item android:id="@+id/settings" android:title="Settings" android:icon="@android:drawable/ic_menu_edit"/> </menu> screen_3.xml :
<menu xmlns:android="http://schemas.android.com/apk/res/android" > <item android:id="@+id/item3" android:title="Item 3" android:icon="@android:drawable/ic_menu_call" /> </menu> Change onTabSelected () :
private int[] menu_resources = new int[] {R.menu.screen_1, R.menu.screen_2, R.menu.screen_3}; public void onTabSelected(Tab tab, FragmentTransaction ft) { screen_fragment = new ScreenFragment(); Bundle args = new Bundle(); args.putInt(key_screen_number, tab.getPosition() + 1); args.putInt(ScreenFragment.key_menu_resource, menu_resources[tab.getPosition()]); screen_fragment.setArguments(args); screen_fragment.setHasOptionsMenu(true); ft.replace(android.support.v7.appcompat.R.id.action_bar_activity_content, screen_fragment); } Now we need to remove (or better comment out) the onCreateOptionsMenu method - it will only interfere with us now. And the onOptionsItemSelected () in MainActivity will also be corrected:
@Override public boolean onOptionsItemSelected(MenuItem item) { if (item.getItemId() != R.id.settings) { return false; } else { Log.d("MENU", "Cliced MenuItem is " + item.getTitle() + " (from MainActivity)"); return true; } } Now I’ll explain that I’m here. The fact is that in the fragment, you can also create a menu. To make it visible, you need to call the Fragment.setHasOptionsMenu (true) method. If we create a menu not in the Activity, but in a fragment, the onOptionsItemSelected () method is called first in the MainActivity , and only then in the ScreenFragment if false is returned in the Activity. Here, instead of if there should be a switch / case , at the end of each case - return true; This means that we have already processed the click and do not need to call onOptionsItemSelected in the fragment. For example, on each tab there is a menu item "Settings". In order not to type the code in each fragment, when you click on this item, we return true . Then onOptionsItemSelected () is called only in Activity, where we can open a new SettingsActivity, for example. If you start the program and press the Menu button on the device on different tabs, different elements will be displayed.
When you click on the menu items in the logs will be not only their name, but in which class the clicks were processed. And you can generally create a separate xml file in the res / menu / folder with this very element, Settings, and in the MainActivity in the onCreateOptionsMenu () method, create a menu from this file. Then the 2 menus will merge, and both items will be visible.
State saving
It often happens that when switching between tabs, the status of the content on them should be maintained. For this, fragments have a special method - setRetainInstance (boolean retain) . If you pass it true in the parameter, the fragment will not be re-created. To check this, rewrite the onTabSelected () method in MainActivity :
private int[] menu_resources = new int[] {R.menu.screen_1, R.menu.screen_2, R.menu.screen_3}; private ScreenFragment[] screens = new ScreenFragment[] {new ScreenFragment(), new ScreenFragment(), new ScreenFragment()}; public void onTabSelected(Tab tab, FragmentTransaction ft) { screen_fragment = screens[tab.getPosition()]; Bundle args = new Bundle(); args.putInt(key_screen_number, tab.getPosition() + 1); args.putInt(ScreenFragment.key_menu_resource, menu_resources[tab.getPosition()]); screen_fragment.setArguments(args); screen_fragment.setHasOptionsMenu(true); screen_fragment.setRetainInstance(true); ft.replace(android.support.v7.appcompat.R.id.action_bar_activity_content, screen_fragment); } Afterword
Well, in general, and all that I wanted to say. The article turned out great, but hopefully useful)
Part 1 - Adding Support Library to a project, simple example, search
Part 3 - Additional Functions
Source: https://habr.com/ru/post/189678/
All Articles