ASP.NET 2.0 Login control + MySQL, VS2008, authorization of users on the site
Regular ASP.NET tools allow you to simplify the process of differentiation of user access rights to certain pages of the site. It's about using Login control with MySQL database for user authorization on ASP.NET site. After successful authorization, you will be redirected to different pages corresponding to the specified roles of some project directories.

The regular controls on the Login tab of the toolbar allow you to implement everything related to user authorization. User data is stored in a database, particularly in MySQL. And the necessary database tables will be created automatically. The controls independently interact with the database, i.e. In particular cases, you do not have to write additional code.
')
ASP.NET login controls work using plain text over HTTP. For security, you can use HTTPS with SSL encryption.
Task description can be skipped.
The current task is to delimit the access rights for the four categories of users. 0 * 1 * 2 * 3 *. 0 * I am the highest category, allows you to create any subordinate categories. The same scheme is provided for the other categories. Each category has its own set of pages. A user can be added only by an existing user with appropriate permissions. Those. self-registration of users will not. The page with the highest priority will include all subordinates, be able to view, change all settings of subordinate pages.
Users of the category 3 * will only be able to view data, with a minimum set of functionality. Users of the category 2 * will have all the capabilities of the 3rd * category + specialized settings, contain a tree / list of users of the 3rd * category, the ability to create, delete users of the 3rd * category. Users of the 2nd * and 0 * categories will also include all subordinate categories and be able to change any settings of subordinate users. In general, it turns out the matryoshka, users of the higher category will see everything that users of the lower category see + additional functions. User page of the 3rd category will look like a template (header body footer) + “third” Web User Control in the body. The user page of the 2nd * category is the same template + “second” Web User Control in the body, containing some markup + “third” Web User Control. And the same principle for 1 * d and 0 * th categories.
All this while fantasy. The article will discuss the implementation of authorization for four folders, each of which will contain its .aspx page.
We believe that the project web application or web site has already been created. VS2008 framework 3.5. The Login.aspx page was created and a login control was placed on it.
Visual Studio 2012 is supported in MySQL Connector / Net 6.6 and higher.
Visual Studio 2010 is supported by versions MySQL Connector / Net 6.3.2 and higher, applications using earlier versions of Connector can be used with Visual Studio 2010 through the .NET 2.x framework.
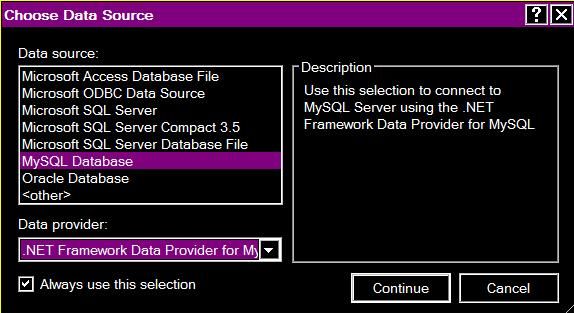
Visual Studio 2008 only supports MySQL Connector / Net 6.4.
From the official MySQL website, download the Connector / Net 6.4.6 library for .NET & MONO mysql-connector-net-6.4.6-noinstall.zip and for windows mysql-connector-net-6.4.6.msi.
Install mysql-connector-net-6.4.6.msi, including configuring the files:
This is an important point, because at the beginning, following a recommendation from some article, I started editing machine.config v2 manually, without installing .msi. The MySQL Website Configuration Tool icons will not appear yet; it will appear on subsequent settings.
If you install the wrong version of mysql-connector for VS2008, then you can observe the following error when you start ASP.NET Configuration -> Security / Security -> Step-by-Step Security Configuration Wizard
Copy the following .dll from v2 (mysql-connector-net-6.4.6-noinstall.zip) of the archive directory into the bin directory of the web application project:
V2 \ mysql.data.dll
V2 \ mysql.web.dll
Add references to MySql.Data and MySql.Web.
Add to web.config:
We develop the project under Windows, it will work under FreeBSD + apache2 + mono. To make everything “real”, on a real FreeBSD server with an external static IP, we create a MySql55 database and a user with a password. Respectively setup of a firewall and port forwarding if necessary. Tables will be created later and automatically. Of course, MySQL database is open for the entire Internet only for a while and for debugging.
Create a database and user:
We check the ability to connect from VS2008 Vista to a remote MySql database:
Add the Label ErrorL to the Login page, into which we will display any debugging messages on the current page. If there are any problems with connecting to the database, the connection attempt procedure will take about 10 seconds and then error output.
Now in Login.aspx.cs in Page_Load add:
In the line Connect we substitute our values.
We launch on step-by-step run with a label in Page_Load, and in case of successful connection myConnection.Open (); execute immediately, and in the following variables there will be corresponding values. We believe that the database and access to it is configured.
In the properties of the Login control, we write the parameter:
MembershipProvider = MySQLMembershipProvider
In order for the MySQL Website Configuration Tool icon to appear, you need to configure Data Connections in Server Explorer. Server Explorer -> Data Connections -> Add Connection ... ->

Server name in the current case is the static IPv4 address of the remote server with MySQL.
Now, next to the green circle icon with a hammer, the MySQL Website Configuration Tool icon should appear in a circle of non-uniform light blue color, with a white cross from the key image and probably a screwdriver, as in the image below.
Through the MySQL Website Configuration Tool you can set / change a lot of necessary parameters. By context, you can figure out why these or other settings are needed.
Through Web Administration Tools we set up the first users and assign roles and access rights. It also automatically adjusts the necessary MySql database tables. Further, during the normal functioning of the site, in the task being implemented, other users will add users.
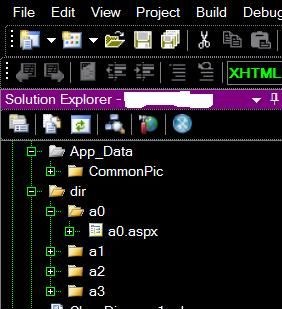
Create 4d directories in the project directory:
... / dir / a0
... / dir / a1
... / dir / a2
... / dir / a3
Access to ASP.NET pages is limited by placing them in a protected folder.
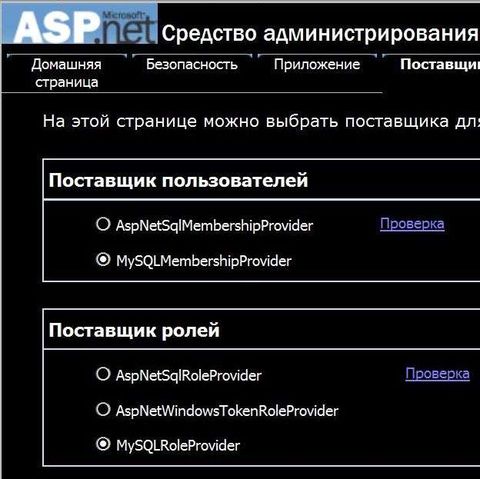
On the ASP.NET Configuration -> Provider tab, it should be like this:
On the security tab, using the Security Configuration Wizard, we associate the folder with the previously created role. For convenience, folder name = role name. Then we match the created users to the previously created roles. Those. you need to assign a role to the folder and include in the role the necessary, previously created users.
Look at the database tables on the server:
# mysql -u root -p
Enter password:
mysql> use MySQLBaseName;
mysql> SHOW TABLES;
+ -------------------------- +
| Tables_in_MySQLBaseName |
+ -------------------------- +
| my_aspnet_applications |
| my_aspnet_membership |
| my_aspnet_profiles |
| my_aspnet_roles |
| my_aspnet_schemaversion |
| my_aspnet_sessioncleanup |
| my_aspnet_sessions |
| my_aspnet_users |
| my_aspnet_usersinroles |
+ -------------------------- +
9 rows in set (0.00 sec)
mysql> quit
Those. On the remote server, the tables for the previously created database are automatically created.
The same can be viewed in Server Explorer -> Data Connection.
Since It is necessary that for each role, the input should occur on its own page a0.aspx, a1.aspx, a2.aspx, a3.aspx. Then we set Event LoggedIn to the Login control, so that after successful login, go to the appropriate page:
We start the project, enter the password and see the transition to the appropriate page, depending on the user's role
The regular controls on the Login tab of the toolbar allow you to implement everything related to user authorization. User data is stored in a database, particularly in MySQL. And the necessary database tables will be created automatically. The controls independently interact with the database, i.e. In particular cases, you do not have to write additional code.
')
ASP.NET login controls work using plain text over HTTP. For security, you can use HTTPS with SSL encryption.
Task description can be skipped.
The current task is to delimit the access rights for the four categories of users. 0 * 1 * 2 * 3 *. 0 * I am the highest category, allows you to create any subordinate categories. The same scheme is provided for the other categories. Each category has its own set of pages. A user can be added only by an existing user with appropriate permissions. Those. self-registration of users will not. The page with the highest priority will include all subordinates, be able to view, change all settings of subordinate pages.
Users of the category 3 * will only be able to view data, with a minimum set of functionality. Users of the category 2 * will have all the capabilities of the 3rd * category + specialized settings, contain a tree / list of users of the 3rd * category, the ability to create, delete users of the 3rd * category. Users of the 2nd * and 0 * categories will also include all subordinate categories and be able to change any settings of subordinate users. In general, it turns out the matryoshka, users of the higher category will see everything that users of the lower category see + additional functions. User page of the 3rd category will look like a template (header body footer) + “third” Web User Control in the body. The user page of the 2nd * category is the same template + “second” Web User Control in the body, containing some markup + “third” Web User Control. And the same principle for 1 * d and 0 * th categories.
All this while fantasy. The article will discuss the implementation of authorization for four folders, each of which will contain its .aspx page.
We believe that the project web application or web site has already been created. VS2008 framework 3.5. The Login.aspx page was created and a login control was placed on it.
Visual Studio 2012 is supported in MySQL Connector / Net 6.6 and higher.
Visual Studio 2010 is supported by versions MySQL Connector / Net 6.3.2 and higher, applications using earlier versions of Connector can be used with Visual Studio 2010 through the .NET 2.x framework.
Visual Studio 2008 only supports MySQL Connector / Net 6.4.
From the official MySQL website, download the Connector / Net 6.4.6 library for .NET & MONO mysql-connector-net-6.4.6-noinstall.zip and for windows mysql-connector-net-6.4.6.msi.
Install mysql-connector-net-6.4.6.msi, including configuring the files:
C:\Windows\Microsoft.NET\Framework\v4.0.30319\Config\machine.config C:\Windows\Microsoft.NET\Framework\v2.0.50727\CONFIG\machine.config This is an important point, because at the beginning, following a recommendation from some article, I started editing machine.config v2 manually, without installing .msi. The MySQL Website Configuration Tool icons will not appear yet; it will appear on subsequent settings.
If you install the wrong version of mysql-connector for VS2008, then you can observe the following error when you start ASP.NET Configuration -> Security / Security -> Step-by-Step Security Configuration Wizard
. . : "MySql.Web, Version=6.7.4.0, Culture=neutral, PublicKeyToken=c5687fc88969c44d" . . System.RuntimeTypeHandle._GetTypeByName(String name, Boolean throwOnError, Boolean ignoreCase, Boolean reflectionOnly, StackCrawlMark& stackMark, Boolean loadTypeFromPartialName) System.RuntimeTypeHandle.GetTypeByName(String name, Boolean throwOnError, Boolean ignoreCase, Boolean reflectionOnly, StackCrawlMark& stackMark) System.RuntimeType.PrivateGetType(String typeName, Boolean throwOnError, Boolean ignoreCase, Boolean reflectionOnly, StackCrawlMark& stackMark) System.Type.GetType(String typeName, Boolean throwOnError, Boolean ignoreCase) System.Web.Compilation.BuildManager.GetType(String typeName, Boolean throwOnError, Boolean ignoreCase) System.Web.Configuration.ConfigUtil.GetType(String typeName, String propertyName, ConfigurationElement configElement, XmlNode node, Boolean checkAptcaBit, Boolean ignoreCase) Copy the following .dll from v2 (mysql-connector-net-6.4.6-noinstall.zip) of the archive directory into the bin directory of the web application project:
V2 \ mysql.data.dll
V2 \ mysql.web.dll
Add references to MySql.Data and MySql.Web.
Add to web.config:
<!-- <connectionStrings/> --> <connectionStrings> <remove name="LocalMySqlServer"/> <add name="LocalMySqlServer" connectionString="Server=sta.tic.ip4.adr; Database=MySQLBaseName; uid=user; pwd=password;" providerName="MySql.Data.MySqlClient"/> </connectionStrings> We develop the project under Windows, it will work under FreeBSD + apache2 + mono. To make everything “real”, on a real FreeBSD server with an external static IP, we create a MySql55 database and a user with a password. Respectively setup of a firewall and port forwarding if necessary. Tables will be created later and automatically. Of course, MySQL database is open for the entire Internet only for a while and for debugging.
Create a database and user:
# mysql -u root -p Enter password: mysql> create database MySQLBaseName; Query OK, 1 row affected (0.00 sec) mysql> CREATE USER 'user'@'sta.tic.ip4.adr' IDENTIFIED BY 'password'; Query OK, 0 rows affected (0.00 sec) mysql> GRANT ALL PRIVILEGES ON MySQLBaseName.* TO 'user'@'sta.tic.ip4.adr' IDENTIFIED BY 'password' WITH GRANT OPTION; Query OK, 0 rows affected (0.00 sec) mysql> flush privileges; Query OK, 0 rows affected (0.00 sec) mysql> quit We check the ability to connect from VS2008 Vista to a remote MySql database:
Add the Label ErrorL to the Login page, into which we will display any debugging messages on the current page. If there are any problems with connecting to the database, the connection attempt procedure will take about 10 seconds and then error output.
Now in Login.aspx.cs in Page_Load add:
using MySql.Data; using MySql.Data.MySqlClient; protected void Page_Load(object sender, EventArgs e) { // MySql string CommandText = ""; string Connect = "Database=MySQLBaseName;Data Source=sta.tic.ip4.adr;User Id=user;Password=password"; MySqlConnection myConnection = new MySqlConnection(Connect); MySqlCommand myCommand = new MySqlCommand(CommandText, myConnection); try { myConnection.Open(); string dd = myConnection.Database; string dd1 = myConnection.DataSource; string dd2 = myConnection.ServerVersion; ConnectionState cs = myConnection.State; myConnection.Close(); } catch (MySqlException ex) { switch (ex.Number) { case 0: ErrorL.Text = "Error 0. Cannot connect to server"; break; case 1045: ErrorL.Text = "Error 1045. Invalid username/password, please try again"; break; case 1042: ErrorL.Text = "Error 1042. Unable to connect to any of the specified MySQL hosts"; break; } } } In the line Connect we substitute our values.
We launch on step-by-step run with a label in Page_Load, and in case of successful connection myConnection.Open (); execute immediately, and in the following variables there will be corresponding values. We believe that the database and access to it is configured.
In the properties of the Login control, we write the parameter:
MembershipProvider = MySQLMembershipProvider
In order for the MySQL Website Configuration Tool icon to appear, you need to configure Data Connections in Server Explorer. Server Explorer -> Data Connections -> Add Connection ... ->
Server name in the current case is the static IPv4 address of the remote server with MySQL.
Now, next to the green circle icon with a hammer, the MySQL Website Configuration Tool icon should appear in a circle of non-uniform light blue color, with a white cross from the key image and probably a screwdriver, as in the image below.
Through the MySQL Website Configuration Tool you can set / change a lot of necessary parameters. By context, you can figure out why these or other settings are needed.
Through Web Administration Tools we set up the first users and assign roles and access rights. It also automatically adjusts the necessary MySql database tables. Further, during the normal functioning of the site, in the task being implemented, other users will add users.
Create 4d directories in the project directory:
... / dir / a0
... / dir / a1
... / dir / a2
... / dir / a3
Access to ASP.NET pages is limited by placing them in a protected folder.
On the ASP.NET Configuration -> Provider tab, it should be like this:
On the security tab, using the Security Configuration Wizard, we associate the folder with the previously created role. For convenience, folder name = role name. Then we match the created users to the previously created roles. Those. you need to assign a role to the folder and include in the role the necessary, previously created users.
Look at the database tables on the server:
# mysql -u root -p
Enter password:
mysql> use MySQLBaseName;
mysql> SHOW TABLES;
+ -------------------------- +
| Tables_in_MySQLBaseName |
+ -------------------------- +
| my_aspnet_applications |
| my_aspnet_membership |
| my_aspnet_profiles |
| my_aspnet_roles |
| my_aspnet_schemaversion |
| my_aspnet_sessioncleanup |
| my_aspnet_sessions |
| my_aspnet_users |
| my_aspnet_usersinroles |
+ -------------------------- +
9 rows in set (0.00 sec)
mysql> quit
Those. On the remote server, the tables for the previously created database are automatically created.
The same can be viewed in Server Explorer -> Data Connection.
Since It is necessary that for each role, the input should occur on its own page a0.aspx, a1.aspx, a2.aspx, a3.aspx. Then we set Event LoggedIn to the Login control, so that after successful login, go to the appropriate page:
protected void Login1_LoggedIn(object sender, EventArgs e) { if (Roles.IsUserInRole(Login1.UserName, "a0")) { Response.Redirect("~/dir/a0/a0.aspx"); return; } if (Roles.IsUserInRole(Login1.UserName, "a1")) { Response.Redirect("~/dir/a1/a1.aspx"); return; } if (Roles.IsUserInRole(Login1.UserName, "a2")) { Response.Redirect("~/dir/a2/a2.aspx"); return; } if (Roles.IsUserInRole(Login1.UserName, "a3")) { Response.Redirect("~/dir/a3/a3.aspx"); return; } } We start the project, enter the password and see the transition to the appropriate page, depending on the user's role
Source: https://habr.com/ru/post/189346/
All Articles