Creating a smart intercom with an answering machine and an Internet connection
Not so long ago, I repaired the intercom handset and wondered if I should make a small upgrade? Teach him to notify me via the Internet that someone came, or even remotely open the door from a mobile phone ... And then I decided - why not even make an answering machine? Nowadays, an answering machine is not really needed on the phones, but knowing who came to me would be very useful, especially since I am not used to picking up the phone if I don’t expect anyone. Turning an idea into reality was not so difficult.
I have an intercom Cyfral, after a brief search, I found a bunch of different schemes of their handsets. Apparently, the intercoms of other companies work on approximately the same principle. I drew the outline of my pipe myself (I could make mistakes):
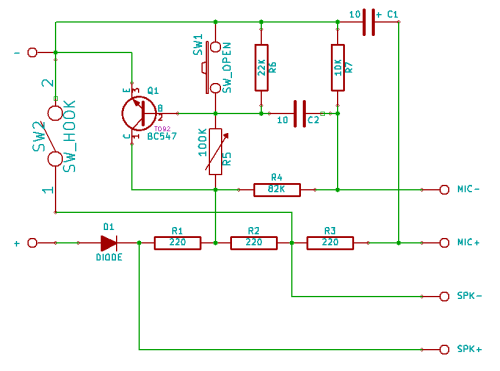
')
The principle of operation is simple. While the intercom is not in use, there is no power in the line. When the tube is lying, the speaker is directly connected to the line, the resistance of the tube is less than 50 Ohms (the intercom will swear and give an error if it is not). When the handset is removed, SW2 is opened, the microphone amplifier is turned on, and the tube’s resistance increases, due to which the intercom and understands that the conversation has begun. When you need to open the door, push the button SW1, causing the tube resistance to grow even stronger.
I decided to pull the board out of the ordinary pipe, get soldered straight to it and put it all into the vintage case of the old wall-mounted telephone.
What points on the diagram are needed? First, you need to track the presence of a signal in a line in order to understand when someone is calling and when the conversation is over. To do this, you need a positive wire from the intercom line (yes, polarity is important there), and preferably a point after the protective diode D1. In order to simulate the removal of the tube, you need to put the relay in series with SW2. To open the door, you need to either close the transistor base to the ground, or stupidly open the circuit. To play sound you need to send a signal to the MIC through a resistor of 10-15 kΩ. The biggest challenge was sound recording. It is possible to put a transformer for galvanic isolation on the speaker terminals or simply to obtain a variable component through a capacitor. Experiments have shown that there is not much difference.
For my project, I took an ATMEGA64 microcontroller. He has a hardware PWM, which is quite good at dealing with sound reproduction, and an analog-to-digital converter can be used to record sound. It was decided to store the data on a standard SD card. To switch between the tube (normal mode) and the microcontroller (sound recording / playback), I used electromagnetic relays. By the way, with this option, the tube becomes the most common if external power is lost. Well, to communicate with the outside world, I decided to use my homemade network, which I wrote about in another article .
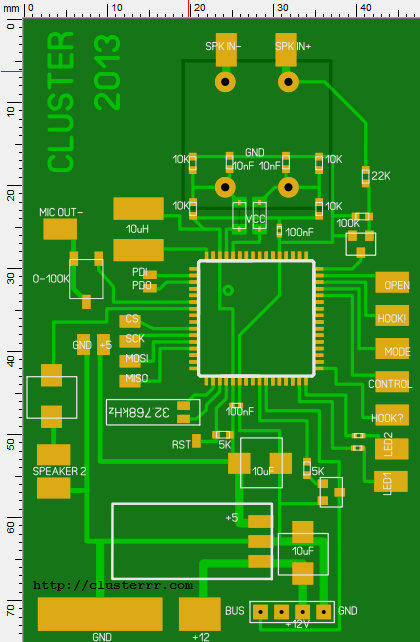
The main board turned out this (relay rendered to a separate one):
Ready view:

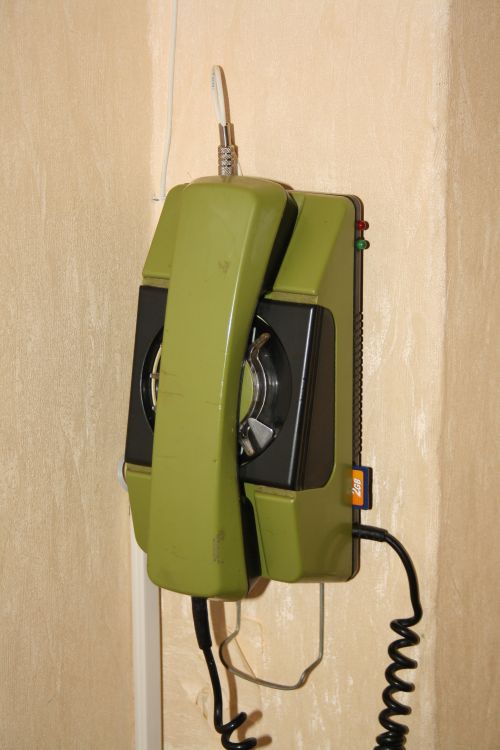
In the phone case:

Yes, it turned out not very carefully ... I do not do everything that I do with my hands.
Summary view:
Demonstration of work:
Well, if you have a disk, why not use it for management? The perfect interface is:
But it is much more convenient to manage it from a PC:
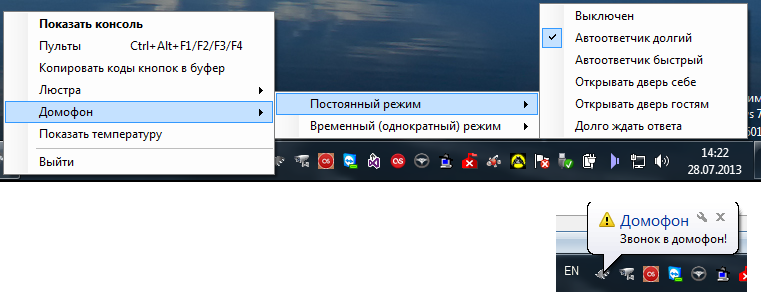
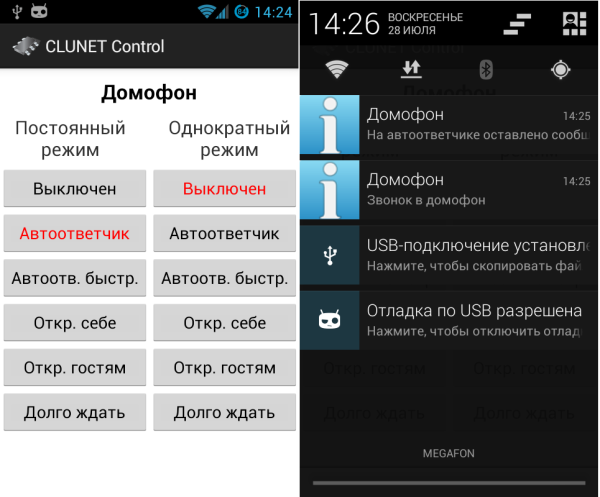
Or from the phone, while using push notifications:
There are three types of operation modes:
At the same time, it is possible to set a single mode, which will change to the main one after the first call. It is very convenient when ordering pizza, for example: when you call the intercom, you no longer need to jump out of bed and look for slippers, the courier at that time has opened the door. Well, the records that are left on the answering machine, leisurely pumped to a remote server, where they can be heard directly from a mobile phone. Yes, this creates an uncompressed WAV file with a full header that no longer requires additional processing.
And most importantly - I got a lot of experience: I learned how to work with SD cards and FAT, play and record sound, and also began to better understand how analog technology works. Perhaps this is the most important in any, even very meaningless project :)
I have an intercom Cyfral, after a brief search, I found a bunch of different schemes of their handsets. Apparently, the intercoms of other companies work on approximately the same principle. I drew the outline of my pipe myself (I could make mistakes):
')
The principle of operation is simple. While the intercom is not in use, there is no power in the line. When the tube is lying, the speaker is directly connected to the line, the resistance of the tube is less than 50 Ohms (the intercom will swear and give an error if it is not). When the handset is removed, SW2 is opened, the microphone amplifier is turned on, and the tube’s resistance increases, due to which the intercom and understands that the conversation has begun. When you need to open the door, push the button SW1, causing the tube resistance to grow even stronger.
I decided to pull the board out of the ordinary pipe, get soldered straight to it and put it all into the vintage case of the old wall-mounted telephone.
What points on the diagram are needed? First, you need to track the presence of a signal in a line in order to understand when someone is calling and when the conversation is over. To do this, you need a positive wire from the intercom line (yes, polarity is important there), and preferably a point after the protective diode D1. In order to simulate the removal of the tube, you need to put the relay in series with SW2. To open the door, you need to either close the transistor base to the ground, or stupidly open the circuit. To play sound you need to send a signal to the MIC through a resistor of 10-15 kΩ. The biggest challenge was sound recording. It is possible to put a transformer for galvanic isolation on the speaker terminals or simply to obtain a variable component through a capacitor. Experiments have shown that there is not much difference.
For my project, I took an ATMEGA64 microcontroller. He has a hardware PWM, which is quite good at dealing with sound reproduction, and an analog-to-digital converter can be used to record sound. It was decided to store the data on a standard SD card. To switch between the tube (normal mode) and the microcontroller (sound recording / playback), I used electromagnetic relays. By the way, with this option, the tube becomes the most common if external power is lost. Well, to communicate with the outside world, I decided to use my homemade network, which I wrote about in another article .
The main board turned out this (relay rendered to a separate one):
Ready view:
In the phone case:
Yes, it turned out not very carefully ... I do not do everything that I do with my hands.
Summary view:
Demonstration of work:
Well, if you have a disk, why not use it for management? The perfect interface is:
But it is much more convenient to manage it from a PC:
Or from the phone, while using push notifications:
There are three types of operation modes:
- Play a sound recording (“Hello, the owner is already waiting for you, bring the pizza soon!”) And open the door
- Play a sound recording (“Leave a message after a beep ...”), record a message and play another recording (“Thank you, bye!”)
- Just play the recording (“Sorry, the host is unavailable” or “I don't want to see anyone”)
At the same time, it is possible to set a single mode, which will change to the main one after the first call. It is very convenient when ordering pizza, for example: when you call the intercom, you no longer need to jump out of bed and look for slippers, the courier at that time has opened the door. Well, the records that are left on the answering machine, leisurely pumped to a remote server, where they can be heard directly from a mobile phone. Yes, this creates an uncompressed WAV file with a full header that no longer requires additional processing.
And most importantly - I got a lot of experience: I learned how to work with SD cards and FAT, play and record sound, and also began to better understand how analog technology works. Perhaps this is the most important in any, even very meaningless project :)
Source: https://habr.com/ru/post/188906/
All Articles