Maha MH-C9000 - Analyzer, Charger and Restorer for Ni-MH / Ni-Cd Batteries
We continue to cover the topic of chargers. Today on our table is a real monster working with nickel, the main distinguishing characteristics of which are high charge currents (up to 2A per channel) and discharge (up to 1A), an informative backlit display, five modes of operation, including charge, restoration and analysis, training, discharge and cycle. By the way, this is not all "buns", in more detail about this device, I will tell under the cut.
I advise beforehand to get acquainted with the theory and, accordingly, the works of my colleague - habrayuzer vvzvlad . In an article about the Kweller X-1800 charger, he talks in detail about the types of nickel batteries and how to charge them. And to consolidate the material there is an excellent article by Ridiko Leonid Ivanovich about charging NiMH and NiCd batteries.

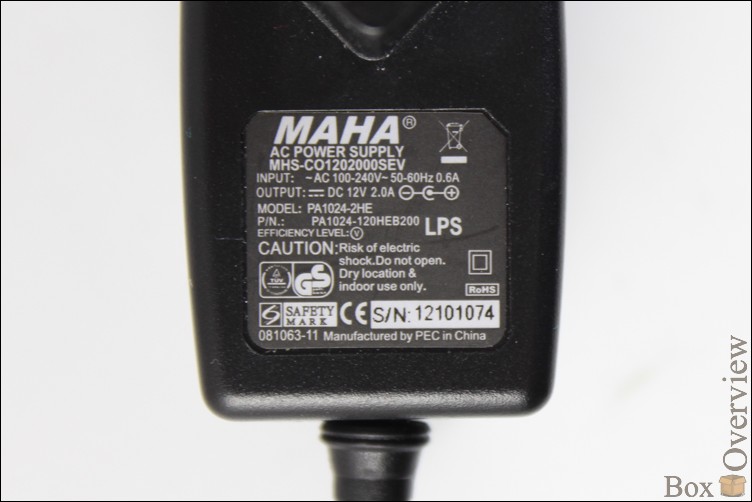
According to the characteristics: voltage 12V, current 2A.
Since the instruction is included only in English, I provide a link to its Russian version.

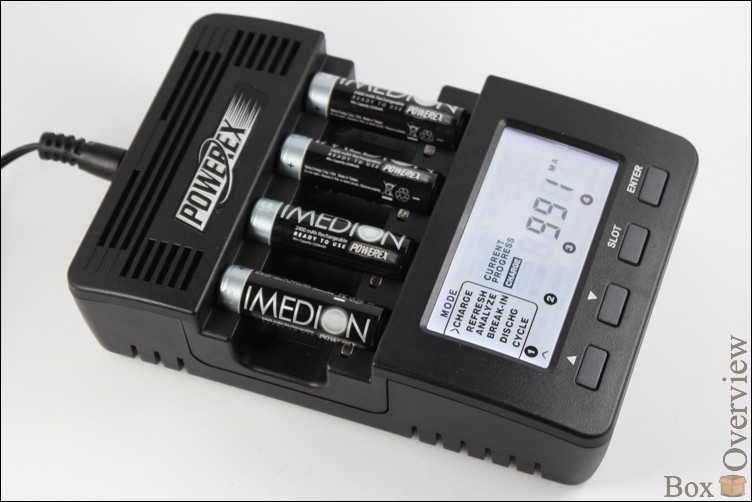
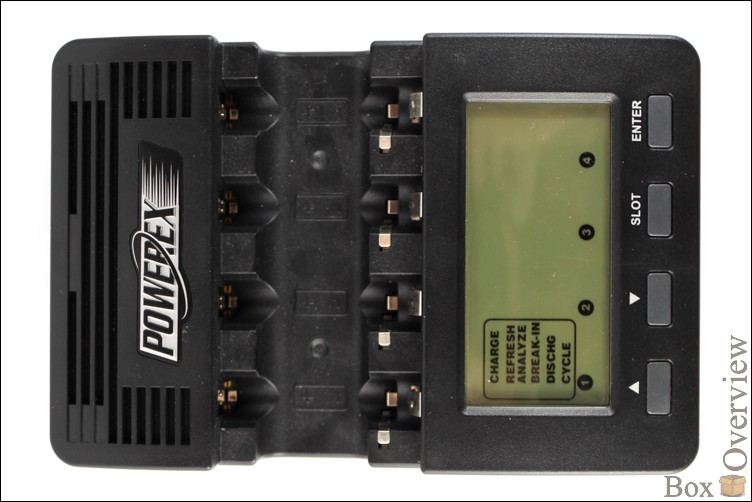
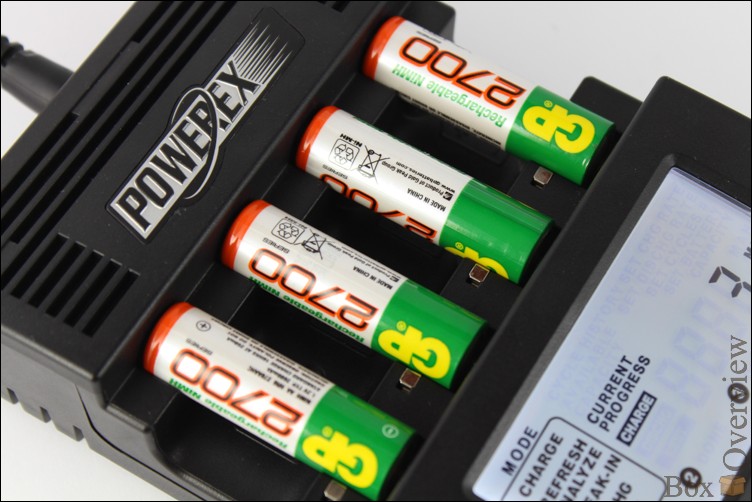
On the front are the battery compartments, the LCD display (with white backlight) and four control buttons. The latter have a good tactile response.
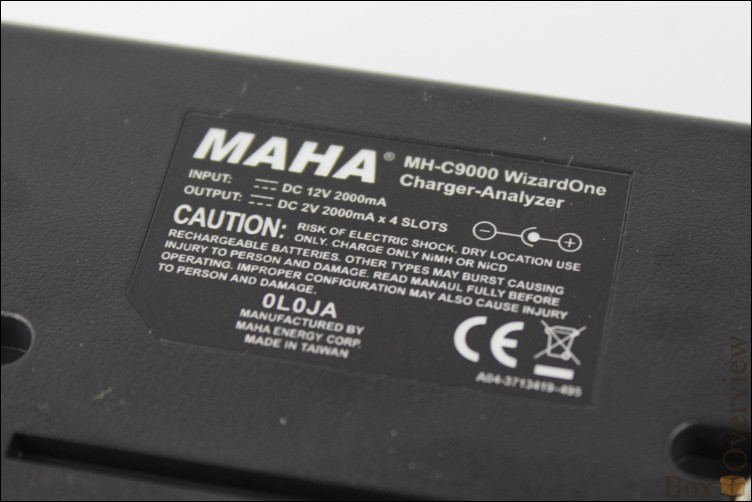
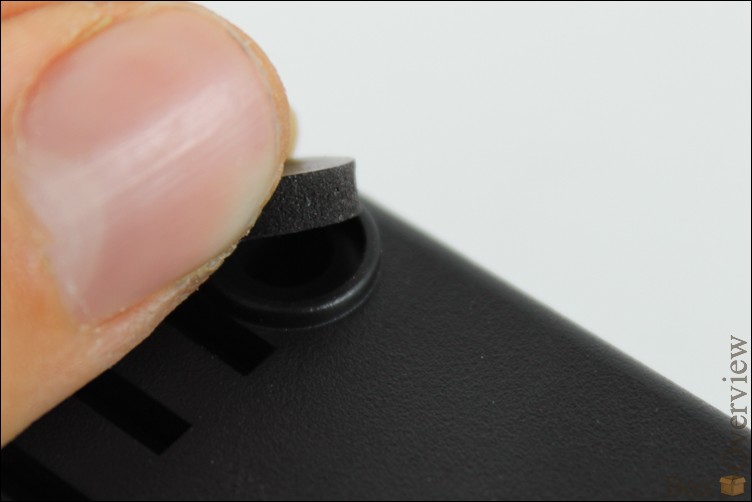
On the reverse side - basic information about the device and a folding metal leg for setting the charging in a “semi-reclining” position, the feature is extremely useful, given that there is good heat during operation. Another plus for the "right" rubber feet - they give extra stability.

For the curious - a label with information closer. Definitely liked the solution with the power of the device. Using an external power supply for 12V 2A with the subsequent conversion in the device itself to 2V 2A (maximum) for each of the 4 slots, we managed to reduce the size of the power adapter and add the ability to directly connect the MAHA NM-C9000 to the car lighter.
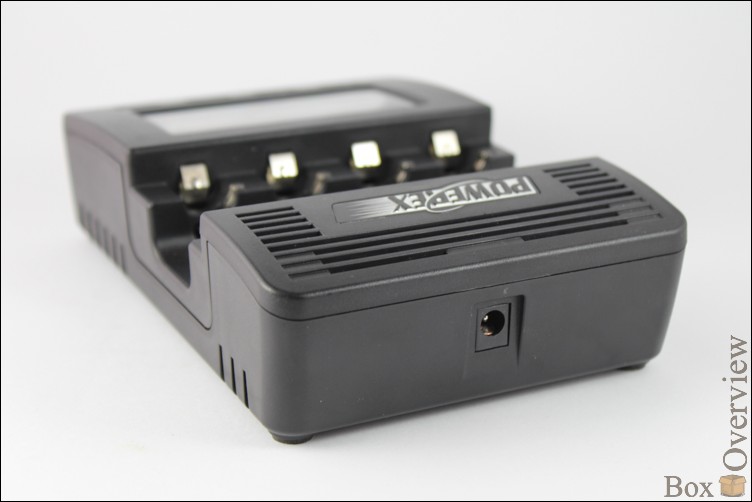
The sides are mostly empty and only at the top end there is a power connector.
Slots support the installation of batteries size AA and AAA. Each of them has its own thermal sensor. Again, the pluses include the distance between the slots, so that the batteries do not heat each other during charging.

The size of the charger itself has increased in proportion to the reduced power adapter. If you are going to constantly carry the unit with you, then you should look in the direction of something smaller, for example, the Kweller X-1800 .

Summing up, I can say that everything is collected and fitted to the conscience - no squeaks, no backlash, and is not going to disintegrate in their hands. To all this, the device is easy to disassemble, be it for dusting (remember about a large number of holes) or just for sporting interest.
')
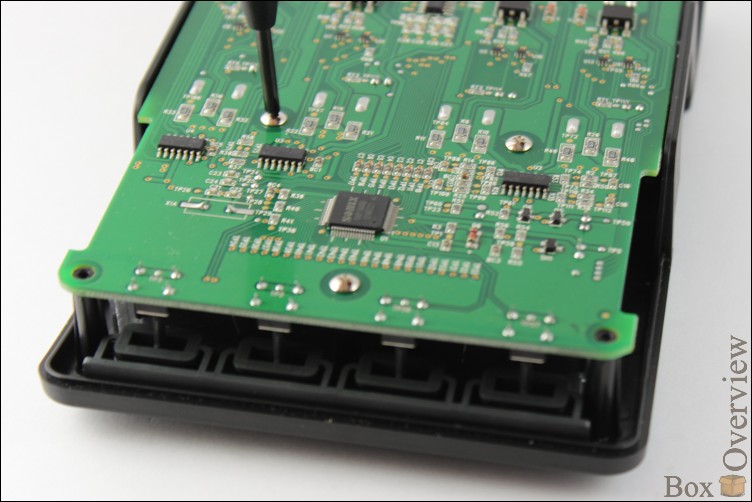
Armed with a Phillips-head screwdriver, we unscrew 4 screws around the perimeter of the device.

After removing the back cover, we see a printed circuit board. The layout is quite dense. All components can be divided into separate blocks.

Now in order. The device "taxis" 8-bit microcontroller (red) manufactured by SoNiX. The company is relatively young (founded in 1996 - my peers), the headquarters is located in Chu-Pei, Taiwan. For the curious: the company 's website here , datasheet on the controller SN8P1808QB here .
Green indicates shunts — exact resistors on which the voltage drop changes to control the current during charge and discharge; blue, the LM324 microcircuit, which serves as an amplifier of the current shunts signal.
Orange denotes the Step-Down unit of the converter, it is the charge unit, and the LM339 comparator chips (blue) together with the field-effect transistors (pink) make up the battery discharge unit. The power supply of the comparators and control electronics is organized by means of a 78D05 linear converter (yellow). On the Internet, a portion of the circuit was also found, or rather its power part, you can read the full version here , and below is the circuitry of one of the charge-discharge channels.

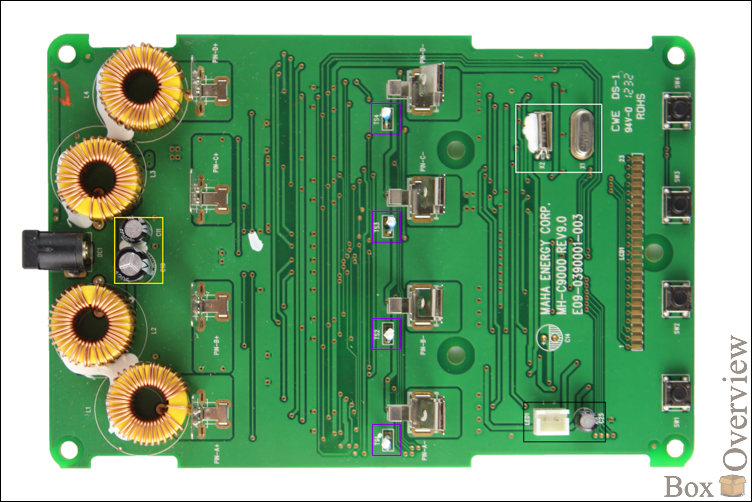
Deal with this part. To get to the back of the PCB and, accordingly, the rest of the giblets, unscrew the three screws on the bottom of the PCB.
We remove the second part of the case and see the upper part of the printed circuit board. Immediately catch your eye on large coils - these are the parts of Step-Down converters located on the reverse side of the PP (orange).

The information display device is a transparent plastic sandwich to protect the LCD display, the actual display itself, the LED substrate and the plastic rack on which it all sits.

In these of your Internet often complain about the excessively bright backlight of the display, I will not deny such a problem. There are two ways to solve it, or not, even three. The first is to use the "magician" as a night light. The second (which I use) is to cover the display with a pair of sheets of paper. And the third, the most radical - solder a 1 kΩ resistor into the power supply circuit of the LED backlight module (red wire in the photo below).
From the remaining on the upper side: thermistors for temperature control on batteries (purple), capacitors (yellow) - part of the linear converter, two quartz (white) - one time for counting time (left) and 12 MHz for clocking the microcontroller (right). Black is the connector for the LED module.
As for the quality of the soldering, everything can be seen from the photos - it is top notch. Massive parts are additionally fixed by some kind of compound, and the thermistors, as expected, are heat-conducting paste.
MAHA MH-C9000 uses the so-called inflexion method for determining the end of fast charging. The essence of this method lies in the fact that it is not the maximum of the voltage across the battery that is analyzed, but the maximum of the derivative of the voltage with respect to time. Those. fast charging will stop at the moment when the rate of voltage rise will be maximum. This allows you to complete the phase of fast charging earlier, when the temperature of the battery has not yet had time to rise significantly. Next comes the phase of recharging and within 2 hours a current of about 200 mA is “poured” into the batteries.
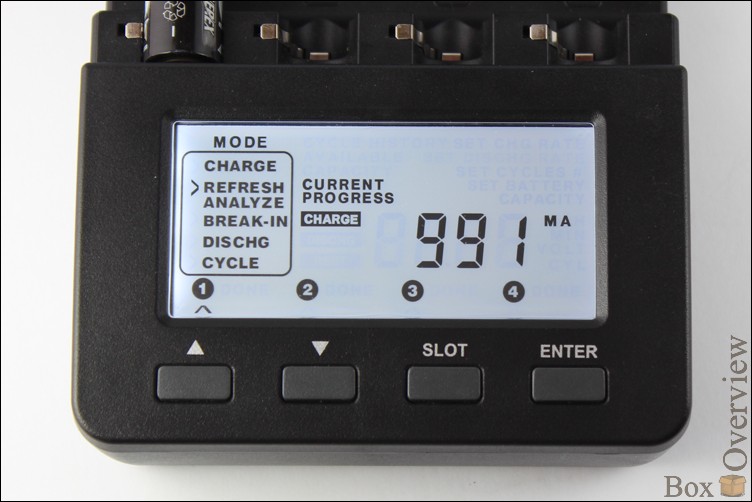
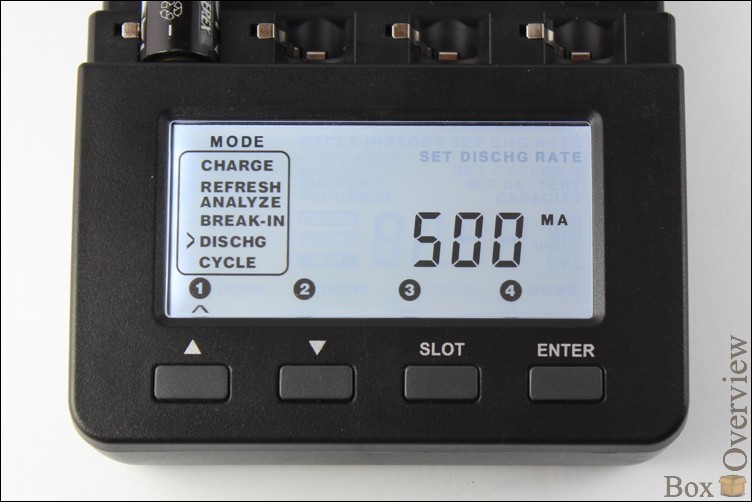
Now let's consider the possibilities of charging, or rather the modes, of which there are 5. When turned on, the screen saver is played when all the segments are lit and the numbers change from one to 9, after which we will be asked to choose the operating mode within 10 seconds . After this time (in the presence of at least one battery), charging mode (CHARGE) will automatically start. Otherwise, the memory will go into standby mode, cutting off the backlight and all the "active" segments.


We take control in their hands. :) Press the Enter button to set the charging mode ( CHARGE ) - the fastest mode, after selecting it, the charger suggests that we set a current in the range from 200 mA to 2A. It is worth noting that this procedure will have to be done for each channel. On the one hand, this is a plus - for each battery you can apply different settings, but when, for example, a set of 4 batteries is set, assign values to each separately somewhat dreary.

The second mode is recovery and analysis ( REFRESH / ANALYZE ) - ideal for batteries that have lain for some time. The principle of operation is as follows: the charger charges the battery, if it was not charged, takes a break, then discharges, measuring the capacitance in the process, breaks again, and then charges again. According to the manufacturer a break gives the electrochemical processes in the battery to come into balance.
In this mode, in addition to the charge current, we have the opportunity to set the discharge current. The recommended charge current is 0.5C, or a current of 0.5 from the battery capacity. The recommended discharge current is 0.25C, or a current of 0.25 from the battery capacity. The table below shows the values of currents for the most common batteries.
The third mode is training ( BREAK-IN ). It is used to establish the capacity of freshly purchased or long-stored batteries. Take into account that the process is quite long (2 days) and in case of power surges or even its disappearance, the charger will reboot and begin normal charging of your batteries with 1A current. If at this moment there are AAA elements installed, then I sympathize with them. The principle of operation of this mode is as follows: first, the batteries are charged with a current of 0.1 ° C for 16 hours, then an hour's rest, followed by a discharge with a current of 0.2 ° C and a new charge of 16 hours with a current of 0.1 ° C. Before starting the procedure, you need to set the battery certified capacity (maximum value - 20000 mAh ).

Practice has shown that it is possible to restore the working capacity of the battery, it all depends on the quality of the battery and the time it “idle”. GP 2700 (minimum passport capacity 2600 mAh) was found in the store after analysis and analysis showed a capacity of around 1000 mAh (all 4 elements), but after a 48-hour BREAK-IN rate, the batteries came to life, and showed a capacity of around 2000- 2100 mAh This, of course, is far from the minimum capacity declared by the manufacturer, but already the result.
DISCHARGE mode does not require extra comments. This is a test function with which you can measure the residual capacity of batteries (for example, to determine self-discharge), or even measure the capacity of non-rechargeable batteries. All you need to do to start this mode is to set the amperage from which the charger will discharge the battery.
And finally - the cycle mode ( CYCLE ). By setting the amount and charge + discharge currents, you can follow the battery behavior under continuous load. A total of 12 cycles are available, each of which is stored in the device’s memory.

The completion of any of the modes is indicated by the inscription DONE near the digital numbering of the slots on the display. Since the display only displays information for one slot at a time (sorry for the tautology), a SLOT button is provided with which you can switch between “bays”.

 4 independent slots
Build quality
overheat protection
Large LCD display
High charge and discharge currents
Five modes of operation
 Large size
Excessively bright display illumination
Reviews on radioscanner.ru
Review from Comuterra Online
Discussion on ixbt.com
FAQ on the device ( part 1 | part 2 )
If you do not have an account on Habrahabr, you can read and comment on our articles on BoxOverview.com
► Characteristics
- Four independent slots for charging Ni-MH / Ni-Cd batteries of sizes and
- Large and informative backlit LCD display
- Charge current from 0.2A to 2A with 0.1A step
- Discharge current from 0.1A to 1A with 0.1A step
- Battery capacity: 100 - 20000 mAh
- Five modes of operation: charge, recovery and analysis, training, discharge, cycle
- Protection against overcharging and undercharging by controlling -ΔV and temperature
- Powered by 12V adapter
- Dimensions, weight: 16611045 mm, 370 grams
I advise beforehand to get acquainted with the theory and, accordingly, the works of my colleague - habrayuzer vvzvlad . In an article about the Kweller X-1800 charger, he talks in detail about the types of nickel batteries and how to charge them. And to consolidate the material there is an excellent article by Ridiko Leonid Ivanovich about charging NiMH and NiCd batteries.
► Packing and packaging
Unfortunately, in connection with the move, the box from the charger was lost, so I cannot show it. On the other hand, there is nothing special to show. The set includes only the most necessary: power adapter, charger and documentation (manual, warranty card). Speaking of the adapter, it is surprisingly compact here.According to the characteristics: voltage 12V, current 2A.
Since the instruction is included only in English, I provide a link to its Russian version.
► Appearance
Wait for any frills in the design of the charger is not necessary, but the "ugly duckling" on your desk, it will not. The body is made of rough black plastic with a large number of holes for ventilation.On the front are the battery compartments, the LCD display (with white backlight) and four control buttons. The latter have a good tactile response.
On the reverse side - basic information about the device and a folding metal leg for setting the charging in a “semi-reclining” position, the feature is extremely useful, given that there is good heat during operation. Another plus for the "right" rubber feet - they give extra stability.
For the curious - a label with information closer. Definitely liked the solution with the power of the device. Using an external power supply for 12V 2A with the subsequent conversion in the device itself to 2V 2A (maximum) for each of the 4 slots, we managed to reduce the size of the power adapter and add the ability to directly connect the MAHA NM-C9000 to the car lighter.
The sides are mostly empty and only at the top end there is a power connector.
Slots support the installation of batteries size AA and AAA. Each of them has its own thermal sensor. Again, the pluses include the distance between the slots, so that the batteries do not heat each other during charging.
The size of the charger itself has increased in proportion to the reduced power adapter. If you are going to constantly carry the unit with you, then you should look in the direction of something smaller, for example, the Kweller X-1800 .
Summing up, I can say that everything is collected and fitted to the conscience - no squeaks, no backlash, and is not going to disintegrate in their hands. To all this, the device is easy to disassemble, be it for dusting (remember about a large number of holes) or just for sporting interest.
')
► Gut guts
A review without a preparation is not a review, therefore, the hero of today's article is gutted and we will study its structure. First you need to unplug the device from the network and remove the 4 rubber feet from the bottom of the device.Armed with a Phillips-head screwdriver, we unscrew 4 screws around the perimeter of the device.
After removing the back cover, we see a printed circuit board. The layout is quite dense. All components can be divided into separate blocks.
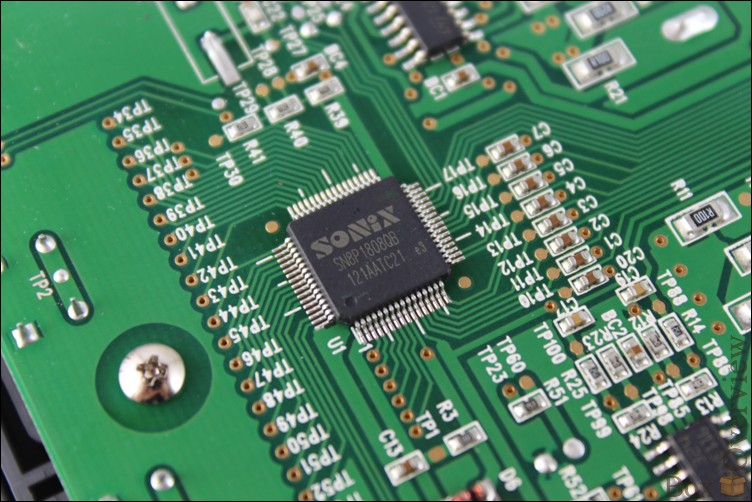
Now in order. The device "taxis" 8-bit microcontroller (red) manufactured by SoNiX. The company is relatively young (founded in 1996 - my peers), the headquarters is located in Chu-Pei, Taiwan. For the curious: the company 's website here , datasheet on the controller SN8P1808QB here .
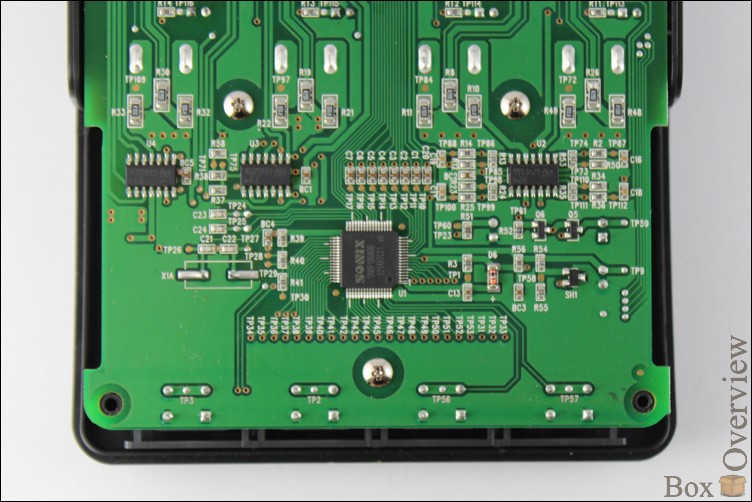
Green indicates shunts — exact resistors on which the voltage drop changes to control the current during charge and discharge; blue, the LM324 microcircuit, which serves as an amplifier of the current shunts signal.
Orange denotes the Step-Down unit of the converter, it is the charge unit, and the LM339 comparator chips (blue) together with the field-effect transistors (pink) make up the battery discharge unit. The power supply of the comparators and control electronics is organized by means of a 78D05 linear converter (yellow). On the Internet, a portion of the circuit was also found, or rather its power part, you can read the full version here , and below is the circuitry of one of the charge-discharge channels.
Deal with this part. To get to the back of the PCB and, accordingly, the rest of the giblets, unscrew the three screws on the bottom of the PCB.
We remove the second part of the case and see the upper part of the printed circuit board. Immediately catch your eye on large coils - these are the parts of Step-Down converters located on the reverse side of the PP (orange).
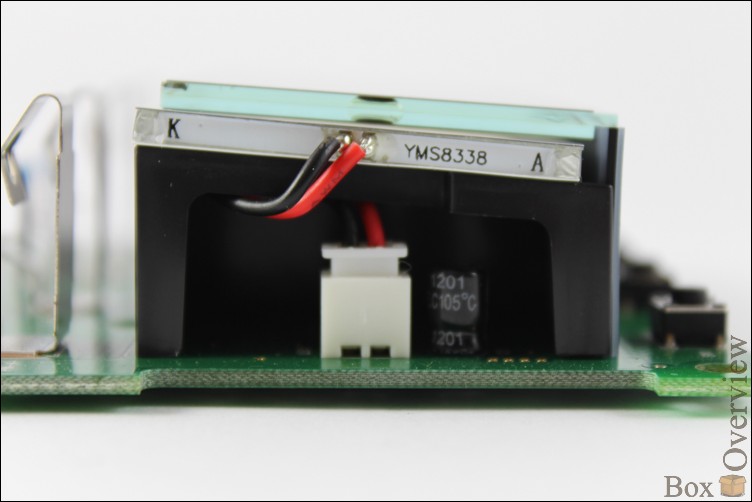
The information display device is a transparent plastic sandwich to protect the LCD display, the actual display itself, the LED substrate and the plastic rack on which it all sits.
In these of your Internet often complain about the excessively bright backlight of the display, I will not deny such a problem. There are two ways to solve it, or not, even three. The first is to use the "magician" as a night light. The second (which I use) is to cover the display with a pair of sheets of paper. And the third, the most radical - solder a 1 kΩ resistor into the power supply circuit of the LED backlight module (red wire in the photo below).
From the remaining on the upper side: thermistors for temperature control on batteries (purple), capacitors (yellow) - part of the linear converter, two quartz (white) - one time for counting time (left) and 12 MHz for clocking the microcontroller (right). Black is the connector for the LED module.
As for the quality of the soldering, everything can be seen from the photos - it is top notch. Massive parts are additionally fixed by some kind of compound, and the thermistors, as expected, are heat-conducting paste.
► Functional
So, let us begin with the very principle of operation of this memory, since it here is different from its cheaper, albeit intellectual, fellows. For example, let us consider the Kweller X-1800 reviewed in one of the previous reviews. It uses the -ΔV method. What does it mean? - The battery charge when using this method is completed when the voltage drop begins. Although the statement "completed" is not quite accurate, in fact, the charger simply reduces the voltage on the batteries. Not much, tens or even millivolts. The controller in the charger constantly monitors the voltage on the battery and after the voltage drops down - reduces the charge current to about 10mA - so that the batteries are always ready, even if they are left in charge for a day. But this method has a minus, in this way the battery is charged even more than 100%, which leads to a decrease in its service life.MAHA MH-C9000 uses the so-called inflexion method for determining the end of fast charging. The essence of this method lies in the fact that it is not the maximum of the voltage across the battery that is analyzed, but the maximum of the derivative of the voltage with respect to time. Those. fast charging will stop at the moment when the rate of voltage rise will be maximum. This allows you to complete the phase of fast charging earlier, when the temperature of the battery has not yet had time to rise significantly. Next comes the phase of recharging and within 2 hours a current of about 200 mA is “poured” into the batteries.
Now let's consider the possibilities of charging, or rather the modes, of which there are 5. When turned on, the screen saver is played when all the segments are lit and the numbers change from one to 9, after which we will be asked to choose the operating mode within 10 seconds . After this time (in the presence of at least one battery), charging mode (CHARGE) will automatically start. Otherwise, the memory will go into standby mode, cutting off the backlight and all the "active" segments.
We take control in their hands. :) Press the Enter button to set the charging mode ( CHARGE ) - the fastest mode, after selecting it, the charger suggests that we set a current in the range from 200 mA to 2A. It is worth noting that this procedure will have to be done for each channel. On the one hand, this is a plus - for each battery you can apply different settings, but when, for example, a set of 4 batteries is set, assign values to each separately somewhat dreary.
The second mode is recovery and analysis ( REFRESH / ANALYZE ) - ideal for batteries that have lain for some time. The principle of operation is as follows: the charger charges the battery, if it was not charged, takes a break, then discharges, measuring the capacitance in the process, breaks again, and then charges again. According to the manufacturer a break gives the electrochemical processes in the battery to come into balance.
In this mode, in addition to the charge current, we have the opportunity to set the discharge current. The recommended charge current is 0.5C, or a current of 0.5 from the battery capacity. The recommended discharge current is 0.25C, or a current of 0.25 from the battery capacity. The table below shows the values of currents for the most common batteries.
| Battery capacity | Charge current | Discharge current |
|---|---|---|
| 2700 mAh | 1300 mA | 700 mA |
| 2650 mAh | 1300 mA | 700 mA |
| 2500-2400 mAh | 1200 mA | 600 mA |
| 2300-2200 mAh | 1100 mA | 600 mA |
| 2100 mAh | 1000 mA | 500 mA |
| 2000 mAh | 1000 mA | 500 mA |
| 1000 mAh | 500 mA | 200 mA |
| 900-700 mAh | 400 mA | 200 mA |
Practice has shown that it is possible to restore the working capacity of the battery, it all depends on the quality of the battery and the time it “idle”. GP 2700 (minimum passport capacity 2600 mAh) was found in the store after analysis and analysis showed a capacity of around 1000 mAh (all 4 elements), but after a 48-hour BREAK-IN rate, the batteries came to life, and showed a capacity of around 2000- 2100 mAh This, of course, is far from the minimum capacity declared by the manufacturer, but already the result.
DISCHARGE mode does not require extra comments. This is a test function with which you can measure the residual capacity of batteries (for example, to determine self-discharge), or even measure the capacity of non-rechargeable batteries. All you need to do to start this mode is to set the amperage from which the charger will discharge the battery.
And finally - the cycle mode ( CYCLE ). By setting the amount and charge + discharge currents, you can follow the battery behavior under continuous load. A total of 12 cycles are available, each of which is stored in the device’s memory.
The completion of any of the modes is indicated by the inscription DONE near the digital numbering of the slots on the display. Since the display only displays information for one slot at a time (sorry for the tautology), a SLOT button is provided with which you can switch between “bays”.
► Results
Maha MH-C9000 is an intelligent charger, the functionality of which is truly rich, here you just need to charge, and restore, and practice, and in combination with high charge / discharge currents and battery support up to 20 Ah - this is the ultimate solution for professional and for home use. Do not forget about the build quality, both external and internal. Of the minuses personally, I would point out a really unnecessarily bright display and rather large dimensions, as a result of which you will not take this device on a long journey.Advantages and disadvantages
4 independent slots Build quality overheat protection Large LCD display High charge and discharge currents Five modes of operation Large size Excessively bright display illumination► Cost
You can buy from the official distributor of the company MAHA in Russia . As of August 2013, the price is 2200 rubles , and complete with a bag for transportation will cost 2450 rubles . They can also purchase the Maha MH-C9000 power adapter from a car cigarette lighter. The price is quite democratic - 300 rubles.► Related Links
Product on the manufacturer's websiteReviews on radioscanner.ru
Review from Comuterra Online
Discussion on ixbt.com
FAQ on the device ( part 1 | part 2 )
If you do not have an account on Habrahabr, you can read and comment on our articles on BoxOverview.com
Source: https://habr.com/ru/post/188884/
All Articles