Bootstrap CSS Sprite: syntax sugar for ![]()
UPD
Today there is no point. Just configure yourself HTTP / 2
- Nginx www.digitalocean.com/community/tutorials/how-to-set-up-nginx-with-http-2-support-on-ubuntu-16-04
- Apache httpd.apache.org/docs/2.4/howto/http2.html
What is it?
One day, I clearly realized that I was tired of writing long links to image files, asking them width and height every time, making sure that all this did not jump while loading and did not blink when hovering over with the mouse. And I decided to automate this whole routine. This is how Bootstrap CSS Sprite - a library that allows you to work with all your images, as with one sprite. At the same time access to the tiles of the sprite is in the style of Twitter Bootstrap.
')
Let me give you an example: we have a cat.png image file . To show this image, you must use the <i> tag , specifying the CSS class img-cat for it , as we do in Twitter Bootstrap:
<i class="img-cat"></i> 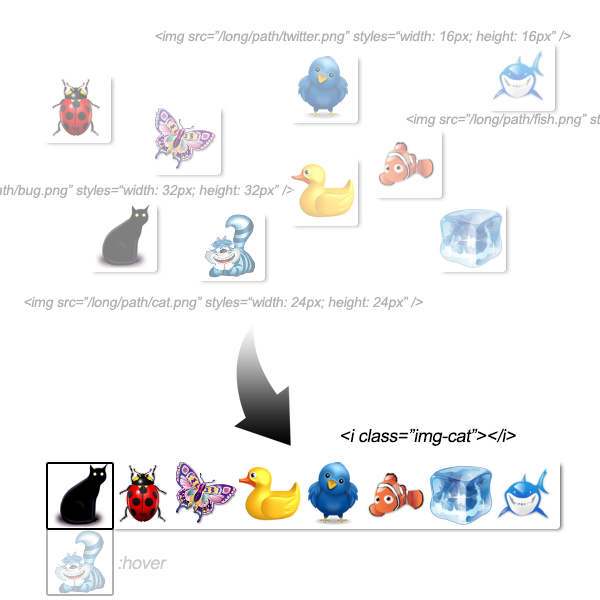
Benefits
- Instead of a set of files with images, we get one and, as a result, just one request to the server instead of a set.
- Changing the image when you first hover with a mouse without blinking and twitching.
- There is no longer any need to specify the width and height for each image in HTML templates — the library will do this for us in the generated CSS file.
- Less HTML:
<i class="img-cat"></i><img src="<?=$this->theme->baseUrl?>/images/cat.png" style="width: 64px; height: 64px;" />
I think it will really save time!
How to use
Let's look at the easiest way to use the library. To generate a sprite, you need to specify where and what files to take. In our case, take jpg, jpeg, gif and png from the directory / path / to / images / source . Then specify the path to the sprite file - /path/to/images/sprite.png - all the original images will be merged into it. It will also generate a CSS file - /path/to/css/sprite.css , which contains classes for all processed images. These classes define the link to the image, its size, and also mouseover behavior.
$sprite = new BootstrapCssSprite(array( 'imgSourcePath' => '/path/to/images/source', 'imgSourceExt' => 'jpg,jpeg,gif,png', 'imgDestPath' => '/path/to/images/sprite.png', 'cssPath' => '/path/to/css/sprite.css', 'cssImgUrl' => '/url/to/images/sprite.png', )); $sprite->generate(); Generation should be run only when adding new images.Also implementation is already ready in the form of a component for Yii Framework. Work with him will be completely similar. You just need to copy the file YiiBootstrapCssSprite.php to / extensions / and add it to the config file:
'components' => array( ... 'sprite' => array( 'class' => 'ext.YiiBootstrapCssSprite', 'imgSourcePath' => '/path/to/images/source', 'imgSourceExt' => 'jpg,jpeg,gif,png', 'imgDestPath' => '/path/to/images/sprite.png', 'cssPath' => '/path/to/css/sprite.css', 'cssImgUrl' => '/url/to/images/sprite.png', ), ... ) Then we generate the sprite: abstract class BaseController { public function init() { ... if (APP_ENV === APP_ENV_DEV) { Yii::app()->sprite->generate(); // Regenerates sprite only if source dir was changed } ... } } : hover
In order to change the picture when you hover the mouse, just enough to put the image file cat.hover.png next to cat.png . And it's all! If you need to change the image when you hover the mouse on its parent element (and not on the image itself), then you have to sweat and add the hover-img CSS class to this element:
<button class="btn hover-img"><i class="img-cat"></i> My Cat</button> It is also possible to manually emulate a hover event:
$('.img-cat').addClass('hover'); Future plans
There are a lot of development plans. From the main:
- Implement sprite generation using different graphic libraries (now there is an implementation only with GD lib).
- Design the library as a component (bundle, etc.) for the main PHP frameworks (
Yii, Zend, Symfony). - Port the library to other web-based languages (Ruby,
Python, .Net, Java, etc.).
I hope that after the publication of the article, plans for the future will expand significantly, and the joy of web developers of all countries and peoples will increase. Waiting for your comments and pull requests :)
UPD maximw made a good idea: replace the <i> tag with a <div> . You can make this tag a configurable option. And @ SelenIT2 gave a very sensible clarification that it is better to replace not with <div> , but with <span> , so as not to break the DOM when inserted into lower-case elements.
Source: https://habr.com/ru/post/188650/
All Articles