Part 3. How to connect a smartphone to the car - read the data
We continue the cycle of articles on how to connect to the on-board system of your car (see Part 1 and Part 2 ) and today we will tell you how to read the data.
It is assumed that by the current moment we have a car with a diagnostic connector that meets the OBD-II standard, a favorite mobile device (laptop, smartphone, tablet) and an adapter based on ELM327, which will allow connecting the machine and mobile device.
As mentioned in the previous section, regardless of the type of communication between the mobile device and the adapter (Bluetooth, Wi-Fi, USB) at the logical level, this is a serial connection. At the program level, you must open the Socket connection between the computer and the adapter over the existing connection of the lower level. Practical software implementation will depend on the operating system and type of connection, examples can be found a lot under all your favorite programming languages. As a basic example, you can take the implementation of the connection on the examples of chat programs for Bluetooth or TCP \ IP. In this article we will not dwell in detail on the implementation of such a connection, for experiments we have enough capabilities of existing programs a la Telnet, for experiments under Android and iOS we have embedded a simple command console in our application OBD Car Doctor .
So, download and install a program that allows you to establish a serial connection with the adapter and provide us with the command line to communicate with the machine.
')
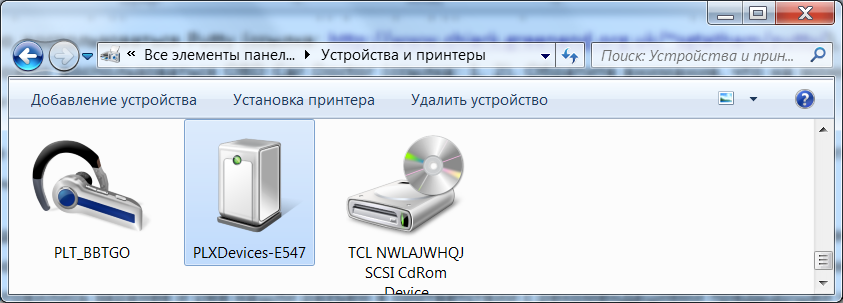
In the Devices section we search for new devices (on some adapters, you need to press a button for the device to be detected), after detecting the device and entering the pin code, the device will appear in the general list.
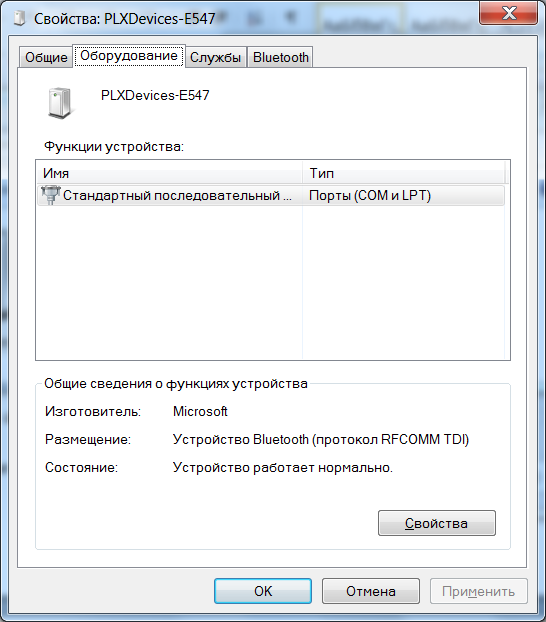
We look at the properties tab equipment
Now the properties of the serial port.
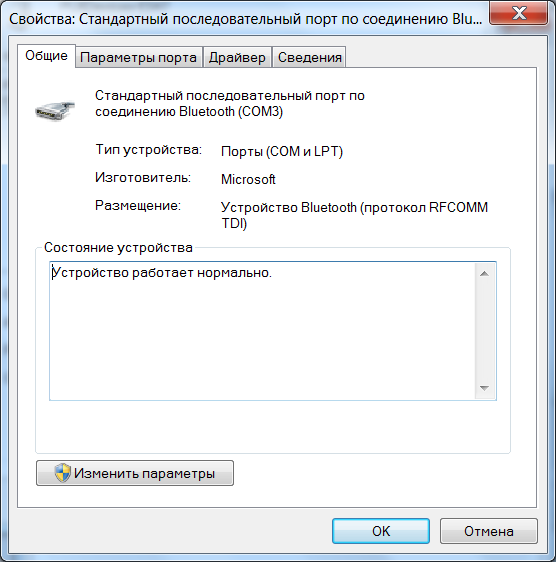
We see and remember that the Bluetooth serial connection is mapped onto the COM3 port. If necessary, change to another port. Now we start Putty and configure the program to work with the COM port defined in the previous step (in the example with COM3).
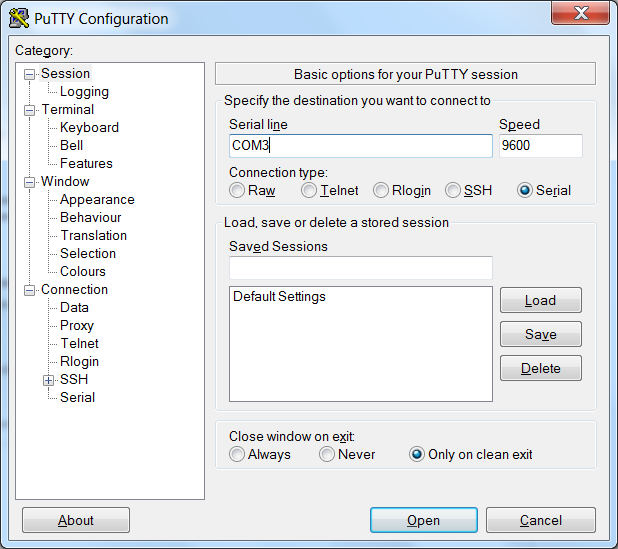
So, enter the name of the COM port, speed 9600, type Serial and click Open to open the terminal window.
1. Connect the Bluetooth adapter to the OBD-II connector of your car (we wrote about it and its location in Part 2 ). Make sure the light on the adapter is lit.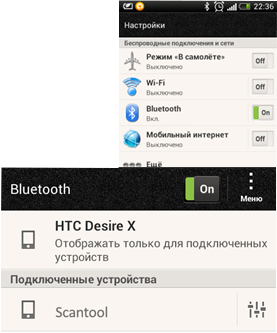
2. Start the car engine
3. Go to the Bluetooth environment on your smartphone: “Settings”> Bluetooth and start searching for Bluetooth devices, find the OBD II adapter, it should appear in the list of devices as' scantool ',' obdkey ',' plx ... ',' cbt 'or something similar. Select an adapter. He will offer to make conjugation devices.
4. Pair the devices. The device will ask for a secret pairing code, as a rule: 1234 or 0000.
5. Go to the OBD Car Doctor app on your smartphone.
6. In Settings, in the BT connection item, select the name of the adapter with which the pairing was previously performed.
7. In Settings, in the Test section, check the Console option. Go back to the main page, click Connect and after successful connection select Console ( this function is available starting from the OBD Car Doctor Android 2.22 version ).
1. Connect the OBD-II Wi-Fi adapter to the OBD-II connector of your car. Start the car engine and wait for the green glow on the Wi-Fi adapter.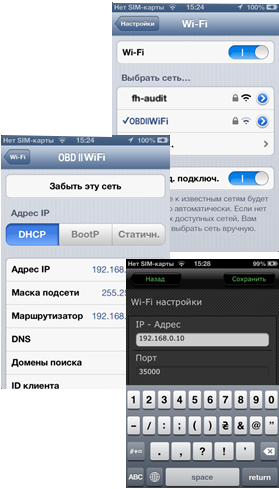
2. On your iPhone device, go to Settings (Settings), select to connect to the Wi-Fi network. After connecting to Wi-Fi, go to advanced settings and install:
3. Navigate to the OBD Car Doctor app> Settings, where you configure the following:
4. Start the engine.
5. Go to the OBD Car Doctor app on your smartphone. In Settings, in the Test section, check the Console option. We return to the main page, click Connect and, after successful connection, select the Console item ( this function is available starting from the OBD Car Doctor iOS 1.3 version, which is expected to be released soon ).
Upon completion of the described actions you are ready to enter commands and receive answers from the vehicle diagnostic system. It is natural to work with the console in motion is not very convenient and not safe even for a passenger. Therefore, we offer to experiment on a set, but conveniently parked car.
Above, we mentioned that the commands are divided into 2 types: adapter control commands and the OBD-II command itself . Usually, control commands start with an AT sequence, while OBD-II commands consist of hexadecimal digits only.
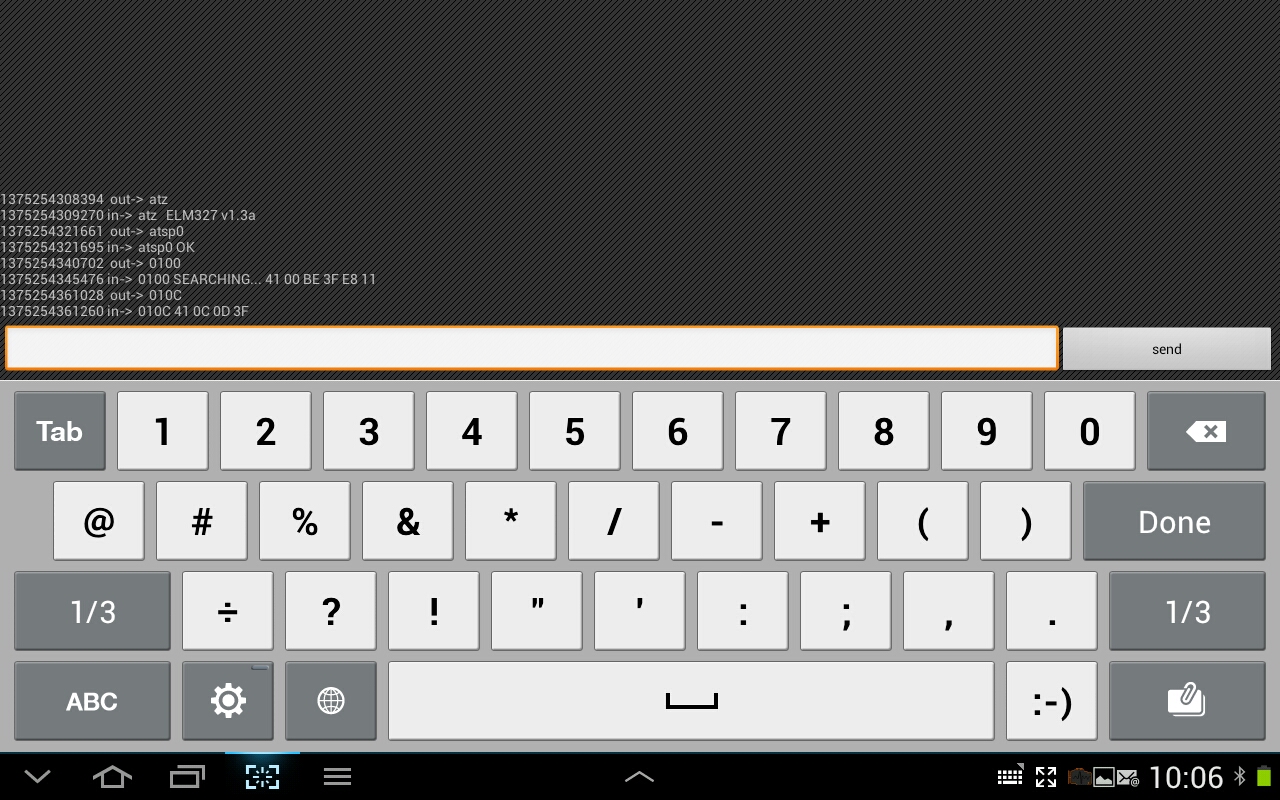
• type ATZ and press Enter (or the Send button). If the adapter has power and the connection with it has been established, we should see the response line:
Or something similar, depending on the controller used and the firmware version of the adapter. ATZ is an initialization command and reloads the adapter.
• The next command can be the protocol installation command, enter the ATSP0 command, we should receive in response
The ATSP0 command does not directly establish the adapter-vehicle interaction protocol, this is a special command that sets the adapter to automatically detect the protocol protocol. To directly search and establish a connection, we must send an OBD-II command.
• We send command 0100 (which stands for MODE 01, PID 00), in case of success, we should get something like
Where X can be any hexadecimal digit.
• spaces can be ignored both in commands and in responses; the presence or absence of spaces in the response is controlled by a separate
• echo may be present or absent in the response (i.e. command repetition, as in the example above); the presence or absence of spaces in the response is controlled by a separate
• the response to the command itself contains the modified value of the command, namely (mode + 0x40) (PID) , i.e. positive response to command 0100 , must begin with 4100 .
or
...
Similar answers mean that the adapter could not automatically determine the communication protocol with the car.
Instead of the automatic protocol search, you can set the protocol number explicitly, hex numbers from 1 to C are supported.
For example, to explicitly establish communication using the ISO 9142-2 protocol, type the ATSP3 command, we get in response ATSP3 OK>
And check the performance of the team 0100, again, if successful, we expect to see
If we see something else, like
What does it mean - communication under this protocol is not established.
For testing and establishing a communication protocol, any vehicle supported by OBD-II can be used, but it is recommended to use the 0100, since it must be supported by the manufacturer in accordance with the standard. This command should return PID support information from 01 to 20 for MODE 01.
Recall that MODE 01 is responsible for reading the dynamic parameters of the vehicle (speed, speed, temperature, etc.) in real time. Accordingly, after reading the answer to 0100, which contains information on which of the PIDs from 01 to 20 (hexadecimal) are supported. To decrypt, we need to convert the hexadecimal representation of a number into a binary one, with the bit position (from highest to lowest) corresponding to the PID number (from 01 to 20).
For example, a response containing 80 00 00 00 = 1000 0000 0000 0000 0000 0000.
Means support for a single PID, namely 01.
Now you can read the answer of your car to the command 0100 and find out the numbers of all the commands (PID) supported in your car. Please note that if the command 0120 is supported, then by sending it you can read the numbers of the supported PIDs in the range 21 - 40, etc., i.e. 0100, 0120, ... 01D0, which are responsible for determining the numbers of all supported commands in MODE 01.
To consolidate the knowledge gained, we propose to perform another simple command and disassemble the result. If you decrypted the response of command 0100 and received that the PID 0C is supported, send the command 010C (engine rpm), the answer should be in the form:
To obtain the value in revolutions per minute, you must receive the answer (0B B8 = 3000) divided by 4, i.e. we get 750 rpm
A list of supported commands and conversion formulas can be found here .
While you are experimenting with sending various commands, as well as receiving and decoding values, we will prepare the next part (s), which will deal with issues of working with multiple onboard controllers, what you need to know about command headers, reading and dumping errors, for which other MODE, "almost OBD-II", as well as other topics that may interest you.
It is assumed that by the current moment we have a car with a diagnostic connector that meets the OBD-II standard, a favorite mobile device (laptop, smartphone, tablet) and an adapter based on ELM327, which will allow connecting the machine and mobile device.
As mentioned in the previous section, regardless of the type of communication between the mobile device and the adapter (Bluetooth, Wi-Fi, USB) at the logical level, this is a serial connection. At the program level, you must open the Socket connection between the computer and the adapter over the existing connection of the lower level. Practical software implementation will depend on the operating system and type of connection, examples can be found a lot under all your favorite programming languages. As a basic example, you can take the implementation of the connection on the examples of chat programs for Bluetooth or TCP \ IP. In this article we will not dwell in detail on the implementation of such a connection, for experiments we have enough capabilities of existing programs a la Telnet, for experiments under Android and iOS we have embedded a simple command console in our application OBD Car Doctor .
So, download and install a program that allows you to establish a serial connection with the adapter and provide us with the command line to communicate with the machine.
- For a laptop with Windows (Linux), you can use Putty ,
- for Android and iOS, you can use OBD Car Doctor Android , OBD Car Doctor iOS . Please note that at the time of publishing the article on iTunes, there may still be an old version 1.2, the console will be available in version 1.3.
After downloading and installing programs, it’s time to take a computer (smartphone), an adapter and slide out to the machine. Listing this article also does not hurt.
')
- We are convinced that before you is your car, and / or that its owner is not against
cruelexperiments with the diagnostic system of the car. - We connect the adapter to the diagnostic connector (I hope you have prepared in advance and have already found the connector in accordance with the recommendations in the previous section).
- The key "to start", turn on the ignition.
- The power light on the adapter should come on and we can continue.
We will discuss in more detail the connection with the Bluetooth adapter, as the most popular and popular type of adapter.
Windows:
In the Devices section we search for new devices (on some adapters, you need to press a button for the device to be detected), after detecting the device and entering the pin code, the device will appear in the general list.
We look at the properties tab equipment
Now the properties of the serial port.
We see and remember that the Bluetooth serial connection is mapped onto the COM3 port. If necessary, change to another port. Now we start Putty and configure the program to work with the COM port defined in the previous step (in the example with COM3).
So, enter the name of the COM port, speed 9600, type Serial and click Open to open the terminal window.
Android:
1. Connect the Bluetooth adapter to the OBD-II connector of your car (we wrote about it and its location in Part 2 ). Make sure the light on the adapter is lit.
2. Start the car engine
3. Go to the Bluetooth environment on your smartphone: “Settings”> Bluetooth and start searching for Bluetooth devices, find the OBD II adapter, it should appear in the list of devices as' scantool ',' obdkey ',' plx ... ',' cbt 'or something similar. Select an adapter. He will offer to make conjugation devices.
4. Pair the devices. The device will ask for a secret pairing code, as a rule: 1234 or 0000.
5. Go to the OBD Car Doctor app on your smartphone.
6. In Settings, in the BT connection item, select the name of the adapter with which the pairing was previously performed.
7. In Settings, in the Test section, check the Console option. Go back to the main page, click Connect and after successful connection select Console ( this function is available starting from the OBD Car Doctor Android 2.22 version ).
iOS:
1. Connect the OBD-II Wi-Fi adapter to the OBD-II connector of your car. Start the car engine and wait for the green glow on the Wi-Fi adapter.
2. On your iPhone device, go to Settings (Settings), select to connect to the Wi-Fi network. After connecting to Wi-Fi, go to advanced settings and install:
- IP Address: Static
- IP Address: 192.168.0.11
- Subnet Mask: 255.255.255.0
3. Navigate to the OBD Car Doctor app> Settings, where you configure the following:
- IP Address: 192.168.0.10
- Port: 35000
- Click “Save” and “Exit”
4. Start the engine.
5. Go to the OBD Car Doctor app on your smartphone. In Settings, in the Test section, check the Console option. We return to the main page, click Connect and, after successful connection, select the Console item ( this function is available starting from the OBD Car Doctor iOS 1.3 version, which is expected to be released soon ).
Upon completion of the described actions you are ready to enter commands and receive answers from the vehicle diagnostic system. It is natural to work with the console in motion is not very convenient and not safe even for a passenger. Therefore, we offer to experiment on a set, but conveniently parked car.
Above, we mentioned that the commands are divided into 2 types: adapter control commands and the OBD-II command itself . Usually, control commands start with an AT sequence, while OBD-II commands consist of hexadecimal digits only.
So, our first team:
• type ATZ and press Enter (or the Send button). If the adapter has power and the connection with it has been established, we should see the response line:
ELM 327 v1.3a >Or something similar, depending on the controller used and the firmware version of the adapter. ATZ is an initialization command and reloads the adapter.
• The next command can be the protocol installation command, enter the ATSP0 command, we should receive in response
ATSP0 OK >The ATSP0 command does not directly establish the adapter-vehicle interaction protocol, this is a special command that sets the adapter to automatically detect the protocol protocol. To directly search and establish a connection, we must send an OBD-II command.
• We send command 0100 (which stands for MODE 01, PID 00), in case of success, we should get something like
0100 Searching…41 00 XX XX XX XX >Where X can be any hexadecimal digit.
Here we pay attention to a few points:
• spaces can be ignored both in commands and in responses; the presence or absence of spaces in the response is controlled by a separate
ATS{0|1} command ATS{0|1}• echo may be present or absent in the response (i.e. command repetition, as in the example above); the presence or absence of spaces in the response is controlled by a separate
ATE{0|1} command ATE{0|1}• the response to the command itself contains the modified value of the command, namely (mode + 0x40) (PID) , i.e. positive response to command 0100 , must begin with 4100 .
In case of failure, the answers may be as follows:
0100 SEARCHING...UNABLE TO CONNECT >or
0100 SEARCHING...NO DATA >...
Similar answers mean that the adapter could not automatically determine the communication protocol with the car.
Instead of the automatic protocol search, you can set the protocol number explicitly, hex numbers from 1 to C are supported.
1 - SAE J1850 PWM2 - SAE J1850 VPW3 - ISO 9142-24 - ISO 14230-4 KWP (5 baud init)5 - ISO 14230-4 KWP (fast init)6 - ISO 15765-4 CAN (11 bit, 500 Kbaud)7 - ISO 15765-4 CAN (29 bit, 500 Kbaud)8 - ISO 15765-4 CAN (11 bit, 250 Kbaud)9 - ISO 15765-4 CAN (29 bit, 250 Kbaud)A - SAE J1939 CAN (29 bit, 250 Kbaud)B - USER1 CAN (11 bit, 125 Kbaud)C - USER2 CAN (11 bit, 50 Kbaud)For example, to explicitly establish communication using the ISO 9142-2 protocol, type the ATSP3 command, we get in response ATSP3 OK>
And check the performance of the team 0100, again, if successful, we expect to see
0100 Searching…01 00 41 00 XX XX XX XX >If we see something else, like
0100 BUS INIT:…ERRORWhat does it mean - communication under this protocol is not established.
For testing and establishing a communication protocol, any vehicle supported by OBD-II can be used, but it is recommended to use the 0100, since it must be supported by the manufacturer in accordance with the standard. This command should return PID support information from 01 to 20 for MODE 01.
Recall that MODE 01 is responsible for reading the dynamic parameters of the vehicle (speed, speed, temperature, etc.) in real time. Accordingly, after reading the answer to 0100, which contains information on which of the PIDs from 01 to 20 (hexadecimal) are supported. To decrypt, we need to convert the hexadecimal representation of a number into a binary one, with the bit position (from highest to lowest) corresponding to the PID number (from 01 to 20).
For example, a response containing 80 00 00 00 = 1000 0000 0000 0000 0000 0000.
Means support for a single PID, namely 01.
Now you can read the answer of your car to the command 0100 and find out the numbers of all the commands (PID) supported in your car. Please note that if the command 0120 is supported, then by sending it you can read the numbers of the supported PIDs in the range 21 - 40, etc., i.e. 0100, 0120, ... 01D0, which are responsible for determining the numbers of all supported commands in MODE 01.
To consolidate the knowledge gained, we propose to perform another simple command and disassemble the result. If you decrypted the response of command 0100 and received that the PID 0C is supported, send the command 010C (engine rpm), the answer should be in the form:
01 0C 41 0C 0B B8 >To obtain the value in revolutions per minute, you must receive the answer (0B B8 = 3000) divided by 4, i.e. we get 750 rpm
A list of supported commands and conversion formulas can be found here .
While you are experimenting with sending various commands, as well as receiving and decoding values, we will prepare the next part (s), which will deal with issues of working with multiple onboard controllers, what you need to know about command headers, reading and dumping errors, for which other MODE, "almost OBD-II", as well as other topics that may interest you.
Source: https://habr.com/ru/post/188488/
All Articles