Changing calculators on a website without programmers

Hi, Habr!
In this article, we will describe the use we have made to Excel Services technology, which is part of the SharePoint server, for building banking products calculators.
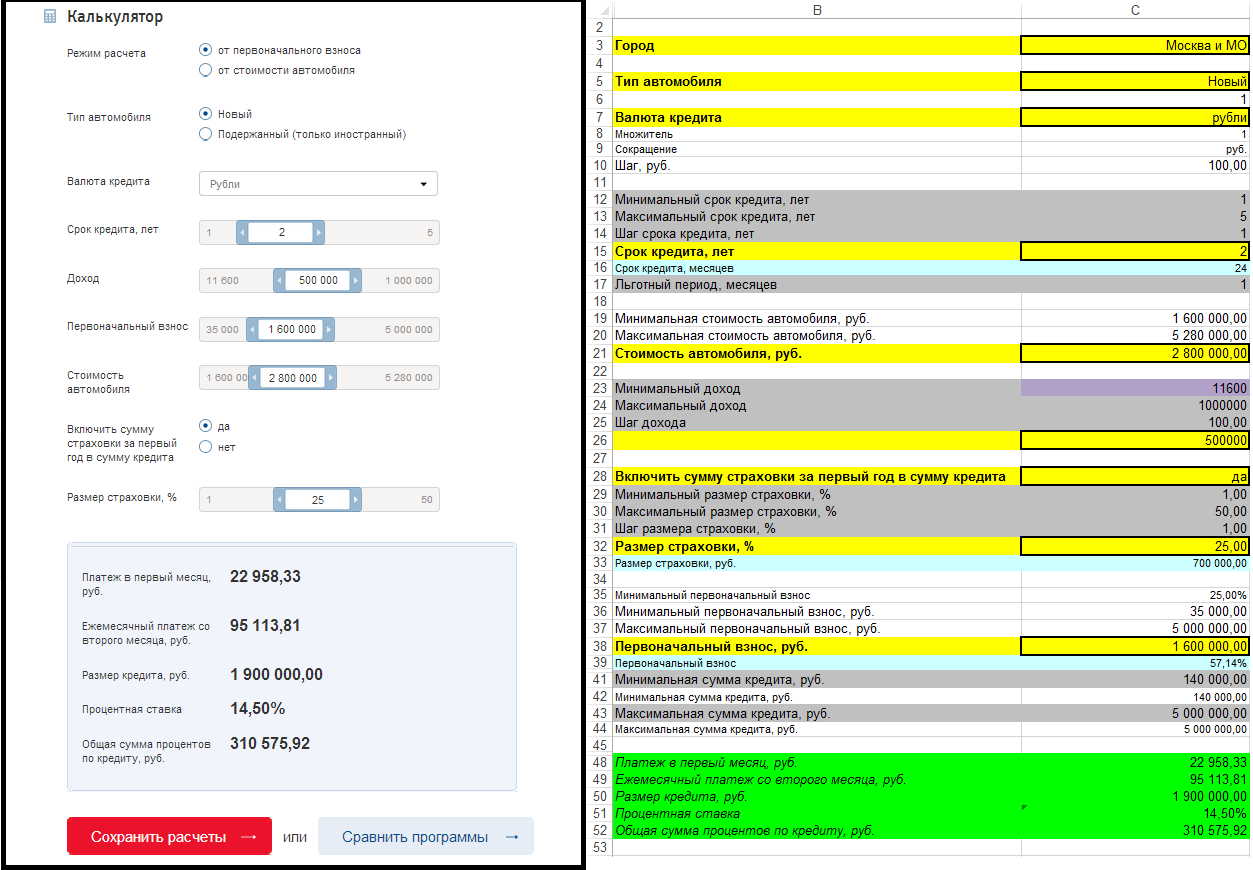
In 2011, we developed the website of VTB24 Bank, one of the important tasks that the new site should solve, was to provide a convenient tool for creating and maintaining calculators and applications related to bank products. For example, for the AvtoStandard credit product, the bank provides the site user with the opportunity to independently calculate the payout amount using a calculator, and if everything suits, you can send a request .
As usual, the calculator update process occurs.
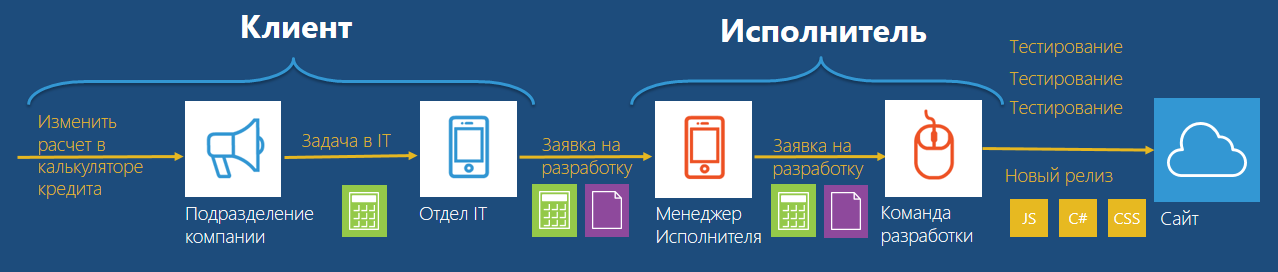
In most cases, the logic of calculating calculators is convenient for bank employees to draw up and coordinate in the form of Excel files, so the process of making changes to the calculator on the website may look like this:
')
If you need to make any changes or add a new product, a process with many participants starts:
- the customer’s specialists coordinate and describe the task (an Excel file with calculations and some TZ is generated);
- set the task to the performer;
- the contractor sets the task for the development team to implement a new calculation logic;
- The team adds a new calculator, or changes the logic of the old.
Depending on the “scale of the tragedy,” this process can take a long time. In our case, this situation did not suit the client, since the information should appear on the site in accordance with certain regulations. For example, new rates are already in effect, and the calculator is still counting on the old ones. Such tasks of the same type are usually not fun for the development team of the performer, it is better to create some new interesting service than to change the rates of products and the logic of calculations every day.
What we strive for
The ideal solution to this problem is to provide the client with the opportunity to independently change the calculation parameters and create new product calculators.

In terms of technical implementation, it might look like this:
- Excel itself considers everything, no transfer of formulas to other languages (JS, C #, etc.).
- use Excel Services technology or libraries for working with Excel;
- all data from the web form that the user enters is recorded on the data entry sheet;
- the book is being calculated;
- calculation results are read and displayed on a web form.
Benefit: The client himself can now change the file and upload the new logic to the site via the web interface.
- We create a web form designer with Excel mapping.
- we define all the fields that are needed to automate the available calculators;
- based on the list of fields, we obtain controls that can be used to automate all calculators (checkbox, radio group, slider, etc.);
- form the settings sheet and specify the web form controls, their values during initialization, boundary values for validation, and any other parameters that will be enough imagination;
- also on the settings sheet we indicate from which cells the result of the calculation will be read, which the user will see on the page.
Benefit: The client himself can now quite quickly create a calculator of a new standard product without involving a programmer.
This is, for example, the data entry and calculation sheet for the “AutoStandard” loan calculator of the VTB24 website:
Consider the approach to creating a calculator constructor.
Technical implementation
Since we had SharePoint 2010 as our platform for the VTB24 public site, Excel Services was the “engine” for calculators.
The tasks of the service do not include data visualization, it only provides program interfaces for working with Excel, a file loaded into memory, and allows you to load / save a file, access its cells for reading and writing, make calculations, and also provides REST API and web API service for these functions. More details about all the possibilities in this article.
Among the features of the service that are important for our task is that the source file is loaded for a user session that works with the portal, and calculations on the book of one user do not affect the calculation results of another user.

We also had to consider the possibility of horizontal scaling to several servers, if the capacity of one server is not enough to serve a large number of users. Among the major drawbacks, one can highlight the basic basic requirements of the software (Enterprise edition of the SharePoint server is required), and from the limitations - the lack of support for macros.
It's time to compile your simple calculator example.
What do we think?
In order to focus on the solution, and not on the intricacies of banking products, we did not take complex real formulas, on the basis of which, for example, the calculators of the VTB24 website work. For example, we have chosen a rather simple formula that allows you to calculate the monthly payment:

Where
A - monthly payment
S is the loan amount
p - interest rate per month
n - the number of months of repayment.
Start by preparing the file.
Create a sheet that will accept input for calculations.
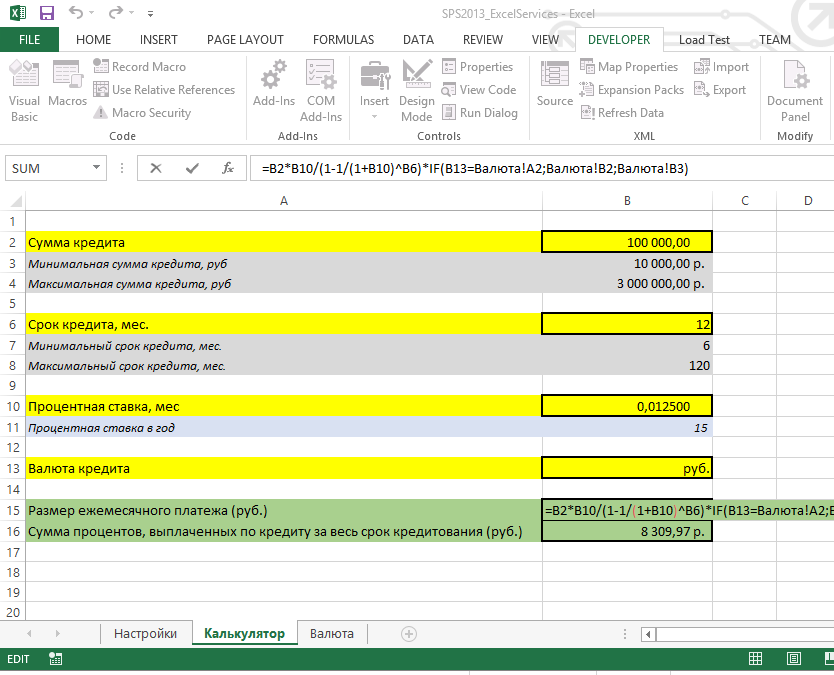
So, for user input fields are available: the loan amount, the number of months and the choice of currency. Interest rate is set to constant. As a result, we get the size of the monthly payment according to the formula chosen above.
Now we need to determine which controls will be available for the user to enter these values on the web form. For the interest of the example, let's take different controls. As a result, we will additionally receive the following sheets:
Sheet with settings . It contains everything you need so that the web form can draw and initialize the controls. For example, line number 3 indicates that the form must create a drop-down list, fill it with values from another Excel sheet (RangeSet column), select a default value and record the result of changing this field by the user in the cell specified in the PutCell column. Flight of fantasy is not limited by anything, and you can come up with any metadata that is needed to solve the problem (for example, some VTB24 calculators use dynamic recalculation of the minimum and maximum values of some fields depending on user input or mode switches - depending on the selected value radio groups use different sheets for calculations).

Leaf with reference books (in our case these are exchange rates).

Now the file contains all the necessary information and the portal administrator will only need to upload it to the SharePoint server and specify only two parameters in the settings: the path to the file and the name of the sheet with a range of cells for the settings.


Let's move on to creating a web interface and code for calculator constructor.
We read settings from a file and generate classes for future controls.
using Microsoft.Office.Excel.Server.WebServices; ………… /// <summary> /// Excel /// </summary> public List<CalculateControl> GetControlsInfo(List<CalculateControl> controls) { List<CalculateControl> controlInfoList = new List<CalculateControl>(); SessionId = ExcelService.OpenWorkbook(ExcelFileUrl, "ru-RU", "ru-RU", out status); string sheetName = SettingsPath.Split('!')[0]; string settingRange = SettingsPath.Split('!')[1]; // - , if (controls != null) Recalc(controls); /* , 3:8 * : * - , "" * - , ( Excel 2 ) */ int rowStart = int.Parse(settingRange.Split(':')[0].ToString().Substring(1)); int rowEnd = int.Parse(settingRange.Split(':')[1].ToString().Substring(1)); while (rowStart <= rowEnd) { string curRange = "A" + rowStart.ToString(); string cell = ExcelService.GetCellA1(SessionId, sheetName, curRange, false, out status).ToString(); if (cell == string.Empty) break; switch (cell) { case "DropDown": controlInfoList.Add(new CalculateControl { Type = CalculatorControlType.Dropdown, Name = GetCellValue(sheetName, "B", rowStart), DefaultVal = GetSingleVal(GetCellValue(sheetName, "G", rowStart)), Title = GetSingleVal(GetCellValue(sheetName, "C", rowStart)), ValueList = GetDropDownVal(GetSingleVal(GetCellValue(sheetName, "D", rowStart))), PutCell = GetCellValue(sheetName, "H", rowStart) }); break; case "Range": controlInfoList.Add(new CalculateControl { Type = CalculatorControlType.Range, Name = GetCellValue(sheetName, "B", rowStart), Title = GetCellValue(sheetName, "C", rowStart), DefaultVal = GetSingleVal(GetCellValue(sheetName, "G", rowStart)), MinVal = GetSingleVal(GetCellValue(sheetName, "E", rowStart)), MaxVal = GetSingleVal(GetCellValue(sheetName, "F", rowStart)), PutCell = GetCellValue(sheetName, "H", rowStart) }); break; case "SingleVal": controlInfoList.Add(new CalculateControl { Type = CalculatorControlType.SingleVal, Name = GetCellValue(sheetName, "B", rowStart), Title = GetCellValue(sheetName, "C", rowStart), DefaultVal = GetSingleVal(GetCellValue(sheetName, "G", rowStart)), }); break; } rowStart++; } ExcelService.CloseWorkbook(SessionId, out status); return controlInfoList; } private string GetCellValue(string sheetName, string colName, int rowIndex) { return GetCellValue(sheetName, string.Concat(colName, rowIndex)); } private string GetCellValue(string sheetName, string cell) { return ExcelService.GetCellA1(SessionId, sheetName, cell, false, out status).ToString(); } private List<string> GetDropDownVal(string rangeInf) { // – «'!B2:B4» // …………….. } private string GetSingleVal(string rangeInf) { var sheetName = rangeInf.Split('!')[0].ToString().Trim(); var cell = rangeInf.Split('!')[1].ToString().Trim(); return GetCellValue(sheetName, cell); } /// <summary> /// /// </summary> /// <param name="controls"></param> public void Recalc(List<CalculateControl> controls) { foreach (CalculateControl control in controls.Where(w => w.Type != CalculatorControlType.SingleVal)) { ExcelService.SetCellA1(SessionId, control.PutCell.Split('!')[0], control.PutCell.Split('!')[1], control.DefaultVal, out status); } ExcelService.CalculateWorkbook(SessionId, CalculateType.Recalculate, out status); } Create controls and initialization logic
/// <summary> /// - /// </summary> private void DrawCalculator() { pnlInput.Controls.Clear(); pnlOut.Controls.Clear(); foreach (CalculateControl control in controlsInfoList) { Label lbl = new Label {Text = control.Title }; if (control.Type.Equals(CalculatorControlType.Dropdown)) { DropDownList dd = new DropDownList { ClientIDMode = ClientIDMode.Static; EnableViewState = true; ID = control.Name; DataSource = control.ValueList; SelectedValue = control.DefaultVal; } dd.DataBind(); pnlInput.Controls.Add(lbl); pnlInput.Controls.Add(dd); pnlInput.Controls.Add(new HtmlGenericControl("br")); } if (control.Type.Equals(CalculatorControlType.Range)) { TextBox tbx = new TextBox { ClientIDMode = ClientIDMode.Static; EnableViewState = true; ID = control.Name; Text = control.DefaultVal; } pnlInput.Controls.Add(lbl); pnlInput.Controls.Add(tbx); pnlInput.Controls.Add(new HtmlGenericControl("br")); } if (control.Type.Equals(CalculatorControlType.SingleVal)) { HtmlGenericControl tbx = new HtmlGenericControl("input"); tbx.Attributes["id"] = control.Name; tbx.Attributes["Value"] = control.DefaultVal; pnlOut.Controls.Add(lbl); pnlOut.Controls.Add(new HtmlGenericControl("br")); pnlOut.Controls.Add(tbx); pnlOut.Controls.Add(new HtmlGenericControl("br")); } } } We receive on the page the ready form
As a result, we get a ready-made form on the page, when the input parameters of which change, the records are written into the specified Excel cells, the results are recalculated and new results are displayed on the page.

Note: to simplify the example, we didn’t do special controls for displaying “range” values for the amount and term of the loan. In our case, they will be needed only for client (javaScript) verification of the entered values.
Of course, before an enterprise-solution, this example should be significantly improved:
- bring logic to a separate web service;
- add asynchronous ajax page update requests;
- write logic on js for more user-friendly behavior of visual elements;
- make a more beautiful (convenient) design (for example, to enter the loan amount);
- etc.
In this simplified example, we set ourselves another task - to show the concept itself.
useful links
1. Excel Services Overview
2. Excel Services Architecture
3. Excel Web Services (developer section).
Nikita Klychnikov, SharePoint ADV / web-engineering development manager
Rustam Cafeev, SharePoint ADV / web-engineering developer
Source: https://habr.com/ru/post/188338/
All Articles