Creating a cross-platform Smart TV application based on the SmartBox library for Samsung, LG, Philips and others
Due to the keen interest in the previous article about the Smartbox library, which is intended to be the basis for any cross-platform SmartTv application, I decided to describe how to create such an application at once for three SmartTv device vendors:

So, in this article you will find a lot of useful information if you:
The article turned out to be "plump" and with a bunch of spoilers - because the table of contents:
* Due to the fact that this article is intended not only for developers - the first and, as it seemed to our team, more interesting, are the items on launching applications in emulators and end devices.
Having plunged into the development of SmartTv applications, you will eventually be forced to test your creation one way or another. Tao Testing for SmartTv consists of consecutive items:
Next we look at the last two steps on the path of the tester. The first item is not specific, and therefore you will find a lot of interesting things by simply launching the application and pressing the
')

Far away, as we found out, not corresponding to reality - these are emulators shipped with each SDK. ( Samsung , LG , Philips ) In the end, emulator launches should be nothing more than a self-test for you. And a workable application in the emulator cannot be considered deliberately workable on the device. And on the contrary, if something does not work for you in the emulator, it is not a fact that this is a fiasco.
Samsung took the next step in testing applications by running the lab on remote devices. In fact, these are real devices that allow you to check all the functions of your offspring that cannot be seen in emulators (for example, the player works with all formats, interaction with DRM systems).
To run our application, you must select a device on the laboratory website and follow the instructions:
")
We consider the easiest, in my opinion, the way to install and test applications on end user devices. For this we need:
You can use the public demo address http://immosmart.imtqy.com/smartbox/demo/demoApp/ , if you for some reason do not have an HTTP server to publish the application. However, I want to note that in order to be able to experiment, and to develop an application, an HTTP server is necessary (unless of course you are using alternative installation methods described in the vendors documentation)

In order to run the app on Samsung TV / BD. You need to create a
Now all that is left is to inform the device of your IP address with

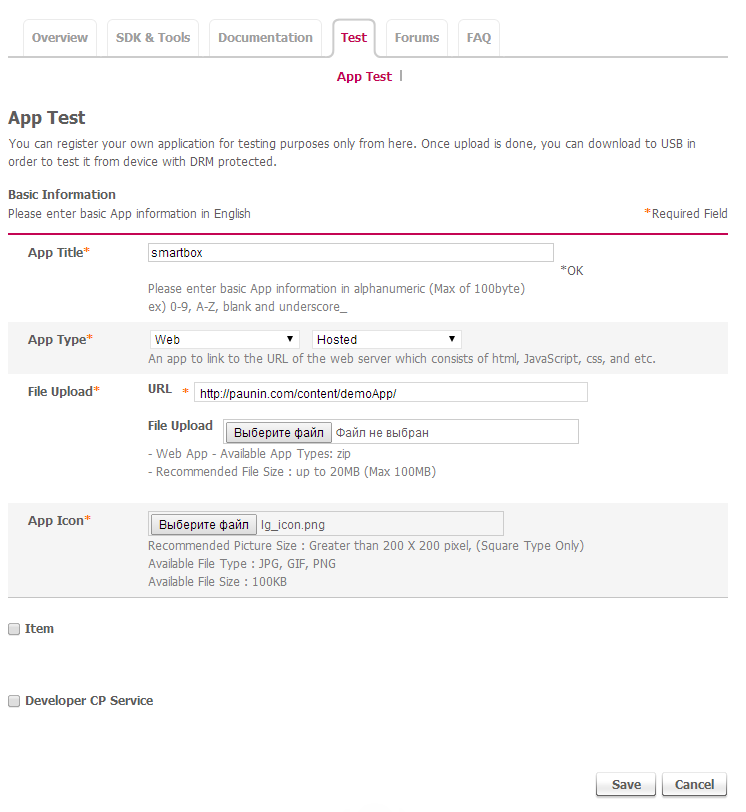
Probably the most exciting quest of all considered devices. To install the LG application, you must register it on the developer’s page (registration / authorization is required).
Fill in everything as indicated in the pictures and download the resulting file.
If someone needs it, I posted my file at http://paunin.com/content/lg_wrapper.zip .

To run on Philips SmartTv devices of the application, we just need to run it in the browser by specifying the HTTP address. In our case, we use the address http://paunin.com/content/demoApp/index.html . However, immediately after the launch of the browser, you will notice the native framework around the elements in focus, which is not acceptable for the combat application, and which in reality will not happen when placing the application in the LG hub.
Everything is solved by specifying the necessary headers from the server, namely "
I will consider, exclusively, the development of an application based on the Smartbox library. If you decide that the functionality of the library is not enough for the tasks facing you, you can always use the native methods of the platforms, having studied the documentation of the device vendor. Also, you can participate in the development and refinement of the project on gitHub .
For impatient - ready application

The configs of the application should be stored in several files, and all of them belong to the Samsung platform:
When you run our application, the
The most important thing to note here is the organization of navigation. All visible elements with the
Let's look into the
While the application is running, we want to show the user tips on the use of certain remote control keys. The easiest way is to update the legend depending on the event that occurred. This is actually the
Like any application, ours must have a data source for display, user interaction, or internal configuration. All our data for the scene
The scenes are just objects of the same structure, stored in the global
I will not dwell on the implementation of scenes, but will only describe the specifics related to the Smartbox library.
As mentioned above, the collection of video streams, after
To demonstrate the operation of the keyboard in the scene
,
!
, , pull request'
STB MAG 200/250
So, in this article you will find a lot of useful information if you:
- Beginner Smart'ist but have experience in classic js / html applications
- Advanced js / html developer and look for a platform for cross-platform SmartTV solution
- Beginner js / html developer and want to start with "Hardcore"
- A tester who needs to run applications developed by third parties
The article turned out to be "plump" and with a bunch of spoilers - because the table of contents:
- Application Testing
- Run in vendor emulators (and remote devices)
- Running on SmartTv TVs
- Application development
- Links to resources for developers
- Smartbox Library
* Due to the fact that this article is intended not only for developers - the first and, as it seemed to our team, more interesting, are the items on launching applications in emulators and end devices.
Application Testing
Having plunged into the development of SmartTv applications, you will eventually be forced to test your creation one way or another. Tao Testing for SmartTv consists of consecutive items:
- Testing in the browser
- Testing in vendor emulators
- Endpoint Testing
Next we look at the last two steps on the path of the tester. The first item is not specific, and therefore you will find a lot of interesting things by simply launching the application and pressing the
F12 key in the browser. Another “hack” in testing is the automation of this process. The library, for example, uses jasmine for tests in the launch environment.')
Run in vendor emulators
Far away, as we found out, not corresponding to reality - these are emulators shipped with each SDK. ( Samsung , LG , Philips ) In the end, emulator launches should be nothing more than a self-test for you. And a workable application in the emulator cannot be considered deliberately workable on the device. And on the contrary, if something does not work for you in the emulator, it is not a fact that this is a fiasco.
How to run the application in the Samsung emulator
To run the application in the latest version of the emulator you need: the emulator itself, which is the image for VirtualBox and is available for download on the SDK page After importing the image, you need to specify the path to the directory with your projects and start the virtual machine. The main thing that you should not forget is that the name of the directory in the virtual machine should be
(pictures are clickable)
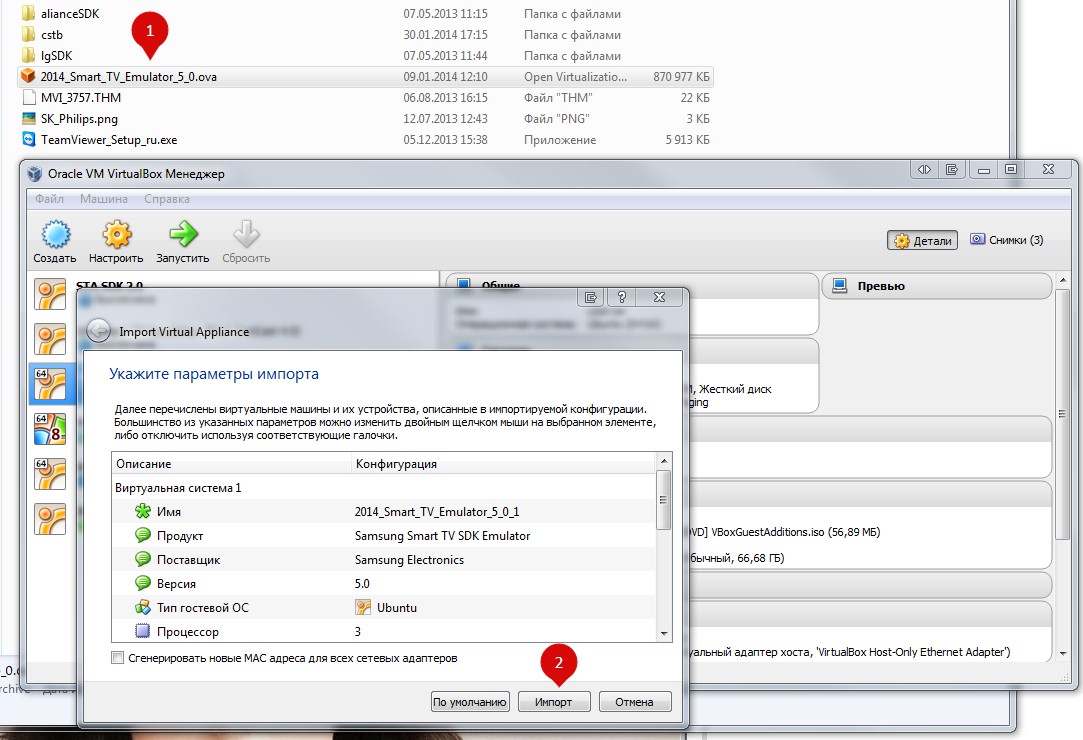
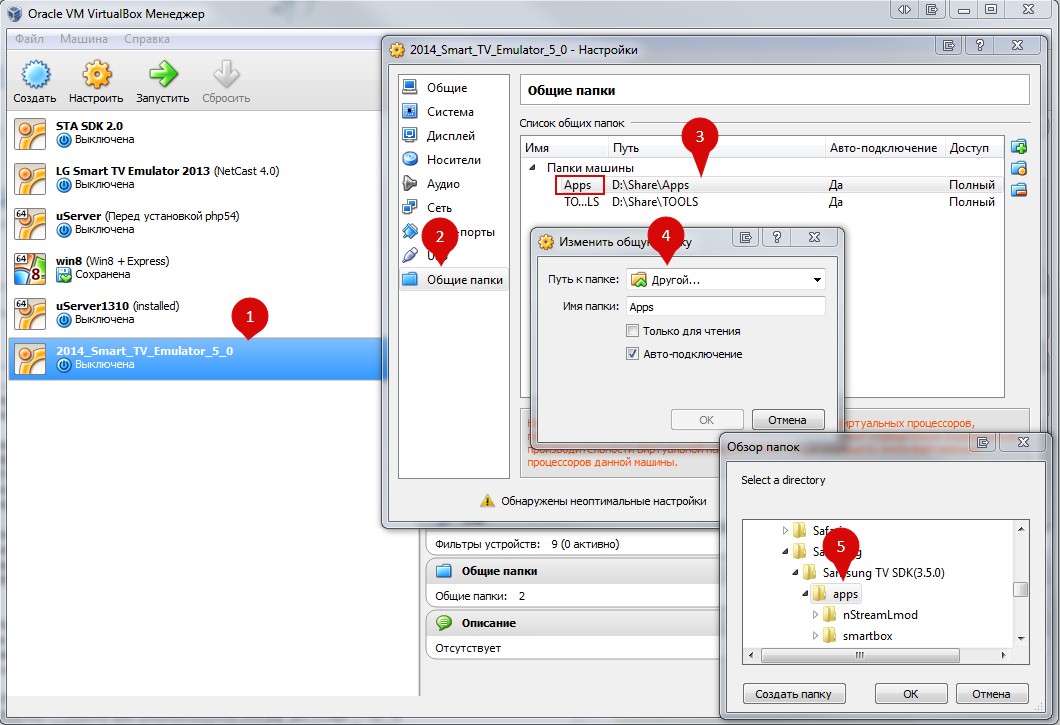
Apps with register. On the screenshots you will find explanations.(pictures are clickable)
How to run the application in the Samsung emulator (old SDK)
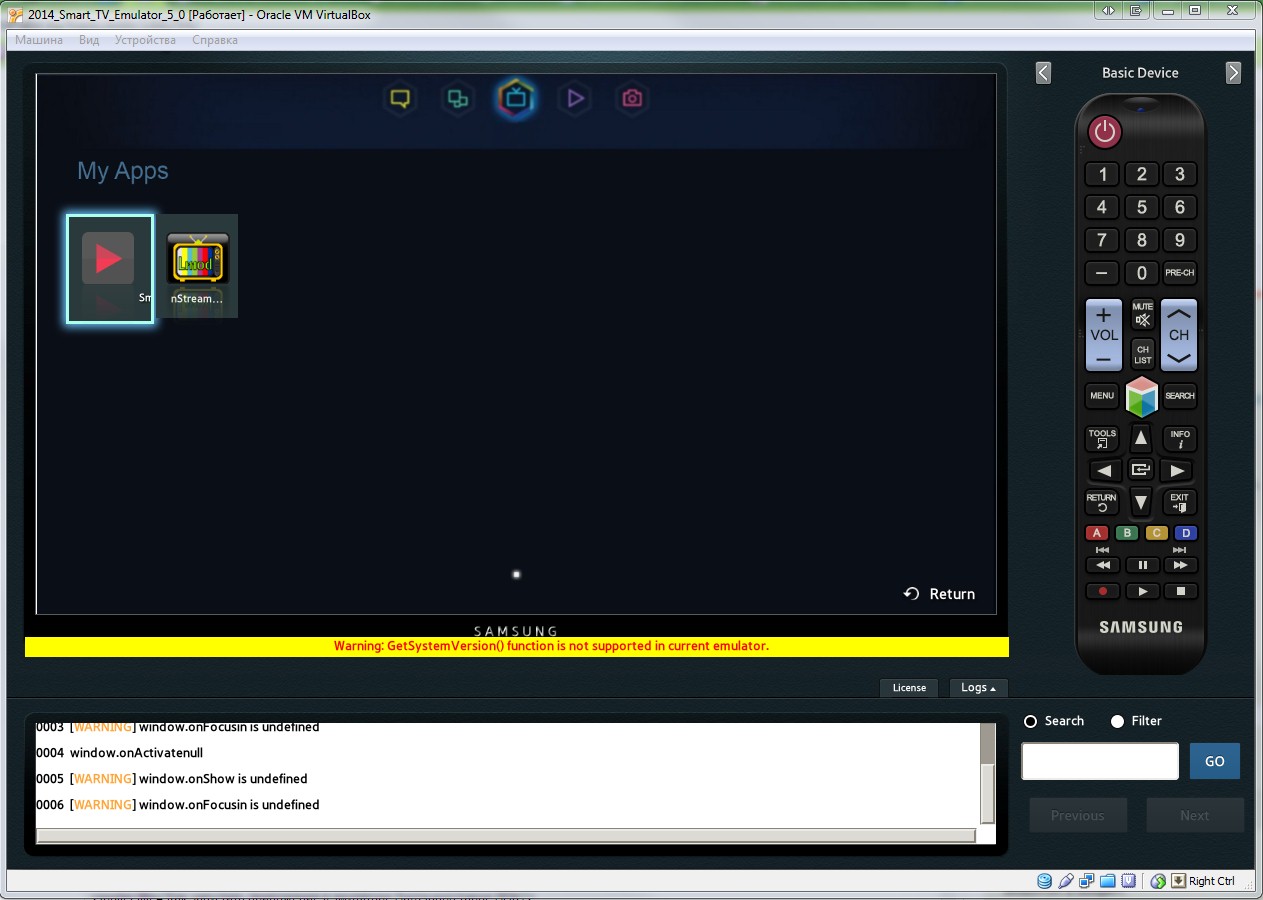
If you are developing an application using the official SDK, then there simply cannot be problems, there is a large launch button. In the case when you want to simply launch the application, you need to place the project in the application directory of the SDK and start the emulator by selecting the desired application. The pictures show how to do it.
(pictures are clickable)
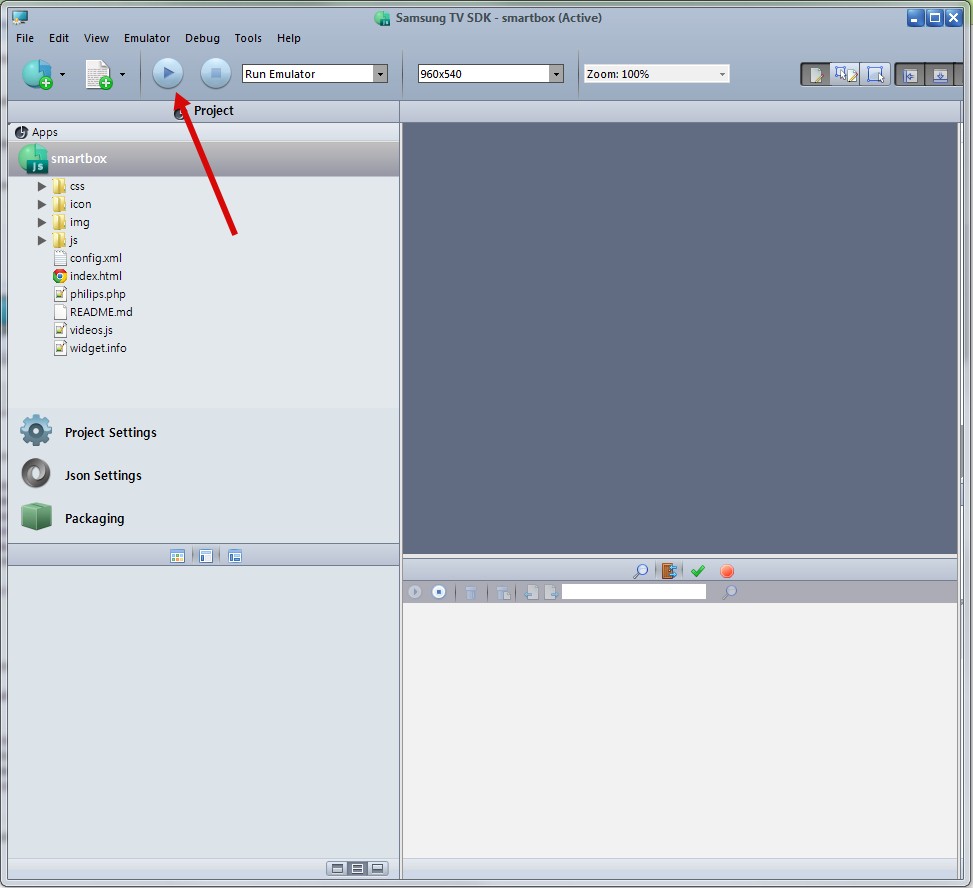
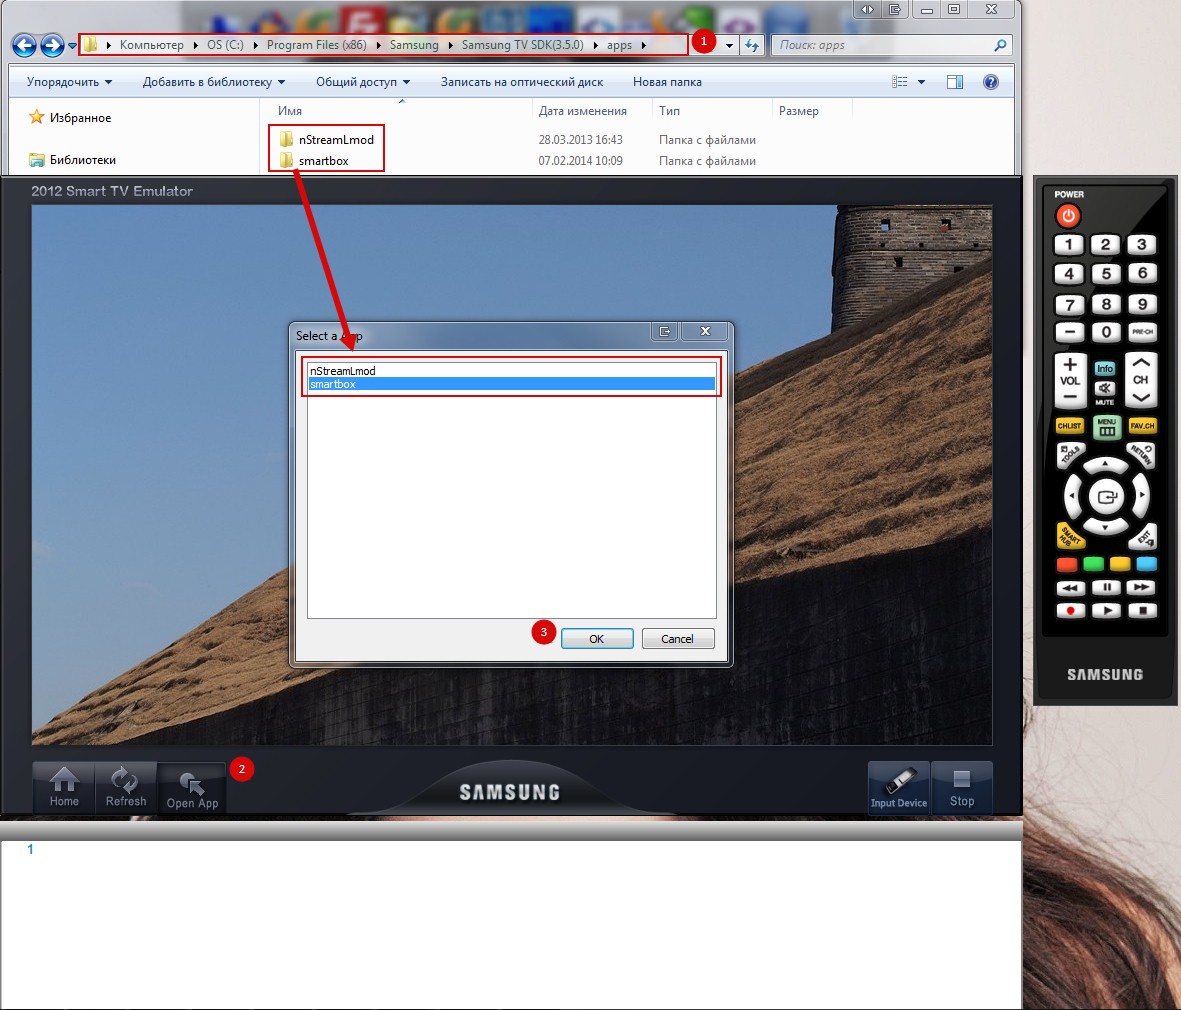

(pictures are clickable)
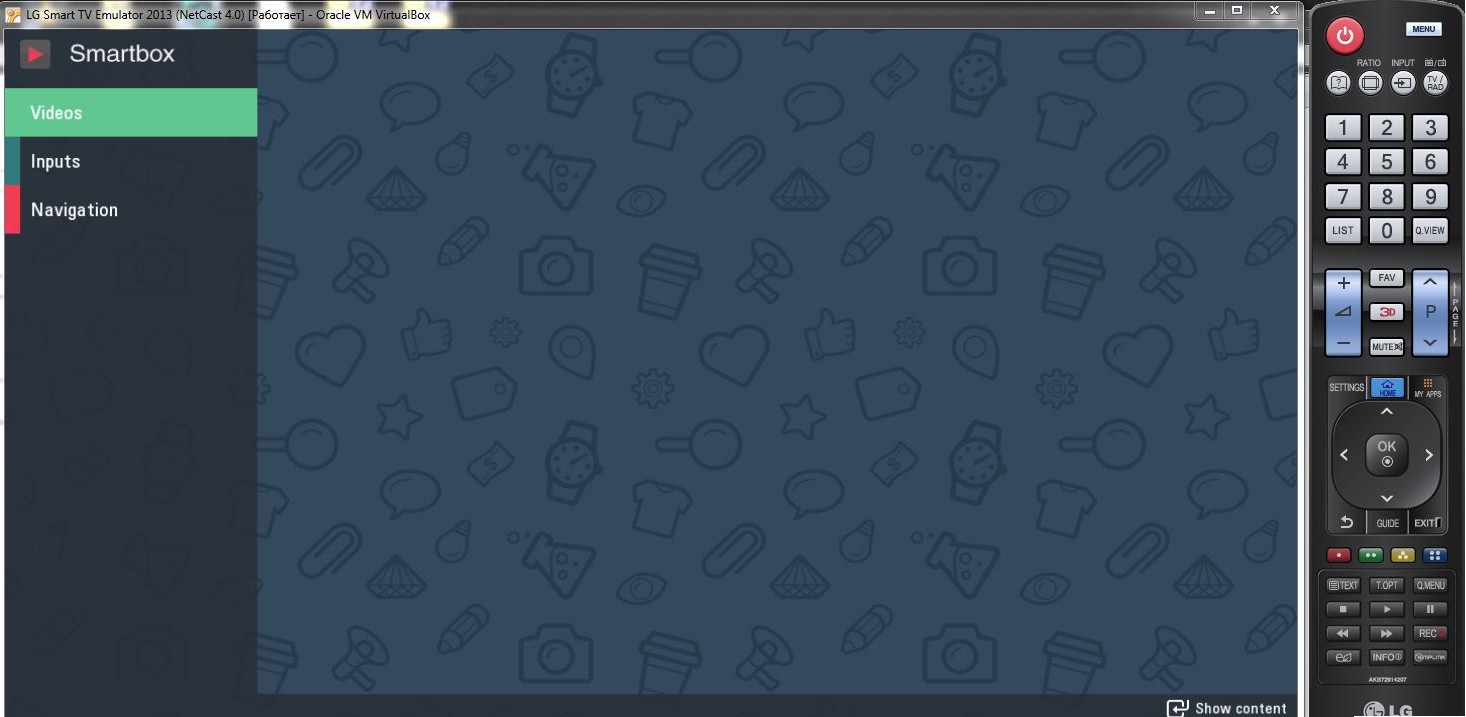
How to run the application in the LG emulator
After running the emulator, which is installed along with the SDK, and in fact is a virtual machine with the OS of the TV, you can specify the URL of your application (yes, the application should be accessible via http, it can be a local apache / denwer / nginx service). Pictures show a sequence of actions.
(pictures are clickable)

 >
>
(pictures are clickable)
>How to run the application in the Philips emulator
Perhaps the most "wonderful" thing that could happen to GUI developers is to get a console when launching an emulator. I will not say anything, see for yourself
(pictures are clickable)
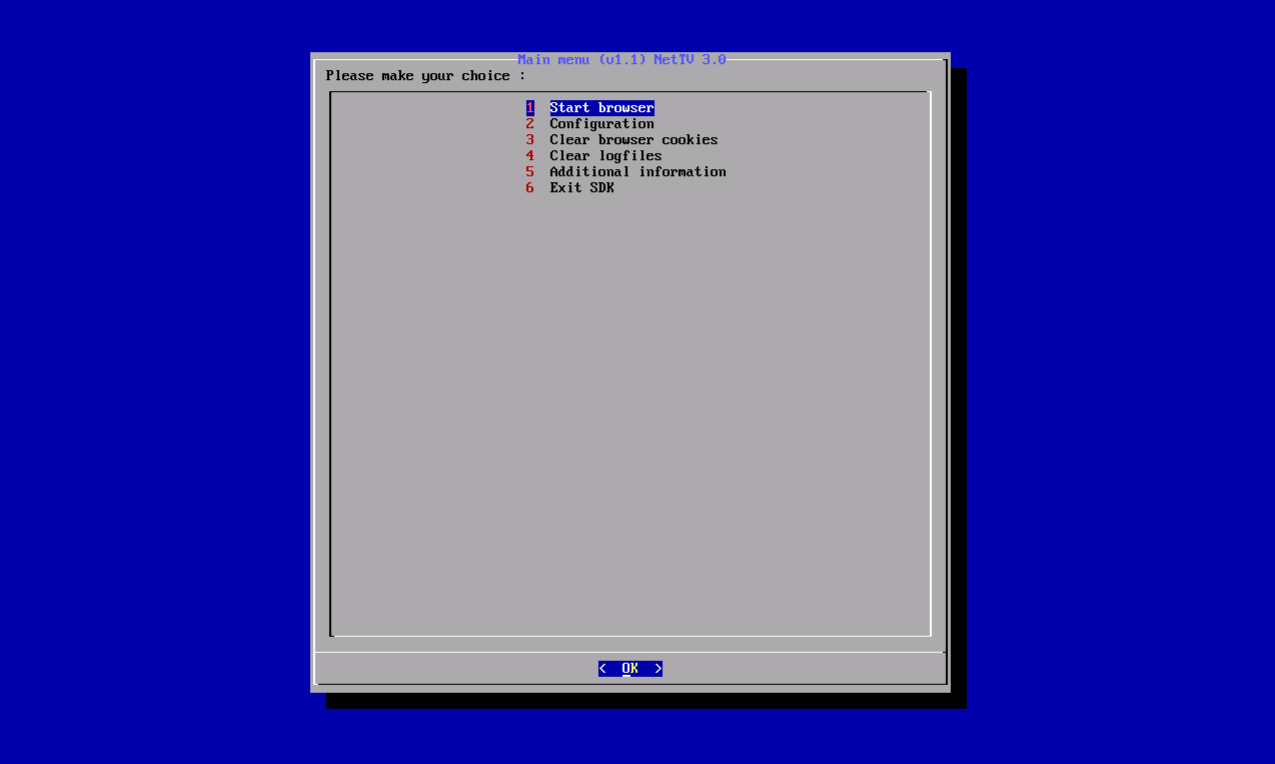

(pictures are clickable)
Samsung took the next step in testing applications by running the lab on remote devices. In fact, these are real devices that allow you to check all the functions of your offspring that cannot be seen in emulators (for example, the player works with all formats, interaction with DRM systems).
To run our application, you must select a device on the laboratory website and follow the instructions:
How to run the application in the Samsung Remote Test System
(pictures are clickable)


Running on SmartTv TVs
We consider the easiest, in my opinion, the way to install and test applications on end user devices. For this we need:
- Http server, with php support - for LG.
I posted the app at http://paunin.com/content/demoApp/index.html - The application itself, it can be taken in the repository of the Smartbox library , in the
demo/demoApp;
You can use the public demo address http://immosmart.imtqy.com/smartbox/demo/demoApp/ , if you for some reason do not have an HTTP server to publish the application. However, I want to note that in order to be able to experiment, and to develop an application, an HTTP server is necessary (unless of course you are using alternative installation methods described in the vendors documentation)
Brief instructions for all vendors (squeeze)
Samsung
10-12 platforms :
13 platform :
* In some cases, TV requires permission to install third-party applications, which is provided by the developer’s key, which can be obtained by contacting Samsung at RND ( http://samsungdforum.com/ ). Made by vendor to prevent illegal distribution of applications.
- The user logs into the account (button A on the remote)
- Type in the field Uch.zap. Samsung: develop
- In the password field: 123456 (any other should also fit)
- Selects "Login"
- Press the "Enter" button on the remote control
- Signed in
- Press the D button on the remote control (in some TV models the TOOLS button)
- Selects "Development"
- Press the "Enter" button on the remote control
- Selects "Configuring server IP address."
- Press the "Enter" button on the remote control
- Dials the IP address: 82.146.41.200
- Click on the remote control return
- Selects "User application sync"
- Press the "Enter" button on the remote control
- The application is being updated.
13 platform :
- Click the Smart Hub button
- Log in to the develop account (Menu - Smart Features -> Samsung Account -> Login (name: develop; password: sso1029dev!)
- On the Smart Hub screen there is a tab “More apps” below, you need to click on it.
- Select Options in the upper right corner of the screen.
- Select IP Settings from the drop down menu.
- Dial IP 82.146.41.200
- Select Options again in the upper right corner.
- Select App Sync from the dropdown list
* In some cases, TV requires permission to install third-party applications, which is provided by the developer’s key, which can be obtained by contacting Samsung at RND ( http://samsungdforum.com/ ). Made by vendor to prevent illegal distribution of applications.
LG
- Copy archive http://paunin.com/content/lg_drm.zip to USB-flash
- Unpack the archive, so that the path to the files is: Root usb-flash / lgapps / installed / etc.
- Insert USB-flash in the USB connector of the TV
- Turn on the TV (Power On on the Remote Control)
- Press Home on the remote control - there will be a transition to Smart TV LG
- Press the red button on the remote control - a form to enter the account will appear
- Type in login:% your login% (if there is no login - register, there are funds on the TV)
- Type in the password field% your password%
- Click OK - you will be logged into your account and go back to LG Smart TV
- Select "My Apps" in the lower right corner
- Press Page down (button to switch channels down) on the remote control - will switch to My applications on USB
- Launch the application
Philips
To launch applications on Philips TVs with the SmartTV function, open the http://goo.gl/o93keD link in the TV browser
Complete installation instructions
In order to run the app on Samsung TV / BD. You need to create a
widgetlist.xml in the root of the server which can be accessed by IP address. For example, http://xxx.xxx.xxx.xxx/widgetlist.xml. I posted the file at http://82.146.41.200/widgetlist.xml. The file is simply a list of applications to install. In the list of widgets, the main element is the download node, where the link to the zip-archive of your application is indicated. The remaining parameters do not matter, even the size. As you can see from our widget list, I zipped my application and folded it at http://paunin.com/content/smartbox.zip .Now all that is left is to inform the device of your IP address with
widgetlist.xml and update the applications. This is done by means of the device, depending on the model:10-12 platforms
- The user logs into the account (button A on the remote)
- Type in the field Uch.zap. Samsung: develop
- In the password field: 123456 (any other should also fit)
- Selects "Login"
- Press the "Enter" button on the remote control
- Signed in
- Press the D button on the remote control (in some TV models the TOOLS button)
- Selects "Development"
- Press the "Enter" button on the remote control
- Selects "Configuring server IP address."
- Press the "Enter" button on the remote control
- Dials the IP address: 82.146.41.200
- Click on the remote control return
- Selects "User application sync"
- Press the "Enter" button on the remote control
- The application is being updated.
13 platform
- Click the Smart Hub button
- Log in to the develop account (Menu - Smart Features -> Samsung Account -> Login (name: develop; password: sso1029dev!)
- On the Smart Hub screen there is a tab “More apps” below, you need to click on it.
- Select Options in the upper right corner of the screen.
- Select IP Settings from the drop down menu.
- Dial IP 82.146.41.200
- Select Options again in the upper right corner.
- Select App Sync from the dropdown list
Probably the most exciting quest of all considered devices. To install the LG application, you must register it on the developer’s page (registration / authorization is required).
Fill in everything as indicated in the pictures and download the resulting file.
If someone needs it, I posted my file at http://paunin.com/content/lg_wrapper.zip .
Register application
And now all that remains is to deliver the application (more precisely, its signature, the application itself is on the Internet) to the TV:(Pictures are clickable)

Application Installation - Formal Instruction
- Copy archive http://paunin.com/content/lg_drm.zip to USB-flash
- Unpack the archive, so that the path to the files is: Root usb-flash / lgapps / installed / etc.
- Insert USB-flash in the USB connector of the TV
- Turn on the TV (Power On on the Remote Control)
- Press Home on the remote control - there will be a transition to Smart TV LG
- Press the red button on the remote control - a form to enter the account will appear
- Type in login:% your login% (if there is no login - register, there are funds on the TV)
- Type in the password field% your password%
- Click OK - you will be logged into your account and go back to LG Smart TV
- Select "My Apps" in the lower right corner
- Press Page down (button to switch channels down) on the remote control - will switch to My applications on USB
- Launch the application
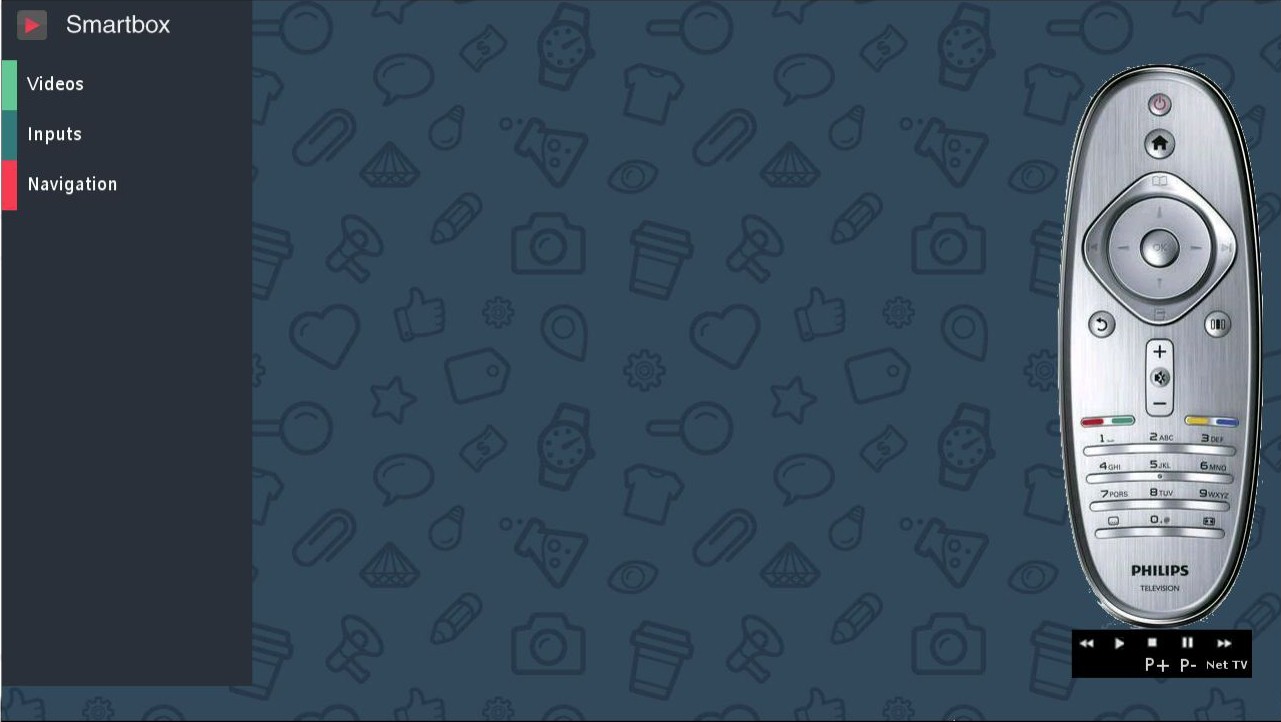
To run on Philips SmartTv devices of the application, we just need to run it in the browser by specifying the HTTP address. In our case, we use the address http://paunin.com/content/demoApp/index.html . However, immediately after the launch of the browser, you will notice the native framework around the elements in focus, which is not acceptable for the combat application, and which in reality will not happen when placing the application in the LG hub.
Everything is solved by specifying the necessary headers from the server, namely "
application/ce-html+xml ". This is handled by the philips.php philips.php present in the php application. Accordingly, we obtain an address of the type http://paunin.com/content/demoApp/philips.php . To speed up the address collection from the TV remote, you can use the service of shortening links, for example, http://goo.gl/ . I got the address http://goo.gl/o93keDApplication development
I will consider, exclusively, the development of an application based on the Smartbox library. If you decide that the functionality of the library is not enough for the tasks facing you, you can always use the native methods of the platforms, having studied the documentation of the device vendor. Also, you can participate in the development and refinement of the project on gitHub .
For impatient - ready application
Application structure
Application configuration
The configs of the application should be stored in several files, and all of them belong to the Samsung platform:
Parameters widget.info (only for Samsung)
This is a plain text file with parameters that speak for themselves, where the interesting parameter is
Screen Resolution , which determines the resolution for which your application is written, the currently recommended HD is 1280x720 . Valid: SD 960x540 and FullHD 1920x1080 Use Alpha Blending = Yes Screen Resolution = 1280x720 Config.xml settings (only for samsung)
Full dock
<?xml version="1.0" encoding="UTF-8"?> <widget> <voice>y</voice> <!-- --> <mouse>y</mouse> <!-- --> <previewjs itemtype="string"></previewjs> <preicon itemtype="string"></preicon> <cpname itemtype="string"></cpname> <cplogo itemtype="string"></cplogo> <cpauthjs itemtype="string"></cpauthjs> <ver itemtype="string">0.1</ver> <!-- --> <mgrver itemtype="string"></mgrver> <fullwidget itemtype="boolean">y</fullwidget> <srcctl itemtype="boolean">y</srcctl> <ticker itemtype="boolean">n</ticker> <childlock itemtype="boolean">n</childlock> <audiomute itemtype="boolean">y</audiomute> <!-- --> <videomute itemtype="boolean">y</videomute> <!-- --> <dcont itemtype="boolean">y</dcont> <widgetname itemtype="string">SmartBox DemoApp</widgetname> <!-- /, --> <description itemtype="string"></description> <!-- / --> <width itemtype="number">1280</width> <!-- - --> <height itemtype="number">720</height> <!-- - --> <author itemtype="group"> <!-- --> <name itemtype="string">Smart</name> <email itemtype="string">info@example.com</email> <link itemtype="string">https://github.com/immosmart/smartbox</link> <organization itemtype="string">Smart</organization> </author> <!-- ( ), --> <ThumbIcon itemtype="string">icon/sb_demo_115x95.png</ThumbIcon> <BigThumbIcon itemtype="string">icon/sb_demo_115x95.png</BigThumbIcon> <BigListIcon itemtype="string">icon/sb_demo_95x78.png</BigListIcon> <ListIcon itemtype="string">icon/sb_demo_85x70.png</ListIcon> </widget> Index.html
When you run our application, the
index.html file always opens, in which all libraries and our scripts are connected, and the initial layout is set.index.html with the description of the included files and layout
<?xml version="1.0" encoding="UTF-8"?> <!DOCTYPE html PUBLIC "-//W3C//DTD XHTML 1.0 Transitional//EN" "http://www.w3.org/TR/xhtml1/DTD/xhtml1-transitional.dtd"> <html xmlns="http://www.w3.org/1999/xhtml"> <head> <meta http-equiv="Content-Type" content="text/html; Charset=UTF-8"/> <title>Smartbox demo</title> <!-- --> <link rel="stylesheet" href="css/input.css"/> <link rel="stylesheet" href="css/keyboard.css"/> <link rel="stylesheet" href="css/legend.css"/> <!-- --> <link rel="stylesheet" href="css/style.css"/> <!-- Smartbox--> <script type="text/javascript" src="http://code.jquery.com/jquery-1.10.1.min.js"></script> <script type="text/javascript" src="http://cdnjs.cloudflare.com/ajax/libs/lodash.js/2.4.1/lodash.js"></script> <script type="text/javascript" src="http://cdnjs.cloudflare.com/ajax/libs/backbone.js/1.1.0/backbone-min.js"></script> <!-- Smartbox--> <script type="text/javascript" src="js/lib/smartbox.js"></script> <!-- --> <script type="text/javascript" src="js/app.js"></script> <!-- --> <script type="text/javascript" src="videos.js"></script> <!----> <script type="text/javascript" src="js/scenes/videos.js"></script> <script type="text/javascript" src="js/scenes/navigation.js"></script> <script type="text/javascript" src="js/scenes/input.js"></script> <!-- --> <script type="text/javascript" src="js/legendTriggers.js"></script> </head> <body> <!--for better view in browser--> <div class="bg"></div> <div class="wrap"> <!-- --> <div class="menu"> <div class="logo"></div> <ul class="menu-items" data-nav_type="vbox" data-nav_loop="true"> <li data-content='video' class="menu-item menu-item_green nav-item">Videos</li> <li data-content='input' class="menu-item menu-item_blue nav-item">Inputs</li> <li data-content='navigation' class="menu-item menu-item_red nav-item">Navigation</li> </ul> </div> <!--// --> <!----> <div class="scenes-wrapper"> <!-- ( scenes/videos.js )--> <div class="scene scene_video js-scene-video" data-nav_type="vbox" data-nav_loop="true"> <!--<div data-url="http://smartimmo.ru/uploaded/big_buck_bunny_480p_h264.mp4" data-type="vod" class="video-item nav-item">Big Buck Bunny</div> <div data-url="https://archive.org/download/ElephantsDream/ed_1024_512kb.mp4" data-type="vod" class="video-item nav-item">Elephants Dream</div> <div data-url="http://europaplus.cdnvideo.ru/europaplus-live/eptv_main.sdp/playlist.m3u8" data-type="hls" class="video-item nav-item">HLS test</div> <div data-url="http://phone.pik-tv.com/live/mp4:piktv3pik3tv/playlist.m3u8" data-type="hls" class="video-item nav-item">HLS test 2</div> <div data-url="http://live.iphone.redbull.de.edgesuite.net/webtvHD.m3u8" data-type="hls" class="video-item nav-item focus">HLS test 3</div>--> </div> <!--// --> <!-- input'--> <div class="scene scene_input js-scene-input"> <div class="input-example"> <h2>Standart input</h2> <input class="input-item js-input-1 nav-item"/> <div class="input-val"> Input value: <span class="js-input-1-val"></span> </div> </div> <div class="input-example"> <h2>Input with email keyboard</h2> <input class="input-item js-input-2 nav-item"/> </div> <div class="input-example"> <h2>Input with num keyboard and maximum 4 signs</h2> <input class="input-item js-input-3 nav-item"/> </div> </div> <!--// input'--> <!-- --> <div class="scene js-scene-navigation"> <ul class="navigation-items"> <li class="navigation-item nav-item">1</li> <li class="navigation-item nav-item">2</li> <li class="navigation-item nav-item">3</li> <li class="navigation-item nav-item">4</li> <li class="navigation-item nav-item">5</li> <li class="navigation-item nav-item">6</li> <li class="navigation-item nav-item">7</li> <li class="navigation-item nav-item">8</li> </ul> <p class="navigation-info"></p> </div> <!--// --> </div> <!--//--> </div> </body> </html> The most important thing to note here is the organization of navigation. All visible elements with the
nav-item class can receive focus on themselves and trigger events later ( focus , click , etc). To optimize navigation, in the sidebar and on the video scene, data-nav_type="vbox" , which tells the navigation plugin to "stop using direction search according to the position of elements on the page, and the focus starts moving from one sibling element to another, which is much faster" (c) Navigation documentation . Another hack is the data-nav_loop="true" attribute, which allows looping navigation within a given element.Main App Object
Let's look into the
js/app.js file js/app.js After initializing the Smartbox itself, the SB.ready(_.bind(App.initialize, App)); application SB.ready(_.bind(App.initialize, App)); is initialized SB.ready(_.bind(App.initialize, App)); , thereby launching the legend $$legend.show(); and adding event handlers this.setEvents(); from menu items, player, remote control keys. Additional comments in the file itself.Legend Change Triggers
While the application is running, we want to show the user tips on the use of certain remote control keys. The easiest way is to update the legend depending on the event that occurred. This is actually the
js/legendTriggers.js . With the focus nav_focus or the loss of focus nav_blur we give the window.$$legend.keys legend elements window.$$legend.keys different values that are immediately displayed with the corresponding icon.Video stream collection
Like any application, ours must have a data source for display, user interaction, or internal configuration. All our data for the scene
videos are stored in the file videos.js . This is just an example, and therefore a real application will probably receive data in a different way. All that this piece of code does is save an array of objects (with links to streams and their names) to the global application object window.App.videos = [...] . Further, in the scene file, this array will be expanded and inserted into html in div.scene_video .Application scenes
The scenes are just objects of the same structure, stored in the global
window.App object, which are shown and hidden depending on which menu element was clickCode responsible for showing scenes
Hanging events by clicking on the menu items:
The method initiates the display of scenes:
//js/app.js $('.menu').on('click', '.menu-item', function ( e ) { var scene = e.currentTarget.getAttribute('data-content'); self.showContent(scene); });) The method initiates the display of scenes:
//js/app.js showContent: function ( scene ) { var cur = this.currentScene, newScene = this.scenes[scene]; if ( cur !== newScene ) { if ( !newScene ) { $$error('Scene ' + scene + ' doesn\'t exist'); } else { if ( cur ) { cur.hide(); } newScene.show(); this.currentScene = newScene; } } } I will not dwell on the implementation of scenes, but will only describe the specifics related to the Smartbox library.
videos.js
As mentioned above, the collection of video streams, after
this.renderItems(App.videos); in html this.renderItems(App.videos); , becomes available for navigation due to the class in the element nav-item . When a scene is initialized, all video streams get the event handler this.$el.on('click', '.video-item', this.onItemClick); where the Player.play(...) stream Player.play(...) . Documentation on the player .input.js
To demonstrate the operation of the keyboard in the scene
input , a keyboard is connected to each separate input field via the SBInput method. ., email
js-input-2 , , click : //js/scene/input.js this.$el.find('.js-input-2').SBInput({ keyboard: { type: 'email' } }); navigation.js
,
nav_focus nav_blur navigation-item , . //js/scene/navigation.js init: function () { var $info; this.$el = $('.js-scene-navigation'); $info = this.$el.find('.navigation-info'); this.$el .find('.navigation-item') .on( { 'nav_focus': function () { $info.html('Item with text "' + this.innerHTML + '" focused'); }, 'nav_blur': function () { $info.html(''); } }); _inited = true; } Smartbox
!
PS
, , pull request'
UPD
STB MAG 200/250
Source: https://habr.com/ru/post/188294/
All Articles