Android component from scratch
Hello! Creating your own interface components is often a necessity to stand out from the general mass of similar programs. This article just discusses the creation of a simple, non-standard component on the example of a timer button.
Develop a button-slider that works as follows: a rectangular area, on the left is a block with an arrow showing the direction of the shift:
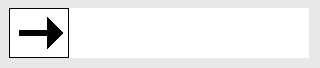
The user clamps the arrow and translates it to the right, as far as a withdrawal, the arrow pulls out the colored squares:

As soon as the user releases the block, the entire line shifts to the left and hides all the blocks shown. After hiding the last block, a broadcast message should be generated that the tape is completely hidden.
To create a new component, create a new project. Next, create a new class with the name “CustomButton”, using the class “View” as the ancestor. Next, create a class constructor and as a result, our future component will look like:
Now we start writing the class code. Before you start writing code, discard the / res / drawable-hdpi folder, the image of a multicolored tape. In the constructor, you first need to initialize all the objects and make all the preliminary settings. Do the following:
1 - Copy the link to the context of the main activity;
2 - Load the prepared blank strip divided by colored squares;
3 - Set up the component necessary for drawing on the surface /
Also declare objects at the beginning of the class:
Now we need to override the procedure for setting the size of the component - onMeasure. I specially made the constant sizes for a component (300 * 50) not to complicate an example. The procedure will be:
Now override the procedure for redrawing the onDraw component. This procedure is called whenever a component needs to be redrawn. The procedure will be:
Preparation for our new component is ready, let's put it on the main activity. First we place on the main surface a new LinearLayout, under the name "LinearLayout1". Next, in the class constructor, create a class for the new button, create the implementation class “LinearLayout1” and add a button to the surface. Activity class will be:
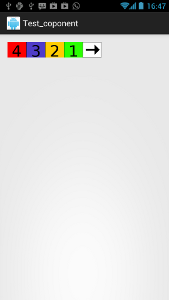
If you run the project for execution on the device (emulator) you will see something like the following:
Now we will start the implementation of animation and reaction to external events. When a user clicks on an interface component whose ancestor is View, events are automatically generated, in particular, you can track the coordinates of a click on a component, and the steps of the click (clicked, moved, pressed). Therefore, you need to override the onTouchEvent procedure, which is responsible for external events. The procedure has one argument “MotionEvent event”, it contains all the parameters of the current event. Extract these parameters as follows:
We give the procedure to the following form:
I will not paint each line, I will define only the main idea. The user clicks on the component arrow, this action is fixed in the variable _Last_Action = 1, we also fix that the user has not pulled a single dice out of the tape - _X = 0. Next, we track the movement of the finger along the component and calculate how many cubes should appear on the screen, for this we calculate _X . Forced redrawing is done using the invalidate () command. At the end, we fix the release of a finger and start the timer if the user draws at least one cube. The timer is necessary to return the strip to its original state not sharply, but gradually.
')
Now we implement the timer itself, which will return the strip to its original position. The timer code will be:
In this procedure, the operation of decreasing the value of the variable _X by 1 occurs cyclically, thereby showing which sector should be shown on the component. Since the additional streams cannot affect the appearance of the component, it is necessary to send redraw messages via Handle. Therefore, in the class constructor, add the implementation of intercepting messages for Handle and redrawing the appearance of the widget:
Now it remains to change the procedure for redrawing the widget, namely, the line of positioning the tape on the surface (the width of one square on the tape is 60 pix, and the total length is 300 pix):
Add all variables to the beginning of the class implementation.
As a result, the class will look like:
We won’t be very tricky, we’ll realize the event that “the tape is hidden” with the help of broadcast messages. In the implementation of the timer, add the lines for sending messages:
The variable "Name" stores the name of our component. To save the name, create an additional procedure:
Add the name of the component to the object declaration block - public String Name.
Now in the constructor of our activity, we will add the interceptor of broadcast messages:
After creating the button object creation line, add a new name transfer string to the object:
Everything, not a standard component is ready, start testing!
So it should turn out ideally - http://youtu.be/3iGxOlWHB0w
The archive of the example with all the comments can be downloaded from the following link - http://www.anprog.com/documents/Line_timer.zip
The task:
Develop a button-slider that works as follows: a rectangular area, on the left is a block with an arrow showing the direction of the shift:
The user clamps the arrow and translates it to the right, as far as a withdrawal, the arrow pulls out the colored squares:
As soon as the user releases the block, the entire line shifts to the left and hides all the blocks shown. After hiding the last block, a broadcast message should be generated that the tape is completely hidden.
Training
To create a new component, create a new project. Next, create a new class with the name “CustomButton”, using the class “View” as the ancestor. Next, create a class constructor and as a result, our future component will look like:
package com.racckat.test_coponent; import android.content.Context; import android.util.AttributeSet; import android.view.View; public class CustomButton extends View { public CustomButton(Context context, AttributeSet attrs) { super(context, attrs); // TODO Auto-generated constructor stub } } Now we start writing the class code. Before you start writing code, discard the / res / drawable-hdpi folder, the image of a multicolored tape. In the constructor, you first need to initialize all the objects and make all the preliminary settings. Do the following:
1 - Copy the link to the context of the main activity;
2 - Load the prepared blank strip divided by colored squares;
3 - Set up the component necessary for drawing on the surface /
public CustomButton(Context context, AttributeSet attrs) { super(context, attrs); _Context = context; // // _BMP_line = BitmapFactory.decodeResource(getResources(),R.drawable.line); // mPaint = new Paint(); mPaint.setAntiAlias(true); mPaint.setTextSize(16); mPaint.setColor(0xFFFFFFFF); mPaint.setStyle(Style.FILL); } Also declare objects at the beginning of the class:
private Paint mPaint; // public Bitmap _BMP_line; // Context _Context; // Now we need to override the procedure for setting the size of the component - onMeasure. I specially made the constant sizes for a component (300 * 50) not to complicate an example. The procedure will be:
@Override protected void onMeasure (int widthMeasureSpec, int heightMeasureSpec) { setMeasuredDimension(300, 50); } Now override the procedure for redrawing the onDraw component. This procedure is called whenever a component needs to be redrawn. The procedure will be:
@Override protected void onDraw(Canvas canvas) { super.onDraw(canvas); canvas.drawRect(0,0, 300, 50, mPaint); canvas.drawBitmap(_BMP_line, 0, 0,null); } Preparation for our new component is ready, let's put it on the main activity. First we place on the main surface a new LinearLayout, under the name "LinearLayout1". Next, in the class constructor, create a class for the new button, create the implementation class “LinearLayout1” and add a button to the surface. Activity class will be:
package com.racckat.test_coponent; import android.os.Bundle; import android.annotation.SuppressLint; import android.app.Activity; import android.widget.LinearLayout; public class MainActivity extends Activity { @SuppressLint("WrongCall") @Override protected void onCreate(Bundle savedInstanceState) { super.onCreate(savedInstanceState); setContentView(R.layout.activity_main); LinearLayout _LL1 = (LinearLayout) findViewById(R.id.LinearLayout1); CustomButton _CB1 = new CustomButton(MainActivity.this, null); _LL1.addView(_CB1); } } If you run the project for execution on the device (emulator) you will see something like the following:
Functional
Now we will start the implementation of animation and reaction to external events. When a user clicks on an interface component whose ancestor is View, events are automatically generated, in particular, you can track the coordinates of a click on a component, and the steps of the click (clicked, moved, pressed). Therefore, you need to override the onTouchEvent procedure, which is responsible for external events. The procedure has one argument “MotionEvent event”, it contains all the parameters of the current event. Extract these parameters as follows:
Float X=(Float)event.getX(); // X Float Y=(Float)event.getY(); // Y int Action=event.getAction(); // We give the procedure to the following form:
@Override public boolean onTouchEvent(MotionEvent event) { // Float X=(Float)event.getX(); // X Float Y=(Float)event.getY(); // Y int Action=event.getAction(); // if((Action==MotionEvent.ACTION_DOWN)&&(X<60)&&(_Last_Action==0)) { _Last_Action = 1; // _X = 0; } if((Action==MotionEvent.ACTION_MOVE)&&(_Last_Action == 1)) { _X = (int) (X/60); if (_X>4) _X=4; // , if (_X<0) _X=0; invalidate(); // } if (Action==MotionEvent.ACTION_UP){ _Last_Action = 2; if (_X>0) MyTimer(); // else _Last_Action = 0; } return true; } I will not paint each line, I will define only the main idea. The user clicks on the component arrow, this action is fixed in the variable _Last_Action = 1, we also fix that the user has not pulled a single dice out of the tape - _X = 0. Next, we track the movement of the finger along the component and calculate how many cubes should appear on the screen, for this we calculate _X . Forced redrawing is done using the invalidate () command. At the end, we fix the release of a finger and start the timer if the user draws at least one cube. The timer is necessary to return the strip to its original state not sharply, but gradually.
')
Now we implement the timer itself, which will return the strip to its original position. The timer code will be:
// public void MyTimer(){ Thread t = new Thread(new Runnable() { public void run() { for(;;){ try { TimeUnit.MILLISECONDS.sleep(500); } catch (InterruptedException e) {e.printStackTrace();} _X--; myHandler.sendEmptyMessage(0); if (_X==0){// myHandler.sendEmptyMessage(0); // _Last_Action = 0; // break; // } } } }); t.start(); } In this procedure, the operation of decreasing the value of the variable _X by 1 occurs cyclically, thereby showing which sector should be shown on the component. Since the additional streams cannot affect the appearance of the component, it is necessary to send redraw messages via Handle. Therefore, in the class constructor, add the implementation of intercepting messages for Handle and redrawing the appearance of the widget:
myHandler = new Handler() { public void handleMessage(android.os.Message msg) { if (msg.what==0){ invalidate(); // } } }; Now it remains to change the procedure for redrawing the widget, namely, the line of positioning the tape on the surface (the width of one square on the tape is 60 pix, and the total length is 300 pix):
canvas.drawBitmap(_BMP_line, (_X*60)-240, 0,null); Add all variables to the beginning of the class implementation.
As a result, the class will look like:
package com.racckat.test_coponent; import java.util.concurrent.TimeUnit; import android.content.Context; import android.graphics.Bitmap; import android.graphics.BitmapFactory; import android.graphics.Canvas; import android.graphics.Paint; import android.graphics.Paint.Style; import android.os.Handler; import android.util.AttributeSet; import android.view.MotionEvent; import android.view.View; public class CustomButton2 extends View { private Paint mPaint; // public Bitmap _BMP_line; // int _Last_Action; // int _X = 0; // public Handler myHandler; // Context _Context; // public CustomButton(Context context, AttributeSet attrs) { super(context, attrs); _Context = context; // // _BMP_line = BitmapFactory.decodeResource(getResources(),R.drawable.line); // mPaint = new Paint(); mPaint.setAntiAlias(true); mPaint.setTextSize(16); mPaint.setColor(0xFFFFFFFF); mPaint.setStyle(Style.FILL); myHandler = new Handler() { public void handleMessage(android.os.Message msg) { if (msg.what==0){ invalidate(); // } } }; } @Override public boolean onTouchEvent(MotionEvent event) { // Float X=(Float)event.getX(); // X Float Y=(Float)event.getY(); // Y int Action=event.getAction(); // if((Action==MotionEvent.ACTION_DOWN)&&(X<60)&&(_Last_Action==0)) { _Last_Action = 1; // _X = 0; } if((Action==MotionEvent.ACTION_MOVE)&&(_Last_Action == 1)) { _X = (int) (X/60); if (_X>4) _X=4; // , if (_X<0) _X=0; invalidate(); // } if (Action==MotionEvent.ACTION_UP){ _Last_Action = 2; if (_X>0) MyTimer(); // else _Last_Action = 0; } return true; } // public void MyTimer(){ Thread t = new Thread(new Runnable() { public void run() { for(;;){ try { TimeUnit.MILLISECONDS.sleep(500); } catch (InterruptedException e) {e.printStackTrace();} _X--; myHandler.sendEmptyMessage(0); if (_X==0){// myHandler.sendEmptyMessage(0); // _Last_Action = 0; // break; // } } } }); t.start(); } @Override protected void onMeasure (int widthMeasureSpec, int heightMeasureSpec) { setMeasuredDimension(300, 50); } @Override protected void onDraw(Canvas canvas) { super.onDraw(canvas); canvas.drawRect(0,0, 300, 50, mPaint); canvas.drawBitmap(_BMP_line, (_X*60)-240, 0,null); } } External messages
We won’t be very tricky, we’ll realize the event that “the tape is hidden” with the help of broadcast messages. In the implementation of the timer, add the lines for sending messages:
// Intent intent1 = new Intent("com.anprog.develop.timer_button_alarm"); intent1.putExtra(Name, 1); _Context.sendBroadcast(intent1); // The variable "Name" stores the name of our component. To save the name, create an additional procedure:
public void SetName(String _name){ Name = _name; } Add the name of the component to the object declaration block - public String Name.
Now in the constructor of our activity, we will add the interceptor of broadcast messages:
// BroadcastReceiver _br = new BroadcastReceiver() { // @Override public void onReceive(Context arg0, Intent intent) { int status_alarm_line_button_1 = intent.getIntExtra("line_button_1", 0); if (status_alarm_line_button_1==1) { // Toast toast = Toast.makeText(getApplicationContext(),"Line alarm!!!", Toast.LENGTH_SHORT); toast.show(); } } }; registerReceiver(_br, new IntentFilter("com.anprog.develop.timer_button_alarm")); After creating the button object creation line, add a new name transfer string to the object:
_CB1.SetName("line_button_1"); // Everything, not a standard component is ready, start testing!
So it should turn out ideally - http://youtu.be/3iGxOlWHB0w
The archive of the example with all the comments can be downloaded from the following link - http://www.anprog.com/documents/Line_timer.zip
Source: https://habr.com/ru/post/188092/
All Articles