Develop Java cloud applications in Eclipse
In this article we will talk about the Windows Azure Toolkit tools for Eclipse and the development of Java cloud applications using them.
Windows Azure Toolkit for Eclipse is an open source toolkit that adds functionality to the Eclipse development environment and allows Java application developers to conveniently develop, manage, and publish applications to the Windows Azure cloud .
')
You can find out more about the project at the following links:
To install the Windows Azure Toolkit for Eclipse add-on, you need a Windows 7 or 8 operating system, or Windows Server 2008 or 2012. The tools support JDK version 1.6 or higher and integrate into the Eclipse IDE for Java EE. You also need a set of Windows Azure SDK 2.0 tools that can be automatically installed when you first create a project in Eclipse.
To host applications in the cloud and run them locally, you need one of the Java application servers of your choice: Tomcat, GlassFish, Jboss, or Jetty. We will use Tomcat 7.0 in this article.

To install Windows Azure Toolkit for Eclipse, launch Eclipse and go to the menu item Help -> Install new software.
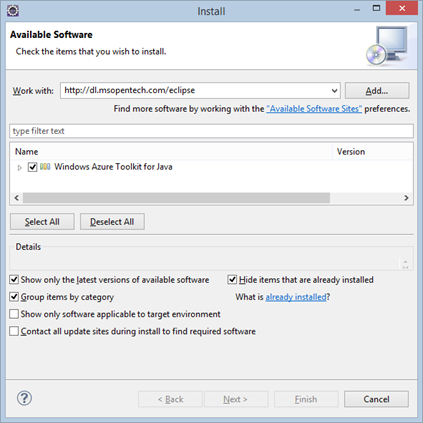
Enter http://dl.msopentech.com/eclipse in the "Work with" field. Select Windows Azure Toolkit for Eclipse from the list and click Next to customize the installation or Finish to install all the default components.

Create a "Dynamic Web Project" project in Eclipse and add a new JSP file under any name with the "New JSP File (html)" template to WebContent. Modify this file to your liking. You should have the picture shown in the picture.

Right-click on the project and select the menu item Windows Azure -> Package for Windows Azure. A wizard will prepare the placement of the project in the cloud. Enter the project name and click Next.

Make sure that the automatically set path to the local JDK location is correct and set the "Automatically upload the local JDK ..." parameter. Click "Next".

Select from the list the server option for running applications that you use locally and plan to use in the cloud. If necessary, manually set the path to this server on your disk. Select the option "Automatically upload the local server ...". Click "Next".
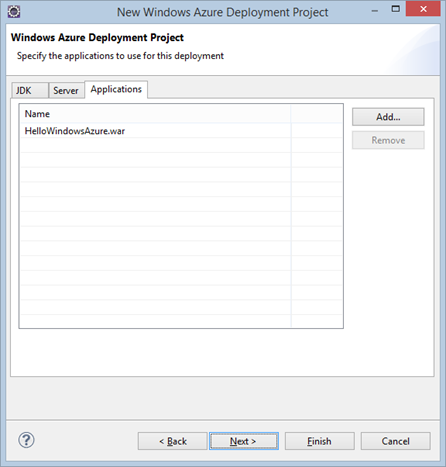
Make sure that the war file is added to the application list. Click "Next".
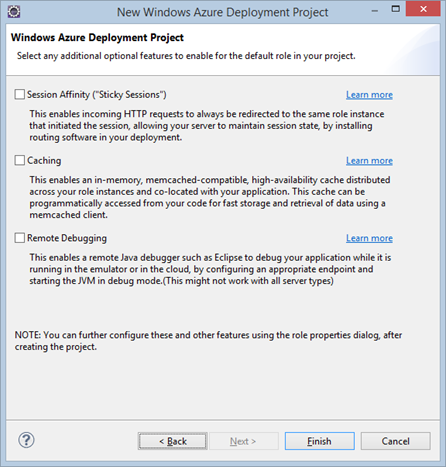
Optionally, enable one of the additional mechanisms for your cloud application: support for sticky sessions, support for caching, support for remote debugging of code. Click "Finish".

A new customized package will be created and added to Project Explorer for publishing to the Windows Azure cloud environment.
Select the package in the list and click the menu item "Run in Windows Azure Emulator"


The project will be launched in the local Windows Azure computing power emulator. The startup process will be displayed in detail in the Eclipse console.

During startup, you may see a request for permission to access the network from a UAC system, simply confirm this request. After a few seconds, your application server will start (in my case, Tomcat).

And the local emulator of computing power of Windows Azure.

Launch your browser and go to http: // localhost: 8080 / HelloWindowsAzure / NewFile.jsp - where NewFile.jsp is the name of the file you created and modified. You will see a working Java web application code ready for posting in Windows Azure.
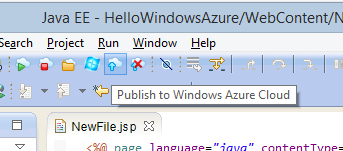
Create an empty cloud services (Cloud Services) in Windows Azure. Stop the local code execution if the project was started and select the "Publish to Windows Azure Cloud" option.

You will need to download the Windows Azure subscription information. Click the "Import PUBLISH-SETTINGS file ..." button to import the subscription. You will be prompted to either download it from the administration portal or use the previously downloaded file from a local disk.

After downloading the configuration file and applying its parameters, the wizard will receive information about your Windows Azure subscription and download the list of subscriptions and the cloud services available in them. You can select the required publishing options:
Set all the necessary data, select the environment for placement as a production. Click the Publish button.
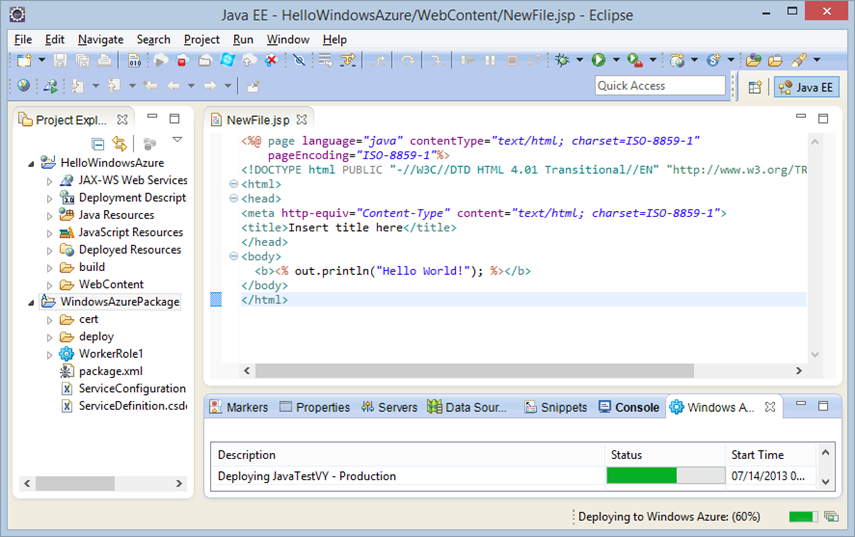
The process of placing the cloud service package in Windows Azure begins. Usually this process takes about a minute or two, depending on the configuration.

Open a browser and go to your cloud service to make sure the Java application is deployed and running in the Windows Azure cloud.
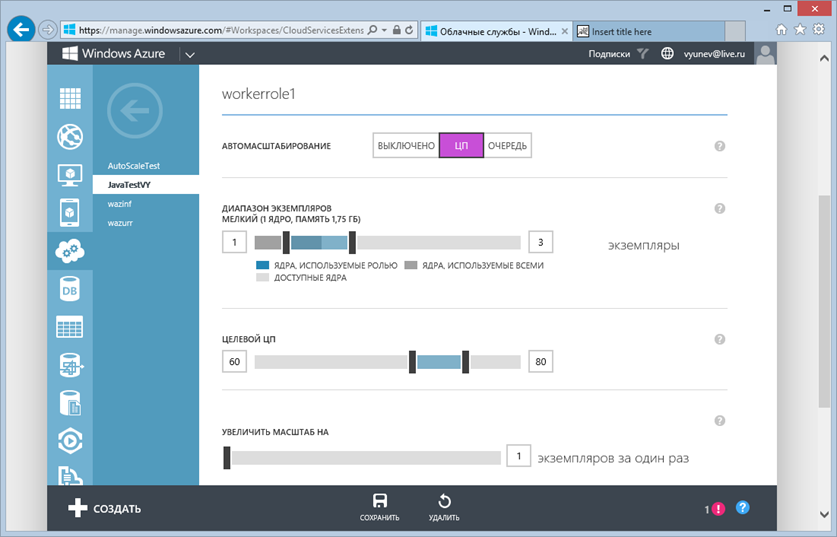
Now you can adjust its parameters, scale your application on demand, or specify automatic scaling parameters.
Java developers can take advantage of other features provided by the Windows Azure for Eclipse toolkit, including the use of Windows Azure service libraries, the use of remote access and debugging to cloud services, as well as other parameters and settings about which you can learn more about link on the MSDN website .
In early July, the Windows Azure Toolkit for Eclipse received an update . Among the new products are the following features:
Do not miss the previous announcements of updates to the Windows Azure platform, which are released almost every week:
For Java developers, there are a number of helpful resources in the Windows Azure cloud that I suggest you visit.
Below you will find links to resources that will help you in using the Microsoft cloud platform:
And if you are already developing on Windows Azure or want to find the developers of your service, visit appprofessionals.ru .
We will be happy to answer your questions at azurerus@microsoft.com . And we are waiting for you in the Windows Azure Community on Facebook . Here you will find experts (don't forget to ask them questions), photos, and lots and lots of news.
Video recordings of Windows Azure Summit reports and video interviews that were conducted during a large cloud conference. DevCon 2013 Windows Azure conference talks you can find here .
Windows Azure Toolkit for Eclipse
Windows Azure Toolkit for Eclipse is an open source toolkit that adds functionality to the Eclipse development environment and allows Java application developers to conveniently develop, manage, and publish applications to the Windows Azure cloud .
')
You can find out more about the project at the following links:
- Documentation: http: // bit.ly/Ly4SBx
- GitHub source code: http: // bit.ly/RbEO5n
Installation
To install the Windows Azure Toolkit for Eclipse add-on, you need a Windows 7 or 8 operating system, or Windows Server 2008 or 2012. The tools support JDK version 1.6 or higher and integrate into the Eclipse IDE for Java EE. You also need a set of Windows Azure SDK 2.0 tools that can be automatically installed when you first create a project in Eclipse.
To host applications in the cloud and run them locally, you need one of the Java application servers of your choice: Tomcat, GlassFish, Jboss, or Jetty. We will use Tomcat 7.0 in this article.

To install Windows Azure Toolkit for Eclipse, launch Eclipse and go to the menu item Help -> Install new software.

Enter http://dl.msopentech.com/eclipse in the "Work with" field. Select Windows Azure Toolkit for Eclipse from the list and click Next to customize the installation or Finish to install all the default components.
Work with Windows Azure Toolkit for Eclipse

Create a "Dynamic Web Project" project in Eclipse and add a new JSP file under any name with the "New JSP File (html)" template to WebContent. Modify this file to your liking. You should have the picture shown in the picture.

Right-click on the project and select the menu item Windows Azure -> Package for Windows Azure. A wizard will prepare the placement of the project in the cloud. Enter the project name and click Next.

Make sure that the automatically set path to the local JDK location is correct and set the "Automatically upload the local JDK ..." parameter. Click "Next".

Select from the list the server option for running applications that you use locally and plan to use in the cloud. If necessary, manually set the path to this server on your disk. Select the option "Automatically upload the local server ...". Click "Next".

Make sure that the war file is added to the application list. Click "Next".

Optionally, enable one of the additional mechanisms for your cloud application: support for sticky sessions, support for caching, support for remote debugging of code. Click "Finish".

A new customized package will be created and added to Project Explorer for publishing to the Windows Azure cloud environment.
Select the package in the list and click the menu item "Run in Windows Azure Emulator"


The project will be launched in the local Windows Azure computing power emulator. The startup process will be displayed in detail in the Eclipse console.

During startup, you may see a request for permission to access the network from a UAC system, simply confirm this request. After a few seconds, your application server will start (in my case, Tomcat).

And the local emulator of computing power of Windows Azure.

Launch your browser and go to http: // localhost: 8080 / HelloWindowsAzure / NewFile.jsp - where NewFile.jsp is the name of the file you created and modified. You will see a working Java web application code ready for posting in Windows Azure.
Placement in the cloud
Create an empty cloud services (Cloud Services) in Windows Azure. Stop the local code execution if the project was started and select the "Publish to Windows Azure Cloud" option.


You will need to download the Windows Azure subscription information. Click the "Import PUBLISH-SETTINGS file ..." button to import the subscription. You will be prompted to either download it from the administration portal or use the previously downloaded file from a local disk.

After downloading the configuration file and applying its parameters, the wizard will receive information about your Windows Azure subscription and download the list of subscriptions and the cloud services available in them. You can select the required publishing options:
- Subscription in which the application is published
- Windows Azure Storage Account
- Name of the cloud service where the application will be placed
- Cloud service environment: styling or production
Set all the necessary data, select the environment for placement as a production. Click the Publish button.

The process of placing the cloud service package in Windows Azure begins. Usually this process takes about a minute or two, depending on the configuration.

Open a browser and go to your cloud service to make sure the Java application is deployed and running in the Windows Azure cloud.

Now you can adjust its parameters, scale your application on demand, or specify automatic scaling parameters.
Developer Opportunities
Java developers can take advantage of other features provided by the Windows Azure for Eclipse toolkit, including the use of Windows Azure service libraries, the use of remote access and debugging to cloud services, as well as other parameters and settings about which you can learn more about link on the MSDN website .
Update
In early July, the Windows Azure Toolkit for Eclipse received an update . Among the new products are the following features:
- the ability to postpone the selection of the storage account when creating a cloud project;
- the ability to create new storage accounts and publish applications to them from the Eclipse environment;
- The ability to host very large applications through local storage;
- Ability to choose between the usual Windows Azure service and placement in a new data center for Chinese consumers;
- Upgrade Windows Azure Libraries for Java with support for new Microsoft Windows Azure Client API.
Do not miss
Do not miss the previous announcements of updates to the Windows Azure platform, which are released almost every week:
- Announcement of support for Dolby Digital Plus audio codec and other Windows Azure Media Services updates
- Announcement of service monitoring and alerts Windows Azure Alerts
- The announcement of the auto-scaling feature in Windows Azure
- Announcements and commercial availability of Windows Azure Web Sites;
- Availability of Windows Server 2012 R2, SQL Server 2014 and Visual Studio 2013 Ultimate in the image gallery of Windows Azure virtual machines
- Cloud backend as a service for Windows, iOS, Windows Phone, Android and mobile HTML5 applications
- and others on the blog ...
useful links
For Java developers, there are a number of helpful resources in the Windows Azure cloud that I suggest you visit.
- Java Tool Center , resources
- Cloud Application Development Articles with Windows Azure for Eclipse and Java
- Java development articles for Windows Azure in Russian
Below you will find links to resources that will help you in using the Microsoft cloud platform:
- Free 30-day trial of Windows Azure;
- Free access to Windows Azure resources for startups , partners , teachers, MSDN subscribers ;
- Windows Azure Development Center (azurehub.ru) - scripts, tutorials, examples, recommendations on the choice of services and development on Windows Azure;
- News channel Windows Azure TV in Russian on YouTube;
- Latest Windows Azure News - Twitter.com/windowsazure_ru ;
- http://wazurr.ru - content aggregator for Windows Azure in Russian and English.
And if you are already developing on Windows Azure or want to find the developers of your service, visit appprofessionals.ru .
We will be happy to answer your questions at azurerus@microsoft.com . And we are waiting for you in the Windows Azure Community on Facebook . Here you will find experts (don't forget to ask them questions), photos, and lots and lots of news.
Video recordings of Windows Azure Summit reports and video interviews that were conducted during a large cloud conference. DevCon 2013 Windows Azure conference talks you can find here .
Source: https://habr.com/ru/post/186638/
All Articles