Honest glow and speed
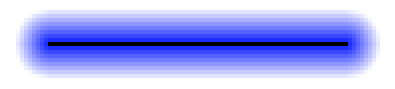
 Probably everyone who has even worked a little bit with Photoshop has seen the outer glow effect for the layer and tried to play with it. In Photoshop there are 2 techniques of this very outer glow. Soft and precise. Soft was not so interesting to me, but looking at precise - I thought.
It looks like this:
This is a single pixel line. A gradient roughly speaking - reflects the distance to the nearest pixel of the image. This very distance could be very tasty for building various effects. This and all contours, and its own gradients, and
even gas discharge effects around and so on.
An example of the effect you can get if you have a distance map. The example uses OpenGL + GLSL, written in Delphi
The main problem of such a glow is the complexity of calculations for large sizes. If we have a glow of 100 pixels, then we need to check 100 * 100 neighboring pixels for each pixel of the image. And for example, for an image of 800 * 600, this will be only 4,800,000,000 checks.
However, photoshop does not suffer from this, and beautifully builds an accurate glow of even large (up to 250) sizes. So there is a solution. And I was curious to find him. I did not manage to google the fast algorithm of such a glow. Most of the algorithms use blur to build a glow, but we all know that a single-pixel line will not give us the same effect as in the picture, it will just turn out.
')
So I drove the bike.
What we do
Let's get started before we decide on terms.We will build a 100 pixel glow for the png image. Here it is:

the original image will be archived. Also, in order to put it in a topic with a picture, I filled the background with black. In the original - it is a white image on a transparent background.
I will call all pixels existing and not existing. The existing pixel is an alpha which is greater than 0, and in fact it also participates in the construction of the glow.
Stage 1
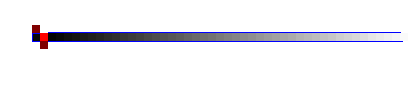
In fact, there is no need for each pixel to look for the closest existing pixel within a radius of 100 pixels. Each existing pixel simply throws on the neighboring roughly this glow:
At this glow color means the distance to the pixel. Thus, it all comes down to “drawing” the glow of the image for each existing pixel. And so that the point of the resulting effect is the nearest - we “draw” only the minimum value.
Throwing away non-existent pixels, we have reduced the glow drawing time, but it is still huge. What to do next?
Stage 2
If we look closely, we can see that if a point from 4 sides is surrounded by existing pixels: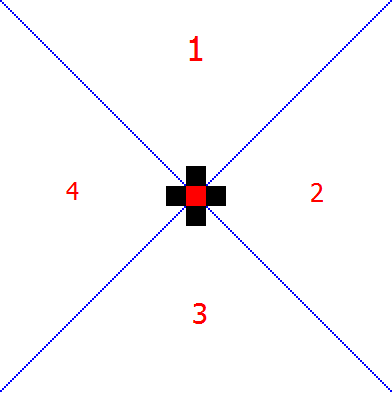
then it won't discard unique pixels at all. All that we draw, processing the red dot, will be ground in each of the numbered zones with a neighboring pixel. Thus, after analyzing the neighboring points, we can discard many existing points. The result of this analysis is this image:

White - existing points that were discarded. Gray - points that will give a real glow. Black - non-existent points.
In fact, we only have the contour, from which we build the glow.
So, our algorithm has become orders of magnitude faster, but it is still as slow as a turtle, compared to the implementation of Photoshop. I have 100 pixels of glow for the image above was built for 2-3 seconds.
Stage 3
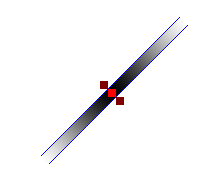
The previous stages were quite trivial. The work of the algorithm was significantly accelerated, but we still have a crazy overdraw for the pixels on the border.Let's take a close look at the situation when 3 pixels from which we need to throw away the glow go next to each other:

In fact, out of 3 (red) pixels, bright red will give only 1 actual line, all other information will be redrawn when drawing a glow for dark red pixels. I will not give a geometric proof of this, for the reader, I think it is quite obvious. If we move 1 pixel to the side like this:
then we lose the left "ray". There will be 1 single pixel, which may be closer to bright red. In addition, we have a whole new area where we have to drop the glow from the bright red pixel:

Shift the bottom pixel to the side and see what happens:
We have 2 beams left again.
Having twisted various situations, and carefully thinking, I came to the conclusion. A pixel will give a ray to the side if there are no three adjacent pixels. Example for neighboring pixels:
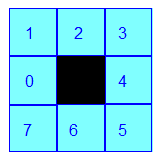
the ray to the left will be if there are no adjacent pixels with indices 7, 0, 1
ray left up - if there are no adjacent pixels with indices 0, 1, 2
ray up - if there are no adjacent pixels 1, 2, 3
etc.
In addition, between the rays, too, there are pixels. So, they will be only when there are 2 adjacent beams. Those. according to the above mentioned picture:
We have a ray right up and a ray right. Between them you will need to draw glow pixels.
Thus, we can significantly reduce overdraw.
Implementation
I implemented this algorithm on Delphi using the Vampyre Imaging Library . At first, I’m cooking in memory already flashed in the articleglow image
then I prepare
image bordering pixels they are gray, you can see if you increase
they are gray, you can see if you increaseglow image I hit logically in 16 zones.
The function in the DrawGlowPart code is able to draw only a strictly defined zone by its index. I had to tinker with the cycles for each zone. In addition, the DrawGlowPart function can draw a zone with an index of 16. This is 1 pixel around any existing pixel that we draw. This image shows that this pixel to the left of bright red:
The result of the fuss is such an ominous picture:

And in just ~ 150 ms on my machine. This is already human.
This algorithm fits well on the GPU, which I will try to do sometime in my spare time in order to get even greater growth and the opportunity to build such glow in real-time. Alas, 150ms is not yet a real-time time, but this is already acceptable for load time.
In photoshop
In Photoshop, the Glou is obviously not implemented according to my algorithm, and I won’t be surprised if I noticefully blasted my code. If you look at the glow from one pixel in Photoshop, then on a fairly good monitor you can see its “polygonality”: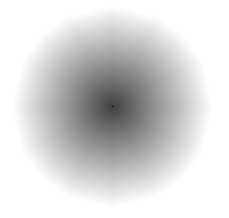
I suspect that the developers build a contour on the boundary pixels, then they shift it and get a polygon. I also suspect that this will reduce overdraft even more. If anyone has materials on this topic - I will be glad to read.
Links to the article
1. The implementation of the algorithm . Binary file + source codes. Compilation will require the Vampyre Imaging Library . The first parameter is the input file. 2nd - the size of the glow in pixels.2. An example of the effect . It does not generate a glow in real time, but uses a previously generated one. For rendering, OpenGL + GLSL is used.
Source: https://habr.com/ru/post/186482/
All Articles