PHPStorm + XDebug + Bitbucket: development on a remote server in a small team
In this article, I will tell you how we built the site development process without raising local copies of the web server in a small development team using Xdebug on a test server and automatically deploying the repository to a combat server.

in our case, the project existed without a repository, a separate topic is how to add it there (because you need to exclude a lot of files that you do not need to add to the turnip), but let's say the turnip is already on Bitbucket, and the files on the server are in the usual directory
If you have not yet installed Git - set
In PHPStorm we set the path to Git (this is the file bin / git.exe) - Settings -> Version Control -> Git -> Path to Git executable
')
In PHPStorm tab VSC -> Checkout from Version Control -> Git
specify the name of the new project directory and the path to the repository, for example
Now the files that you edit locally will automatically be uploaded to the server.
Now, after each push, all files on the server will be brought to the files from the repository, you can implement the same approach on the test server, but in this case, if one developer has unsigned files, then they will be lost on the server and they will have to be re-loaded.
How to install it I will not describe, we will assume that Xdebug is installed, we’re correcting the config /etc/php5/conf.d/xdebug.ini:
Pay attention to the remote_connect_back directive - it allows you to connect not to the specified IP of the developer’s machine, but to the IP of the client that is surrounded by PHP (REMOTE_ADDR), so Multiple people can work with Xdebug at the same time. This does not mean that Xdebug will be launched each time the server is accessed, for its launch you still need to transfer certain cookies - more
We drive in here the IDE key PHPSTORM key we specified in xdebug.idekey and the appeared links at the bottom are repackaged to the bookmarks bar.
There is no need to specifically configure PHPStorm, everything is already set up, but just in case the settings here - Project Settings -> PHP -> Debug
now you need to make the debugger:
Since the connection goes from the outside, and many are now sitting behind routers, then on the router you need to forward port 9000 to your local IP address, on the D-link DIR 300 it looks like this:
If the debugger gives an error that it cannot find the corresponding current executable file on the local machine, then in the PHP -> Servers settings you can set the correspondence of the paths on the server to the paths on the locale.
References:
http://git-scm.com/
http://xdebug.org/
http://bitbucket.org/
http://jetbrains.com/phpstorm/
A little about the reasons for not raising a local copy of the web server:
But refusing to create a local copy of the server, we lose a lot of advantages of this approach:
If debugging can be done using Xdebug, and moving to another server, the third advantage can be a serious obstacle, so my article is relevant first of all to small teams where you can give tasks so. so that they practically do not overlap.
There is another option for organizing development servers - each project participant creates its own copy of the files and domains on the server, so the server is one, and remote, but each developer does not interfere with the other ... minus this approach in the high complexity of the organization, especially if the project has many subdomains.
- If you work under Windows, and a web server on Linux, then the local server for a complex portal (in which there is a lot of specific software) under Windows can be raised at all, it remains to raise a copy in a virtual machine, but in this case the difference in setting up the developer’s software is setting up a virtual machine and setting up a remote web server is only in the IP address.
- If you still raise a local copy, you will have to constantly synchronize the settings of the server software, the database, and besides, the question remains how to deal with cron tasks that often have to be done in the morning.
- If a site resides on several servers or even its individual parts occupy several servers (for example, scaled tables are part of the table on one, part on another server), then all this can also greatly complicate the task of creating a local server.
- The performance of your machine and server can vary greatly, which can have an impact on the code.
- Not all project participants can have sufficient system administration skills.
But refusing to create a local copy of the server, we lose a lot of advantages of this approach:
- Run the interpreter from the IDE and debug it accordingly.
- Download speed and ping.
- The developers each work with their own copy of the server, so they can not interfere with each other.
If debugging can be done using Xdebug, and moving to another server, the third advantage can be a serious obstacle, so my article is relevant first of all to small teams where you can give tasks so. so that they practically do not overlap.
There is another option for organizing development servers - each project participant creates its own copy of the files and domains on the server, so the server is one, and remote, but each developer does not interfere with the other ... minus this approach in the high complexity of the organization, especially if the project has many subdomains.
Explanation of the scheme:
- The developer has a copy of the repository.
- The test and combat web server has a working copy of the repository as the root directory of the project.
- The project files in PHPStorm are linked to the working directory of the test web server, this means when Ctrl + S an automatic edit of the file to the server occurs.
How is the development:
- developer corrects code locally
- presses ctrl + s file uploads to server
- launches the required page of the test web server in the browser (or performs the necessary action on it), looks at the result
- if necessary, starts the debugger using Xdebug
- if everything suits, commits to the repository and then push
- the storage (in our case, this is Bitbucket) automatically after each Push'a polls the specified script on the battle server
- when polling, this script causes git pull, and so on. leads the working directory of the combat web server to the current version from the repository
Server preparation
in our case, the project existed without a repository, a separate topic is how to add it there (because you need to exclude a lot of files that you do not need to add to the turnip), but let's say the turnip is already on Bitbucket, and the files on the server are in the usual directory
- Login under the project user:
su myproject - Generate SSH keys for authorization on bitbucket without password
ssh-keygen -t rsa - get the public key
and add it to Bitbucket in the Deployment keys section in the project settingscat ~/.ssh/id_rsa.pub - clone the project in the temporary directory ~ / tmp / myproject.ru:
mkdir ~/tmp mkdir ~/tmp/myproject.ru cd ~/tmp/myproject.ru git clone git@bitbucket.org:username/myproject.ru.git - we copy .git and .gitignore to the working directory of the project (we have this /vhosts/myproject.ru/), we do not copy the other files!
cp -r .git .gitignore /vhosts/myproject.ru/ rm -rf ~/tmp/myproject.ru - we bring files to a status from a repository
cd /vhosts/myproject.ru git reset --hard
Client preparation
If you have not yet installed Git - set
In PHPStorm we set the path to Git (this is the file bin / git.exe) - Settings -> Version Control -> Git -> Path to Git executable
')
Clone repository:
In PHPStorm tab VSC -> Checkout from Version Control -> Git
specify the name of the new project directory and the path to the repository, for example
username@bitbucket.org/username/myproject.ru.gitWe synchronize files with a remote server:
- Add a server and specify its access File -> Settings -> Deployment
- in the Root path, specify the path to the project root (in my case /vhosts/myprojet.ru/) - the project root on the server must match the file hierarchy with the root directory of the repository
- Go to the Mappings tab and specify in the Deployment path on server - / and in the Web path on server too - / (if it starts from the root of the site)
- Select our server in the list and click on the button Use as default
- Next in the Deployment -> Options you need to select the On save save action (Ctrl + S) in the upload files
- In Warn when uploading over newer file, select Compare timestamp & size (although you can also by content) and check Notify about remote changes, this will let you know if someone rules the same file
Now the files that you edit locally will automatically be uploaded to the server.
Setting up the autopool on the combat server:
- Create a shell script for the automatic pull of the project /vhosts/myproject.ru/gitsync.sh:
#!/bin/sh cd /vhosts/myproject.ru && git reset --hard && git status --porcelain -uall | egrep '^\?\?' | awk '{ print $2; }' | xargs rm && git pull
Do not forget to add execution rights to the script.chmod a+x /vhosts/myproject.ru/gitsync.sh - Since the repository operations are from the user who owns the files, and the web server is working from another user, you need to add permission to run the auto-pull script on behalf of someone else without a password through / etc / sudoers
# /etc/sudoers # # This file MUST be edited with the 'visudo' command as root. # # See the man page for details on how to write a sudoers file. # Defaults env_reset # sudo , .. - Defaults:www-data !requiretty # Host alias specification # User alias specification # Cmnd alias specification # User privilege specification root ALL=(ALL) ALL # Allow members of group sudo to execute any command # (Note that later entries override this, so you might need to move # it further down) %sudo ALL=(ALL) ALL # #includedir /etc/sudoers.d # www-data ALL = (myproject) NOPASSWD: /vhosts/myproject.ru/gitsync.sh - Let's create a php script that will run our shell script from the web /vhosts/myproject.ru/htdocs/gitsync.php (the name can be chosen more secret, as well as add a password transfer):
<?php $output = array(); exec('sudo -u myproject /vhosts/myproject.ru/gitsync.sh 2>&1', $output); foreach ($output as $line) { echo $line."\r\n"; } die(); ?> - in Bitbucket in the project settings in the Services tab in the POST section we write the path to the autopool script:
myproject.ru/gitsync.phpmyproject.ru/gitsync.phpand click Save
Now, after each push, all files on the server will be brought to the files from the repository, you can implement the same approach on the test server, but in this case, if one developer has unsigned files, then they will be lost on the server and they will have to be re-loaded.
Connecting Xdebug
How to install it I will not describe, we will assume that Xdebug is installed, we’re correcting the config /etc/php5/conf.d/xdebug.ini:
zend_extension=/usr/lib/php5/20090626/xdebug.so xdebug.remote_enable=1 xdebug.remote_connect_back=1 xdebug.idekey=PHPSTORM xdebug.remote_port=9000 Pay attention to the remote_connect_back directive - it allows you to connect not to the specified IP of the developer’s machine, but to the IP of the client that is surrounded by PHP (REMOTE_ADDR), so Multiple people can work with Xdebug at the same time. This does not mean that Xdebug will be launched each time the server is accessed, for its launch you still need to transfer certain cookies - more
We drive in here the IDE key PHPSTORM key we specified in xdebug.idekey and the appeared links at the bottom are repackaged to the bookmarks bar.
There is no need to specifically configure PHPStorm, everything is already set up, but just in case the settings here - Project Settings -> PHP -> Debug
now you need to make the debugger:
- in PHPStorm to enable wiretapping of debugger connections - the button Start Listen PHP Debug Connection
- open the site, click the Start debugger tab, reload the page
- PHPStorm should be on the incoming connection and open the debugger
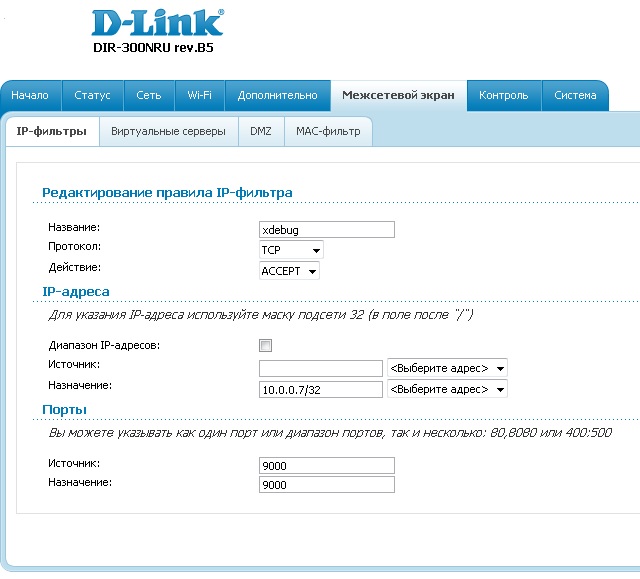
Since the connection goes from the outside, and many are now sitting behind routers, then on the router you need to forward port 9000 to your local IP address, on the D-link DIR 300 it looks like this:
If the debugger gives an error that it cannot find the corresponding current executable file on the local machine, then in the PHP -> Servers settings you can set the correspondence of the paths on the server to the paths on the locale.
References:
http://git-scm.com/
http://xdebug.org/
http://bitbucket.org/
http://jetbrains.com/phpstorm/
Source: https://habr.com/ru/post/186080/
All Articles