Universal Analytics - New Generation Web Analytics
Universal Analytics is a new version of Google Analytics web analytics.
The principles of Universal Analytics differ from the principles of the previous version of the system. If you are wondering what the Google Analytics update is and what has been useful in this system, you have come across the article you need.
While collecting information during the preparation of this article, I spent a lot of time finding something useful (by useful I mean cases using this system), however, it turned out that I could find practical advice on the Internet (both Western and ours) not so simple - they are simply not there (with rare exceptions). Since almost half a year has passed since the release of Universal Analytics in Beta mode (the system continues to work in this mode and now, but for Google a long testing period is a common situation), a natural question is “why?”. Do companies really see no point in investing now (despite the “free” system, they still have to invest, since all the settings that you implemented in the previous version will not be transferred automatically to the new version) in the transition from Google Analytics to Universal Analytics? Running a little ahead, I will express my opinion: in many cases it is worth it.
What is new in Universal Analytics?
')
It will be correct to indicate at the very beginning that the Universal Analytics user interface is almost identical to the interface of the previous version. That is, Universal Analytics is not a new web analytics system, it is primarily a long overdue update of the data analytics approach in Google Analytics.
The first thing that has changed with the release of the new version is the process of data collection . Google Analytics used 5 different cookies to collect information about visitors, each of which contained information about the visitor: a keyword, a source of traffic, a campaign name, a page number in a session on the site and some other indicators. Each time a visitor went to a page on your site, the Google Analytics tracking code reads this vast array of information from cookies and sends it to the data collection server.
Universal Analytics has a slightly different approach to accomplishing the same task. Only one Cookie is stored in the visitor's browser, which actually contains one unique unique identification number of the site visitor (client ID). The updated tracking code reads this cookie and transmits to Google’s server not the entire huge array of indicators listed in the previous paragraph, but only the unique number of the visitor who made this hit. What is the difference? A much smaller amount of data is transmitted to Universal Analytics servers. Next, Google already on its servers calculates what page this account has in the user session, whether the visitor was on the site earlier, whether any user variable was assigned to this visitor or not, and so on. According to Google, a full transition to Universal Analytics will increase the average speed of the global Internet by 5% (taking into account the fact that Google Analytics is installed on 80% of all sites in the world).
Having in hands a unique ID of the visitor (access to it is possible to receive the standard JS methods kindly provided by Google) it would be logical to assume that Google will present ample opportunities for its use.
Having access to a unique visitor ID, it becomes possible to cross-platform tracking of the same visitor. If earlier, a visitor, going to the site first from a home computer, and then, for example, from a mobile device, was in fact two visitors to us at once, now we have the opportunity, at the moment when the visitor logs in to the site, to inform the analytics system, that the same visitor returned to the site and link all the information about the second visit to the same visitor (read, rewrite his only Coookie).
Moreover, thanks to the new measurement and data transfer protocol ( new measurement protocol ), it becomes possible not only to rewrite the Client ID, but also to independently generate various types of hits, which are then transmitted from any devices with Internet access and capable of sending a standard HTTP request.
I will give an example of using this technology: a visitor goes to the website of an online store, makes a purchase through a basket and chooses a delivery method - self-pickup, and a payment method - payment upon receipt of the goods. Being in the “Google Analytics stage” you would not have had the opportunity at the time of receiving the money to transfer to the Google server that the visitor, who made an order a few days ago on the site, nevertheless took it from the pickup point and paid in cash. And now there is such an opportunity: you just have to make one of your devices used for making a purchase at a pickup point (for example, a barcode scanner) generate a simple HTTP request that sends information about the transaction directly to Google, assigning this hit the same visitor who made a purchase a few days ago.
Another new feature from the list of the most important functions is the creation of your own parameters and metrics . The traffic source, browser, screen resolution are all examples of the standard options that are currently available in Google Anaytics. The bounce rate, conversion rate are all examples of predefined metrics.
Imagine that you, for example, store in your CRM system the gender (M or F) of each client. You may be interested in the opportunity to find out the conversion rate in purchases or registration of representatives of each sex. This information may be useful for optimizing the site and advertising campaigns. To do this, you just need to create a new parameter in Google Analytics - gender, and then teach your CRM system to generate a hit containing information about a new indicator created inside Universal Analytics.
It is also worth mentioning, perhaps, the migration of some basic system settings that previously “lived” in the developers' monastery and required changes in the tracking code, and now they exist directly inside the Universal Analytics interface and their settings are available there. These include the lifetime of the session and the campaign, the attribution of key queries that contained the brand name to direct traffic, the exclusion of transitions from certain domains from the traffic of transitions and some others.
Further, in my opinion, it would be correct to give an example of the use of new features of Universal Analytics. In our company, as well as, it seems to me, in most other companies that use paid channels to attract visitors to the site, until now this tool did not allow conveniently and segmented, perhaps, the most important metric for business, and sales in an automatic or semi-automatic mode. , on a variety of interesting business indicators. It is clear that Google Analytics existed and there is a report on e-commerce, but it was possible to transfer data to this report only at the time of placing an order on the website, and not at the time of receipt of money on the company's account, which, of course, somewhat distorted the real results of the company's activities on the Internet. Further description of how we solved this problem in our country.
Step 1. Install and configure Universal Analytics and Google Tag Manager
Despite the fact that the article is not about this, I cannot help writing a few introductory words about the Google Tag Manager, since we used this tool to solve the problem, and some readers of this article could not hear about it.
Google Tag Manager allows you to easily manage tags (designed to track or optimize marketing) on a website. To understand the purpose of the Google Tag Manager, I’ll give an example: let's say your site now uses Google Analytics, Google Adwords is used to attract visitors, and, for example, Google’s experiments are used to conduct a | b-tests on the site’s pages, this actually means the presence of 3 different types of tracking codes on the site. Add to this another possible transition to Universal Analytics, as well as event and e-commerce event codes, and you’ll have a long list of tags scattered across your site.
The work of the Google Tag Manager is based on the use of one tag - the so-called container, which must be placed on all pages of the site instead of individual tags, such as AdWords, Google Analytics, Floodlight, and others. After you post a container fragment on the website, tags will be added, updated and managed in the Google Tag Manager Manager account in the web interface.
In addition, Google Tag Manager allows you to reduce the risk of unfair use of your unique account number, for example, by your competitors. If the site has a “bare” Universal Analytics code, anyone can send a hit to your statistics with information about a transaction that has occurred, knowing the identification number of your Universal Analytics account (UA-XXX-YY), which will spoil your statistics and may create an incorrect idea of results of your company.
So, to solve our problem, first of all we install the Google Tag Manager.
Go to the Google Tag Manager website www.google.com/tagmanager (GTM) and register a new account:

In the fields Account name and Container name enter the address of the site (or domain name). Click the Create account button. Then GTM will offer you a special code that must be placed on all pages of your site immediately after the tag.
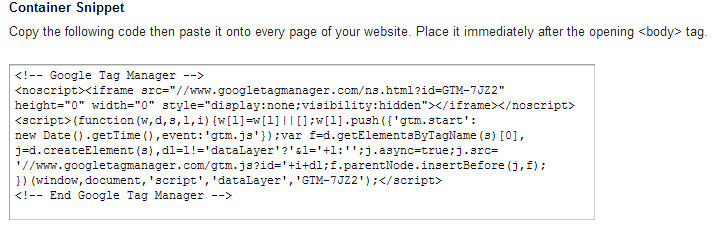
After the proposed GTM code is placed in the right place on all pages of your site, go to Google Analytics, log in with your existing Google login and password for your account (which currently tracks your site traffic) and create a new web resource specially for Universal Analytics (hereinafter referred to as UA):

In the settings of the new web resource, select the tracking method - Universal Analytics, enter the name and address of the site, as well as TimeZone:

Click the button “Get tracking ID” and the service redirects us to the page with the code UA, which is recommended to us once [IMG] http://i47.fastpic.ru/big/2013/0709/1f/bec6c0e37deb4c888fa9aa0daa22171f.png [/ IMG] to place as well as the GTM container code immediately after the tag:

Next, we return to the GTM website in order to add a new tag with the code UA to the previously created container. To do this, click on the New Tag button.

Specify the name of the tag (for example, Universal Analytics Code), select the type of the created tag (Tag Type) from the offered list and then add the identifier of your account to the appropriate field (Tracking Id):

Also, we need to specify a rule (Add Rule to Fire Tag), in which the UA code will work. Select the available All Pages option (we need the UA tracking code to run on all pages of the site):
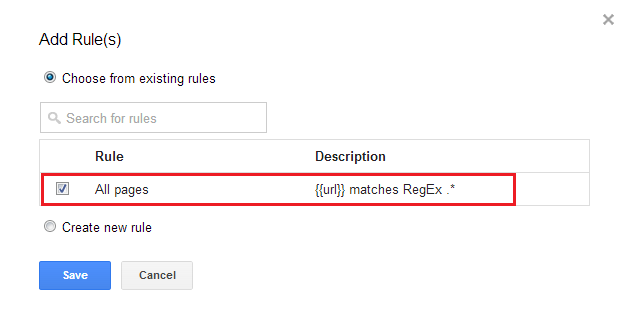
No more changes on this page are needed - click the Save button.
In order for the changes made to the GTM container to take effect (and the UA code is started to be executed), you must click the Create Version button:

And then press the Publish button:

Congratulations, the UA code was successfully entered into the GTM container on your site.
It remains to wait a bit to make sure that we did everything correctly and the statistics of visits to your site began to be transmitted to the corresponding UA profile (When creating a new web resource, 1 default profile is automatically created, to which all statistics of visits to the site are transmitted. About the data structure, the difference See profiles from web resources and accounts in the Google Analytics Help support.google.com/analytics/answer/1009618?hl=en ).
Step 2. Integrating Universal Analytics with a CRM system
In our company, CRM-system HighRise (37signals.com) is used for customer relationship management. As mentioned at the beginning of the article, the main task that needs to be solved with the help of UA is the correct transfer of company revenue data into the UA interface for further calculating the ROI of advertising (and non-advertising) channels, as well as segmentation of this metric according to various preset parameters.
This is how the HighRise system launch window looks like:

The main object in this system is the contact person (representative) of the company with which cooperation is being negotiated.
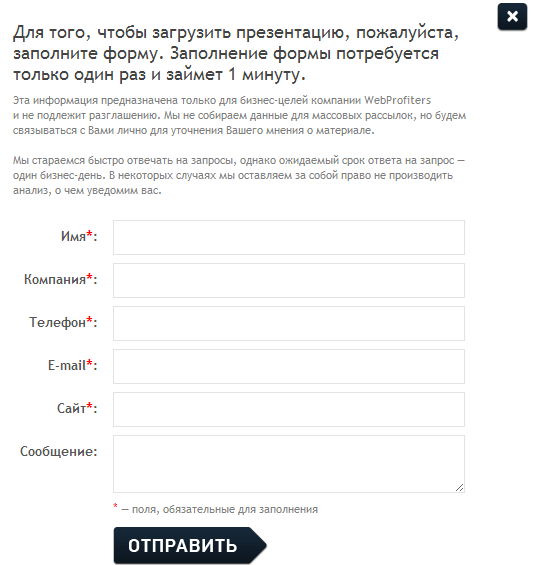
New contacts in HighRise are created automatically (using the HighRise API) when filling out one of the contact forms on our website:
Next, for each contact person, the consultants manually specify the type and the deadline for the task to be performed.
If you go down a level, you can see that for each contact person the types of deals (deals) that are to be carried out (or have already been completed) are created and stored:
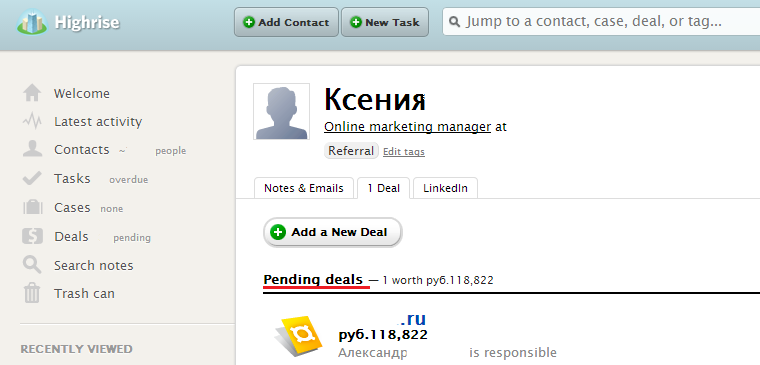
Each transaction has 3 statuses: Lost (the transaction is lost, there will be no payment), Pending (the transaction is in the process of discussion), Win (the transaction took place, payment was received to the organization’s account).
Given all the above information about the features of CRM system HighRise, the main task can be reformulated as follows:
When the status of the transaction changes from Pending to Win, it is necessary to transfer information to the UA about the amount of the transaction in relation to the visitor who submitted the application on the website.
This task is implemented in 2 stages:
1. When a new contact is entered into HighRise, it is necessary to save his unique Client ID in a separate field
2. When the status of the transaction changes from Pending to Win, you need to generate a hit that will transmit information about the volume of the transaction inside the UA, while correctly attributing the volume of the transaction to the corresponding visitor.
The first stage is relatively simple. In the help for UA developers, there is a JS code that allows you to determine the unique identification number of the visitor who is on the site. It looks like this:
Clientid variable will be assigned a unique site visitor number. Calling this method at the moment when the visitor fills out the application form for the service, while on the company's website, it is possible to save the visitor's ClientId in one of the available fields for the new contact person (for example, you can always use the free “Fax” field for these needs).
Thus, we enter into our CRM system a unique visitor identification number, which in UA is tied to the parameters “Traffic Source”, “City”, “Advertising Campaign” and others.
Go to the second step. As I mentioned at the beginning of the article, one of the main innovations in UA (and at the same time different from Google Analytics) is the ability to send hits inside the UA using regular HTTP requests. That is, in fact, any device with access to the Internet can transmit information inside the UA system.
Example http request:
When using a server based CRM system, the problem would be solved as follows: it would be necessary to refine the CRM system so that when the status of the transaction from Pending to Win changes, an HTTP request with the parameters we need is sent.
Our company, however, uses web based CRM and it is natural to change the code of such a system, we have no opportunity. The task, however, does not become much more difficult - fortunately, we are able to use the rich features of the HighRise API. We need to write a small script that highlights all the latest “won” (win) transactions and transmits information on them inside Universal Analytics.
It would seem that we are close to solving our problem. However, at this point, we recall that in UA (as well as, in fact, in Google Analytics) there is no metric that allows you to consolidate information about income. Here we come to the aid of another useful innovation in Universal Analytics - the ability to create your own parameters and metrics (we are in this case interested in metrics).
So, it is said - done. We return to the Google Analytics website, select the Universal Analytics web resource we created earlier from the list of accounts and resources, and click the Administrator button in the upper right corner. Next, go to the tab User Defined, then - Custom Indicators:

Create a new custom indicator, indicating the type - Currency, as well as the minimum and maximum values:

After creating a new metric, we also need to create a new custom report (generating a report using custom metrics is only possible using the custom report functionality — this metric cannot be used in standard reports). To do this, click on the Settings button, then - New user report. In the appeared window we set the following data:

Press the Create Report button and get the following table at the output:
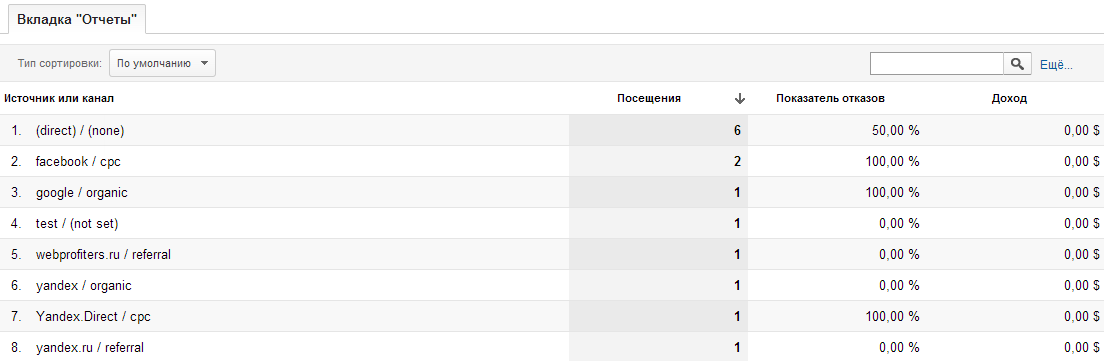
So, we have created a custom metric and a simple user report to which we can later transfer the data we need for analysis. In a similar way, you can create any other reports combining parameters and indicators (both custom and standard).
I will not describe the process of writing the script and its code, since the article is not about the HighRise API, but go to the format (example) of the HTTP –request. The HTTP request looks like this:
We return to the custom report we created to verify that the data on completed transactions began to be transferred from the CRM system:

Problem solved
I hope the material will be useful to you!
All good analytics and high ROI.
The principles of Universal Analytics differ from the principles of the previous version of the system. If you are wondering what the Google Analytics update is and what has been useful in this system, you have come across the article you need.
While collecting information during the preparation of this article, I spent a lot of time finding something useful (by useful I mean cases using this system), however, it turned out that I could find practical advice on the Internet (both Western and ours) not so simple - they are simply not there (with rare exceptions). Since almost half a year has passed since the release of Universal Analytics in Beta mode (the system continues to work in this mode and now, but for Google a long testing period is a common situation), a natural question is “why?”. Do companies really see no point in investing now (despite the “free” system, they still have to invest, since all the settings that you implemented in the previous version will not be transferred automatically to the new version) in the transition from Google Analytics to Universal Analytics? Running a little ahead, I will express my opinion: in many cases it is worth it.
What is new in Universal Analytics?
')
It will be correct to indicate at the very beginning that the Universal Analytics user interface is almost identical to the interface of the previous version. That is, Universal Analytics is not a new web analytics system, it is primarily a long overdue update of the data analytics approach in Google Analytics.
The first thing that has changed with the release of the new version is the process of data collection . Google Analytics used 5 different cookies to collect information about visitors, each of which contained information about the visitor: a keyword, a source of traffic, a campaign name, a page number in a session on the site and some other indicators. Each time a visitor went to a page on your site, the Google Analytics tracking code reads this vast array of information from cookies and sends it to the data collection server.
Universal Analytics has a slightly different approach to accomplishing the same task. Only one Cookie is stored in the visitor's browser, which actually contains one unique unique identification number of the site visitor (client ID). The updated tracking code reads this cookie and transmits to Google’s server not the entire huge array of indicators listed in the previous paragraph, but only the unique number of the visitor who made this hit. What is the difference? A much smaller amount of data is transmitted to Universal Analytics servers. Next, Google already on its servers calculates what page this account has in the user session, whether the visitor was on the site earlier, whether any user variable was assigned to this visitor or not, and so on. According to Google, a full transition to Universal Analytics will increase the average speed of the global Internet by 5% (taking into account the fact that Google Analytics is installed on 80% of all sites in the world).
Having in hands a unique ID of the visitor (access to it is possible to receive the standard JS methods kindly provided by Google) it would be logical to assume that Google will present ample opportunities for its use.
Having access to a unique visitor ID, it becomes possible to cross-platform tracking of the same visitor. If earlier, a visitor, going to the site first from a home computer, and then, for example, from a mobile device, was in fact two visitors to us at once, now we have the opportunity, at the moment when the visitor logs in to the site, to inform the analytics system, that the same visitor returned to the site and link all the information about the second visit to the same visitor (read, rewrite his only Coookie).
Moreover, thanks to the new measurement and data transfer protocol ( new measurement protocol ), it becomes possible not only to rewrite the Client ID, but also to independently generate various types of hits, which are then transmitted from any devices with Internet access and capable of sending a standard HTTP request.
I will give an example of using this technology: a visitor goes to the website of an online store, makes a purchase through a basket and chooses a delivery method - self-pickup, and a payment method - payment upon receipt of the goods. Being in the “Google Analytics stage” you would not have had the opportunity at the time of receiving the money to transfer to the Google server that the visitor, who made an order a few days ago on the site, nevertheless took it from the pickup point and paid in cash. And now there is such an opportunity: you just have to make one of your devices used for making a purchase at a pickup point (for example, a barcode scanner) generate a simple HTTP request that sends information about the transaction directly to Google, assigning this hit the same visitor who made a purchase a few days ago.
Another new feature from the list of the most important functions is the creation of your own parameters and metrics . The traffic source, browser, screen resolution are all examples of the standard options that are currently available in Google Anaytics. The bounce rate, conversion rate are all examples of predefined metrics.
Imagine that you, for example, store in your CRM system the gender (M or F) of each client. You may be interested in the opportunity to find out the conversion rate in purchases or registration of representatives of each sex. This information may be useful for optimizing the site and advertising campaigns. To do this, you just need to create a new parameter in Google Analytics - gender, and then teach your CRM system to generate a hit containing information about a new indicator created inside Universal Analytics.
It is also worth mentioning, perhaps, the migration of some basic system settings that previously “lived” in the developers' monastery and required changes in the tracking code, and now they exist directly inside the Universal Analytics interface and their settings are available there. These include the lifetime of the session and the campaign, the attribution of key queries that contained the brand name to direct traffic, the exclusion of transitions from certain domains from the traffic of transitions and some others.
Further, in my opinion, it would be correct to give an example of the use of new features of Universal Analytics. In our company, as well as, it seems to me, in most other companies that use paid channels to attract visitors to the site, until now this tool did not allow conveniently and segmented, perhaps, the most important metric for business, and sales in an automatic or semi-automatic mode. , on a variety of interesting business indicators. It is clear that Google Analytics existed and there is a report on e-commerce, but it was possible to transfer data to this report only at the time of placing an order on the website, and not at the time of receipt of money on the company's account, which, of course, somewhat distorted the real results of the company's activities on the Internet. Further description of how we solved this problem in our country.
Step 1. Install and configure Universal Analytics and Google Tag Manager
Despite the fact that the article is not about this, I cannot help writing a few introductory words about the Google Tag Manager, since we used this tool to solve the problem, and some readers of this article could not hear about it.
Google Tag Manager allows you to easily manage tags (designed to track or optimize marketing) on a website. To understand the purpose of the Google Tag Manager, I’ll give an example: let's say your site now uses Google Analytics, Google Adwords is used to attract visitors, and, for example, Google’s experiments are used to conduct a | b-tests on the site’s pages, this actually means the presence of 3 different types of tracking codes on the site. Add to this another possible transition to Universal Analytics, as well as event and e-commerce event codes, and you’ll have a long list of tags scattered across your site.
The work of the Google Tag Manager is based on the use of one tag - the so-called container, which must be placed on all pages of the site instead of individual tags, such as AdWords, Google Analytics, Floodlight, and others. After you post a container fragment on the website, tags will be added, updated and managed in the Google Tag Manager Manager account in the web interface.
In addition, Google Tag Manager allows you to reduce the risk of unfair use of your unique account number, for example, by your competitors. If the site has a “bare” Universal Analytics code, anyone can send a hit to your statistics with information about a transaction that has occurred, knowing the identification number of your Universal Analytics account (UA-XXX-YY), which will spoil your statistics and may create an incorrect idea of results of your company.
So, to solve our problem, first of all we install the Google Tag Manager.
Go to the Google Tag Manager website www.google.com/tagmanager (GTM) and register a new account:
In the fields Account name and Container name enter the address of the site (or domain name). Click the Create account button. Then GTM will offer you a special code that must be placed on all pages of your site immediately after the tag.
After the proposed GTM code is placed in the right place on all pages of your site, go to Google Analytics, log in with your existing Google login and password for your account (which currently tracks your site traffic) and create a new web resource specially for Universal Analytics (hereinafter referred to as UA):
In the settings of the new web resource, select the tracking method - Universal Analytics, enter the name and address of the site, as well as TimeZone:
Click the button “Get tracking ID” and the service redirects us to the page with the code UA, which is recommended to us once [IMG] http://i47.fastpic.ru/big/2013/0709/1f/bec6c0e37deb4c888fa9aa0daa22171f.png [/ IMG] to place as well as the GTM container code immediately after the tag:
Next, we return to the GTM website in order to add a new tag with the code UA to the previously created container. To do this, click on the New Tag button.
Specify the name of the tag (for example, Universal Analytics Code), select the type of the created tag (Tag Type) from the offered list and then add the identifier of your account to the appropriate field (Tracking Id):
Also, we need to specify a rule (Add Rule to Fire Tag), in which the UA code will work. Select the available All Pages option (we need the UA tracking code to run on all pages of the site):
No more changes on this page are needed - click the Save button.
In order for the changes made to the GTM container to take effect (and the UA code is started to be executed), you must click the Create Version button:
And then press the Publish button:
Congratulations, the UA code was successfully entered into the GTM container on your site.
It remains to wait a bit to make sure that we did everything correctly and the statistics of visits to your site began to be transmitted to the corresponding UA profile (When creating a new web resource, 1 default profile is automatically created, to which all statistics of visits to the site are transmitted. About the data structure, the difference See profiles from web resources and accounts in the Google Analytics Help support.google.com/analytics/answer/1009618?hl=en ).
Step 2. Integrating Universal Analytics with a CRM system
In our company, CRM-system HighRise (37signals.com) is used for customer relationship management. As mentioned at the beginning of the article, the main task that needs to be solved with the help of UA is the correct transfer of company revenue data into the UA interface for further calculating the ROI of advertising (and non-advertising) channels, as well as segmentation of this metric according to various preset parameters.
This is how the HighRise system launch window looks like:
The main object in this system is the contact person (representative) of the company with which cooperation is being negotiated.
New contacts in HighRise are created automatically (using the HighRise API) when filling out one of the contact forms on our website:
Next, for each contact person, the consultants manually specify the type and the deadline for the task to be performed.
If you go down a level, you can see that for each contact person the types of deals (deals) that are to be carried out (or have already been completed) are created and stored:
Each transaction has 3 statuses: Lost (the transaction is lost, there will be no payment), Pending (the transaction is in the process of discussion), Win (the transaction took place, payment was received to the organization’s account).
Given all the above information about the features of CRM system HighRise, the main task can be reformulated as follows:
When the status of the transaction changes from Pending to Win, it is necessary to transfer information to the UA about the amount of the transaction in relation to the visitor who submitted the application on the website.
This task is implemented in 2 stages:
1. When a new contact is entered into HighRise, it is necessary to save his unique Client ID in a separate field
2. When the status of the transaction changes from Pending to Win, you need to generate a hit that will transmit information about the volume of the transaction inside the UA, while correctly attributing the volume of the transaction to the corresponding visitor.
The first stage is relatively simple. In the help for UA developers, there is a JS code that allows you to determine the unique identification number of the visitor who is on the site. It looks like this:
ga(function(tracker) {
var clientId = tracker.get('clientId');
});
Clientid variable will be assigned a unique site visitor number. Calling this method at the moment when the visitor fills out the application form for the service, while on the company's website, it is possible to save the visitor's ClientId in one of the available fields for the new contact person (for example, you can always use the free “Fax” field for these needs).
Thus, we enter into our CRM system a unique visitor identification number, which in UA is tied to the parameters “Traffic Source”, “City”, “Advertising Campaign” and others.
Go to the second step. As I mentioned at the beginning of the article, one of the main innovations in UA (and at the same time different from Google Analytics) is the ability to send hits inside the UA using regular HTTP requests. That is, in fact, any device with access to the Internet can transmit information inside the UA system.
Example http request:
www.google-analytics.com/collect?v=1&tid=UA-xxxx&cid=555&otherparameters
v: ( 1)
tid: ( - UA)
cid: ( )
When using a server based CRM system, the problem would be solved as follows: it would be necessary to refine the CRM system so that when the status of the transaction from Pending to Win changes, an HTTP request with the parameters we need is sent.
Our company, however, uses web based CRM and it is natural to change the code of such a system, we have no opportunity. The task, however, does not become much more difficult - fortunately, we are able to use the rich features of the HighRise API. We need to write a small script that highlights all the latest “won” (win) transactions and transmits information on them inside Universal Analytics.
It would seem that we are close to solving our problem. However, at this point, we recall that in UA (as well as, in fact, in Google Analytics) there is no metric that allows you to consolidate information about income. Here we come to the aid of another useful innovation in Universal Analytics - the ability to create your own parameters and metrics (we are in this case interested in metrics).
So, it is said - done. We return to the Google Analytics website, select the Universal Analytics web resource we created earlier from the list of accounts and resources, and click the Administrator button in the upper right corner. Next, go to the tab User Defined, then - Custom Indicators:
Create a new custom indicator, indicating the type - Currency, as well as the minimum and maximum values:
After creating a new metric, we also need to create a new custom report (generating a report using custom metrics is only possible using the custom report functionality — this metric cannot be used in standard reports). To do this, click on the Settings button, then - New user report. In the appeared window we set the following data:
Press the Create Report button and get the following table at the output:
So, we have created a custom metric and a simple user report to which we can later transfer the data we need for analysis. In a similar way, you can create any other reports combining parameters and indicators (both custom and standard).
I will not describe the process of writing the script and its code, since the article is not about the HighRise API, but go to the format (example) of the HTTP –request. The HTTP request looks like this:
www.google-analytics.com/collect?v=1&tid=UA-XXXX-YYY&cid=1161411544.1373152807&t=event&ec=transaction&ea=Xenia&cm1=500000,
v=1 – ( 1)
tid= UA-XXXX-YYY – Universal Analytics
cid=1161411544.1373152807 – Client ID
t=event – , ( , (event), (transaction).
e=transaction –
ea=Xenia - ( , )
cm1=500000 – ( )
We return to the custom report we created to verify that the data on completed transactions began to be transferred from the CRM system:
Problem solved
I hope the material will be useful to you!
All good analytics and high ROI.
Source: https://habr.com/ru/post/186076/
All Articles