Background replacement in Gimpa - working solution
In the comments to the Clipping Magic post ... I lamented the impossibility of qualitatively separating the object from the background in Gimp. Since May, I have been looking for a working method of replacing the background, so as not to suffer with Photoshop in Ubuntu, which has long been my only axis on the desktop. After reading hundreds of lessons (including lessons on manually creating such masks in Photoshop, since the masks in the gimp are almost the same), I could not find a way that was as fast and as good as Refine Edges in CS5- 6 And yesterday, in the plug-in catalog on the Gimp official website, a plugin was posted that finally did the job.
So, meet:
Immediately I warn you that the plug-in can replace only a relatively uniform background. With the motley background, nothing will work out, although you can try to prepare the motley background with the help of wavelet analysis , and then set this plugin on it. But, unlike Refine Edges, the plugin does not require preliminary preparation of selection - you only need to take a pipette beforehand with the main background color and the color of the shadows (one of them should be set with the foreground color, the second with the back color).
On the page of the plugin, in principle, describes in detail how to use it.
Therefore, the purpose of this note is to simply introduce you to a simple solution that has appeared, and give an example of using it on a much more complex image.
At the beginning of May, I was lucky to participate (as a student) in a studio shooting in difficult “field” conditions - on a small patch of a flight of steps from the St. Petersburg Ice Palace, we launched a mini-studio to shoot participants of the German Treaties exhibition. Since the ultimate goal of the shooting is to print a glossy booklet - all photos had to undergo a post-processing in the same style, one of the tasks of which was just to replace the crumpled blue fabric background with a decent looking gradient of the same tone. And here I began to lag far behind the professional who organized the shooting: although photoshop runs in Linux, it works with annoying bugs, and on my not very new computer it is also terribly slow. However, until yesterday, I could not find an adequate replacement.
Since I needed a solution that would allow us to quickly process the photo from this shoot, I tried all the methods on the most difficult photo from the entire series: a photo of a girl in a blue dress, almost merging in color with the background, with backlit slightly disheveled red curls (all Pictures are clickable, you can download a full-size original from a Yandex disk):
')

At first, I prepared a little picture, using resynthesizer, covering the areas that are out of the general tone (see the file on the Yandex disk ).
Then I duplicated the layer so that later, using a mask to hide the unsightly backdrop, I would leave the floor covering almost as in the original.
From the copy of the layer, I took the approximate main background color with the pipette (to get a good separation of hair from the background, it is better to take the main color closer to the hair) - # 0149a6 and the approximate color of shadows from one of the dark areas - # 001333.
Now the first step of the filter operation is the automatic creation of the preliminary mask. In the Russian version of the gimp, the filter is located in the “Layer - Mask” menu.

The filter needs to indicate that we are in the first step, and show which color is the main background color in the image — the foreground or background color we chose. The colors of the shadows, as can be seen from the window, will be considered transitional between the selected colors of the foreground and background.
With the default settings, I got this mask:
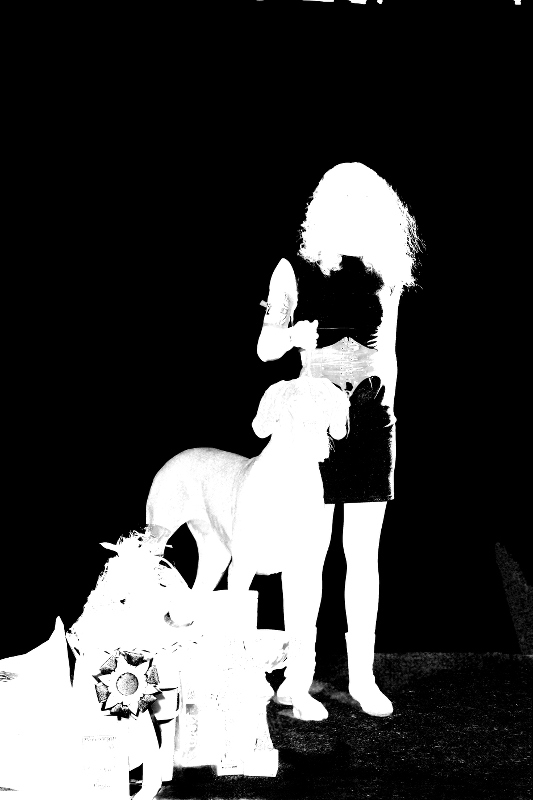
If the result does not suit you at all, you can remove the layer (to facilitate editing in the first step, this is not a mask, but a separate layer, where you can change the transparency and calmly draw the desired mask with black and white brushes) and try again with different settings. Or if the result is almost good, as in my case, you can paint the mask manually. As you can see in the picture, the blue dress got into the background area, but this is absolutely unimportant - the main thing is that the light-white transitions on the borders of the dress and the background were carefully drawn on the mask, and the hair was well separated from the background. And the middle of the dress (and other areas undeservedly assigned to the background areas) can be easily painted over with a white brush.
So, literally after a few seconds of editing, we get the final version of the layer, which will then become our mask:

Now we run the plugin a second time - in the plugin window, we indicate, respectively, that we are in the second step. At this step, you can also change the settings of the plug-in, including making a “rotation of the palette” to replace the translucent pixels of the layer with a different color (if you plan to replace the background with a very different color).
Here is the result of the second step with the default settings:

We put an empty layer under it, fill it with a radial gradient, place the original image on top of all layers and leave only the bottom with a carpet covering from it using a gradient mask. We also slightly retouch the main characters on the layer with no background, and here’s the final result:

Since, when working with this filter, it is not necessary to spend time on the preliminary selection of the main objects - it allows you to significantly speed up the work of changing the background.
A “uniform” business result, if someone is interested, looks like this .
So, meet:
Color to Mask Pro Plugin
Immediately I warn you that the plug-in can replace only a relatively uniform background. With the motley background, nothing will work out, although you can try to prepare the motley background with the help of wavelet analysis , and then set this plugin on it. But, unlike Refine Edges, the plugin does not require preliminary preparation of selection - you only need to take a pipette beforehand with the main background color and the color of the shadows (one of them should be set with the foreground color, the second with the back color).
On the page of the plugin, in principle, describes in detail how to use it.
Therefore, the purpose of this note is to simply introduce you to a simple solution that has appeared, and give an example of using it on a much more complex image.
At the beginning of May, I was lucky to participate (as a student) in a studio shooting in difficult “field” conditions - on a small patch of a flight of steps from the St. Petersburg Ice Palace, we launched a mini-studio to shoot participants of the German Treaties exhibition. Since the ultimate goal of the shooting is to print a glossy booklet - all photos had to undergo a post-processing in the same style, one of the tasks of which was just to replace the crumpled blue fabric background with a decent looking gradient of the same tone. And here I began to lag far behind the professional who organized the shooting: although photoshop runs in Linux, it works with annoying bugs, and on my not very new computer it is also terribly slow. However, until yesterday, I could not find an adequate replacement.
Since I needed a solution that would allow us to quickly process the photo from this shoot, I tried all the methods on the most difficult photo from the entire series: a photo of a girl in a blue dress, almost merging in color with the background, with backlit slightly disheveled red curls (all Pictures are clickable, you can download a full-size original from a Yandex disk):
')
At first, I prepared a little picture, using resynthesizer, covering the areas that are out of the general tone (see the file on the Yandex disk ).
Then I duplicated the layer so that later, using a mask to hide the unsightly backdrop, I would leave the floor covering almost as in the original.
From the copy of the layer, I took the approximate main background color with the pipette (to get a good separation of hair from the background, it is better to take the main color closer to the hair) - # 0149a6 and the approximate color of shadows from one of the dark areas - # 001333.
Now the first step of the filter operation is the automatic creation of the preliminary mask. In the Russian version of the gimp, the filter is located in the “Layer - Mask” menu.
The filter needs to indicate that we are in the first step, and show which color is the main background color in the image — the foreground or background color we chose. The colors of the shadows, as can be seen from the window, will be considered transitional between the selected colors of the foreground and background.
With the default settings, I got this mask:
If the result does not suit you at all, you can remove the layer (to facilitate editing in the first step, this is not a mask, but a separate layer, where you can change the transparency and calmly draw the desired mask with black and white brushes) and try again with different settings. Or if the result is almost good, as in my case, you can paint the mask manually. As you can see in the picture, the blue dress got into the background area, but this is absolutely unimportant - the main thing is that the light-white transitions on the borders of the dress and the background were carefully drawn on the mask, and the hair was well separated from the background. And the middle of the dress (and other areas undeservedly assigned to the background areas) can be easily painted over with a white brush.
So, literally after a few seconds of editing, we get the final version of the layer, which will then become our mask:
Now we run the plugin a second time - in the plugin window, we indicate, respectively, that we are in the second step. At this step, you can also change the settings of the plug-in, including making a “rotation of the palette” to replace the translucent pixels of the layer with a different color (if you plan to replace the background with a very different color).
Here is the result of the second step with the default settings:
We put an empty layer under it, fill it with a radial gradient, place the original image on top of all layers and leave only the bottom with a carpet covering from it using a gradient mask. We also slightly retouch the main characters on the layer with no background, and here’s the final result:
Since, when working with this filter, it is not necessary to spend time on the preliminary selection of the main objects - it allows you to significantly speed up the work of changing the background.
A “uniform” business result, if someone is interested, looks like this .
Source: https://habr.com/ru/post/186014/
All Articles