We are friends of Check Point and GOST encryption
Hi, Habrovchane! 
In this article we will tell you about the process of setting up IPSec VPN on Check Point R75.40VS gateways using Russian cryptoalgorithms. This article will be of interest first of all to engineers involved in setting up and supporting Check Point products.
When I had the task to configure Check Point IPSec VPN gateways using Russian cryptography, I was faced with the problem of a lack of information describing this process. On this topic, you can find the official guides, describing the process in general terms, and a little scattered information on the Internet. Personally, after studying them, I still have a lot of questions that we tried to highlight in this article.
')
The use of GOST encryption allows organizations to fulfill the requirements for the cryptographic protection of communication channels in cases when this is dictated by the requirements of the Russian legislation. It should be noted that for the time being, Check Point gateways are still being certified by the FSB as SKZI (information encryption tool), but the manufacturer promises to receive a certificate in the foreseeable future. Although the crypto-libraries themselves have a certificate from the FSB, the question remains of controlling their embedding.
The topic of control over embedding of cryptographic tools is rather ambiguous and only the FSB can give a definitive answer to some questions.
An interesting post on this topic can be read here:
www.cryptopro.ru/forum2/default.aspx?g=posts&t=1534
In a few words about this topic can be found at the end of the article.
Support for GOST encryption on Check Point gateways has been around for quite a while for certified and upcoming FSTEC versions of firewall screens from this manufacturer. The ability to use GOST encryption on Check Point gateways appears due to the installation of a special patch (hotfix in Check Point terminology) and crypto libraries of the CryptoPro company. For all versions except R65.50, only building an IPSec Site-to-Site Domain Based VPN is available; for version R65.50, the option of building an IPSec Site-to-Site Route Based VPN is also available. Currently hotfixes for GOST IPSec encryption exist for the following Check Point versions:
• R65.50 (CryptoPro CSP 3.6 crypto libraries are used);
• R71.20 (CryptoPro CSP 3.6 R2 crypto library is used);
• R75.30 (CryptoPro CSP 3.6 R3 crypto library is used);
• R75.40VS (CryptoPro CSP 3.6 R3 crypto library is used).
Versions R65.50 and R71.20 are certified by the FSTEC of Russia for a firewall in the third class of protection, and version R71.20 is additionally certified for an intrusion detection system and certified for the absence of undeclared capabilities in the fourth level.
It should also be noted that multi-threading support is implemented in the GOST-pack versions for the R75.30 and R75.40VS, which should have a good impact on performance.
This article will describe the process of setting up GOST encryption on the latest available version (R75.40VS).
The description of setting GOST encryption for version R71.20 is described quite well in this article:
www.masterlab.ru/CheckPoint/Knowledgebase/GOST-VPN-on-Check-Point
In order to make the description more informative, not the easiest deployment option was chosen. The description includes setting up a Site-to-Site Domain Based VPN with authentication of partners for GOST certificates and password (PSK). To configure the authentication of partners in the state-of-the-art certificates, a certification authority is needed to ensure their release; this description uses the Microsoft Certification Authority with an installed CryptoPro Pro CSP. Description of the integration of CryptoPro CSP with Microsoft Certification Authority deserves a separate discussion and will not be presented in this article. For test purposes, if you do not want to deploy a certificate authority for issuing GOST certificates, you can use the CryptoPro test certificate authority located at this address:
www.cryptopro.ru/certsrv
The process of setting up the Microsoft Certification Authority with CryptoPro, for example, is well described by the guys from S-Terra in the admin guides on the CSP VPN Gate and CSP VPN Client, which can be found here:
www.s-terra.com/documents/R31/Gate/CSP_VPN_Appendix.pdf
www.s-terra.com/documents/R311/Client/CSP_VPN_Client_Admin_Guide_cp.pdf
In general, the whole process can be divided into the following stages:
1. Preliminary steps related to the installation and initial configuration of Check Point and the certification authority;
2. Generate an external gamma file for pseudo-random number sensors used on gateways;
3. Installing hotfix and crypto library;
4. Creating and configuring a pseudo-random number sensor;
5. Configure VPN:
5.1. Configure VPN using certificates;
5.2. Set up a VPN using a password.
Below the points will be considered all the above stages.
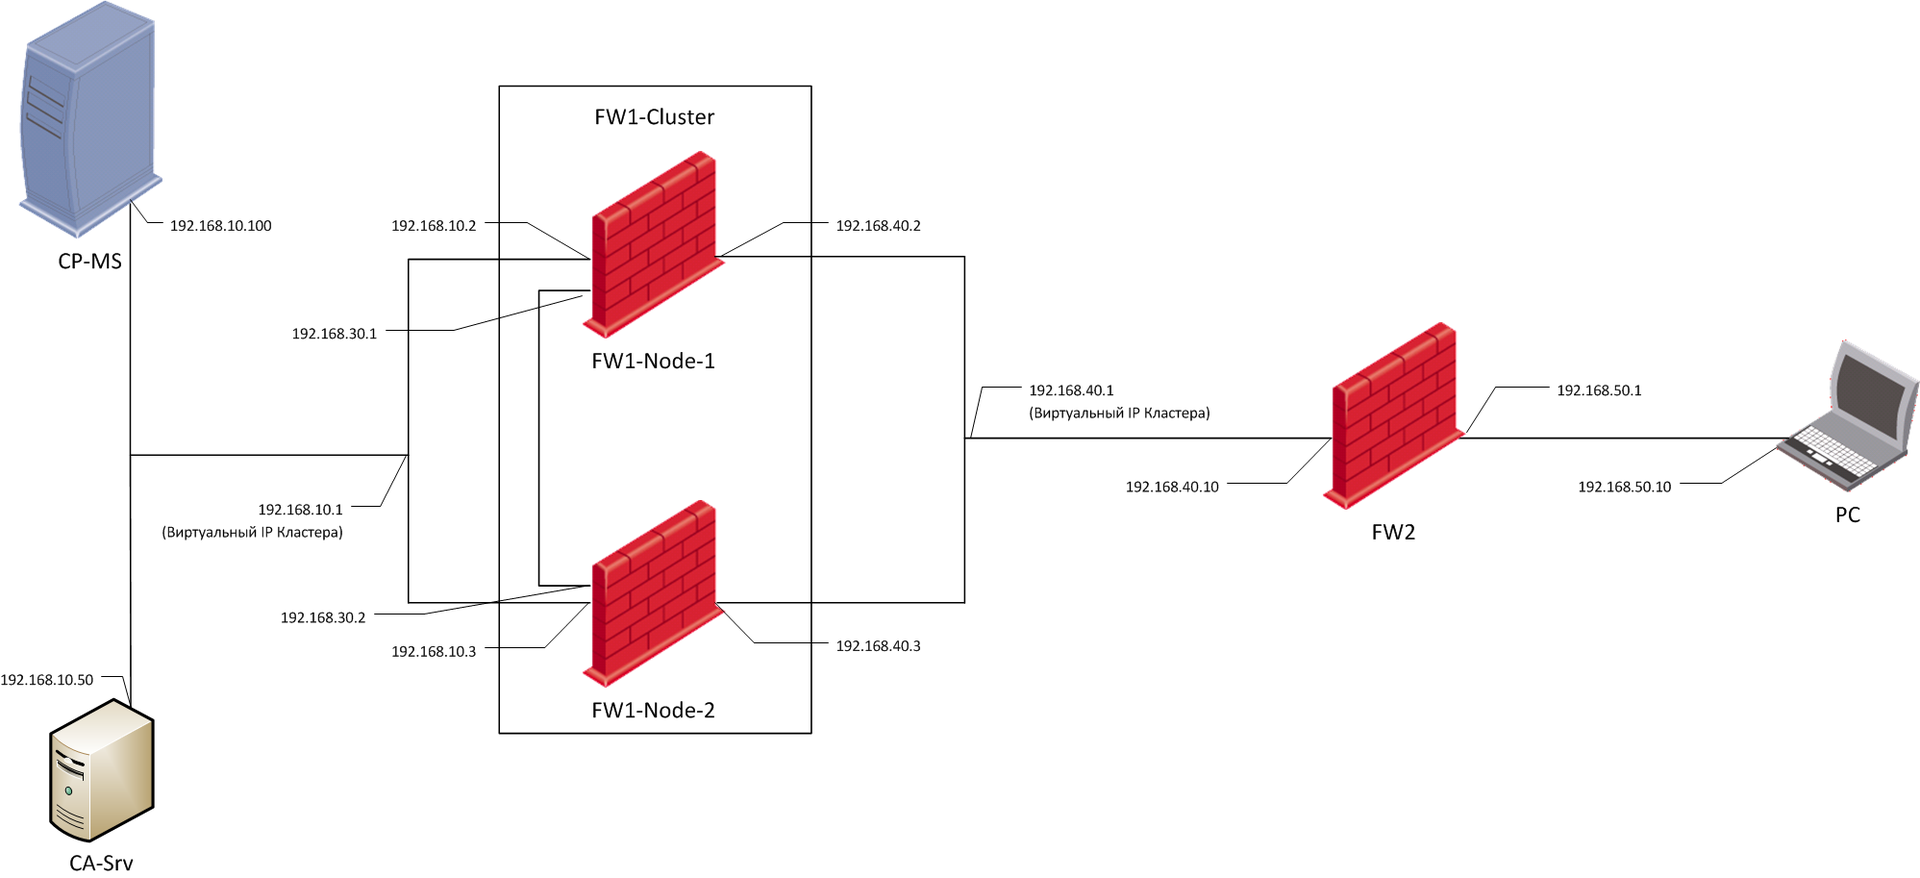
Stand scheme:
To configure GOST encryption on Check Point gateways, you need the following software:
• CryptoPro CSP 3.6 R3 distribution for Windows (x86 / x64), you can download it here (registration is required):
www.cryptopro.ru/sites/default/files/private/csp/36R3/7491/CSPSetup.exe
• CryptoPro CSP 3.6 R3 distribution for Check Point SPLAT / GAiA (x86 / x64), you can download it here (registration is required):
www.cryptopro.ru/sites/default/files/private/csp/36R3/7491/splat-gaia.tgz
• Check Point R75.40VS Gaia distribution, you can download it here (registration is required):
supportcenter.checkpoint.com/supportcenter/portal/user/anon/page/default.psml/media-type/html?action=portlets.DCFileAction&eventSubmit_doGetdcdetails=&fileid=18503
• Universal hotfix (patch) for GOST support on Check Point gateways and control servers and a special version of the Check Point SmartConsole control utility, with support for GOST settings, can be downloaded here (If you need an official source, you can request from distributors or the manufacturer):
ngfw.ru/2013/gost-ipsec-v4-r75-40vs
Unlike the R65.50 and R71.20 versions, the GOST encryption setting for the R75.30 and R75.40VS versions does not require an additional Check Point license (free license for the GOST encryption functionality) and the test configuration can be fully performed on trial licenses.
• Install and initialize Check Point Gateways and Management Server;
• Configure the Microsoft Certification Authority with the CryptoPro CSP.
In this description, the external gamma file is created on the CA-Srv machine using a biological random number sensor included in the CryptoPro Pro CSP 3.6 for Windows installed on the machine to create a certification authority. To create a certified solution in real conditions, an external gamut file must be created on a machine that meets the requirements of the External Gamma Workstation document (ZTYAI.00050-03 90 05), which can be downloaded here (registration is required):
www.cryptopro.ru/sites/default/files/private/csp/36R3/7491/doc.zip
This file contains a gamut for initializing a software pseudo-random number sensor used to generate private encryption keys.
To generate a gamma, perform the following sequence of actions:
1) Create directories for source material files (In the case described, this is a separate directory for each gateway, since using the same file on different gateways is NOT ALLOWED, although technically it is possible);
2) From the command line of the machine with CryptoPro CSP 3.6 installed, go to the C: \ Program Files \ CryptoPro \ CSP directory and run the following command:
where:
Command entry example:

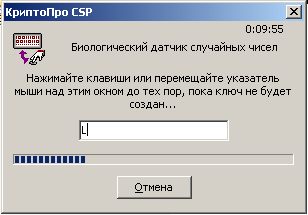
3) The “correct” AWP of the external gamut uses a hardware pseudo-random number sensor included in the Sable electronic lock, in the test case a biological pseudo-random number sensor is used and you will be asked to click on the keys or move the mouse, it looks like this:
If the genkpim.exe utility is successfully launched, the following message will be displayed in the command line:

Upon completion of the biological random number sensor operation, a given number of gamma segments of 36 bytes each will be created (32 bytes of the pseudo-random sequence and 4 bytes of the CRC to the segment). In the directory specified in the command, two directories will be created with the names db1 and db2, each containing one file with the name kis_1, these files are identical and duplicated for reliability.
Crypto-libraries should be installed only on gateways. On a machine that performs the role of the Check Point Management Server exclusively, the installation of cryptoblocks is optional. Hotfix needs to be installed on both the gateways and the management server.
To install a hotfix on a machine that performs the role of the Check Point Management Server exclusively, complete the following steps:
1) Copy the hotfix file (archive named VPN_R75.40VS_HF_GOST_V4.0_EA) to the temporary directory on the server;
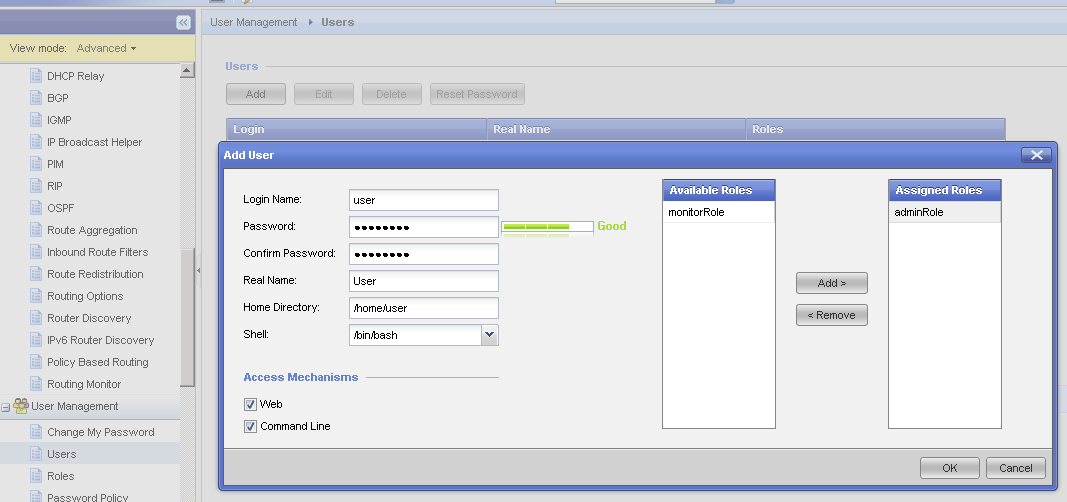
To transfer / download files from Check Point, it is convenient to use the WinSCP utility. In order to use the WinSCP utility to connect to Check Point, you need to specify the user using bash as standard when authenticating. To do this, you must either temporarily change the settings used by the user that you are logging in to, or create a user to which you will hang this one on a permanent basis. In Gaia OS, this can be done via a web interface, here’s an example of how a window with user settings should look like:
2) Log in to the server via SSH;
3) Switch to expert mode;
4) Unpack the archive in the current directory;
5) Run the installation script by running the command:
6) Installing a hotfix will cause an interruption of the services provided by the management server, agree with the warning about this:

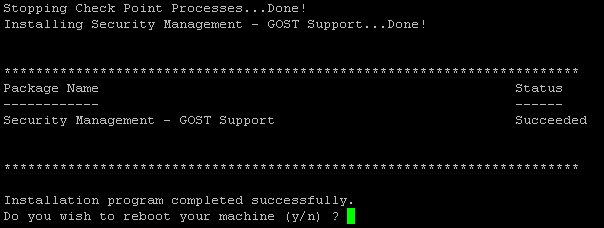
7) After the installation is completed, you will receive the following message and asked to restart the server, agree:
8) After the reboot, the installation of the hotfix on the management server can be considered complete, it is necessary to install the hotfix and crypto libraries on the gateways;
9) To install the hotfix and crypto-library on the machine acting as a gateway or a gateway combined with the management server, perform the following steps:
• Log into the gateway through SSH;
• Switch to expert mode;
• Create the following directories on the gateway:
• Copy the rmp files included in the CryptoPro CSP 3.6 R3 distribution kit for Check Point SPLAT / GAiA (x86 / x64) to the gateway / var / gost_install / rpm;
• Copy the corresponding external gamma file kis_1 to the / var / gost_install / kis directory on the gateway, it can be any file and the advising directory db1 or db2 of the directory specified in the command genkpim.exe ynp, since the files are identical;
• Copy the hotfix (archive named VPN_R75.40VS_HF_GOST_V4.0_EA) to the temporary directory on the gateway;
• Unpack the archive in the current directory;
• Run the installation script by running the following command:
• Installing a hotfix will cause interruption of services provided by the gateway (including the transfer of traffic through the gateway), agree with the warning about this;
• Upon completion of the installation, you will be presented with the following message and asked to restart the gateway, agree.
For a machine acting as a gateway, the message will look like this:
For a machine acting as a gateway combined with a management server, the following:

10) After the installation is completed, you will need to enter the license key for CryptoPro. You can do this with the following command:
To view the license status, use the following command:
In the test environment, this item can be skipped and use the trial license for CryptoPro.
11) If you are using the 64-bit version of the Gaia OS, you need to disable SecureXL technology using the cpconfig utility launched from the command line.
These actions are performed on gateways, including gateways that are combined with the management server.
1) Log in to the gateway via SSH;
2) Switch to expert mode;
3) Copy the file kis_1 from the / var / gost_install / kis directory to the directories / var / opt / cprocsp / dsrf / db1 / and / var / opt / cprocsp / dsrf / db2 /;
4) Create a pseudo-random number sensor by running the following command:
5) Configure the created pseudo-random number sensor to use the external gamma file by executing the following commands:
You can verify that a new pseudo-random number sensor has been created using the following command:
The output of the command will look like this and should contain information about the sensor with the name CPSDRNG and the maximum priority level equal to zero:
The kis_1 file will be consumed when the sensor is initialized, for example, to create a private key container, adding a certificate takes 2 segments of the sequence. Segments of the sequence are taken from the end of the file, used segments are deleted.
For example:
File size before adding certificate:

File size after adding certificate:
To configure GOST encryption with the authentication of certificate partners, you must perform the following sequence of actions:
1) Install a special version of Check Point SmartConsole (file named: SmartConsole_GOST_R75.40VS_EA);
2) Login to the management server using this utility;
3) Create a new VPN Community:
4) Put the gateways in the VPN Community being created, between which the VPN connection will be built:
5) Configure the VPN Community to use GOST encryption:
There are 3 options:
Set 1 and Set 2 - differing in the used encryption modes, you can use any (supported by all versions for which there is a GOST, except R65.50);
Legacy - compatibility mode with GOST on Check Point R65.50, if there is a need to build VPN tunnels with gateways operating on this version of Check Point.
6) Click the "OK" button, thereby creating a new VPN Community;
The VPN Community list will look something like this:
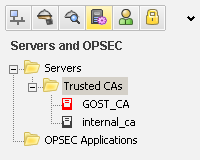
7) After creating the VPN Community and adding gateways to it, it is necessary to make in the configuration of the management server information about the GOST Certificate Authority that will issue certificates for our gateways. Add a new trusted certificate authority to the configuration:
8) If the CRL Distribution Point (in the example, it is a certificate authority server) is behind one of the gateways and the other gateways will connect to it via a VPN connection, these gateways will not be able to load the CRL, because they will not be able to build a VPN because of the impossibility checking the certificate of the first gateway. Get a vicious circle. In this case, you must disable the CRL check for this certificate authority. To do this, uncheck all the checkboxes in the “Retrieve CRL From” section of the OPSEC PKI tab:
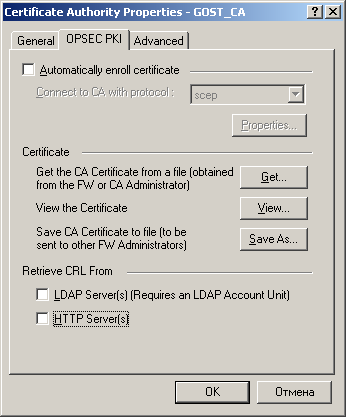
Or you can take the CRL Distribution Point outside the VPN domain of the gateway protecting it so that other gateways will not access it through a VPN connection.
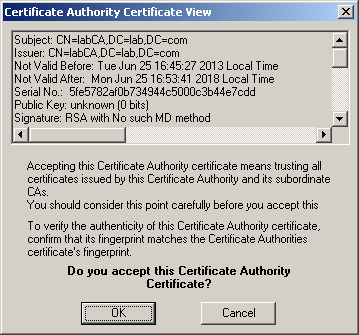
9) Upload the certification authority root certificate in DER format and add it to the Check Point configuration:
10) After adding a new certification authority, it is necessary to issue certificates for gateways. The order of issuance and addition of certificates for the cluster and nonclustered gateways is slightly different.
In the case of a cluster of gateways, certificates are issued to EVERY member of the cluster. To issue a certificate, follow these steps:
• Open the properties of the gateway cluster object;
• Go to the “Cluster Members” tab;
• Double-click the cluster member object;
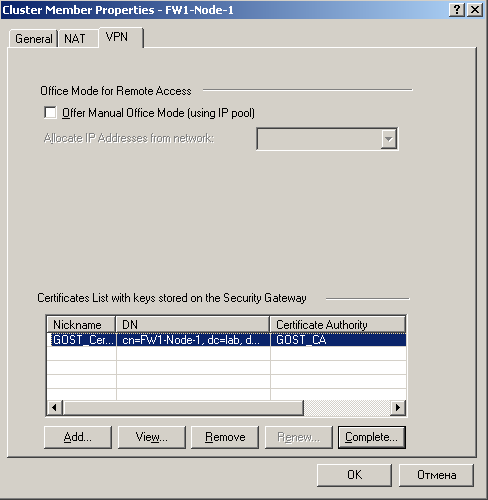
• In the “Cluster Member Properties” window that opens, go to the “VPN” tab and click the “Add” button in the “Certificates List with keys stored on Security Gateway” field:
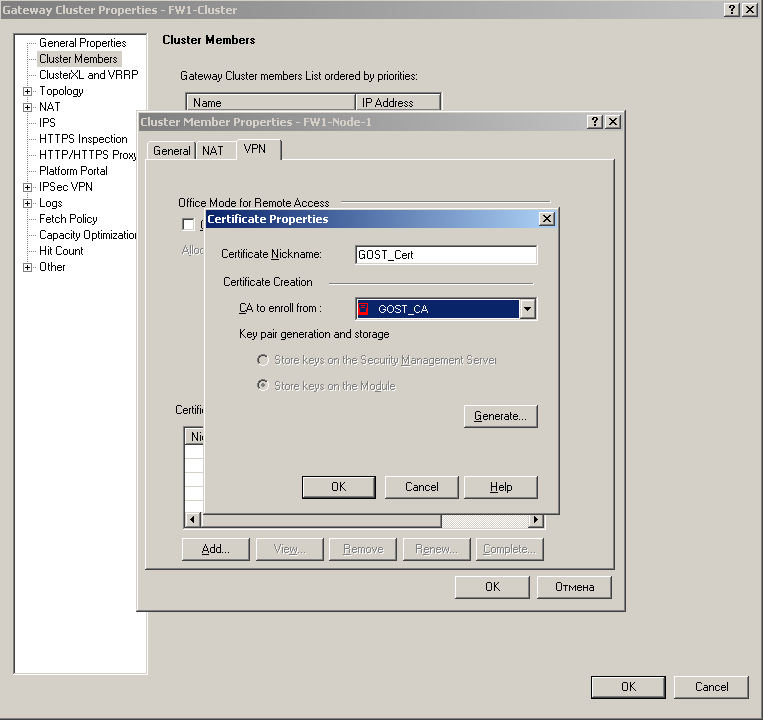
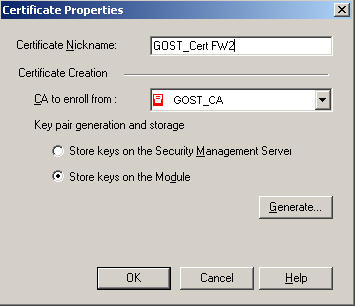
• Enter the certificate name;
• In the “CA to enroll from” field, select the added GOST certification authority and click the Generate button;
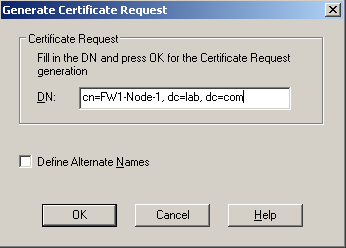
• Fill in the Distinguished Name for the request, for example:
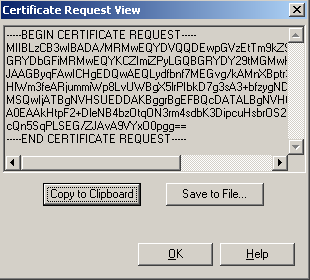
• A certificate request will be generated, click “Copy to Clipboard”:
• Paste the certificate request in the “Saved Request” field on the certification authority portal and click issue:

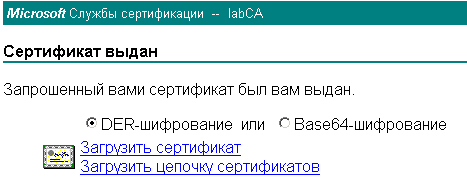
• Save the certificate file in DER format:
• In the field “Certificates List with keys for Security Gateway” click the button “Complete”, in the opened window select the saved certificate file:
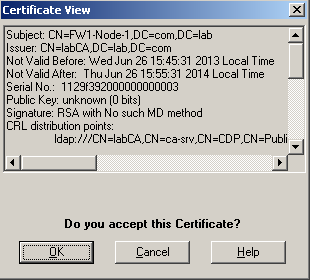
• Accept the certificate:
• Repeat this sequence for each cluster member.
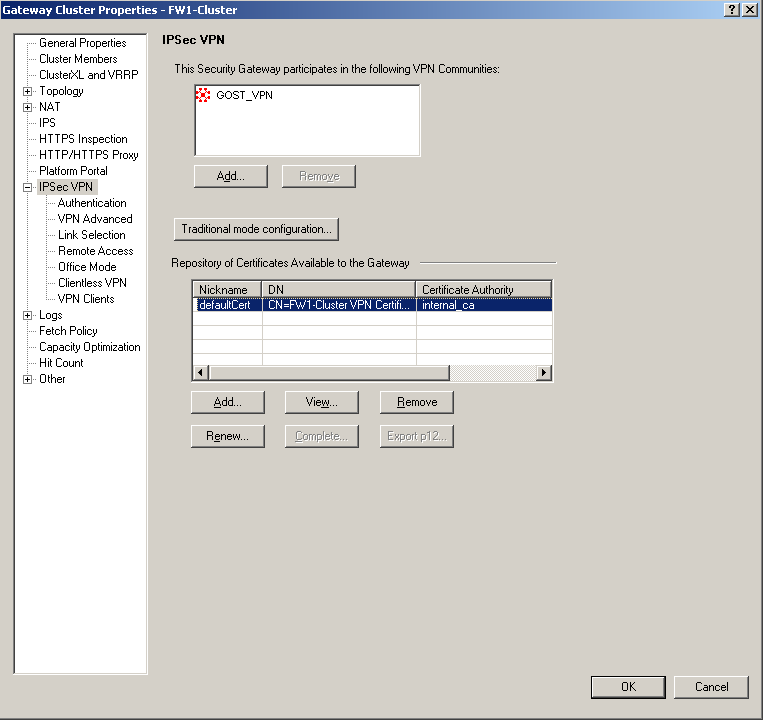
In the case of issuing a certificate for a nonclustered gateway, a certificate request is created in the gateway properties window, section “IPSec VPN”, column “Repository of Certificates Available to the Gateway”. Also press the “Add” key, only in the case of a nonclustered gateway there will be a choice of where the encryption keys will be stored. In this case, select the “Store keys on the Module” column, otherwise the procedure is completely similar to the one described above.
After adding certificates, a nonclustered gateway is ready to build a GOST VPN after policy installation, but in the case of a cluster, this is not all. CryptoPro encrypts traffic sent between cluster members and between libraries on the gateway using a Site Key or Site Certificate. In the case of a nonclustered gateway, the certificate that was issued and added to the gateway is used as the Site Certificate. In the case of a cluster, only the Site Key can be used for these purposes and must be generated and added to the configuration;
11) To generate a Site Key, you must perform the following sequence of actions:
• Open the gateway object properties window, in the “IPSec VPN” section in the “Repository of Certificates Available to the Gateway” column, select the certificate issued by the Gateway internal certification authority (Check Point internal_ca) and click the “View” button;
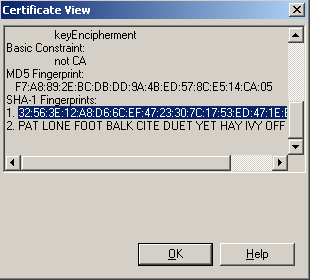
• In the certificate properties window that opens, you need to find the first line with the SHA-1 certificate hash, you will need it to generate the Site Key;
• On any gateway with CryptoPro installed from expert mode, the following command must be executed:
where:
Example of command execution and output:
[Expert @ FW1-Node-1: 0] # bash /opt/cprocsp/bin/ia32/cp-genpsk.sh FW1-Cluster Net 6 32: 56: 3E: 12: A8: D6: 6C: EF: 47: 23: 30: 7C: 17: 53: ED: 47: 1E: BD: 7F: 7D
genpsk
UTC Wed Jun 26 12:15:53 2013
FW1-Cluster. Net. Number of stations 1.
Stations: 32563E12A8D66CEF4723307C1753ED471EBD7F7D
Part 0. Valid for (months) 6.
FW1-Cluster UTC Wed Jun 26 12:15:53 2013
32563E12A8D66CEF4723307C1753ED471EBD7F7D part 0 valid for (months) 6
W6426WLHP3C8TM
W6426WLHP3C8TM
W6426WLHP3C8TM
genpsk
UTC Wed Jun 26 12:15:53 2013
FW1-Cluster. Net. Number of stations 1.
Stations: 32563E12A8D66CEF4723307C1753ED471EBD7F7D
Part 1. Valid for (months) 6.
FW1-Cluster UTC Wed Jun 26 12:15:53 2013
32563E12A8D66CEF4723307C1753ED471EBD7F7D part 1 valid for (months) 6
41NKET2QC6B3NW
41NKET2QC6B3NW
41NKET2QC6B3NW
• The output of the command contains two parts of the generated Site Key, which must be combined and entered into the cluster configuration. The first part is marked green, the second part is marked red. You need to combine them as follows:
W6426WLHP3C8TM 41NKET2QC6B3NW
Site Key must be regenerated in the following cases:
• Site Key has expired;
• VPN was turned on and off;
• Certificate issued by an internal certification authority (internal_ca) has been updated.
• After you have a Site Key, you need to make it into the cluster configuration. Open the properties of the cluster object, the “IPSec VPN” section, the “VPN Advanced” column and click the “Pre-Shared Secret” button in the “GOST Standard” section:

• In the window that opens, enter the Site Key and click OK:
12) Now you can install policies on gateways and check the logs for the fact that the VPN is successfully assembled. The logs must contain messages on the successful installation of a Site Key or Site Certificate and the initialization of cryptographic libraries and messages of the Encrypt / Decrypt type for traffic transmitted through a VPN connection. Examples of messages:

13) If the policy has been established without errors and these messages are present in the logs, then congratulations, you have successfully managed to configure the VPN using GOST encryption.
If, by coincidence, you have no desire or ability to bother with certificates, you can configure partner authentication using a passphrase. It is not recommended to use this option with a large number of gateways due to the complexity of working with a large number of passwords, and since the password must be specified for each pair of gateways, their number can be truly enormous. So, to configure a GOST VPN using a password, you must perform the following sequence of actions:
1) Install a special version of Check Point SmartConsole (file named: SmartConsole_GOST_R75.40VS_EA);
2) Login to the management server using this utility;
3) Create a new VPN Community:
4) Put the gateways in the VPN Community being created, between which the VPN connection will be built:
5) Configure the VPN Community to use GOST encryption:
There are 3 options:
Set 1 and Set 2 - differing in the used encryption modes, you can use any (supported by all versions for which there is a GOST, except R65.50);
Legacy - compatibility mode with GOST on Check Point R65.50, if there is a need to build VPN tunnels with gateways operating on this version of Check Point.
6) Set the password for authentication in the VPN Community settings. This is done in the properties of the VPN Community in the section “Advanced Settings”, item “Shared Secret”:
7) Click the "OK" button, thereby creating a new VPN Community;
The VPN Community list will look something like this:
8) Generate a Site Key for EACH gateway, as specified in section 5.1, paragraph 11. In the case of a cluster of gateways, one Site Key is generated per cluster. If you have an established GOST certificate on a nonclustered gateway, then the Site Key for this gateway can be not generated. For nonclustered gateways, both the Site Key and Site Certificate can be used. Site Certificate is preferable and, if there is a certificate, it will be used;
9) After generating and installing the Site Key, you need to generate a password for a pair of gateways. Unlike the “traditional” VPN setting on Check Point, when setting up a GOST VPN, you cannot use an arbitrary password, you need to generate it by analogy with the Site Key. To generate a password for a pair of gateways, follow these steps:
• On any gateway with CryptoPro installed from expert mode, the following command must be executed:
where:
There is no fundamental difference in which gateway is first and which second is not; the <pair_name> field can be filled in arbitrarily.
Example of command execution and output:
Expert @ FW1-Node-1: 0] # bash /opt/cprocsp/bin/ia32/cp-genpsk.sh FW1-FW2 Net 6 32: 56: 3E: 12: A8: D6: 6C: EF: 47: 23 : 30: 7C: 17: 53: ED: 47: 1E: BD: 7F: 7D A6: F0: 24: 9A: 16: AA: 7F: 42: 9A: 3A: A2: 83: 66: FA: 67: E9: 75: 08: 46: 1B
genpsk
UTC Sat Jun 29 11:17:26 2013
FW1-FW2. Net. Number of stations 2.
Stations: 32563E12A8D66CEF4723307C1753ED471EBD7F7D A6F0249A16AA7F429A3AA28366FA67E97508461B
Part 0. Valid for (months) 6.
FW1-FW2 UTC Sat Jun 29 11:17:26 2013
32563E12A8D66CEF4723307C1753ED471EBD7F7D part 0 valid for (months) 6
BC1HGFATY4N6QM
BC1HGFATY4N6QM
BC1HGFATY4N6QM
FW1-FW2 UTC Sat Jun 29 11:17:26 2013
A6F0249A16AA7F429A3AA28366FA67E97508461B part 0 valid for (months) 6
ZPYLCHU36QNZNM
ZPYLCHU36QNZNM
ZPYLCHU36QNZNM
genpsk
UTC Sat Jun 29 11:17:26 2013
FW1-FW2. Net. Number of stations 2.
Stations: 32563E12A8D66CEF4723307C1753ED471EBD7F7D A6F0249A16AA7F429A3AA28366FA67E97508461B
Part 1. Valid for (months) 6.
FW1-FW2 UTC Sat Jun 29 11:17:26 2013
32563E12A8D66CEF4723307C1753ED471EBD7F7D part 1 valid for (months) 6
WKDHN8MRYD599U
WKDHN8MRYD599U
WKDHN8MRYD599U
FW1-FW2 UTC Sat Jun 29 11:17:26 2013
A6F0249A16AA7F429A3AA28366FA67E97508461B part 1 valid for (months) 6
FN4T4X8Z5YRT0U
FN4T4X8Z5YRT0U
FN4T4X8Z5YRT0U
• The output of the command contains four parts of the generated password that need to be combined and entered into the configuration. The first part is marked green, the second part is marked red, the third honor is marked blue, the fourth - orange, but they are combined, unlike the Site Key, not in order, and so: part 1 + part 3 + part 2 + part 4, combination example parts:
BC1HGFATY4N6QM WKDHN8MRYD599U ZPYLCHU36QNZNM FN4T4X8Z5YRT0U
The password must be regenerated in the following cases:
• The password has expired;
• VPN was turned on and off;
• Certificate issued by an internal certification authority (internal_ca) has been updated.
10) After you have a password, it must be entered into the configuration. Open the gateway properties window, the “IPSec VPN” section, click the “Traditional mode configuration” button, select the “Pre-Shared Secret” checkbox:
11) Click the Edit Secrets button, enter the generated key for another member of the gateway pair, and click OK:
12) If you have gateways that are managed by other management servers, as in the example, repeat the operation of adding a key to them;
13) Now you can install policies on gateways and check the logs for the fact that the VPN is successfully assembled. The logs must contain messages on the successful installation of a Site Key or Site Certificate and the initialization of cryptographic libraries and messages of the Encrypt / Decrypt type for traffic transmitted through a VPN connection.
14) , , VPN .
« ?» . « -2005» , . , « », 5 . , , . , , , , , , -2005 .
In this article we will tell you about the process of setting up IPSec VPN on Check Point R75.40VS gateways using Russian cryptoalgorithms. This article will be of interest first of all to engineers involved in setting up and supporting Check Point products.
When I had the task to configure Check Point IPSec VPN gateways using Russian cryptography, I was faced with the problem of a lack of information describing this process. On this topic, you can find the official guides, describing the process in general terms, and a little scattered information on the Internet. Personally, after studying them, I still have a lot of questions that we tried to highlight in this article.
')
The use of GOST encryption allows organizations to fulfill the requirements for the cryptographic protection of communication channels in cases when this is dictated by the requirements of the Russian legislation. It should be noted that for the time being, Check Point gateways are still being certified by the FSB as SKZI (information encryption tool), but the manufacturer promises to receive a certificate in the foreseeable future. Although the crypto-libraries themselves have a certificate from the FSB, the question remains of controlling their embedding.
The topic of control over embedding of cryptographic tools is rather ambiguous and only the FSB can give a definitive answer to some questions.
An interesting post on this topic can be read here:
www.cryptopro.ru/forum2/default.aspx?g=posts&t=1534
In a few words about this topic can be found at the end of the article.
Support for GOST encryption on Check Point gateways has been around for quite a while for certified and upcoming FSTEC versions of firewall screens from this manufacturer. The ability to use GOST encryption on Check Point gateways appears due to the installation of a special patch (hotfix in Check Point terminology) and crypto libraries of the CryptoPro company. For all versions except R65.50, only building an IPSec Site-to-Site Domain Based VPN is available; for version R65.50, the option of building an IPSec Site-to-Site Route Based VPN is also available. Currently hotfixes for GOST IPSec encryption exist for the following Check Point versions:
• R65.50 (CryptoPro CSP 3.6 crypto libraries are used);
• R71.20 (CryptoPro CSP 3.6 R2 crypto library is used);
• R75.30 (CryptoPro CSP 3.6 R3 crypto library is used);
• R75.40VS (CryptoPro CSP 3.6 R3 crypto library is used).
Versions R65.50 and R71.20 are certified by the FSTEC of Russia for a firewall in the third class of protection, and version R71.20 is additionally certified for an intrusion detection system and certified for the absence of undeclared capabilities in the fourth level.
It should also be noted that multi-threading support is implemented in the GOST-pack versions for the R75.30 and R75.40VS, which should have a good impact on performance.
This article will describe the process of setting up GOST encryption on the latest available version (R75.40VS).
The description of setting GOST encryption for version R71.20 is described quite well in this article:
www.masterlab.ru/CheckPoint/Knowledgebase/GOST-VPN-on-Check-Point
In order to make the description more informative, not the easiest deployment option was chosen. The description includes setting up a Site-to-Site Domain Based VPN with authentication of partners for GOST certificates and password (PSK). To configure the authentication of partners in the state-of-the-art certificates, a certification authority is needed to ensure their release; this description uses the Microsoft Certification Authority with an installed CryptoPro Pro CSP. Description of the integration of CryptoPro CSP with Microsoft Certification Authority deserves a separate discussion and will not be presented in this article. For test purposes, if you do not want to deploy a certificate authority for issuing GOST certificates, you can use the CryptoPro test certificate authority located at this address:
www.cryptopro.ru/certsrv
The process of setting up the Microsoft Certification Authority with CryptoPro, for example, is well described by the guys from S-Terra in the admin guides on the CSP VPN Gate and CSP VPN Client, which can be found here:
www.s-terra.com/documents/R31/Gate/CSP_VPN_Appendix.pdf
www.s-terra.com/documents/R311/Client/CSP_VPN_Client_Admin_Guide_cp.pdf
In general, the whole process can be divided into the following stages:
1. Preliminary steps related to the installation and initial configuration of Check Point and the certification authority;
2. Generate an external gamma file for pseudo-random number sensors used on gateways;
3. Installing hotfix and crypto library;
4. Creating and configuring a pseudo-random number sensor;
5. Configure VPN:
5.1. Configure VPN using certificates;
5.2. Set up a VPN using a password.
Below the points will be considered all the above stages.
Stand scheme:
| Node name | operating system | Role |
|---|---|---|
| CPMS | Check Point Gaia R75.40VS | Check Point Gateway Management Server (Primary Management Server) Controlled gateways: FW1-Node-1, FW1-Node-2 |
| FW1-Node-1 | Check Point Gaia R75.40VS | Check Point (Security gateway), cluster member FW1-Cluster, cluster mode: Multicast load sharing |
| FW1-Node-2 | Check Point Gaia R75.40VS | Check Point (Security gateway), cluster member FW1-Cluster, cluster mode: Multicast load sharing |
| Fw2 | Check Point Gaia R75.40VS | Check Point Gateway Management Server (Primary Management Server), Check Point Gateway (Security gateway) |
| PC | Windows 7 | The machine used to check traffic between gateways |
| CA-Srv | Windows Server 2003 Enterprise | Certificate Authority (Microsoft CA with installed CryptoPro) |
To configure GOST encryption on Check Point gateways, you need the following software:
• CryptoPro CSP 3.6 R3 distribution for Windows (x86 / x64), you can download it here (registration is required):
www.cryptopro.ru/sites/default/files/private/csp/36R3/7491/CSPSetup.exe
• CryptoPro CSP 3.6 R3 distribution for Check Point SPLAT / GAiA (x86 / x64), you can download it here (registration is required):
www.cryptopro.ru/sites/default/files/private/csp/36R3/7491/splat-gaia.tgz
• Check Point R75.40VS Gaia distribution, you can download it here (registration is required):
supportcenter.checkpoint.com/supportcenter/portal/user/anon/page/default.psml/media-type/html?action=portlets.DCFileAction&eventSubmit_doGetdcdetails=&fileid=18503
• Universal hotfix (patch) for GOST support on Check Point gateways and control servers and a special version of the Check Point SmartConsole control utility, with support for GOST settings, can be downloaded here (If you need an official source, you can request from distributors or the manufacturer):
ngfw.ru/2013/gost-ipsec-v4-r75-40vs
Unlike the R65.50 and R71.20 versions, the GOST encryption setting for the R75.30 and R75.40VS versions does not require an additional Check Point license (free license for the GOST encryption functionality) and the test configuration can be fully performed on trial licenses.
1. Preliminary actions
• Install and initialize Check Point Gateways and Management Server;
• Configure the Microsoft Certification Authority with the CryptoPro CSP.
2. Generate an external gamma file
In this description, the external gamma file is created on the CA-Srv machine using a biological random number sensor included in the CryptoPro Pro CSP 3.6 for Windows installed on the machine to create a certification authority. To create a certified solution in real conditions, an external gamut file must be created on a machine that meets the requirements of the External Gamma Workstation document (ZTYAI.00050-03 90 05), which can be downloaded here (registration is required):
www.cryptopro.ru/sites/default/files/private/csp/36R3/7491/doc.zip
This file contains a gamut for initializing a software pseudo-random number sensor used to generate private encryption keys.
To generate a gamma, perform the following sequence of actions:
1) Create directories for source material files (In the case described, this is a separate directory for each gateway, since using the same file on different gateways is NOT ALLOWED, although technically it is possible);
2) From the command line of the machine with CryptoPro CSP 3.6 installed, go to the C: \ Program Files \ CryptoPro \ CSP directory and run the following command:
genkpim.exe yn <p> where:
o y – ( 2 , 10 , 1000 ); o n – (8 16- ), , 11111111; o <p> - ( , 1). Command entry example:
3) The “correct” AWP of the external gamut uses a hardware pseudo-random number sensor included in the Sable electronic lock, in the test case a biological pseudo-random number sensor is used and you will be asked to click on the keys or move the mouse, it looks like this:
If the genkpim.exe utility is successfully launched, the following message will be displayed in the command line:
Upon completion of the biological random number sensor operation, a given number of gamma segments of 36 bytes each will be created (32 bytes of the pseudo-random sequence and 4 bytes of the CRC to the segment). In the directory specified in the command, two directories will be created with the names db1 and db2, each containing one file with the name kis_1, these files are identical and duplicated for reliability.
3. Installing hotfix and crypto libraries
Crypto-libraries should be installed only on gateways. On a machine that performs the role of the Check Point Management Server exclusively, the installation of cryptoblocks is optional. Hotfix needs to be installed on both the gateways and the management server.
To install a hotfix on a machine that performs the role of the Check Point Management Server exclusively, complete the following steps:
1) Copy the hotfix file (archive named VPN_R75.40VS_HF_GOST_V4.0_EA) to the temporary directory on the server;
To transfer / download files from Check Point, it is convenient to use the WinSCP utility. In order to use the WinSCP utility to connect to Check Point, you need to specify the user using bash as standard when authenticating. To do this, you must either temporarily change the settings used by the user that you are logging in to, or create a user to which you will hang this one on a permanent basis. In Gaia OS, this can be done via a web interface, here’s an example of how a window with user settings should look like:
2) Log in to the server via SSH;
3) Switch to expert mode;
4) Unpack the archive in the current directory;
5) Run the installation script by running the command:
./UnixInstallScript 6) Installing a hotfix will cause an interruption of the services provided by the management server, agree with the warning about this:
7) After the installation is completed, you will receive the following message and asked to restart the server, agree:
8) After the reboot, the installation of the hotfix on the management server can be considered complete, it is necessary to install the hotfix and crypto libraries on the gateways;
9) To install the hotfix and crypto-library on the machine acting as a gateway or a gateway combined with the management server, perform the following steps:
• Log into the gateway through SSH;
• Switch to expert mode;
• Create the following directories on the gateway:
/var/gost_install/rpm /var/gost_install/kis • Copy the rmp files included in the CryptoPro CSP 3.6 R3 distribution kit for Check Point SPLAT / GAiA (x86 / x64) to the gateway / var / gost_install / rpm;
• Copy the corresponding external gamma file kis_1 to the / var / gost_install / kis directory on the gateway, it can be any file and the advising directory db1 or db2 of the directory specified in the command genkpim.exe ynp, since the files are identical;
• Copy the hotfix (archive named VPN_R75.40VS_HF_GOST_V4.0_EA) to the temporary directory on the gateway;
• Unpack the archive in the current directory;
• Run the installation script by running the following command:
./UnixInstallScript • Installing a hotfix will cause interruption of services provided by the gateway (including the transfer of traffic through the gateway), agree with the warning about this;
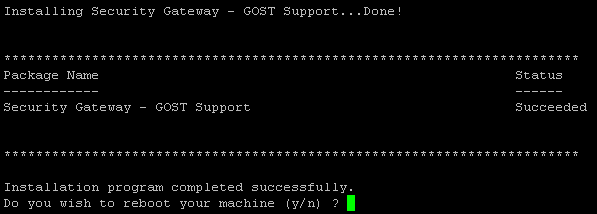
• Upon completion of the installation, you will be presented with the following message and asked to restart the gateway, agree.
For a machine acting as a gateway, the message will look like this:
For a machine acting as a gateway combined with a management server, the following:
10) After the installation is completed, you will need to enter the license key for CryptoPro. You can do this with the following command:
/opt/cprocsp/sbin/ia32/cpconfig -license -set < > To view the license status, use the following command:
/opt/cprocsp/sbin/ia32/cpconfig -license -view In the test environment, this item can be skipped and use the trial license for CryptoPro.
11) If you are using the 64-bit version of the Gaia OS, you need to disable SecureXL technology using the cpconfig utility launched from the command line.
4. Creating and configuring a pseudo-random number sensor
These actions are performed on gateways, including gateways that are combined with the management server.
1) Log in to the gateway via SSH;
2) Switch to expert mode;
3) Copy the file kis_1 from the / var / gost_install / kis directory to the directories / var / opt / cprocsp / dsrf / db1 / and / var / opt / cprocsp / dsrf / db2 /;
4) Create a pseudo-random number sensor by running the following command:
/opt/cprocsp/sbin/ia32/cpconfig -hardware rndm -add cpsd -name 'CPSDRNG' -level 0 5) Configure the created pseudo-random number sensor to use the external gamma file by executing the following commands:
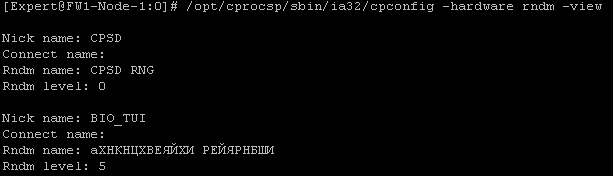
/opt/cprocsp/sbin/ia32/cpconfig -hardware rndm -configure cpsd -add string /db1/kis_1 /var/opt/cprocsp/dsrf/db1/kis_1 /opt/cprocsp/sbin/ia32/cpconfig -hardware rndm -configure cpsd -add string /db2/kis_1 /var/opt/cprocsp/dsrf/db2/kis_1 You can verify that a new pseudo-random number sensor has been created using the following command:
/opt/cprocsp/sbin/ia32/cpconfig -hardware rndm -view The output of the command will look like this and should contain information about the sensor with the name CPSDRNG and the maximum priority level equal to zero:
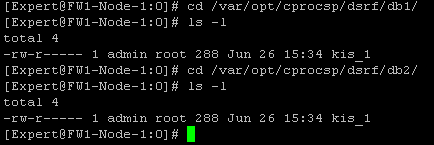
The kis_1 file will be consumed when the sensor is initialized, for example, to create a private key container, adding a certificate takes 2 segments of the sequence. Segments of the sequence are taken from the end of the file, used segments are deleted.
For example:
File size before adding certificate:
File size after adding certificate:
5. Configure VPN
5.1. Configuring VPN using certificates
To configure GOST encryption with the authentication of certificate partners, you must perform the following sequence of actions:
1) Install a special version of Check Point SmartConsole (file named: SmartConsole_GOST_R75.40VS_EA);
2) Login to the management server using this utility;
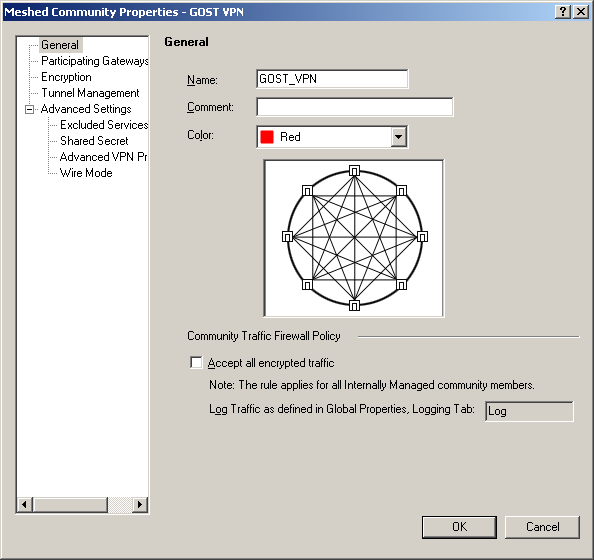
3) Create a new VPN Community:
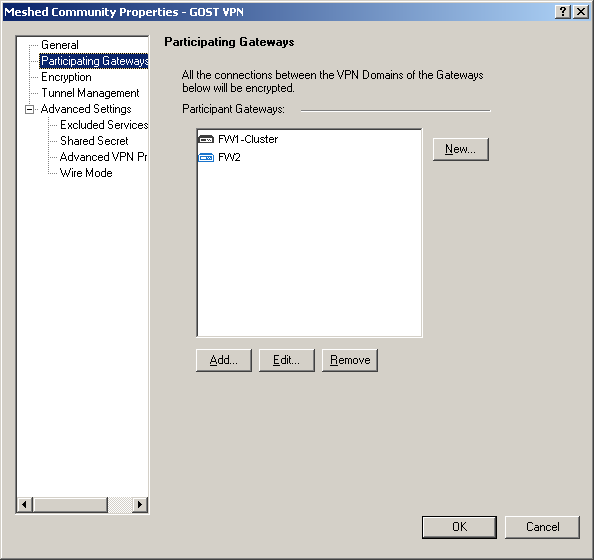
4) Put the gateways in the VPN Community being created, between which the VPN connection will be built:
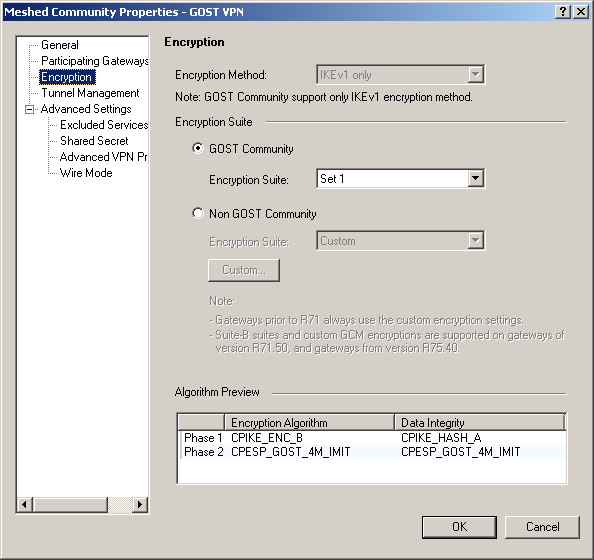
5) Configure the VPN Community to use GOST encryption:
There are 3 options:
Set 1 and Set 2 - differing in the used encryption modes, you can use any (supported by all versions for which there is a GOST, except R65.50);
Legacy - compatibility mode with GOST on Check Point R65.50, if there is a need to build VPN tunnels with gateways operating on this version of Check Point.
6) Click the "OK" button, thereby creating a new VPN Community;
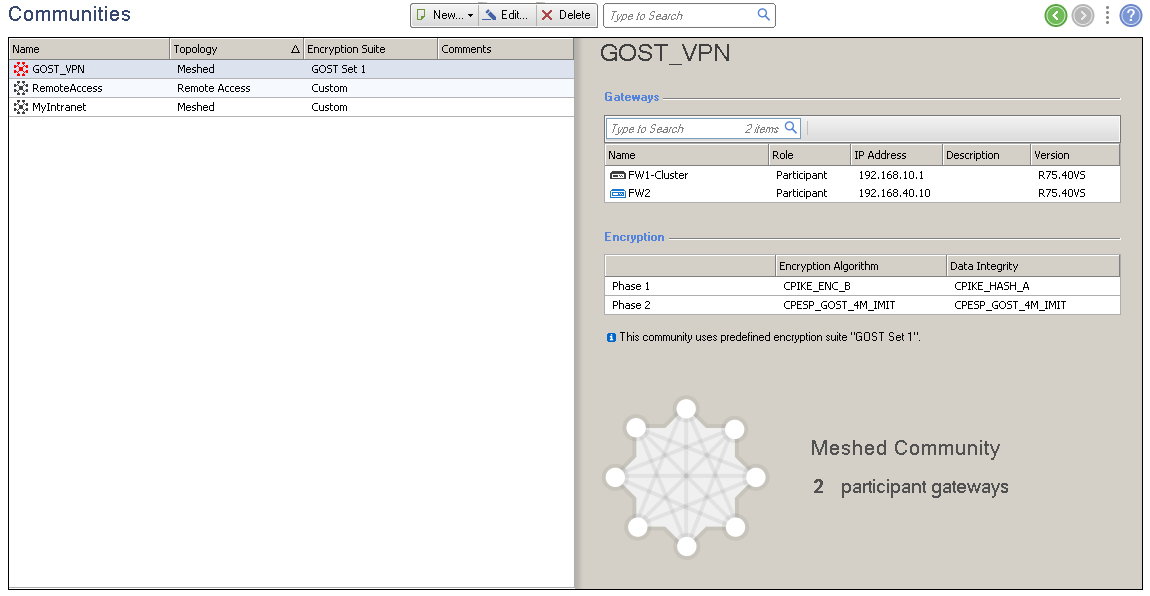
The VPN Community list will look something like this:
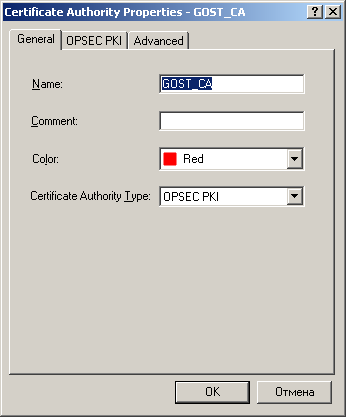
7) After creating the VPN Community and adding gateways to it, it is necessary to make in the configuration of the management server information about the GOST Certificate Authority that will issue certificates for our gateways. Add a new trusted certificate authority to the configuration:
8) If the CRL Distribution Point (in the example, it is a certificate authority server) is behind one of the gateways and the other gateways will connect to it via a VPN connection, these gateways will not be able to load the CRL, because they will not be able to build a VPN because of the impossibility checking the certificate of the first gateway. Get a vicious circle. In this case, you must disable the CRL check for this certificate authority. To do this, uncheck all the checkboxes in the “Retrieve CRL From” section of the OPSEC PKI tab:
Or you can take the CRL Distribution Point outside the VPN domain of the gateway protecting it so that other gateways will not access it through a VPN connection.
9) Upload the certification authority root certificate in DER format and add it to the Check Point configuration:
10) After adding a new certification authority, it is necessary to issue certificates for gateways. The order of issuance and addition of certificates for the cluster and nonclustered gateways is slightly different.
In the case of a cluster of gateways, certificates are issued to EVERY member of the cluster. To issue a certificate, follow these steps:
• Open the properties of the gateway cluster object;
• Go to the “Cluster Members” tab;
• Double-click the cluster member object;
• In the “Cluster Member Properties” window that opens, go to the “VPN” tab and click the “Add” button in the “Certificates List with keys stored on Security Gateway” field:
• Enter the certificate name;
• In the “CA to enroll from” field, select the added GOST certification authority and click the Generate button;
• Fill in the Distinguished Name for the request, for example:
• A certificate request will be generated, click “Copy to Clipboard”:
• Paste the certificate request in the “Saved Request” field on the certification authority portal and click issue:
• Save the certificate file in DER format:
• In the field “Certificates List with keys for Security Gateway” click the button “Complete”, in the opened window select the saved certificate file:
• Accept the certificate:
• Repeat this sequence for each cluster member.
In the case of issuing a certificate for a nonclustered gateway, a certificate request is created in the gateway properties window, section “IPSec VPN”, column “Repository of Certificates Available to the Gateway”. Also press the “Add” key, only in the case of a nonclustered gateway there will be a choice of where the encryption keys will be stored. In this case, select the “Store keys on the Module” column, otherwise the procedure is completely similar to the one described above.
After adding certificates, a nonclustered gateway is ready to build a GOST VPN after policy installation, but in the case of a cluster, this is not all. CryptoPro encrypts traffic sent between cluster members and between libraries on the gateway using a Site Key or Site Certificate. In the case of a nonclustered gateway, the certificate that was issued and added to the gateway is used as the Site Certificate. In the case of a cluster, only the Site Key can be used for these purposes and must be generated and added to the configuration;
11) To generate a Site Key, you must perform the following sequence of actions:
• Open the gateway object properties window, in the “IPSec VPN” section in the “Repository of Certificates Available to the Gateway” column, select the certificate issued by the Gateway internal certification authority (Check Point internal_ca) and click the “View” button;
• In the certificate properties window that opens, you need to find the first line with the SHA-1 certificate hash, you will need it to generate the Site Key;
• On any gateway with CryptoPro installed from expert mode, the following command must be executed:
bash /opt/cprocsp/bin/ia32/cp-genpsk.sh <machine_name> <net_id> <expiry> <Site_ID> where:
o <machine_name> - ; o <net_id> - , , Net, , Net , , Site Key ; o <expiry> - , 6; o <Site_ID> - SHA-1 . Example of command execution and output:
[Expert @ FW1-Node-1: 0] # bash /opt/cprocsp/bin/ia32/cp-genpsk.sh FW1-Cluster Net 6 32: 56: 3E: 12: A8: D6: 6C: EF: 47: 23: 30: 7C: 17: 53: ED: 47: 1E: BD: 7F: 7D
genpsk
UTC Wed Jun 26 12:15:53 2013
FW1-Cluster. Net. Number of stations 1.
Stations: 32563E12A8D66CEF4723307C1753ED471EBD7F7D
Part 0. Valid for (months) 6.
FW1-Cluster UTC Wed Jun 26 12:15:53 2013
32563E12A8D66CEF4723307C1753ED471EBD7F7D part 0 valid for (months) 6
W6426WLHP3C8TM
W6426WLHP3C8TM
W6426WLHP3C8TM
genpsk
UTC Wed Jun 26 12:15:53 2013
FW1-Cluster. Net. Number of stations 1.
Stations: 32563E12A8D66CEF4723307C1753ED471EBD7F7D
Part 1. Valid for (months) 6.
FW1-Cluster UTC Wed Jun 26 12:15:53 2013
32563E12A8D66CEF4723307C1753ED471EBD7F7D part 1 valid for (months) 6
41NKET2QC6B3NW
41NKET2QC6B3NW
41NKET2QC6B3NW
• The output of the command contains two parts of the generated Site Key, which must be combined and entered into the cluster configuration. The first part is marked green, the second part is marked red. You need to combine them as follows:
W6426WLHP3C8TM 41NKET2QC6B3NW
Site Key must be regenerated in the following cases:
• Site Key has expired;
• VPN was turned on and off;
• Certificate issued by an internal certification authority (internal_ca) has been updated.
• After you have a Site Key, you need to make it into the cluster configuration. Open the properties of the cluster object, the “IPSec VPN” section, the “VPN Advanced” column and click the “Pre-Shared Secret” button in the “GOST Standard” section:
• In the window that opens, enter the Site Key and click OK:
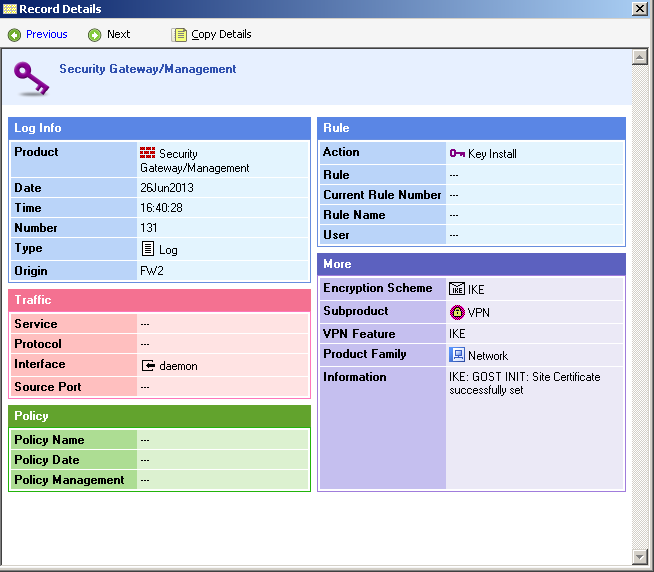
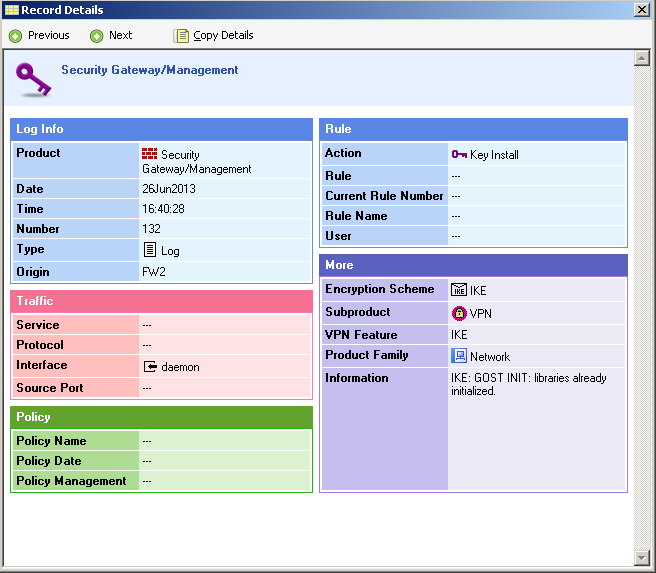
12) Now you can install policies on gateways and check the logs for the fact that the VPN is successfully assembled. The logs must contain messages on the successful installation of a Site Key or Site Certificate and the initialization of cryptographic libraries and messages of the Encrypt / Decrypt type for traffic transmitted through a VPN connection. Examples of messages:
13) If the policy has been established without errors and these messages are present in the logs, then congratulations, you have successfully managed to configure the VPN using GOST encryption.
5.2. Setting up a VPN using a password
If, by coincidence, you have no desire or ability to bother with certificates, you can configure partner authentication using a passphrase. It is not recommended to use this option with a large number of gateways due to the complexity of working with a large number of passwords, and since the password must be specified for each pair of gateways, their number can be truly enormous. So, to configure a GOST VPN using a password, you must perform the following sequence of actions:
1) Install a special version of Check Point SmartConsole (file named: SmartConsole_GOST_R75.40VS_EA);
2) Login to the management server using this utility;
3) Create a new VPN Community:
4) Put the gateways in the VPN Community being created, between which the VPN connection will be built:
5) Configure the VPN Community to use GOST encryption:
There are 3 options:
Set 1 and Set 2 - differing in the used encryption modes, you can use any (supported by all versions for which there is a GOST, except R65.50);
Legacy - compatibility mode with GOST on Check Point R65.50, if there is a need to build VPN tunnels with gateways operating on this version of Check Point.
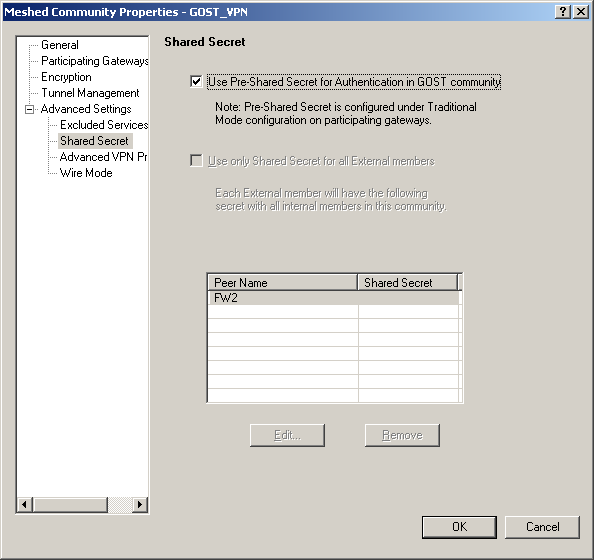
6) Set the password for authentication in the VPN Community settings. This is done in the properties of the VPN Community in the section “Advanced Settings”, item “Shared Secret”:
7) Click the "OK" button, thereby creating a new VPN Community;
The VPN Community list will look something like this:
8) Generate a Site Key for EACH gateway, as specified in section 5.1, paragraph 11. In the case of a cluster of gateways, one Site Key is generated per cluster. If you have an established GOST certificate on a nonclustered gateway, then the Site Key for this gateway can be not generated. For nonclustered gateways, both the Site Key and Site Certificate can be used. Site Certificate is preferable and, if there is a certificate, it will be used;
9) After generating and installing the Site Key, you need to generate a password for a pair of gateways. Unlike the “traditional” VPN setting on Check Point, when setting up a GOST VPN, you cannot use an arbitrary password, you need to generate it by analogy with the Site Key. To generate a password for a pair of gateways, follow these steps:
• On any gateway with CryptoPro installed from expert mode, the following command must be executed:
bash /opt/cprocsp/bin/ia32/cp-genpsk.sh <pair_name> <net_id> <expiry> <GW_1_Site_ID> <GW_2_Site_ID> where:
o <pair_name> - ; o <net_id> - , Net, Net , ; o <expiry> - , 6; o <GW_1_Site_ID> - SHA-1 ; o <GW_2_Site_ID> - SHA-1 . There is no fundamental difference in which gateway is first and which second is not; the <pair_name> field can be filled in arbitrarily.
Example of command execution and output:
Expert @ FW1-Node-1: 0] # bash /opt/cprocsp/bin/ia32/cp-genpsk.sh FW1-FW2 Net 6 32: 56: 3E: 12: A8: D6: 6C: EF: 47: 23 : 30: 7C: 17: 53: ED: 47: 1E: BD: 7F: 7D A6: F0: 24: 9A: 16: AA: 7F: 42: 9A: 3A: A2: 83: 66: FA: 67: E9: 75: 08: 46: 1B
genpsk
UTC Sat Jun 29 11:17:26 2013
FW1-FW2. Net. Number of stations 2.
Stations: 32563E12A8D66CEF4723307C1753ED471EBD7F7D A6F0249A16AA7F429A3AA28366FA67E97508461B
Part 0. Valid for (months) 6.
FW1-FW2 UTC Sat Jun 29 11:17:26 2013
32563E12A8D66CEF4723307C1753ED471EBD7F7D part 0 valid for (months) 6
BC1HGFATY4N6QM
BC1HGFATY4N6QM
BC1HGFATY4N6QM
FW1-FW2 UTC Sat Jun 29 11:17:26 2013
A6F0249A16AA7F429A3AA28366FA67E97508461B part 0 valid for (months) 6
ZPYLCHU36QNZNM
ZPYLCHU36QNZNM
ZPYLCHU36QNZNM
genpsk
UTC Sat Jun 29 11:17:26 2013
FW1-FW2. Net. Number of stations 2.
Stations: 32563E12A8D66CEF4723307C1753ED471EBD7F7D A6F0249A16AA7F429A3AA28366FA67E97508461B
Part 1. Valid for (months) 6.
FW1-FW2 UTC Sat Jun 29 11:17:26 2013
32563E12A8D66CEF4723307C1753ED471EBD7F7D part 1 valid for (months) 6
WKDHN8MRYD599U
WKDHN8MRYD599U
WKDHN8MRYD599U
FW1-FW2 UTC Sat Jun 29 11:17:26 2013
A6F0249A16AA7F429A3AA28366FA67E97508461B part 1 valid for (months) 6
FN4T4X8Z5YRT0U
FN4T4X8Z5YRT0U
FN4T4X8Z5YRT0U
• The output of the command contains four parts of the generated password that need to be combined and entered into the configuration. The first part is marked green, the second part is marked red, the third honor is marked blue, the fourth - orange, but they are combined, unlike the Site Key, not in order, and so: part 1 + part 3 + part 2 + part 4, combination example parts:
BC1HGFATY4N6QM WKDHN8MRYD599U ZPYLCHU36QNZNM FN4T4X8Z5YRT0U
The password must be regenerated in the following cases:
• The password has expired;
• VPN was turned on and off;
• Certificate issued by an internal certification authority (internal_ca) has been updated.
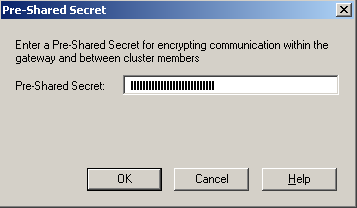
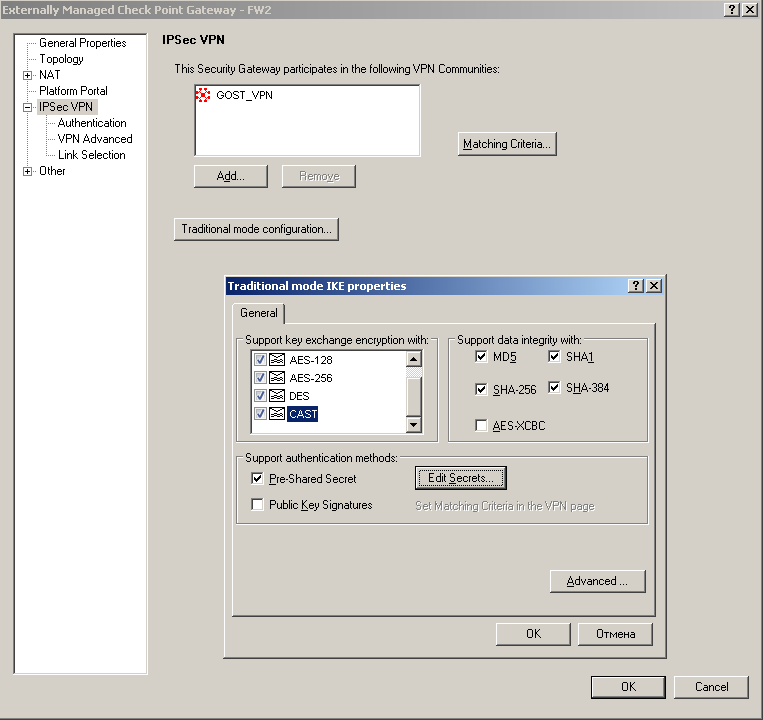
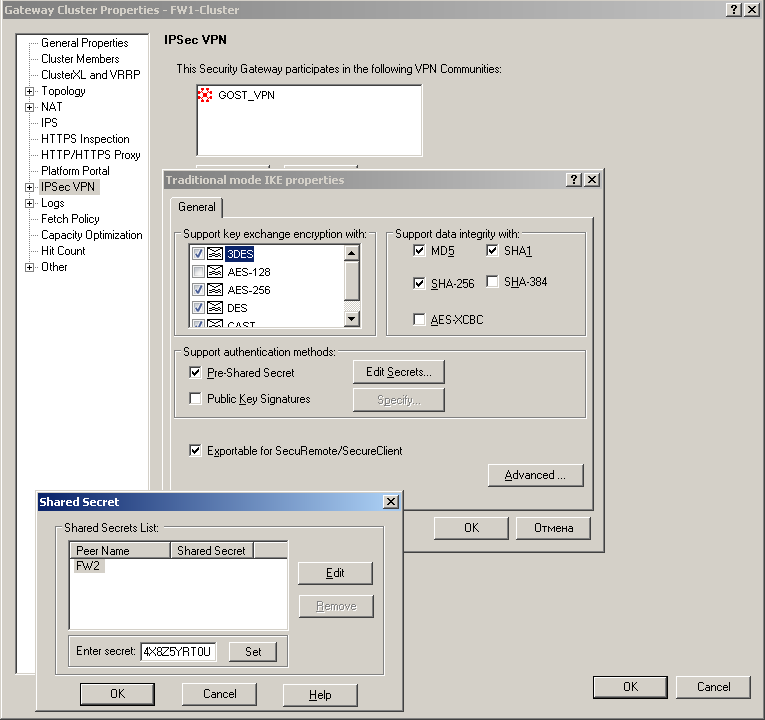
10) After you have a password, it must be entered into the configuration. Open the gateway properties window, the “IPSec VPN” section, click the “Traditional mode configuration” button, select the “Pre-Shared Secret” checkbox:
11) Click the Edit Secrets button, enter the generated key for another member of the gateway pair, and click OK:
12) If you have gateways that are managed by other management servers, as in the example, repeat the operation of adding a key to them;
13) Now you can install policies on gateways and check the logs for the fact that the VPN is successfully assembled. The logs must contain messages on the successful installation of a Site Key or Site Certificate and the initialization of cryptographic libraries and messages of the Encrypt / Decrypt type for traffic transmitted through a VPN connection.
14) , , VPN .
PS ?
« ?» . « -2005» , . , « », 5 . , , . , , , , , , -2005 .
Source: https://habr.com/ru/post/185930/
All Articles