NAT traversal with IPv6 & CloudFlare
Good day. Today I would like to share with you an interesting way to solve the problem of accessing your server / PC due to NAT, using IPv6 Tunnel Broker and free CloudFlare features.
As you know, many users are granted access to the Internet either through a dynamic IP address or using NAT technology.
If the former can still use any Free DDNS service, then the latter have to sit idly or buy a coveted static IP address from the provider.
')
In this article, you will see how using the above-mentioned services to “grab” a blog from a computer that is behind NAT. As a result, the site will be available even where there is no IPv6 connection and there is no trace.
First of all, you need to get an IPv6 address, without which we will fail. Some providers have already begun to provide them to their users, but since mine does not issue IPv6 addresses, we will use some service that provides access to IPv6 over an existing IPv4 connection. Freenet6 Tunnel Broker was chosen because of the convenient Windows client.
Available versions for:
To get a client, you need to register on the resource itself. After that, download it and install it (on Windows 8 it is installed in compatibility mode). So it looks after a successful installation:

By default, the connection is anonymous, it promises that the IPv6 address will change after reconnection (I have at least that).
To avoid this and get a static IPv6 address, you need to register again, this time on the Freenet6 server. The choice is small - Amsterdam or Montreal. Choose what is closer to you.
When the next registration was successful, you can connect! Enter our username and password along with the selected server address and click Connect.
Since we are behind NAT, IPv6-in-UDP-IPv4 Tunnel Mode will be automatically selected. This can be seen on the Advanced and Status tabs:

The IPv6 address in Local Endpoint Adresses is our desired address. To make sure that our computer is accessible from the outside, we try to ping . If the result is negative, most likely in the firewall you will have to create an incoming rule for “ICMPv6”.
For local access, I have been using WampServer for a long time. However, it can be used any other, or all components separately.
After installation, you need to make sure that all services have started successfully (the icon in the tray is green), and localhost along with phpMyAdmin are available.

You should also immediately set a password for the root user of the MySQL server.
Click on the tray icon, MySQL -> MySQL Console,
Use the UPDATE statement to change the password:
Then
Everything, the password is changed. Download some WordPress and unpack it into a www-directory.
Since we are going to host a website, a domain name will be required for convenient access. In Ukraine, you can register it for free in such zones as .pp.ua and .bz.ua .In Russia, as far as I know, .net.ru, .org.ru. As the user bost84 reported in the comments, these domains are no longer free.
At this stage we will not go in cycles, there are many articles on the Internet on how to do this.
Probably the majority of Habrakhabra users know or have heard about a CDN service like CloudFlare .
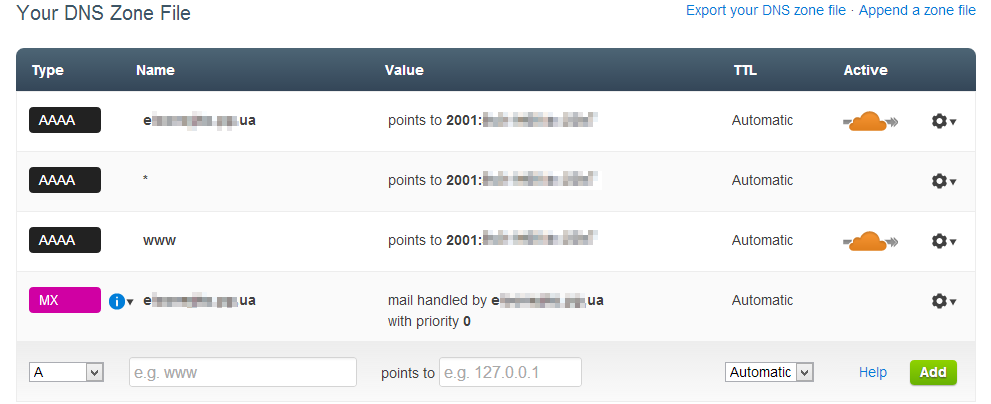
We register, add the domain in the “Websites” section, wait a minute until the DNS records of the DNS parking registrars are scanned. After this, click on “Continue Setup”, the DNS records settings page will open, where you need to delete all A-records, and assign the resulting static IPv6 address to AAAA-records.
In the end, it should look like this:
We confirm the changes and get a list of two DNS servers that we use instead of parking ones.
In the “Websites” section , go to “CloudFlare Settings” for our domain and change the setting to “Full” to configure “Automatic IPv6”.
That's all - it remains to wait for the change of DNS servers. If you can not wait, with the help of nslookup we find out supposedly the IPv4-address of our site (in fact, the address of the CloudFlare Network) and make changes in the “hosts” file.

You can go install WordPress, and as a result use any anonymizer to check access from outside:


That's all, thank you for your attention.
Foreword
As you know, many users are granted access to the Internet either through a dynamic IP address or using NAT technology.
If the former can still use any Free DDNS service, then the latter have to sit idly or buy a coveted static IP address from the provider.
')
In this article, you will see how using the above-mentioned services to “grab” a blog from a computer that is behind NAT. As a result, the site will be available even where there is no IPv6 connection and there is no trace.
IPv6
First of all, you need to get an IPv6 address, without which we will fail. Some providers have already begun to provide them to their users, but since mine does not issue IPv6 addresses, we will use some service that provides access to IPv6 over an existing IPv4 connection. Freenet6 Tunnel Broker was chosen because of the convenient Windows client.
Available versions for:
- Windows x86
- Windows x64
- Sources to compile on Linux / Unix / MacOS / BSD
- Some Linux distributions have an RPM package called gogoc
To get a client, you need to register on the resource itself. After that, download it and install it (on Windows 8 it is installed in compatibility mode). So it looks after a successful installation:
By default, the connection is anonymous, it promises that the IPv6 address will change after reconnection (I have at least that).
To avoid this and get a static IPv6 address, you need to register again, this time on the Freenet6 server. The choice is small - Amsterdam or Montreal. Choose what is closer to you.
When the next registration was successful, you can connect! Enter our username and password along with the selected server address and click Connect.
Since we are behind NAT, IPv6-in-UDP-IPv4 Tunnel Mode will be automatically selected. This can be seen on the Advanced and Status tabs:
The IPv6 address in Local Endpoint Adresses is our desired address. To make sure that our computer is accessible from the outside, we try to ping . If the result is negative, most likely in the firewall you will have to create an incoming rule for “ICMPv6”.
WAMP installation
For local access, I have been using WampServer for a long time. However, it can be used any other, or all components separately.
After installation, you need to make sure that all services have started successfully (the icon in the tray is green), and localhost along with phpMyAdmin are available.
You should also immediately set a password for the root user of the MySQL server.
Click on the tray icon, MySQL -> MySQL Console,
<ENTER> .Use the UPDATE statement to change the password:
UPDATE user SET password=PASSWORD(' ') WHERE user='root';Then
flush privileges;
quit;
Everything, the password is changed. Download some WordPress and unpack it into a www-directory.
Domain name
Since we are going to host a website, a domain name will be required for convenient access. In Ukraine, you can register it for free in such zones as .pp.ua and .bz.ua .
At this stage we will not go in cycles, there are many articles on the Internet on how to do this.
Cloudflare
Probably the majority of Habrakhabra users know or have heard about a CDN service like CloudFlare .
We register, add the domain in the “Websites” section, wait a minute until the DNS records of the DNS parking registrars are scanned. After this, click on “Continue Setup”, the DNS records settings page will open, where you need to delete all A-records, and assign the resulting static IPv6 address to AAAA-records.
In the end, it should look like this:
We confirm the changes and get a list of two DNS servers that we use instead of parking ones.
In the “Websites” section , go to “CloudFlare Settings” for our domain and change the setting to “Full” to configure “Automatic IPv6”.
That's all - it remains to wait for the change of DNS servers. If you can not wait, with the help of nslookup we find out supposedly the IPv4-address of our site (in fact, the address of the CloudFlare Network) and make changes in the “hosts” file.
You can go install WordPress, and as a result use any anonymizer to check access from outside:
That's all, thank you for your attention.
Source: https://habr.com/ru/post/185886/
All Articles