Network Documentation Tool - network documentation system
Dear habrasoobschestvu, let me bring to your attention in my opinion a very useful tool - Netdot (Network Documentation Tool). Search on Habra did not give out a single mention of this interesting tool. Russian-language information resources also bypassed it. I hope that my short review will be useful to network administrators.
Briefly describe how I began to use this tool. My colleagues and I had a rather simple task - to choose a tool for managing ip-addresses. From the table on Wikipedia, we selected several tools and tried to compare them. The key parameters for selection were: active development, openness, cross-platform, availability of tools for managing DNS records, graphical representation of the address space.
Each of the tested systems has its own advantages and disadvantages. Of all the things we tested, we stopped at Netdot. It is actively developed, has rich functionality, the system is open, written in Perl (I program in Perl and it is easier for me to customize something to fit my needs), has a rather pleasant and non-overloaded interface.
Of course, there are some drawbacks, but for us they are not relevant: so far only the BIND DNS server is supported (we use it, and besides, no one bothers to write our own synchronization script), the topology graphics are rather confusing (I’m sure that over time, this defect will be eliminated), does not know how to build an L3-topology, an inflexible rights management system.
Thus, in the process of finding one small tool, we discovered a more extensive and functional tool. After all, it is very convenient to have all the information about the network infrastructure in one place, as well as the ability to manage it, create logical connections, manage rights.
We also tried to use the NOC system ( Review article on Habrahabr). Its functionality is much richer, but it seemed to us less convenient. Perhaps, time will pass and we will reconsider our views.
So, Netdot - as the name implies ( Net work Do cumentation T ool), this software helps to maintain documentation, namely:
I will describe a little general structure. Netdot consists of the following components:
The main elements in Netdot are “devices” (switches, routers, access points, servers). It should be noted that PCs, laptops, mobile phones, etc. are not considered as “devices”. They are entered into the database from ARP tables and device switching tables, and then they can be tracked by IP or MAC addresses, and also see which switch port they were connected in the past.
')
I will describe in brief the installation process. As an operating system, I used CentOS 6.4.
• Download the latest version from the developers site:
• Or get the latest version from GitHub:
• Unpack the archive:
• Install dependencies:
• Install the missing Perl modules:
• Copy the configuration file:
• Edit the settings:
Database connection options
where DB_DBA is the user who has the right to create databases, DB_DATABASE is the name of the Netdot database to be created, DB_NETDOT_USER is the user of the Netdot database.
All other settings can be edited later. It should be noted that in the future, when changing the configuration, Apache should be restarted for the changes to take effect.
• We initiate a database:
• Install Netdot directly
• Configure Apache:
• After installation, restart Apache:
Installation is complete. Launch the browser and go to http: //your hostname.domain/netdot . The default username and password is “admin”.
A more detailed description of the installation can be found in the official documentation - https://osl.uoregon.edu/redmine/projects/netdot/files
The utility interface is quite simple:

Devices can be added in several ways:
• Poll devices using a script in the command line:
You can get a complete list of script parameters using the command:
• Poll or add device via web interface:
As a result, we get a list of devices:
For each device, quite detailed information is displayed:
Finally, I will give an example of displaying information about the available address space.
General list of subnets:
A subnet is what you see on the interface of the router. A container may contain subnets and other containers. A subnet cannot contain other subnets and containers. The container is transformed into a subnet when it appears on one of the interfaces of the router.
Subnet Map:
An IP address can take one of the following states:
Netdot is a fairly powerful and functional system. Of course, in one article it is impossible to describe all its capabilities. If you are interested in the article, I will be happy to continue.
Project site:
https://osl.uoregon.edu/redmine/projects/netdot
Why did we choose Netdot
Briefly describe how I began to use this tool. My colleagues and I had a rather simple task - to choose a tool for managing ip-addresses. From the table on Wikipedia, we selected several tools and tried to compare them. The key parameters for selection were: active development, openness, cross-platform, availability of tools for managing DNS records, graphical representation of the address space.
Each of the tested systems has its own advantages and disadvantages. Of all the things we tested, we stopped at Netdot. It is actively developed, has rich functionality, the system is open, written in Perl (I program in Perl and it is easier for me to customize something to fit my needs), has a rather pleasant and non-overloaded interface.
Of course, there are some drawbacks, but for us they are not relevant: so far only the BIND DNS server is supported (we use it, and besides, no one bothers to write our own synchronization script), the topology graphics are rather confusing (I’m sure that over time, this defect will be eliminated), does not know how to build an L3-topology, an inflexible rights management system.
Thus, in the process of finding one small tool, we discovered a more extensive and functional tool. After all, it is very convenient to have all the information about the network infrastructure in one place, as well as the ability to manage it, create logical connections, manage rights.
We also tried to use the NOC system ( Review article on Habrahabr). Its functionality is much richer, but it seemed to us less convenient. Perhaps, time will pass and we will reconsider our views.
Opportunities
So, Netdot - as the name implies ( Net work Do cumentation T ool), this software helps to maintain documentation, namely:
- find and poll devices using SNMP;
- build and display the L2 topology using various sources: CDP, LLDP, STP, switching tables;
- keep track of equipment (Asset Management);
- keep track of the address space (IPAM);
- manage DNS records;
- manage DHCP;
- keep records of cable infrastructure: rooms, racks, sockets, connections inside and between buildings, and so on;
- contact accounting (administrators, operators, divisions, vendors, suppliers, etc.)
- export settings for external systems: Nagios, RANCID, Cacti, BIND, DHCPD, and more.
Structure
I will describe a little general structure. Netdot consists of the following components:
- Database - currently supported by MySQL and PostgreSQL. Ideally, it is possible to use any database that is supported by Perl DBI.
- Libraries - The code is a hierarchical structure of Perl object-oriented classes.
- The user interface is based on the HTML :: Mason framework.
- Command line scripts - various scripts (import, export, configuration update, etc.). You can run them with a certain frequency using CRON.
The main elements in Netdot are “devices” (switches, routers, access points, servers). It should be noted that PCs, laptops, mobile phones, etc. are not considered as “devices”. They are entered into the database from ARP tables and device switching tables, and then they can be tracked by IP or MAC addresses, and also see which switch port they were connected in the past.
')
Installation
I will describe in brief the installation process. As an operating system, I used CentOS 6.4.
• Download the latest version from the developers site:
~# wget netdot.uoregon.edu/pub/dists/netdot-1.0.4.tar.gz• Or get the latest version from GitHub:
~# git clone git://github.com/cvicente/Netdot• Unpack the archive:
~# tar -zxC /usr/local/src -f netdot-1.0.4.tar.gz• Install dependencies:
~# cd /usr/local/src/netdot-1.0.4/~# make rpm-installNote 1 . I have activated the RPMForge repository and during the installation I got an error:Transaction Check Error:file /usr/share/man/man3/XML::SAX::Base.3pm.gz conflicts between attempted installs of perl-XML-SAX-0.96-7.el6.noarch and perl-XML-SAX-Base-1.04-1.el6.rf.noarchfile /usr/share/man/man3/XML::SAX::Exception.3pm.gz conflicts between attempted installs of perl-XML-SAX-0.96-7.el6.noarch and perl-XML-SAX-Base-1.04-1.el6.rf.noarch
To fix it, add the following line to the /etc/yum.repos.d/rpmforge.repo file:exclude=perl-XML-SAX-Base
Note 2 . If you have a distribution based on Debian, then Netdisco MIBs should be installed automatically. In my case, they must be installed manually:~# yum install net-snmp net-snmp-utils~# wget kent.dl.sourceforge.net/project/netdisco/netdisco-mibs/latest-snapshot/netdisco-mibs-snapshot.tar.gz~# tar -zxC /usr/local/src -f netdisco-mibs-snapshot.tar.gz~# mkdir /usr/local/netdisco~# mv /usr/local/src/netdisco-mibs /usr/local/netdisco/mibs~# cp /usr/local/netdisco/mibs/snmp.conf /etc/snmp/
• Install the missing Perl modules:
~# make installdeps• Copy the configuration file:
~# cp etc/Default.conf etc/Site.conf• Edit the settings:
Database connection options
DB_TYPE => 'mysql'DB_DBA => 'root',DB_DBA_PASSWORD => 'rootpass',DB_HOST => 'localhost',DB_DATABASE => 'netdot',DB_NETDOT_USER => 'netdot_user',DB_NETDOT_PASS => 'netdot_pass',where DB_DBA is the user who has the right to create databases, DB_DATABASE is the name of the Netdot database to be created, DB_NETDOT_USER is the user of the Netdot database.
All other settings can be edited later. It should be noted that in the future, when changing the configuration, Apache should be restarted for the changes to take effect.
• We initiate a database:
~# make installdb• Install Netdot directly
~# make install• Configure Apache:
~# cp /usr/local/netdot/etc/netdot_apache2_local.conf /etc/httpd/conf.d/• After installation, restart Apache:
~# service httpd restartInstallation is complete. Launch the browser and go to http: //your hostname.domain/netdot . The default username and password is “admin”.
A more detailed description of the installation can be found in the official documentation - https://osl.uoregon.edu/redmine/projects/netdot/files
Interface
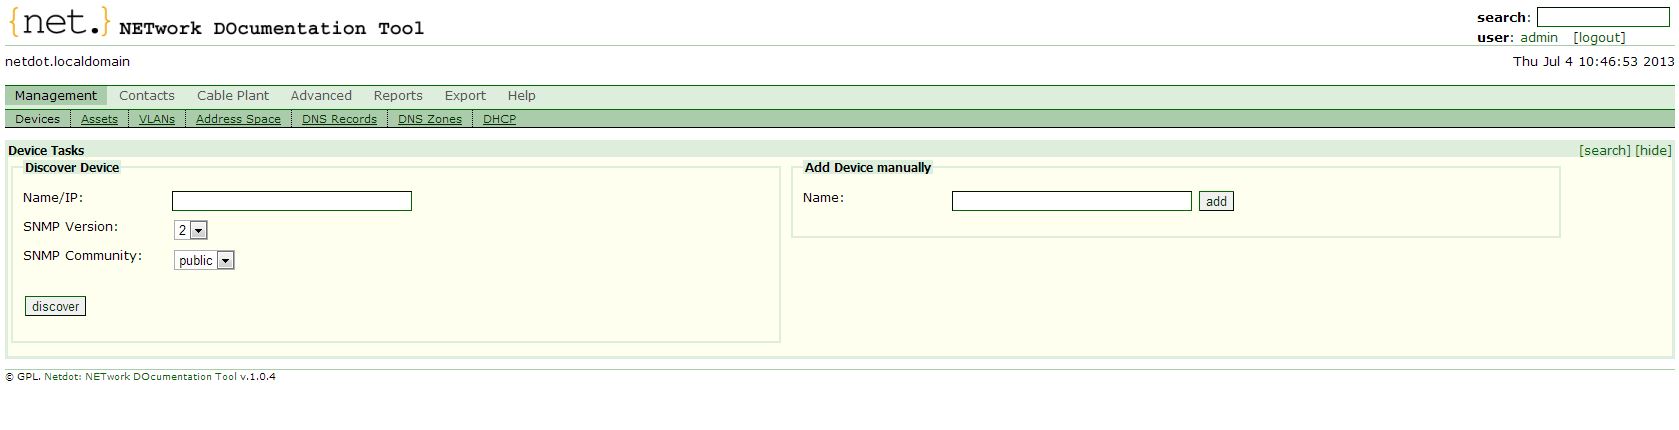
The utility interface is quite simple:
Devices can be added in several ways:
• Poll devices using a script in the command line:
~# /usr/local/netdot.bin/updatedevices.pl -H < > -I -c <> - extract information from a single host~# /usr/local/netdot.bin/updatedevices.pl -B 192.168.1.0/24 -I -c <> - scan the subnet and extract information~# /usr/local/netdot.bin/updatedevices.pl -E < > - scan the devices described in the fileYou can get a complete list of script parameters using the command:
~# /usr/local/netdot.bin/updatedevices.pl -h• Poll or add device via web interface:
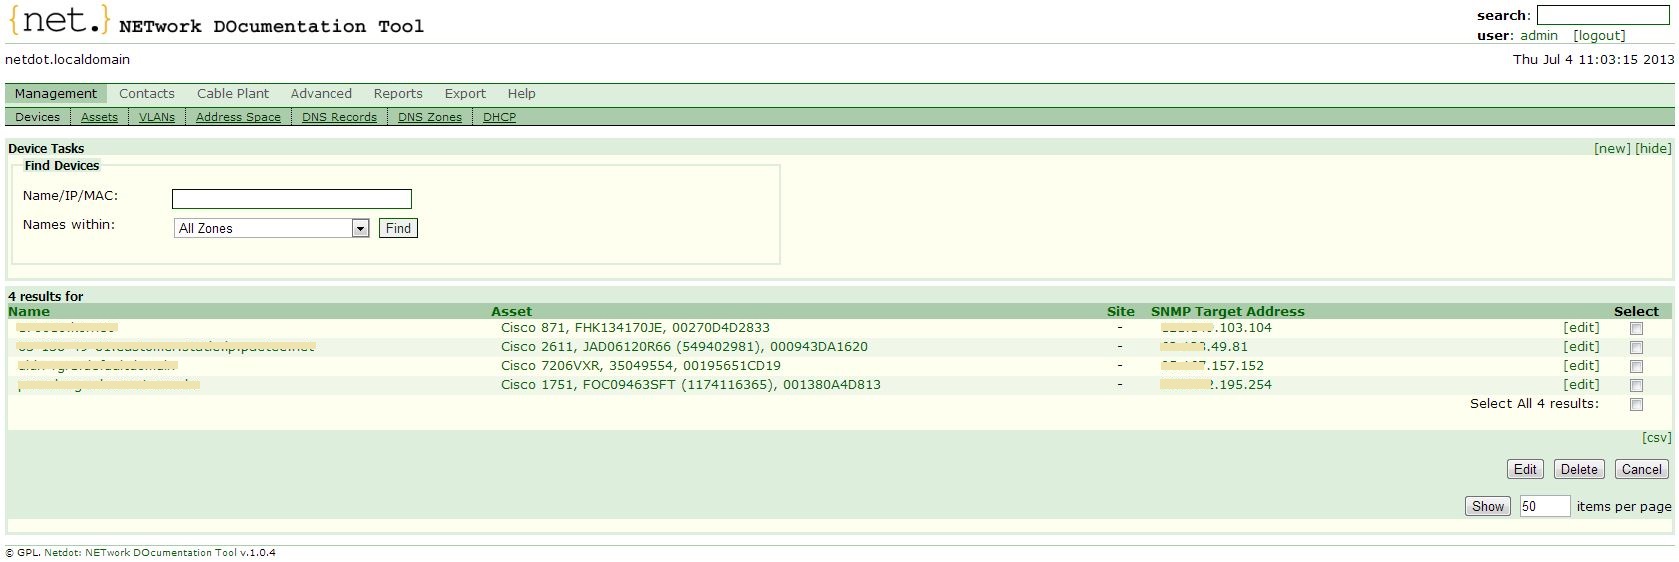
As a result, we get a list of devices:
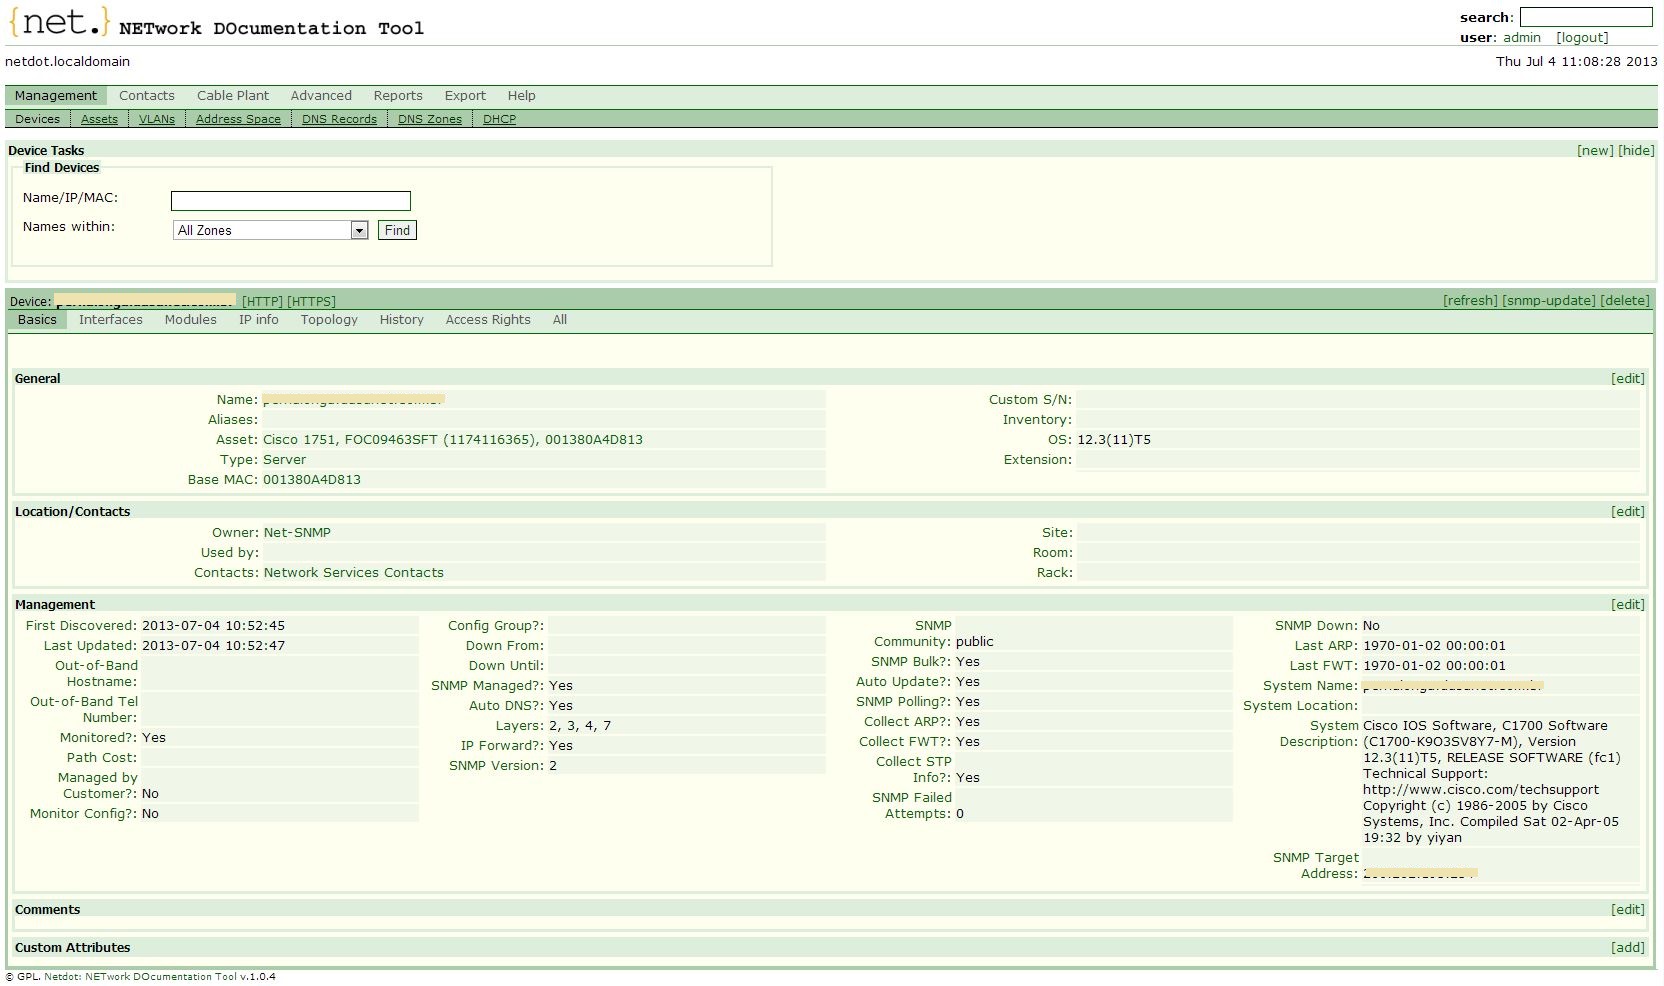
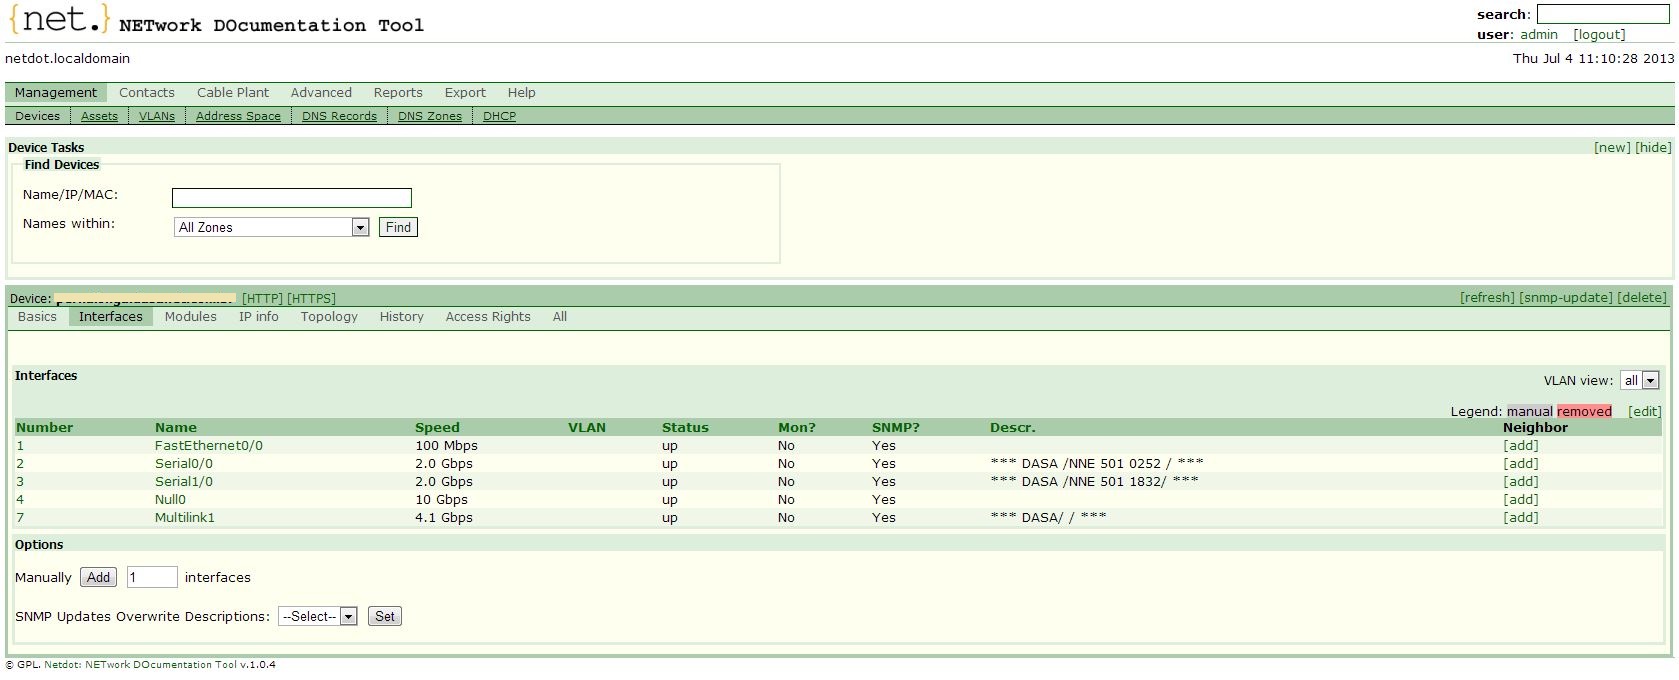
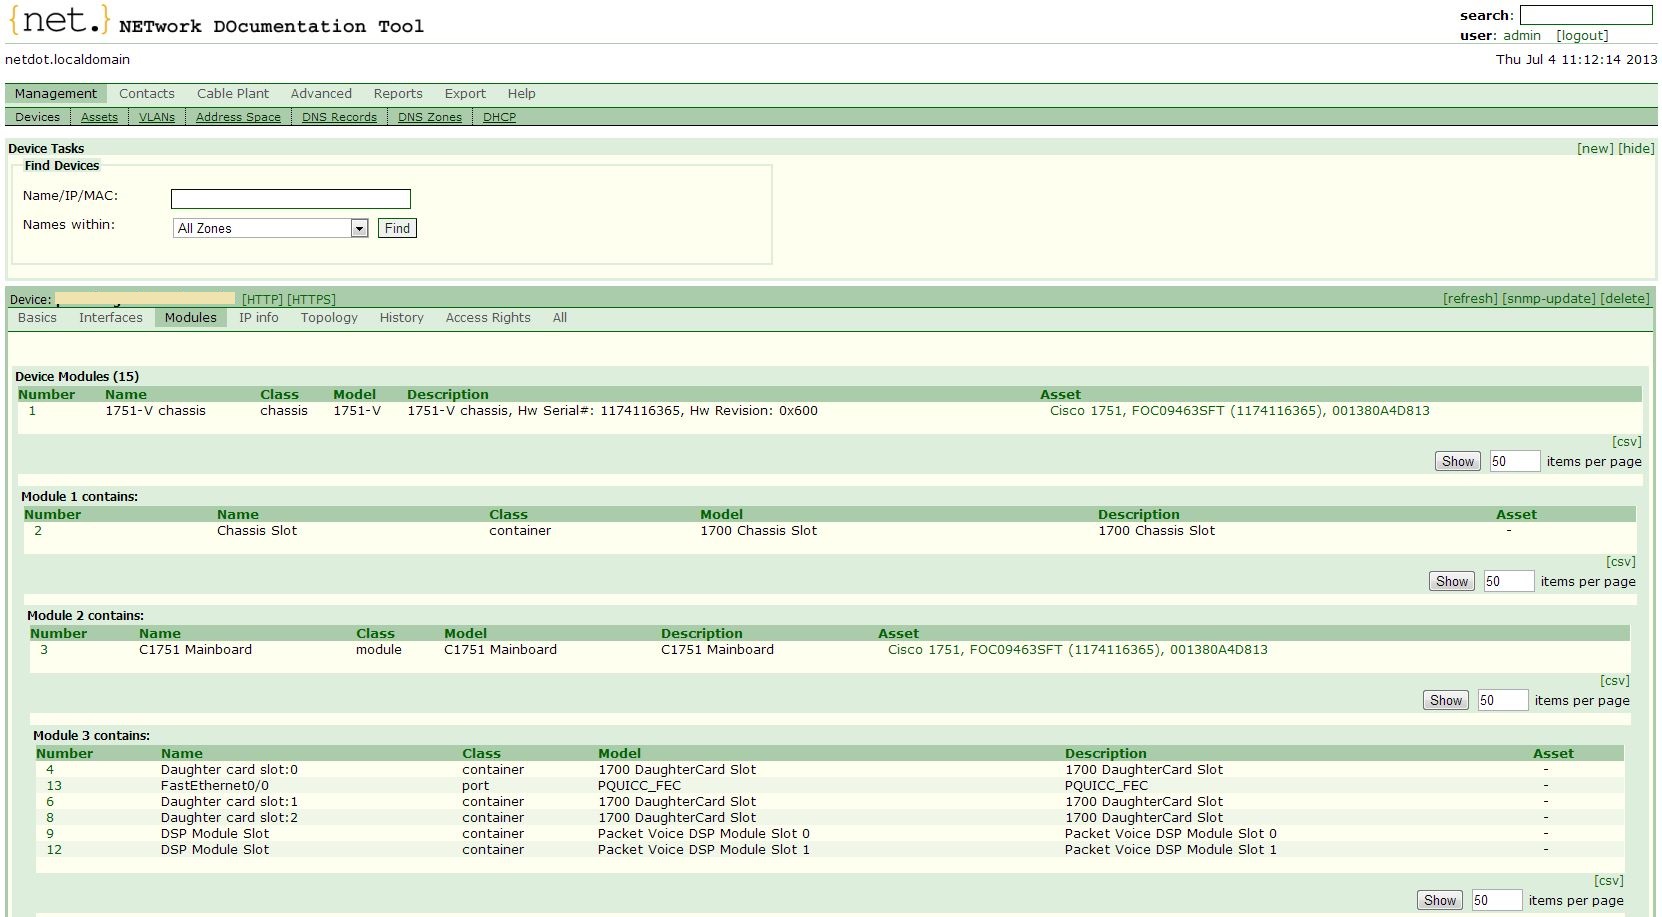
For each device, quite detailed information is displayed:
Finally, I will give an example of displaying information about the available address space.
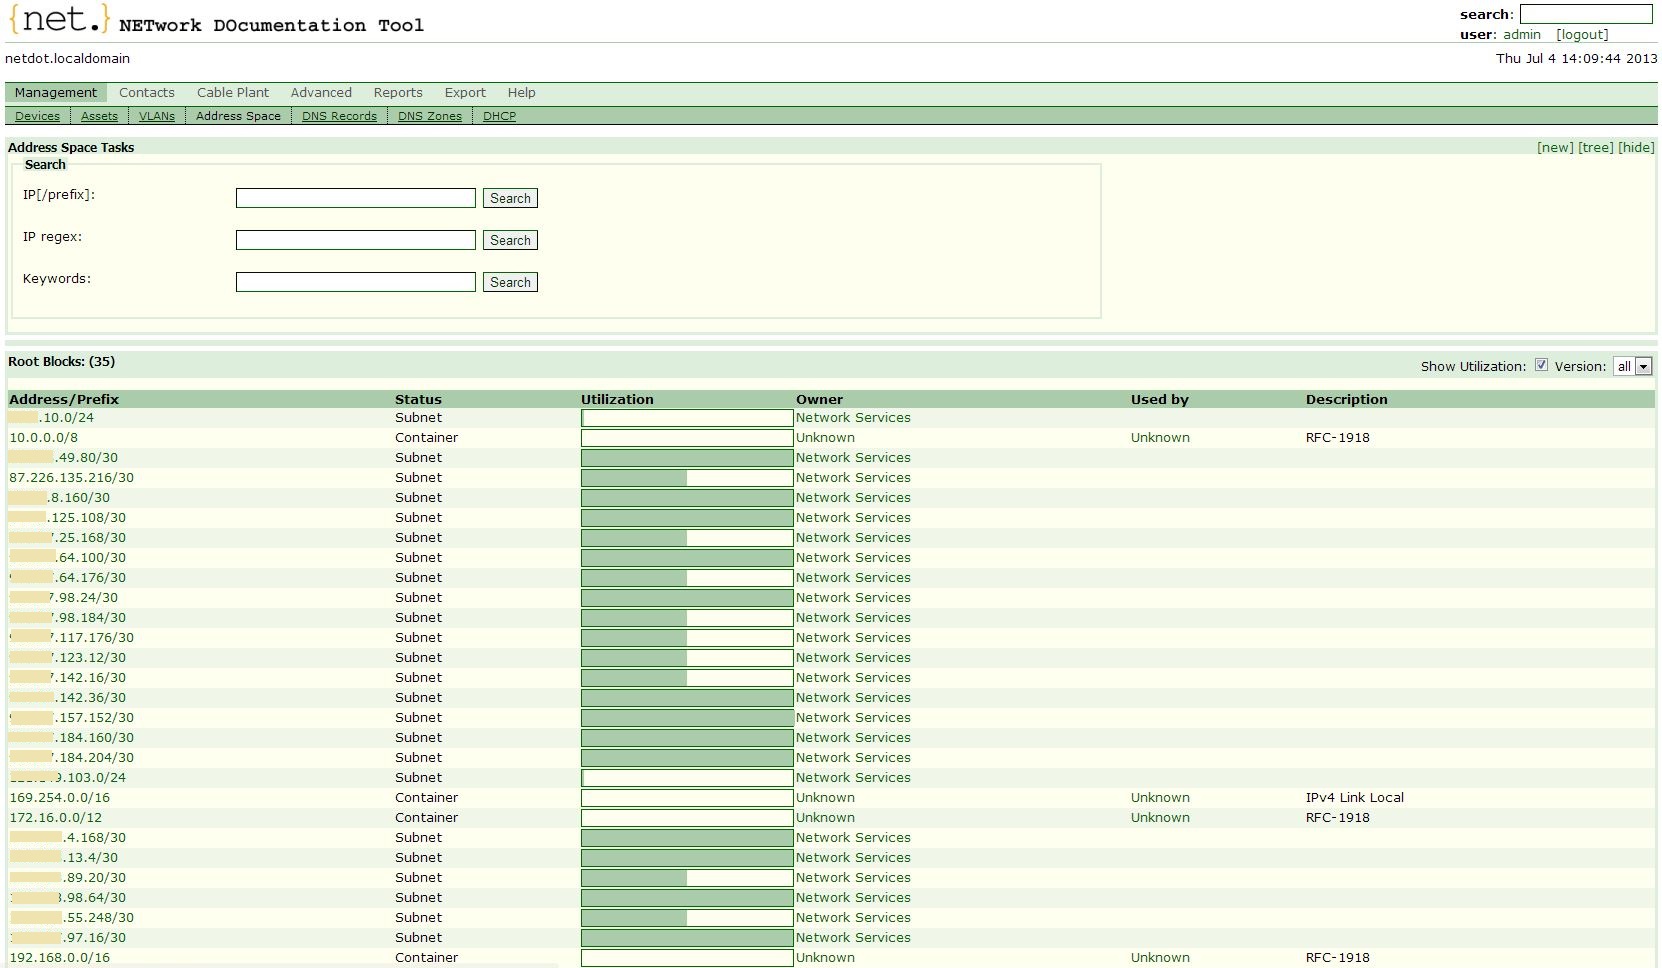
General list of subnets:
A subnet is what you see on the interface of the router. A container may contain subnets and other containers. A subnet cannot contain other subnets and containers. The container is transformed into a subnet when it appears on one of the interfaces of the router.
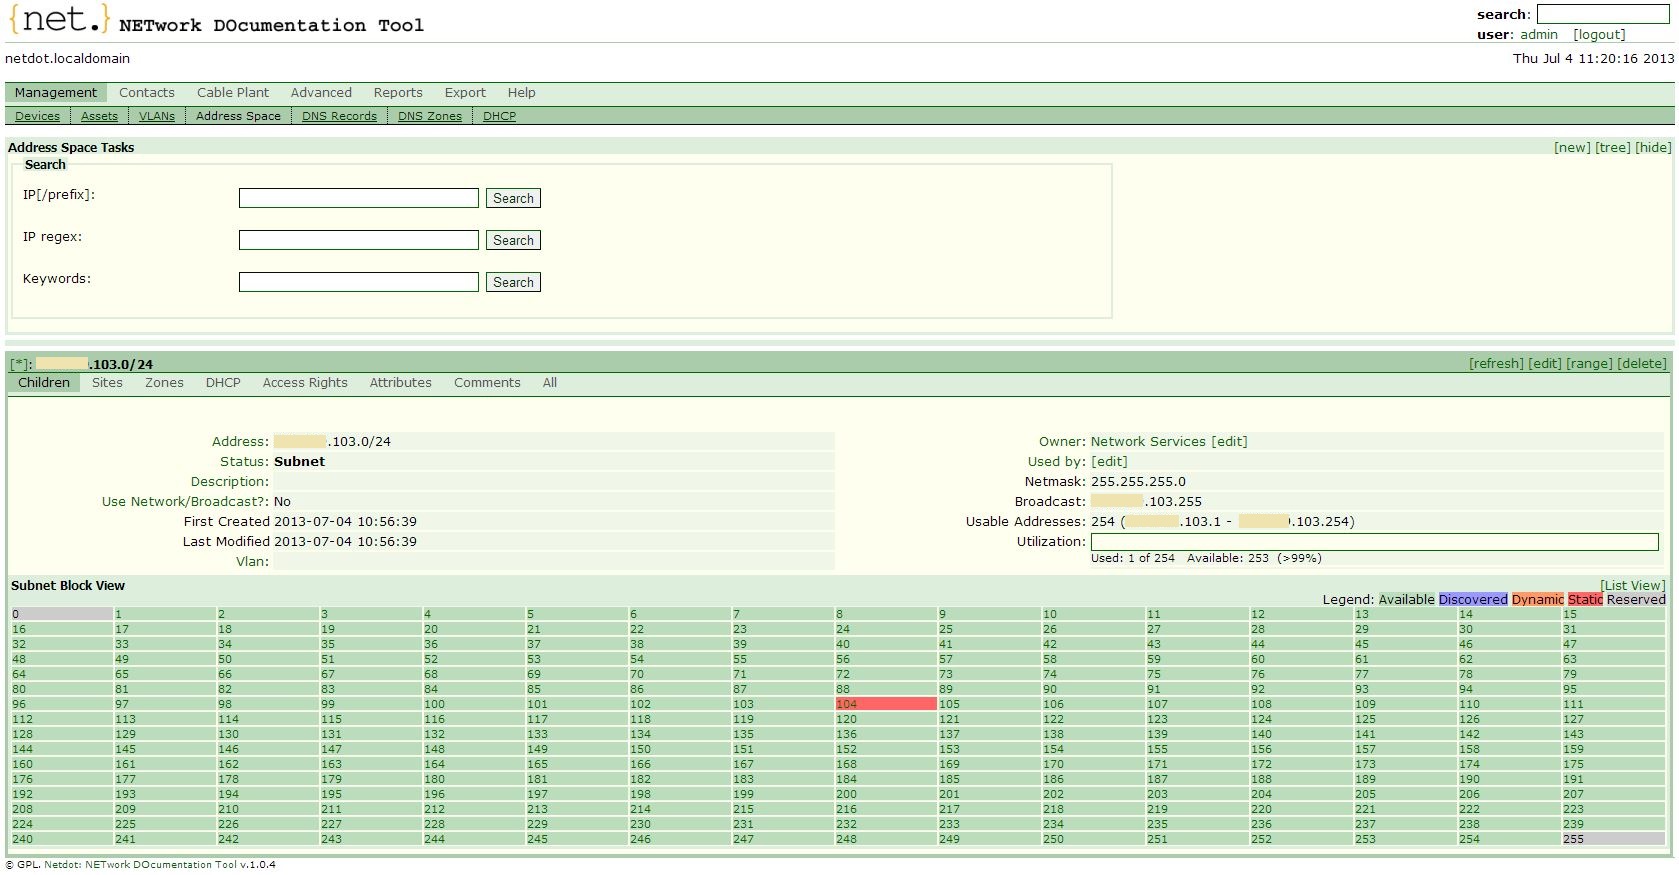
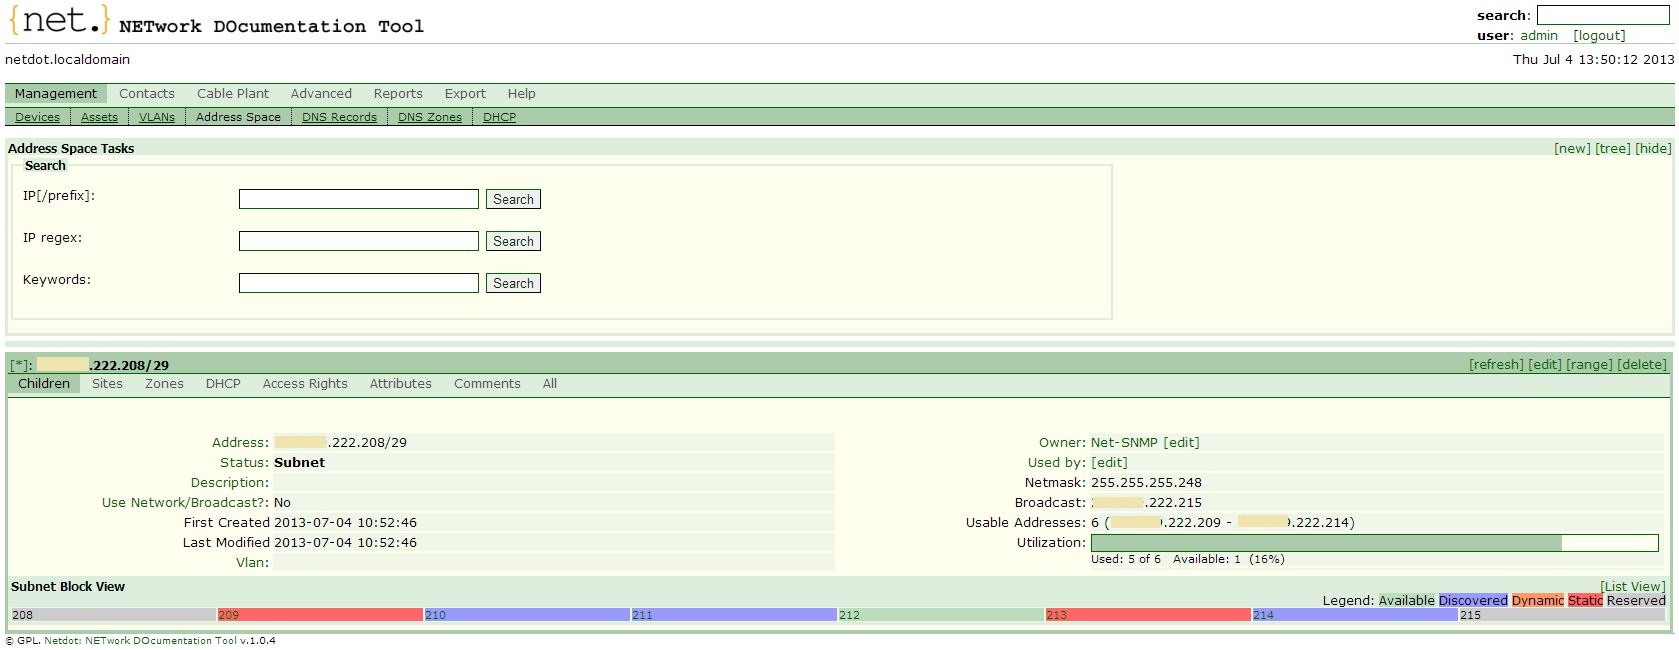
Subnet Map:
An IP address can take one of the following states:
- Free (available) - free address
- Static (static) - belongs to the device interface
- Discovered (discovered) - found in the ARP table
- Dynamic (dynamic) - included in the range distributed by DHCP
- Reserved (reserved) - addresses that cannot be assigned to interfaces
Summary
Netdot is a fairly powerful and functional system. Of course, in one article it is impossible to describe all its capabilities. If you are interested in the article, I will be happy to continue.
Project site:
https://osl.uoregon.edu/redmine/projects/netdot
Source: https://habr.com/ru/post/185660/
All Articles