Self-made ergonomic CatBoard keyboard []
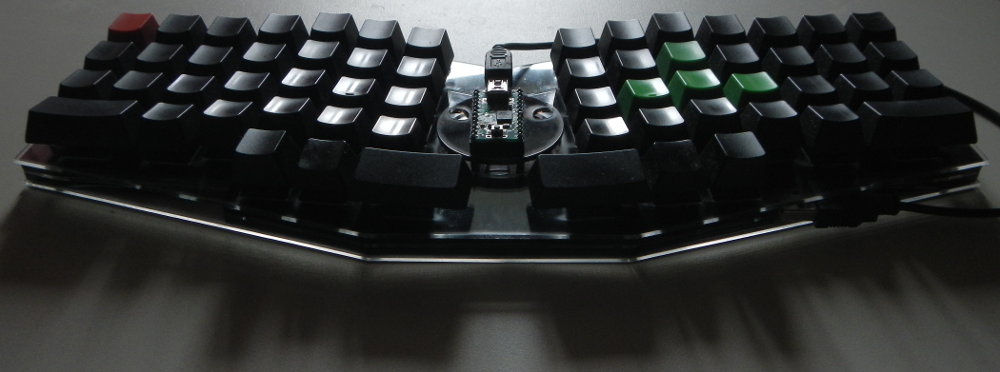
CatBoard is a self-made, ergonomic, open source compact keyboard that has many non-standard solutions, such as: non-standard hardware layout with standard keyboard shortcuts; fast auto-repeated key pressed; Fn layer with cursor keys, number pad, function keys; separate keys for switching layouts; more convenient location of Ctrl and Shift; separate AltTab button; Macintosh compatibility mode, allowing you to work on it in the same way as on a PC; possibility of firmware without additional equipment; the ability to install on top of a laptop keyboard. Thanks to the open code, you can do anything with the keyboard, the new firmware is flooded in a matter of seconds, so you can experiment right on the go.
Long historical part
It all started back in 2005, when I wanted to work with a really ergonomic keyboard, but I was not ready to order an expensive keyboard from abroad. I decided to develop the keyboard myself, because what is easier, buy buttons, take a controller from any cheap keyboard, and just connect the buttons in the same way as it is done in this keyboard. At that time, I really liked the Kinesis Advantage keyboard, almost ideal, but I thought that it would be worthwhile to start manufacturing with a flat keyboard, like the Maltron Flat .
')
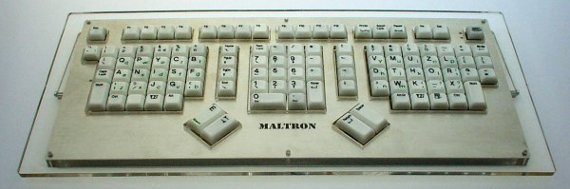
Keyboard Maltron Flat
I was then able to type blindly, learned through the Stamina typing tutor . Before that I tried to learn in Solo, but he got me so much that I didn’t finish my studies, did all the exercises, but didn’t print blindly. But at Stamina, learning was easy, and when the print speed reached 200 characters per minute, I was able to start working without looking at the keyboard. I learned to print both Russian and English text right away, took turns doing the exercises, and because of this I could immediately begin to work fully using the blind method. I rearranged the buttons on my keyboard, thereby troll my colleagues, it was interesting to even invent different inscriptions on the keyboard, because the caps of the buttons are different on different rows, so I had to rearrange them only to my own row, and it was desirable not to touch fj, which had serifs (and they are important in blind typing so that you can put your hands in the starting position of the seal without looking).
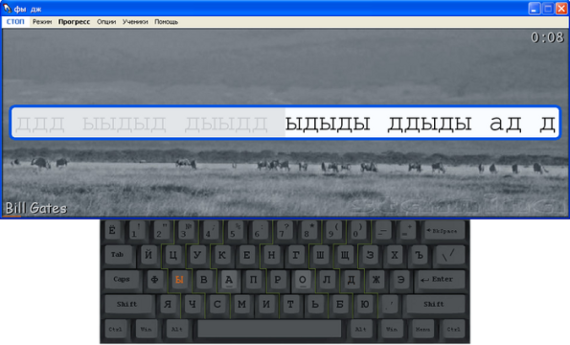
Keyboard simulator Stamina
Before doing anything, I found one Moscow company in which I bought Cherry MX Black buttons with a margin, and a programmable keyboard for KBM-105 trading terminals for experiments (index 105 is the number of buttons, 15x7 matrix). Having drawn the layout of the buttons, I began to think about how I could make a housing at home. From the materials at hand he collected various designs, which are now embarrassing to show, in general, nothing worked out, it was both crooked and shaky. Work on the manufacture of the case has stalled, but on the programmable KBM-105 began to experiment with layouts.
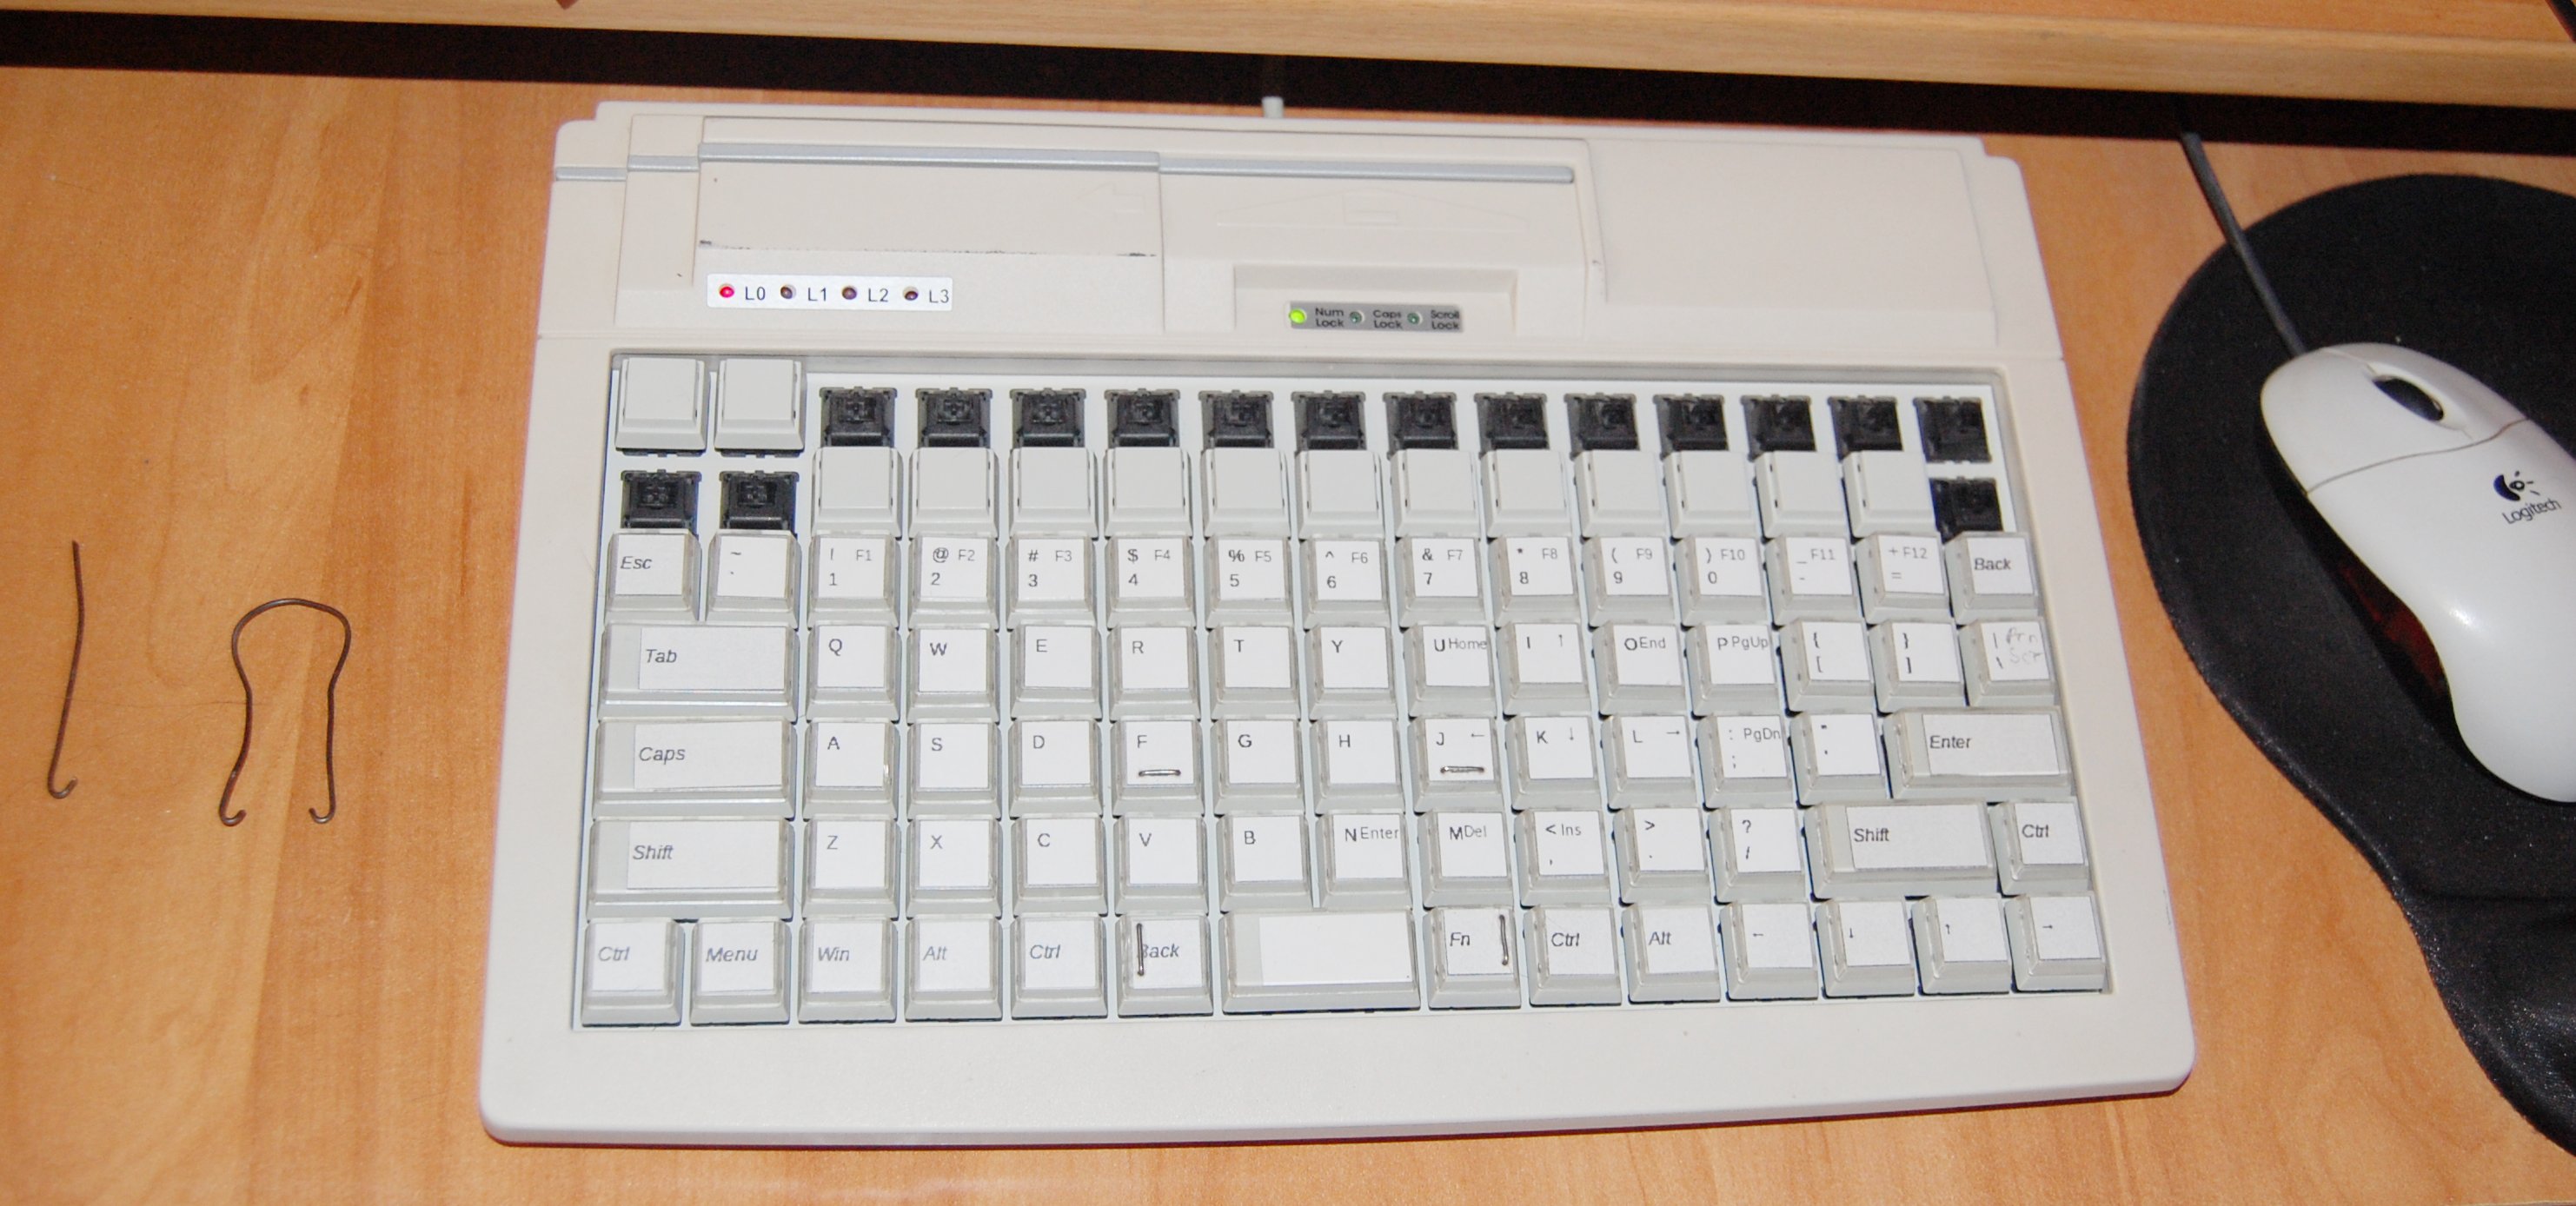
KBM-105 programmable keyboard
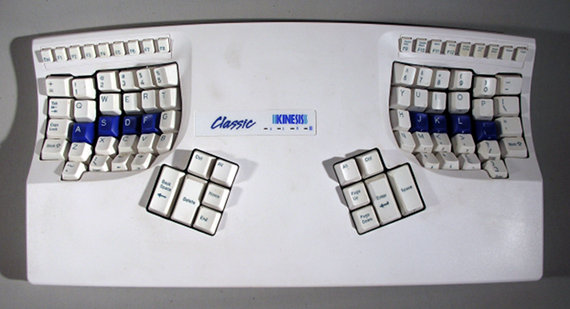
At that time, the very unusual NSK 535 keyboard was made, everything in it was revolutionary, and an alphabetic layout, and shifty on the thumbs. Looking at such a miracle, I decided to even try to type it with such ciphers, but it seemed very revolutionary, and returned the ciphers back to the little fingers, the good thing is that you can quickly flash the KBM-105 keyboard, you can change the button layout several times a day.
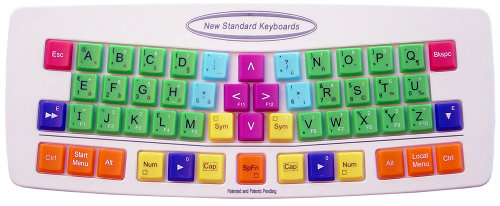
NSK 535 R Keyboard
I worked on this programmable keyboard at home for several years, while at work there was quite a standard keyboard, there were no problems with working on two completely different keyboards, only my work was much nicer.
For quick mastering of new layouts on the programmable keyboard, I even wrote an online keyboard simulator Klavarog ( http://klava.org/ ), so that you can work from any computer connected to the Internet, without installing any programs, now everyone has done it, and while online simulators, if they were, it was only in Flash, and they did not work in Linux with Russian letters. At first it was a very simple simulator, there was not even a hint about the keys pressed, just a picture of the keyboard. Although still it remains the simplest simulator, while very effective, because it was done for himself. Beginners are offered a mode that allows them to master the arrangement of all the letters literally in a day, no need to spend a week or two on passing lessons, which add one button to the study, as is done in almost all simulators.

Keyboard simulator Klavarog
At some point in time, I decided that I would develop a new keyboard, and the project would be open. I created the Wiki site http://kbd.klava.org/ , where I began to collect information about different keyboards, and began to look for any information on keyboard development, because my keyboard already needed to do my controller, the standard one no longer fit. It turned out that I did not know anything about the manufacture of keyboards.
There was also the fact that I left the office and began working at home, and even on a laptop, the matrix programmable keyboard was used less and less. Over time, the heat has already disappeared, the usual worries and affairs overshadowed the development of the keyboard. But the idea was too intrusive, and I began to slowly think about how you can remake the keyboard in a laptop, because it was impossible to physically redo it, so software was used. First, I moved the cursor keys to the main alphabetic block, if you hold down AltGr (right Alt), then some letters became arrows, at first they were VIM's hjkl buttons, then I made a more familiar and convenient
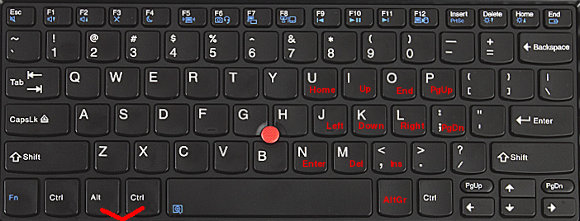
Modified Laptop Keyboard Layout
At one time it turned out that there was no work, and I decided to change the hated QWERTY layout (how my little fingers were hurting from it when I was learning to touch typing) to a more ergonomic Dvorak , and with the help of my simulator I began to study it. Just at that time, I made a special mode in Klavarog, in which it is proposed to type one short word many times in a row, at first slowly, then quickly, driving a new layout into my memory, very effectively. I had been busy for about a week, things were going tight, the speed was growing very slowly, while somehow I forgot how to work in QWERTY, others didn’t have such a problem, but I was scared, suddenly I would have to do something urgent, but I forgot how to type , but in Dvorak not yet learned. And at this moment of timelessness, my old computer BK-0010/01, which had the JCUKEN phonetic layout, is in my eye, in which the Latin letters are located in the same place as the Russians with similar sound in the standard YTsUKEN layout. Nostalgia for the days of BC so overwhelmed that I decided to make this layout myself, and try to study it. It was not possible to make one-on-one, some frequently encountered letters were not very well located, and I ended up changing it quite a lot , and I have good reasons for rearranging each key. But in general, it still remained phonetic, and for the most part coincides with the old. After making the layout and flashing it into my operating system (at that time I already started working in Ubuntu Linux), I began to study it in the simulator. And then a miracle happened, the process went so fast that I brought the printing speed to 200 characters per minute (again these 200) in five days, and started working in a new layout.
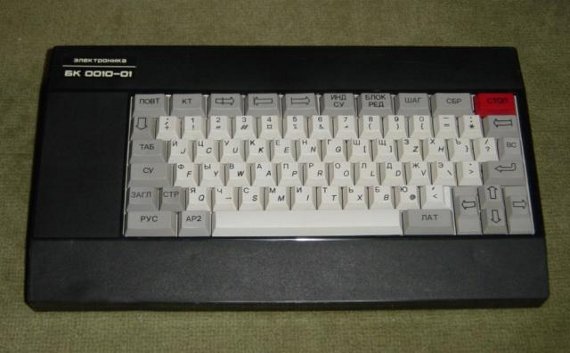
Keyboard of the soviet computer BK 0010-01

JCUKEN modified layout
Now everything was fine with me, except for the location of the keys, and did not make a long space, although it was shorter on a laptop than on conventional keyboards, due to the extra keys on the bottom row. It is time to make the keyboard, only it should be compact, so that it can be placed on top of the laptop keyboard, and as low as possible in height. Since the keyboard should be placed on top of the notebook, and on my Thinkpad there is a touchpoint right in the middle of the keyboard that is above the level of all the buttons, I decided to make a hole on the bottom of the keyboard case, at first it was round, then just added cat ears. From that moment, my keyboard became CatBoard = ^. ^ =
I decided to make the case out of aluminum, and began to look for production, where I could cut holes for buttons and the body contour with a laser. No one wants to get involved with small orders, most honestly write about the amount of the minimum order, some say this only after the order. For cutting aluminum, a rather powerful laser is needed, it’s not easy to find one, so I decided to make a body out of plastic sheet or plexiglass. And here, thanks to Habra, I found mention of the first otkvvyshimsya in Russia fablab . I contacted the head of the laboratory FabLab77 , met, I talked about my project, and got access to equipment with which you can do anything, unlimited opportunities opened up. It was also lucky that at that time the Americans came from MIT, and held a week-long seminar at which they taught to work with all their equipment, only open software was used.
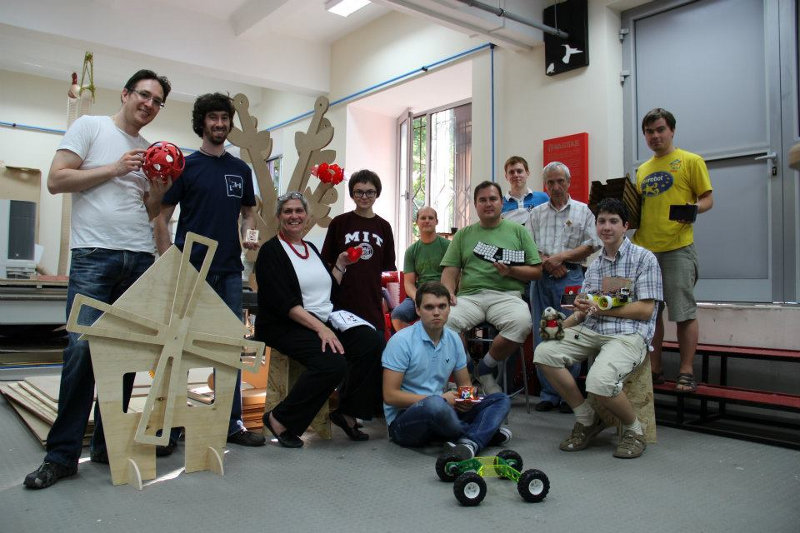
The last day of the MIT workshop at FabLab77
In search of an ergonomic button layout, I made many layouts of plywood, on which I found the best layout, and it turned out to be almost the same as in the Truly Ergonomic and ErgoDox keyboards (I did not yet know about its existence). Well, this is not surprising, because people's hands are almost the same.
After the hull was ready, and the arrangement of the buttons completely suited me, I began to study how to make the controller. At the same time he began to collect a home mini lab for soldering. I bought a soldering iron with power adjustment, assembled a box in which I placed the Dremel 300 with a prefix that turns it into a small drilling machine - Dremel Workstation 220. In this box I made a folding cover on which to work. Now the box always stands under the table, taking up space in the apartment, and when you need to do something, I take it out and put it on the table.
At first, the controller decided to assemble it himself, at the same time collecting the programmer, in the fablab on the milling machine Modela made printed circuit boards, soldered them, but did not work, because the working programmer was only in the lab, I didn’t want to buy a new one, but I couldn’t mess with the boards only at home. I learned that there are microcontrollers with a hardware implementation of the USB protocol, a further search brought me to ready-made controllers, such as Teensy, and our similar developments from Microsin , from which I purchased the AVR-USB162 .
I decided to attach the wires not directly to the controller, but through the connector that I installed inside the case. Having traveled again to the fab lab, I cut out the case with a laser, which I decided not to do with rounded edges, outlining blocks with buttons in straight lines, got the current keyboard design. The controller is placed directly on top of the case, it rests on a screw with a nut, and planted washers, and the connector does not allow the board to spin. So that the wire does not rest on the laptop screen, put the controller closer to the middle of the keyboard. But how it happens when you didn’t think about this problem:

Richard Stallman and his OLPC laptop with HHKB keyboard
When developing the circuit, I realized that the buttons need to be connected via diodes so that there is no situation when, when pressing several buttons in different rows and columns, the controller started thinking that the button was pressed from intersecting rows. Everyone knows that, but I did not know about it then. The Cherry MX buttons have an empty space where you can install either a diode or an LED. In order not to solder the diodes outside, I installed a small KD522B diode on each button, though they got the polarity wrong, they have the label location not uniform, you must look in the directory where the anode and the cathode are, therefore, when you connect the buttons to the controller, you take into account your mistake.
When everything was assembled, it remained only to flash the controller, at first I used the LUFA library, but I could not figure it out, because I never programmed in C, and in fact I don’t know this language. In search of another solution, I found a simple keyboard scan code, where the Teensy library was used. The code turned out to be a lot of errors, but fixing them was no longer difficult, the most important thing was working. I made the firmware in a couple of days, and the keyboard worked, I would never have thought that I could create it so quickly. Then of course there were weeks of fine-tuning it to the mind, correcting mistakes, adding functions unseen before. And I did it all already on the new keyboard.
Since the keyboard turned out to be divided, the hands are farther from each other, and the stand for hands on the laptop is not designed for it, so the hands began to rest on the corners of the laptop. Solved the problem with two mouse pads with gel pads, cut off the extra part of the rug, and got a comfortable palm rest to the keyboard. Thanks to the straight line of the case, the pads were installed just perfectly.

CatBoard Keyboard over ASUS EEE PC 701 Laptop
What a pleasure it was to finally start working on what was assembled with my own hands, and does not have those flaws that I was just tired of, because I work on the keyboard every day, and every day it oppresses me. Come to any computer store, and try to buy a keyboard, in which there are no shifted rows, the heritage of mechanical typewriters, they simply do not exist. I would understand if the standard keyboards were ideally ergonomic, so there is no, this standard rests only on the habit of people, and all new users learn again on these keyboards, made under the old days (not in appearance, in fact).
In this case, my main requirement is to use a laptop keyboard on top, my new keyboard performed, it will fit even on the smallest netbook - ASUS EEE PC 701, which has a screen of just 7 inches, as seen in the photo just above. Although I don’t work on this netbook, it’s quite possible that I’ll start using it somewhere on the road, because now you don’t need to use its small keyboard when you have to squeeze your fingers together to place them on small keys.
Initially, there were flat caps with a transparent lid, purchased together with a programmable keyboard, and later put black caps from WASD Keyboards when he made an order for new buttons, this time already Cherry MX Blue (with a click) and Cherry MX Red (like black ones without click, but softer).
The second keyboard was decided to collect because of the tight Cherry MX Black, they have an effort of pressing more than 60 grams, in blue and red from 45 grams. Pressing them was still normal, but to keep pressed down, which is often not necessary, the finger gets tired because of the presence of the Fn layer.
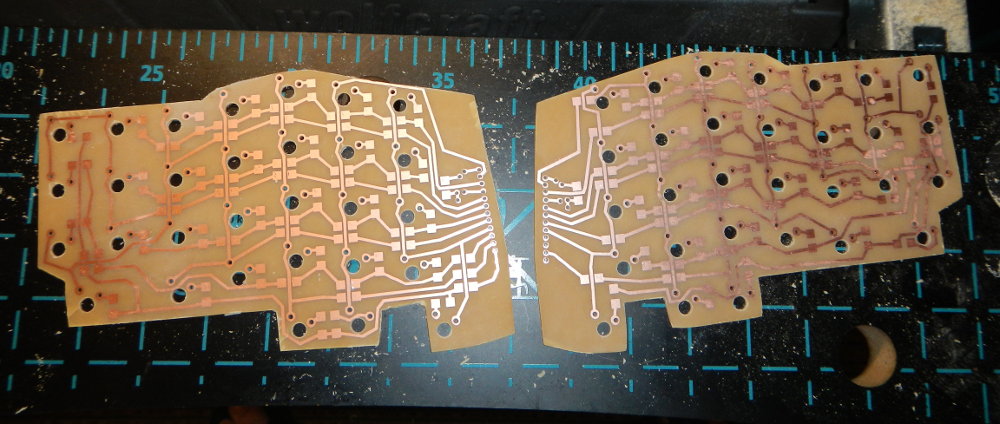
The manufacture of CatBoard] [was joined by a suenot colleague, whom Klavogonschikov met at the meeting, and one copy was asked to be made for the fab lab. Therefore, instead of soldering with wires, I decided to make printed circuit boards, there are two pieces on each keyboard, a connector is installed on the edge of the board into which the controller is inserted, connecting both boards, although due to the lack of ports, we had to connect the boards with five wires.

Eugene collects his white CatBoard] [
To mill such large boards for a very long time, I decided to pickle them. Usually prepared for etching using photoresist or LUT, I decided to do it with a laser, glued a vinyl self-adhesive film to the board foil, laser cut the film along the contour of the tracks, removed the excess, and etched it in ammonium persulfate solution. The boards were from the gettinax, and my mistake was to cut them with metal scissors, they are quite fragile, in one place the piece with the track broke off. Drilled at home Dremel, did not want to mess with milling.

Etching board
Drilled board
The use of 1.5 mm plexiglass together with 3 mm colored plastic made it possible to make the keyboard case a little thinner than in the first keyboard made of only 3 mm sheets, which made it necessary to mill the projections under the button latches. The controller took another model, more compact ( AVR-USB162MU ). Installed two LEDs, blue and red, which show the current keyboard layout.
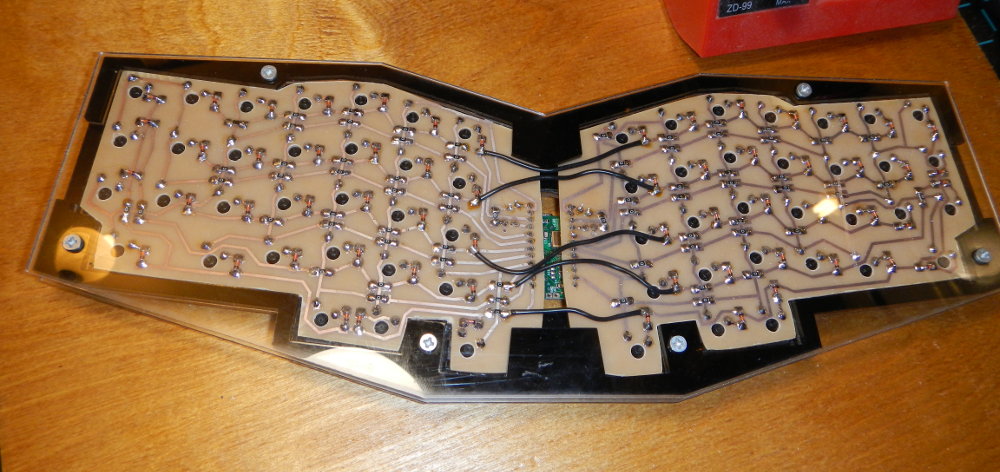
Bottom view
The keyboard layers are fastened with M3 threaded rivets with a notch and countersunk head screws. Instead of threaded rivets, you can take more affordable exhausting, knock a nail out of them, and cut the M3 thread inside.
')
Keyboard Maltron Flat
I was then able to type blindly, learned through the Stamina typing tutor . Before that I tried to learn in Solo, but he got me so much that I didn’t finish my studies, did all the exercises, but didn’t print blindly. But at Stamina, learning was easy, and when the print speed reached 200 characters per minute, I was able to start working without looking at the keyboard. I learned to print both Russian and English text right away, took turns doing the exercises, and because of this I could immediately begin to work fully using the blind method. I rearranged the buttons on my keyboard, thereby troll my colleagues, it was interesting to even invent different inscriptions on the keyboard, because the caps of the buttons are different on different rows, so I had to rearrange them only to my own row, and it was desirable not to touch fj, which had serifs (and they are important in blind typing so that you can put your hands in the starting position of the seal without looking).
Keyboard simulator Stamina
Before doing anything, I found one Moscow company in which I bought Cherry MX Black buttons with a margin, and a programmable keyboard for KBM-105 trading terminals for experiments (index 105 is the number of buttons, 15x7 matrix). Having drawn the layout of the buttons, I began to think about how I could make a housing at home. From the materials at hand he collected various designs, which are now embarrassing to show, in general, nothing worked out, it was both crooked and shaky. Work on the manufacture of the case has stalled, but on the programmable KBM-105 began to experiment with layouts.
KBM-105 programmable keyboard
At that time, the very unusual NSK 535 keyboard was made, everything in it was revolutionary, and an alphabetic layout, and shifty on the thumbs. Looking at such a miracle, I decided to even try to type it with such ciphers, but it seemed very revolutionary, and returned the ciphers back to the little fingers, the good thing is that you can quickly flash the KBM-105 keyboard, you can change the button layout several times a day.
NSK 535 R Keyboard
I worked on this programmable keyboard at home for several years, while at work there was quite a standard keyboard, there were no problems with working on two completely different keyboards, only my work was much nicer.
For quick mastering of new layouts on the programmable keyboard, I even wrote an online keyboard simulator Klavarog ( http://klava.org/ ), so that you can work from any computer connected to the Internet, without installing any programs, now everyone has done it, and while online simulators, if they were, it was only in Flash, and they did not work in Linux with Russian letters. At first it was a very simple simulator, there was not even a hint about the keys pressed, just a picture of the keyboard. Although still it remains the simplest simulator, while very effective, because it was done for himself. Beginners are offered a mode that allows them to master the arrangement of all the letters literally in a day, no need to spend a week or two on passing lessons, which add one button to the study, as is done in almost all simulators.
Keyboard simulator Klavarog
At some point in time, I decided that I would develop a new keyboard, and the project would be open. I created the Wiki site http://kbd.klava.org/ , where I began to collect information about different keyboards, and began to look for any information on keyboard development, because my keyboard already needed to do my controller, the standard one no longer fit. It turned out that I did not know anything about the manufacture of keyboards.
There was also the fact that I left the office and began working at home, and even on a laptop, the matrix programmable keyboard was used less and less. Over time, the heat has already disappeared, the usual worries and affairs overshadowed the development of the keyboard. But the idea was too intrusive, and I began to slowly think about how you can remake the keyboard in a laptop, because it was impossible to physically redo it, so software was used. First, I moved the cursor keys to the main alphabetic block, if you hold down AltGr (right Alt), then some letters became arrows, at first they were VIM's hjkl buttons, then I made a more familiar and convenient
ijkl , so that when AltGr was pressed, the arrows as if they themselves jump under the fingers. Then I placed the Ctrl key to the left of the spacebar, shifting Alt to the left by one key, this turned out to be a very good solution . I even learned how to work in Emacs under this case, it turns out that on the ancient keyboards Ctrl was located on the site of the modern Caps Lock, it’s clear why I didn’t like this editor before, this is because of the inconvenient location of Ctrl. It is necessary to take into account, this all concerns only blind typing, when typing with two fingers, the key layout does not matter much, it’s just a matter of habit.Modified Laptop Keyboard Layout
At one time it turned out that there was no work, and I decided to change the hated QWERTY layout (how my little fingers were hurting from it when I was learning to touch typing) to a more ergonomic Dvorak , and with the help of my simulator I began to study it. Just at that time, I made a special mode in Klavarog, in which it is proposed to type one short word many times in a row, at first slowly, then quickly, driving a new layout into my memory, very effectively. I had been busy for about a week, things were going tight, the speed was growing very slowly, while somehow I forgot how to work in QWERTY, others didn’t have such a problem, but I was scared, suddenly I would have to do something urgent, but I forgot how to type , but in Dvorak not yet learned. And at this moment of timelessness, my old computer BK-0010/01, which had the JCUKEN phonetic layout, is in my eye, in which the Latin letters are located in the same place as the Russians with similar sound in the standard YTsUKEN layout. Nostalgia for the days of BC so overwhelmed that I decided to make this layout myself, and try to study it. It was not possible to make one-on-one, some frequently encountered letters were not very well located, and I ended up changing it quite a lot , and I have good reasons for rearranging each key. But in general, it still remained phonetic, and for the most part coincides with the old. After making the layout and flashing it into my operating system (at that time I already started working in Ubuntu Linux), I began to study it in the simulator. And then a miracle happened, the process went so fast that I brought the printing speed to 200 characters per minute (again these 200) in five days, and started working in a new layout.
Keyboard of the soviet computer BK 0010-01
JCUKEN modified layout
Now everything was fine with me, except for the location of the keys, and did not make a long space, although it was shorter on a laptop than on conventional keyboards, due to the extra keys on the bottom row. It is time to make the keyboard, only it should be compact, so that it can be placed on top of the laptop keyboard, and as low as possible in height. Since the keyboard should be placed on top of the notebook, and on my Thinkpad there is a touchpoint right in the middle of the keyboard that is above the level of all the buttons, I decided to make a hole on the bottom of the keyboard case, at first it was round, then just added cat ears. From that moment, my keyboard became CatBoard = ^. ^ =
I decided to make the case out of aluminum, and began to look for production, where I could cut holes for buttons and the body contour with a laser. No one wants to get involved with small orders, most honestly write about the amount of the minimum order, some say this only after the order. For cutting aluminum, a rather powerful laser is needed, it’s not easy to find one, so I decided to make a body out of plastic sheet or plexiglass. And here, thanks to Habra, I found mention of the first otkvvyshimsya in Russia fablab . I contacted the head of the laboratory FabLab77 , met, I talked about my project, and got access to equipment with which you can do anything, unlimited opportunities opened up. It was also lucky that at that time the Americans came from MIT, and held a week-long seminar at which they taught to work with all their equipment, only open software was used.
The last day of the MIT workshop at FabLab77
In search of an ergonomic button layout, I made many layouts of plywood, on which I found the best layout, and it turned out to be almost the same as in the Truly Ergonomic and ErgoDox keyboards (I did not yet know about its existence). Well, this is not surprising, because people's hands are almost the same.
After the hull was ready, and the arrangement of the buttons completely suited me, I began to study how to make the controller. At the same time he began to collect a home mini lab for soldering. I bought a soldering iron with power adjustment, assembled a box in which I placed the Dremel 300 with a prefix that turns it into a small drilling machine - Dremel Workstation 220. In this box I made a folding cover on which to work. Now the box always stands under the table, taking up space in the apartment, and when you need to do something, I take it out and put it on the table.
At first, the controller decided to assemble it himself, at the same time collecting the programmer, in the fablab on the milling machine Modela made printed circuit boards, soldered them, but did not work, because the working programmer was only in the lab, I didn’t want to buy a new one, but I couldn’t mess with the boards only at home. I learned that there are microcontrollers with a hardware implementation of the USB protocol, a further search brought me to ready-made controllers, such as Teensy, and our similar developments from Microsin , from which I purchased the AVR-USB162 .
I decided to attach the wires not directly to the controller, but through the connector that I installed inside the case. Having traveled again to the fab lab, I cut out the case with a laser, which I decided not to do with rounded edges, outlining blocks with buttons in straight lines, got the current keyboard design. The controller is placed directly on top of the case, it rests on a screw with a nut, and planted washers, and the connector does not allow the board to spin. So that the wire does not rest on the laptop screen, put the controller closer to the middle of the keyboard. But how it happens when you didn’t think about this problem:
Richard Stallman and his OLPC laptop with HHKB keyboard
When developing the circuit, I realized that the buttons need to be connected via diodes so that there is no situation when, when pressing several buttons in different rows and columns, the controller started thinking that the button was pressed from intersecting rows. Everyone knows that, but I did not know about it then. The Cherry MX buttons have an empty space where you can install either a diode or an LED. In order not to solder the diodes outside, I installed a small KD522B diode on each button, though they got the polarity wrong, they have the label location not uniform, you must look in the directory where the anode and the cathode are, therefore, when you connect the buttons to the controller, you take into account your mistake.
When everything was assembled, it remained only to flash the controller, at first I used the LUFA library, but I could not figure it out, because I never programmed in C, and in fact I don’t know this language. In search of another solution, I found a simple keyboard scan code, where the Teensy library was used. The code turned out to be a lot of errors, but fixing them was no longer difficult, the most important thing was working. I made the firmware in a couple of days, and the keyboard worked, I would never have thought that I could create it so quickly. Then of course there were weeks of fine-tuning it to the mind, correcting mistakes, adding functions unseen before. And I did it all already on the new keyboard.
Since the keyboard turned out to be divided, the hands are farther from each other, and the stand for hands on the laptop is not designed for it, so the hands began to rest on the corners of the laptop. Solved the problem with two mouse pads with gel pads, cut off the extra part of the rug, and got a comfortable palm rest to the keyboard. Thanks to the straight line of the case, the pads were installed just perfectly.
CatBoard Keyboard over ASUS EEE PC 701 Laptop
What a pleasure it was to finally start working on what was assembled with my own hands, and does not have those flaws that I was just tired of, because I work on the keyboard every day, and every day it oppresses me. Come to any computer store, and try to buy a keyboard, in which there are no shifted rows, the heritage of mechanical typewriters, they simply do not exist. I would understand if the standard keyboards were ideally ergonomic, so there is no, this standard rests only on the habit of people, and all new users learn again on these keyboards, made under the old days (not in appearance, in fact).
In this case, my main requirement is to use a laptop keyboard on top, my new keyboard performed, it will fit even on the smallest netbook - ASUS EEE PC 701, which has a screen of just 7 inches, as seen in the photo just above. Although I don’t work on this netbook, it’s quite possible that I’ll start using it somewhere on the road, because now you don’t need to use its small keyboard when you have to squeeze your fingers together to place them on small keys.
Initially, there were flat caps with a transparent lid, purchased together with a programmable keyboard, and later put black caps from WASD Keyboards when he made an order for new buttons, this time already Cherry MX Blue (with a click) and Cherry MX Red (like black ones without click, but softer).
The second keyboard was decided to collect because of the tight Cherry MX Black, they have an effort of pressing more than 60 grams, in blue and red from 45 grams. Pressing them was still normal, but to keep pressed down, which is often not necessary, the finger gets tired because of the presence of the Fn layer.
The manufacture of CatBoard] [was joined by a suenot colleague, whom Klavogonschikov met at the meeting, and one copy was asked to be made for the fab lab. Therefore, instead of soldering with wires, I decided to make printed circuit boards, there are two pieces on each keyboard, a connector is installed on the edge of the board into which the controller is inserted, connecting both boards, although due to the lack of ports, we had to connect the boards with five wires.
Eugene collects his white CatBoard] [
To mill such large boards for a very long time, I decided to pickle them. Usually prepared for etching using photoresist or LUT, I decided to do it with a laser, glued a vinyl self-adhesive film to the board foil, laser cut the film along the contour of the tracks, removed the excess, and etched it in ammonium persulfate solution. The boards were from the gettinax, and my mistake was to cut them with metal scissors, they are quite fragile, in one place the piece with the track broke off. Drilled at home Dremel, did not want to mess with milling.
Etching board
Drilled board
The use of 1.5 mm plexiglass together with 3 mm colored plastic made it possible to make the keyboard case a little thinner than in the first keyboard made of only 3 mm sheets, which made it necessary to mill the projections under the button latches. The controller took another model, more compact ( AVR-USB162MU ). Installed two LEDs, blue and red, which show the current keyboard layout.
Bottom view
The keyboard layers are fastened with M3 threaded rivets with a notch and countersunk head screws. Instead of threaded rivets, you can take more affordable exhausting, knock a nail out of them, and cut the M3 thread inside.

CatBoard] [
Keyboard Features CatBoard
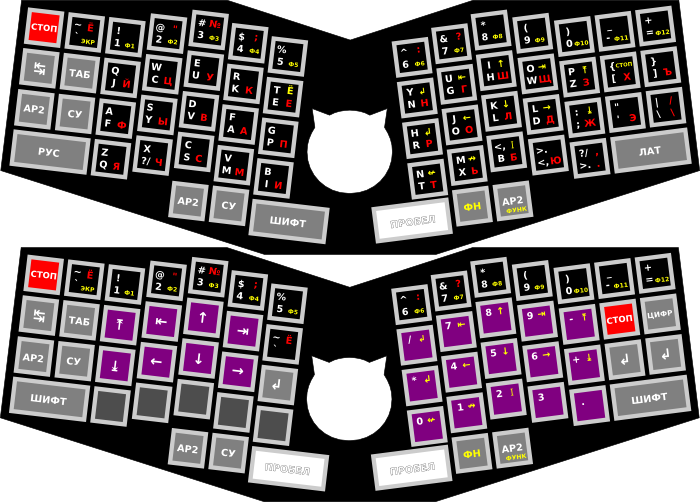
The most important thing is the Fn layer, the one that works when the Fn button is pressed under the right thumb. Its presence has allowed to make the keyboard very compact, and at the same time fully functional. I did the same on a regular keyboard, reconfiguring the operating system, though not all programs worked, such as Skype and Sublime Text. Now, not only did it become more convenient to work with the Fn layer, due to the correct location of the Fn button, it also works absolutely in all programs, but at least even in the BIOS, because when the Fn is clamped, the keyboard sends completely different key codes, instead of
ijkl pressing the arrows goes, uo is Home and End, p; these are Page Up and Page Down, h - Enter, nm - Backspace and Delete,, - Insert. The entire digital series becomes functional, i.e. Fn + 1 is F1, Fn + 0 is F10, well, Fn + - = this is F11 and F12.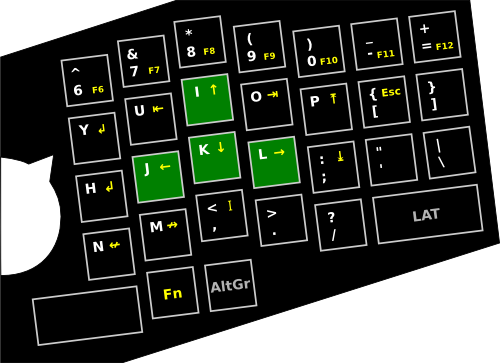
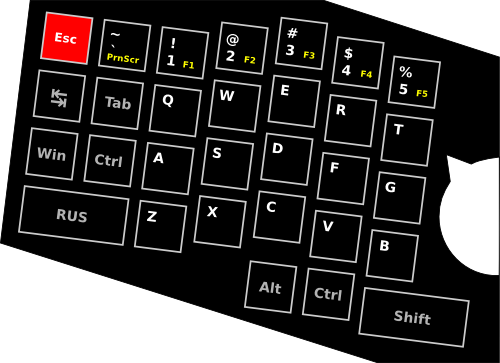
The spacebar has long been shaking only with my right hand, so it was decided to use the left space as a shift. It turned out to be very convenient, because it can be held even when typing with the same hand, no need to alternate the little fingers, the letter on the left is the right little finger, the letter on the right is the left little finger. With such shifty and Caps Lock is not needed, keep it pressed, and print for as long as you like.
In place of the released Shiftov hung the function of switching the language, on the left - RUS, on the right - LAT, just like on old Soviet computers.At the same time, I left the function of the cipher on these buttons, if you press it quickly once, then the necessary layout will be enabled, and in other cases it will be the cipher, and in some specific cases it can even be Ctrl.
To the left of the Tab button has placed a separate AltTab button, when it is pressed, Alt is pressed, Tab is pressed and released, and Alt is held. To switch to the next window, just click next to the usual Tab, very convenient. However, if this new button is pressed while pressing Alt or Ctrl, then it will work as a regular Tab.
Ctrl and Alt are now pressed to the space, with Ctrl closer to it. Thanks to separate buttons for turning on layouts, and a separate AltTab button, I almost stopped using Alt buttons.
There is a fixed mode called by Fn + AltGr, in which a numeric block appears on the right half of the keyboard, and the same block with arrows on the left.
It has long dreamed of trying fast auto-repeatkey pressed, which wrote a long time ago, Jeff Raskin. But I did even better, for his work it takes not a triple keystroke, but a double one, and this works thanks to not a fixed time, but an auto-tuning for the user. The faster a double press of a button is followed by a hold, the faster it will start and a key will be automatically repeated. In this case, false positives are very rare, and do not depend on the speed of the user. Tests show that this auto-repeat is twice as fast as usual. At the same time, I got used to it so quickly that I stopped using the usual one, it seems to me too slow, it starts slowly, works slowly, although of course the second parameter can be easily adjusted, but the first one will not work, otherwise there will be false alarms with normal printing. The only problem,turbo-auto-rep does not work in games where auto-repetition is not needed at all, but just a pressed key is needed, so for such cases I made it disconnectable by Fn + Esc.
In place of the Russian letter E, he placed the letter E, which will be dialed while Fn is clamped. Now I always type E, because now I don’t have to reach for it. Moreover,
~in the English layout, it was thus more convenient to type.Since I'm not typing in QWERTY, but in JCUKEN, and there are separate buttons for switching languages, then I made my own non-standard hardware layout, and thanks to this, it was possible to do something that nobody had guessed to do before me, namely, keyboard shortcuts from QWERTY. After all, in order to leave comfortable Ctrl + XCV, we made the layout Colemak, and I get not only keyboard shortcuts for working with the clipboard, but all the others. After all, in my JCUKEN I placed V in place of W only because Ctrl + W was not very convenient, and often pressed it accidentally, which led to unpleasant consequences. Now I am returning back to FYWA, and it became possible just because of the standard keyboard shortcuts.
With the advent of additional LEDs that display the current layout, they are clearly visible with side vision, and at the same time do not interfere with work, yet made the function to turn them off, press Fn + Y, and the keyboard no longer glows.
Often it is necessary to leave the computer, but since my keyboard does not allow to close the laptop without removing it, I made the keypad lock function . Pressing Fn + RShift, the keyboard turns off the LEDs, stops accepting any presses except for the same combination, and sends Win + L pressing to the computer, a combination that locks the operating system with a password so that someone else cannot use your computer in your presence.
Stitcheda keyboard without a programmer, directly via the same USB cable with which it is connected to a computer. Just press a button on the controller, how the DFU loader is activated.located at the end of the controller's memory, and through a special program, you can upload the compiled firmware to the beginning of the controller's memory. I put a three-second pause in the download script, so I calmly send the data to the download, and I manage to activate the bootloader, i.e. I don’t need another keyboard for flashing to press Enter. Basically, for this reason, I placed the controller not inside the keyboard case, but directly on top, so that the bootloader button is available. Due to this, the keyboard case turned out to be as thin as possible, it would have been difficult to squeeze the controller into it, and we would have to bring the connector out, complicating the assembly.
My look at CatBoard
Since none of the manufactured keyboards came up to me, because one of the main requirements was to use the keyboard on top of the notebook, I had to make the keyboard myself. Thanks to FabLab77, I was able to make several variants of the case, and test the different arrangement of buttons, eventually came to the same arrangement of buttons that in Truly Ergonomics and ErgoDox, except that the buttons under the thumbs are completely different, they do not close the touchpad of the laptop , and did not cut the extreme buttons on the left and right, the keyboard turned out to be most compatible with the standard one. Although of course you have to retrain, especially with your left hand, working with navigation keys, and function keys.
The result is a very convenient Russian keyboard, sharpened by typewriting (blind ten-finger print) and programming, allowing the use of non-standard English layout with standard keyboard combinations, while compatible with all operating systems and programs. As I created the first copy of the working keyboard in the New Year holidays this year, I still work on it, I cannot switch to the usual one, or rather, I just don’t want to.
The memory of the controller is only half occupied (4 KB loader, and almost 4 KB keyboard controller), so there is still a lot of space for expanding the functionality of the keyboard. And the most important thing is that you can do it yourself, no need to wait for someone to implement the necessary for me personally. Only on its keyboard it became possible to realize what has long dreamed of, and much more can be done, complete ideas.
Analogs
There are various really ergonomic keyboards, however, due to the high price and the need to get used to them, they are in low demand, unfortunately.
ErgoDox (Key64)
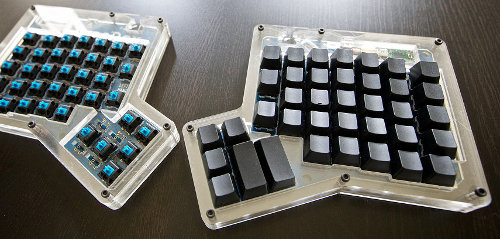
After I made the first version of CatBoard, I learned about the existence of a similar project, only already brought by enthusiasts to a joint release. This is a keyboard consisting of two halves, connected by a wire. The PCB is designed in such a way that the same and only inverted boards are used for the left and right half.
Truly Ergonomics
Stand under the arms are removed, so that the keyboard becomes even more compact.
New Stanadrd Keyboards (NSK 535 R)
This keyboard is too revolutionary, starting with the alphabetic layout, so that it can not be used to enter Russian texts. Very not convenient arrangement of arrows.
Maltron
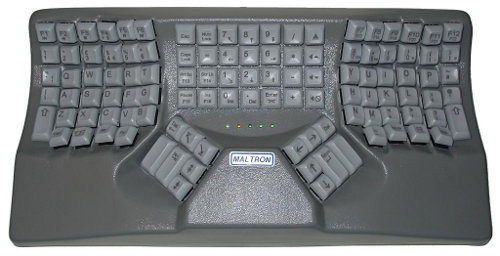
Available for a long time, there are modifications for one hand. Pretty expensive.
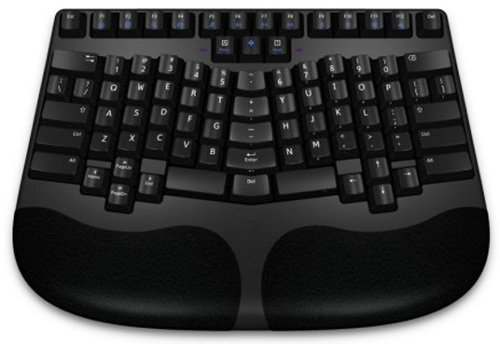
Kinesis
She starred in the movie "People in Black". One of the best and affordable keyboards, is still evolving.
CatBoard from the old mechanical keyboard
Recently presented Alps White buttons from the old mechanical keyboard, already dropped out of it. I decided to assemble CatBoard from them, I will make the installation with wires, it will be much faster than making a printed circuit board. The controller will be installed on the keyboard case, and will be held together by friction in the connector.


With buttons and the ability to make a case, repeat the keyboard quite easily.
Future plans
I do not plan to engage in the production of such keyboards. Communicating with all your friends showed that most do not even see the difference between a standard keyboard and a CatBoard, and even more so no one wants to relearn.
If you make such a keyboard relatively cheap (on films), then you need an order for a very large number of keyboards. On mechanical buttons for less than $ 100, it will not be possible to do anything, and then, this is also a large batch of production. Self-assembly of one keyboard will cost 5-6 tr.
If someone wants to get the same keyboard (or similar in its project), and at the same time he can not do it, write to ibnteo@gmail.com, think of something together. And if you collect it yourself, then all the more write, or you can chat on Skype (text) - my Skype name is exactly the same as my nickname here.
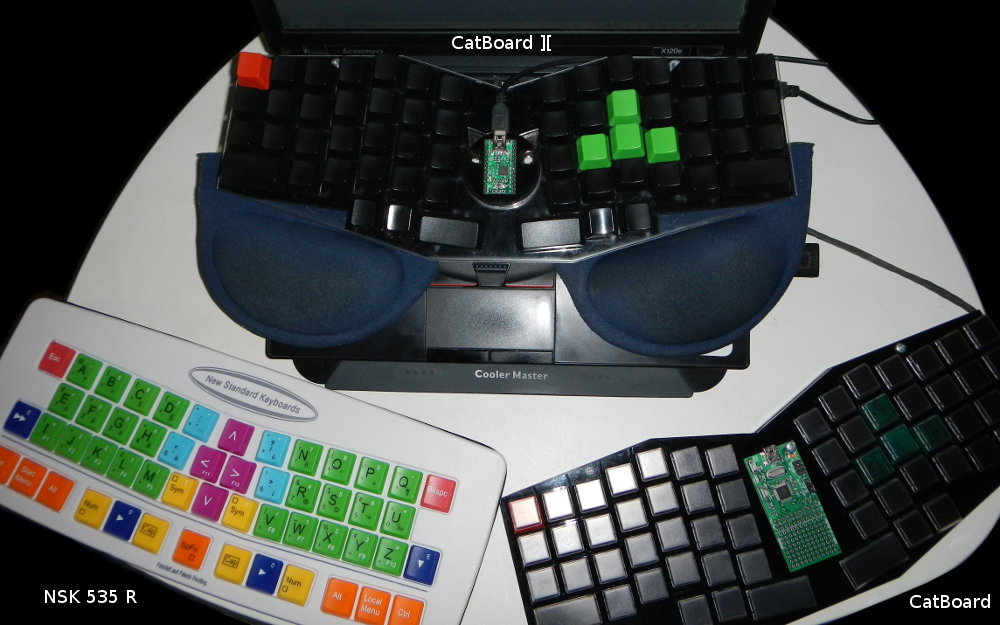
CatBoard] [, NSK 535 R, CatBoard
Links
Project website: http://catboard.klava.org/
Source files: https://github.com/ibnteo/catboard
CatBoard blog: http://ibnteo.klava.org/tag/catboard
Cherry MX buttons and caps: http : //www.wasdkeyboards.com/
Controllers: http://microsin.ru/
Hardware: http://www.krepmarket.ru/
Plexiglas: http://art-landia.ru/category/plexiglas/
FabLab: http : //fablab77.ru/
Diodes, LEDs, resistors, soldering equipment and materials were purchased at the Moscow-based radio market on the third floor: http://www.tkmitino.ru/
Some parts were purchased in Chip and Dipe: http: / /www.chipdip.ru/
Keyboard simulator: http://klava.org/
Clavogonki: http://klavogonki.ru/
English keyboard forums: http://geekhack.org/ , http://deskthority.net/
Source: https://habr.com/ru/post/185500/
All Articles