Acquaintance with UnrealEngine. Part 1
Did you ever want to make your game or 3D presentation, or just find out how other games work? I always wanted to make my game, and it was interesting to find out how existing ones work. I will not hide that one of my favorite games is Unreal, running on the UnrealEngine engine from Epic Games. The first version of the engine appeared in 1998. At the moment, the current version of the fourth engine. In addition to the Unreal series itself, a lot of games were made on the engine.
Having released the first version of the engine, Epic Games attached it to the UnrealEditor engine - an editor that allows you to make your own levels and mods for the game. In 2009, Epic Games released UDK which allowed them to make their games. In my opinion, this engine is worthy to figure out how to work with it and what it can.
I will try to describe the basics of working with UnrealEngine, but for some reason I will describe it mainly in its second version. Most of this will work in both UDK and UnrealEngine4. So, if you are interested, welcome under cat.
Some theory
Any UnrealEngine action takes place at the (Level) level. The level in turn consists of the level geometry and the Actors. And, actually, while the engine is running, the player moves through the levels, and interacts with the Actors.
Geometry
UnrealEngine uses CSG geometry. This means that initially the whole world is filled with solid matter, and we can cut out of it pieces of the size and shape we need, or add the parts we need to the already cut out space. That is, to get a simple scene consisting, for example, of two rooms connected by a corridor, we must sequentially cut out two rooms and connect them with a corridor. If we in one of the rooms want to add, for example, a staircase, a column, or just a sphere under the ceiling, then it will be necessary not to cut, but rather to add the necessary geometry. All specified manipulations are performed using Brush. Brushes can be made of different shapes and purposes. The engine also allows you to import and export brushes, in text format t3d. The format is quite simple and allows you to write a converter when knowing other 3d formats, depending on the UnrealEd version (UnrealEngine level editor) to import brushes from common formats such as DFX / ASC / ASE. To work with the geometry also should be attributed, and the imposition of textures on the resulting geometry.
Actors
The second component of the level is the actors. Actors are much more complicated than geometry. If you dig deeper, then all the actors are the heirs from the class of the actor. But I think now it is not enough what will tell you. But in general, UnrealEngine is object-oriented, and one of the basic components used in UnrealEngine is Actor, there is an even more basic Object, but they are not used directly on the level. As a result, the actor can be any thing at the level, both visible and invisible. For example, almost always at the level there is a PlayerStart actor who is responsible for the place where the player will appear, or, for example, the Light actor is responsible for lighting the level. Actors can also influence global level behavior. For example, the ZoneInfo actor can change the lighting, gravity, background melody and other parameters of the enclosed space where it is located. And there may be just decorative actors in the form of a table, chair, floor lamp. In general, we can say that everything in the UnrealEngine world is the actors, including the brushes described above (Brush).
')
Practice
Reading all this and not trying to do something of my own, in my opinion, is pretty boring. Therefore, I propose to make a simple level. I guess that many have some kind of game from the Unreal series, UnrealEditor goes with them, which can be found in the System directory of the game. You can try to use it. Most likely you will get it very well, although there may be some minor differences from the one described below (especially, this concerns UT3 and UDK. I didn’t work with them).
Training
For those who for some reason did not have the Unreal series of games, there is an option to use the Unreal Engine 2 Runtime ,. What it is will tell the wiki .
The advantages of this choice: small size, sparing system requirements - it works on a very inhibitory 3D hardware; there is no heap of excess, which at first can be very distracting; free for non-commercial use.
Cons: many things do not work (although not the fact that you will find some); little embedded content, almost everything will have to do yourself.
For those who decided to use it, here is the download link .
Finally, we launch UnrealEditor (UnrealEd.exe) and see a fairly standard view for 3D editors with four windows. Namely, a top, front, side view and a window with the resulting level. The editor is customizable, and you can arrange the windows in different ways, you can remove unnecessary ones or add new ones. This is done through the menu View-ViewPorts.
Create a level
 We find the panel with primitives on the left, and right-click on the cube. Properties of the created brush appear. We set the width, height, and depth equal to 1024 and click Build, then Close. A red cube should appear in the windows of the projections, this is the so-called construction brush. It can be only one on the map. It is not a geometry, but serves only to create it. Now, in the Top window, click the left button in the resulting brush, hold down the Ctrl key and move the mouse to the right. In principle, we can now cut our first cube, but then it will turn out with the default texture, but it is not very beautiful. Therefore, select View-> Show Texture Browser and select the texture you like there. I chose the LigthWell group texture StoneBrickBig2 from the EM_RunTime_T package - just leave it selected.
 Now we look at the panel with actions on the brushes and find the Substract action there or simply select Brush-> Substract from the menu. So we cut out our first brush - this is geometry that is already usable. We can see what happened in the projection of DynamicLight.
About the DynamicLight projection
To move in the projection is used:
Clamped left mouse button: turns left / right, move forward / backward.
Clamped right mouse button: look around with the mouse.
Both buttons are pressed: move up / down, move left / right (by streyf)
Also in this view, you can select any surface and assign it a texture from the texture browser.
Clamped left mouse button: turns left / right, move forward / backward.
Clamped right mouse button: look around with the mouse.
Both buttons are pressed: move up / down, move left / right (by streyf)
Also in this view, you can select any surface and assign it a texture from the texture browser.
Although it can be called the first level, we will do a little more. Namely, choose the primitive ladder (LinearStarcase). Put it to one of the walls inside our cube (you can rotate the brush with the right mouse button while holding down the Ctrl key), select the texture of the future staircase, but this time select the Add command. Thus, we add the resulting brush to our cube. We continue. Right-clicking on the Cylinder primitive we set a height of 1024, the outer radius is 512, the inner is 512, the number of sides is 24, we set at some distance from our cube, but so that the staircase looks toward the cylinder, and we cut it.
I ended up doing so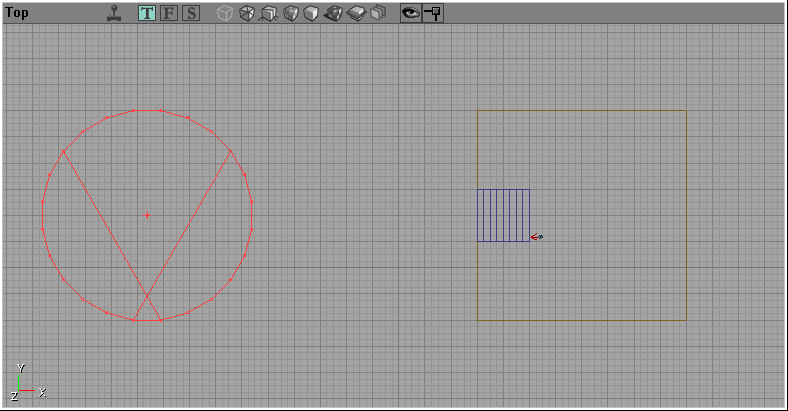
Now we need to associate the room "cube" with the room "cylinder". To do this, you need to create a cube-type brush with parameters that would allow it to fall into both the cube and the cylinder, and at the same time would be as wide as a ladder.
Like this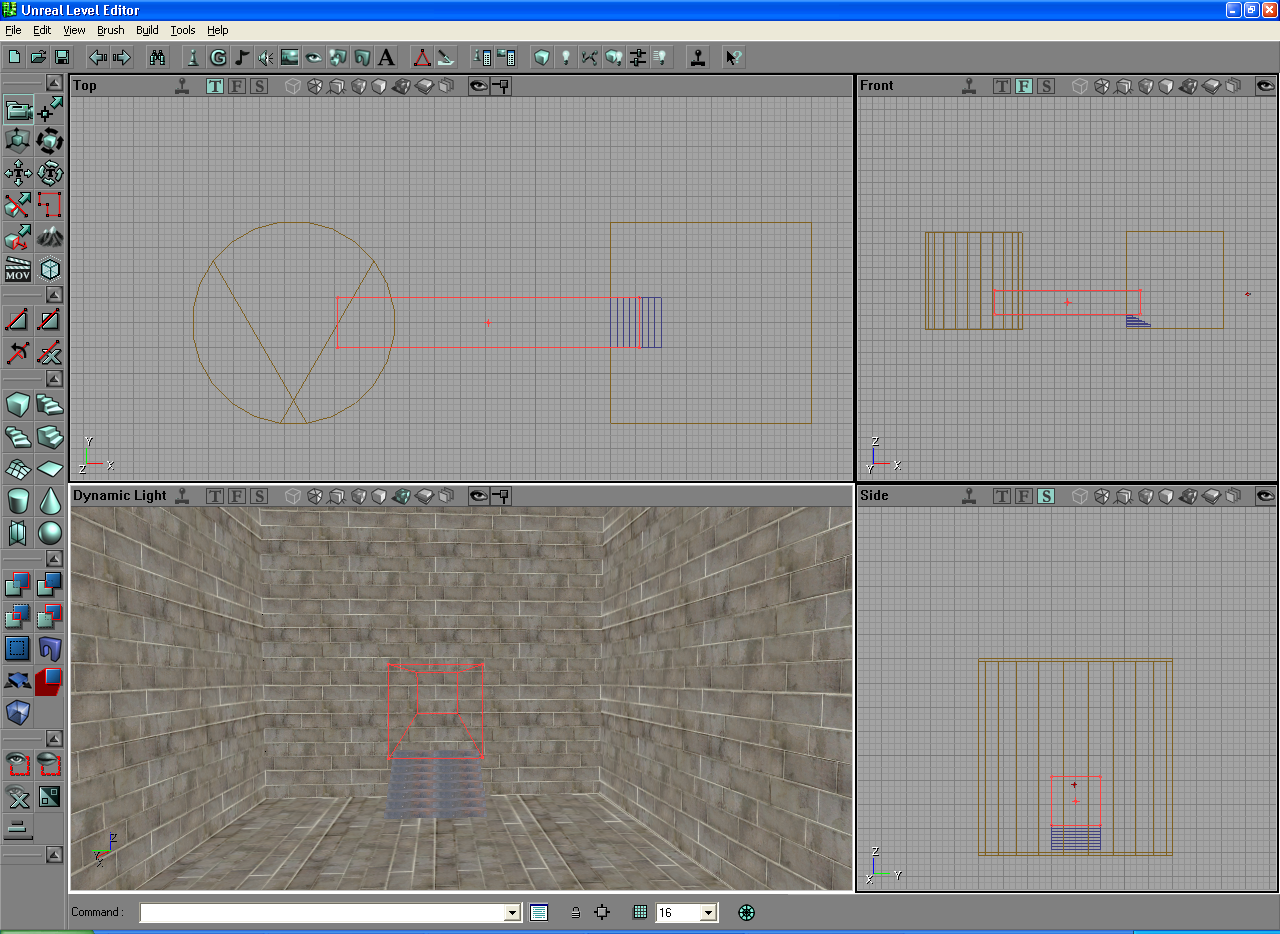
Now we need to trim our brush so that it does not create unnecessary, unnecessary geometry. To do this, select Deinterselect. As a result, our brush will be cut off exactly along the border of the cube and cylinder. Now you can select the texture of the corridor and cut (Substract). Geometry is ready. You can fly to admire in the projection of DynamicLight. It's time to save the map. Choose File-Save As ... then those who did it all in the Unreal Engine 2 Runtime should name the card using the EM_name-card pattern, those who did in any of the UT versions should better name the DM-name card.
We have almost everything ready. However, if we now make Build-> BuildAll, then in the projection of DynamicLight there will be a pitch darkness. And all because we have no lighting. It's time to add it. To do this, open the Actor Browser window (View-> Show Actro Class Browser). In the window that appears, look in the tree Actor-> Light and select it. After this, click in one of the projection windows with the right button and select Add Light Here, thereby adding light sources. I put two in the hallway and one each in a cube and top hat. We make Build-> BuildAll and if everything is done correctly, the map will be filled with light again and will play with textures. Light sources themselves have a large set of properties. You can choose one, for example, the one in the cylinder. Right-click and select Properties and play around with the parameters from the LightColor group (to see the changes, turn on the Runtime Preview in the DynamicLight window. To do this, click the joystick next to the window title).
The last stroke is left - and, precisely, indicate where the player will appear. To do this, open the Actor Browser window again, look there for Actor-> Navigation Point-> Small Navigation Point-> Player Start, now right-click the cube in the room and select Add Player Start. Then we precisely adjust the position so that it is just above the ground, somewhere in 4 cells, and away from the walls as much. We do Build-> BuildAll-save the card. So the first level is ready, it seems rather dreary, but this is only the first time. Now it's time to start it.
Choose Build-> Play Level and go through our level.
Conclusion
So we met with UnrealEngine, however, so far very superficially. In order to understand more deeply how the engine works and how to do something other than level walking with it, you need to become familiar with the internal script language UnrealScript. And if we want to make a network game, then also with replication. The article turned out much more than we would like, but I hope I did not tire you too much. The next part will cover the topic of UnrealScript and the interaction of actors. To be continued, to new meetings ...
Source: https://habr.com/ru/post/185232/
All Articles