simpleTooltip: HTML filled with CSS and flavored jQuery

Everyone knows what a tooltip is . Someone finds them extremely useful, and someone bypasses. Fate decided to put me in the first category.
Tipsy Tooltip used in Twitter Bootstrap pushed me to develop my own version of hints. At first, I used it, but I didn’t need all the features of the plugin and, being a perfectionist, the extra code confused nature. I decided: I will write what I need and not a single line more. I wrote and dare to share the recipe with the community. Maybe someone will like it ...
Read before cooking
I note that the idea is not new and a similar implementation most likely exists. Therefore, if you have already eaten a couple of tutltips and do not want more, refuse to read this recipe, because it is only a lesson, the main moral of which is: the code used in the frontend should be used and not simply given to the client.
')
Prepare the dough - take some HTML
We prepare the dough often and know the recipe for a tooth - at this stage we will do a routine operation: create HTML markup with links, each of which will have a hint and, different from the previous, direction:
<section> <div> <a href="#" data-tooltip="nw" title="This is an example of Northwest gravity">Northwest</a> </div> <div> <a href="#" data-tooltip="north" title="This is an North gravity">North</a> </div> <div> <a href="#" data-tooltip="ne" title="This is an example of Northeast gravity">Northeast</a> </div> <div> <a href="#" data-tooltip="west" title="This is an example of West gravity">West</a> </div> <div> <h3>simpleTooltip</h3> </div> <div> <a href="#" data-tooltip="east" title="This is an example of East gravity">East</a> </div> <div> <a href="#" data-tooltip="sw" title="This is an example of Southwest gravity">Southwest</a> </div> <div> <a href="#" data-tooltip="south" title="This is an example of South gravity">South</a> </div> <div> <a href="#" data-tooltip="se" title="This is an example of Southeast gravity">Southeast</a> </div> </section> An element that should have a hint needs to assign two attributes:
- data-tooltip - tool body offset.
- nw - northwest
- north - north
- ne - northeast
- west - west
- east - east
- sw - southwest
- south
- se - southeast
- title - text.
So, we have eight basics ready for the future of the dish. Each we have seasoned in our own way and now is the time to do the preparation of the filling.
Filling: Check if your CSS is running out.
The filling should be tasty, and therefore we will not use any impurities and harmful substances. Only, as it is sometimes called, the natural product is pure CSS. We will need pseudo-elements
:before and :after , attribute selectors with modifiers of the beginning and end of the line ( ^ , $ ) and CSS function attr () . Making sure you have the ingredients, you can start cooking.Smell
We do not want to eat the foul-smelling tooltips? We don’t exactly want and, therefore, we immediately say to ourselves: there are no magic numbers — only a valid and meaningful code.
Basic styles
#tooltip_width { float:left; } #tooltip_width, [data-tooltip]:before, [data-tooltip]:after { display:none; font:normal 11px/24px Arial; } [data-tooltip]:before, [data-tooltip]:after { position:absolute; z-index:1000; } [data-tooltip]:before { content:attr(data-title); color:#fff; padding:0 5px; border-radius:2px; background:rgba(0,0,0,.8); text-align:center; white-space:nowrap; } [data-tooltip]:after { content:''; height:0; width:0; border:solid transparent; border-width:5px; pointer-events:none; } [data-tooltip]:hover:before, [data-tooltip]:hover:after { display:block; } Pseudo-element
:after - decorative arrow pointer to the parent,: :before - body of the tooltip with text. And another thing: you just noticed the rules for an element with #tooltip_width , but you have no idea why you need it. So here it is - this is a special powder from the cook and it is needed to measure the width of the tip. Initially, at the stage of drawing up ideas about the future dish, it was planned to calculate the width according to the formula: width = text.length * 5; // - (Arial, 11px) But this approach was doomed for two reasons:
- Latin characters, on average, are not as wide (~ 5px) as Cyrillic (~ 6.5px);
- the equation did not provide for the same number of characters of different widths. For example, "
iii" will not be equal to "WWW" in width.
A new method that takes into account all the features works as follows: the text of the tooltip is placed in an invisible, floating (
float:left ) block with identical font size settings, then its width is measured and it is removed from the DOM, thus allowing to get the next tooltip width using the same element.Attribute selectors with modifiers
A good choice for grouping properties. You can do without them, as well as eating soup / borscht without bread, but still it will be more delicious with them.
The names of the direction, such as: nw and ne begin with the Latin letter n and have common properties - this plays into our hands and we can describe their rules in this form:
[data-tooltip^=n]:before, [data-tooltip^=n]:after { top:100%; } [data-tooltip^=n]:before { margin-top:5px; } [data-tooltip^=n]:after { margin-top:-5px; border-bottom-color:rgba(0,0,0,.8); } Remember that in the
:before pseudo-element is the text, and :after is a decorative pointer. This code works for the nw , ne and north directions and shifts the pseudo-elements 100% down: the text is displaced another 5px below (5px is the height and half of the pointer's width), and the arrow is as above — this allows you to “magnetise” it to the body type.
The blue line is
top:100% , the red line is margin-top:5px .The same is true for sw , se and south , only the offset is directed up:
[data-tooltip^=s]:before, [data-tooltip^=s]:after { bottom:100%; } [data-tooltip^=s]:before { margin-bottom:5px; } [data-tooltip^=s]:after { margin-bottom:-5px; border-top-color:rgba(0,0,0,.8); } As you may have guessed, all the names for the direction of displacement are chosen so that they can be easily combined into groups. Let's now describe the common styles for nw , ne , sw , se , north and south using the end of line modifier:
[data-tooltip$=w]:before, [data-tooltip$=w]:after, [data-tooltip$=th]:before, [data-tooltip$=th]:after { left:50%; } [data-tooltip$=w]:before { margin-left:-15px; } [data-tooltip$=w]:after, [data-tooltip$=th]:after { margin-left:-5px; } [data-tooltip$=e]:before, [data-tooltip$=e]:after { right:50%; } [data-tooltip$=e]:before { margin-right:-15px; } [data-tooltip$=e]:after { margin-right:-5px; } 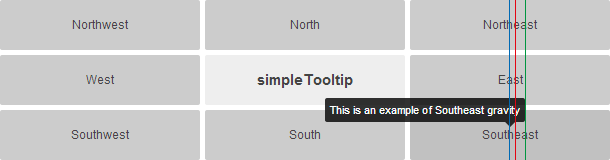
The blue line is
right:50% , the red line is margin-right:-5px , the green line is margin-right:-15px .Now we describe the behavior for the two remaining directions — east and west :
[data-tooltip$=st]:before, [data-tooltip$=st]:after { bottom:50%; } [data-tooltip$=st]:after { margin-bottom:-5px; } [data-tooltip$=st]:before { margin-bottom:-12px; } [data-tooltip=west]:before, [data-tooltip=west]:after { left:100%; } [data-tooltip=west]:before { margin-left:10px; } [data-tooltip=west]:after { margin-right:-10px; border-right-color:rgba(0,0,0,.8); } [data-tooltip=east]:before, [data-tooltip=east]:after { right:100%; } [data-tooltip=east]:before { margin-right:10px; } [data-tooltip=east]:after { margin-left:-10px; border-left-color:rgba(0,0,0,.8); } In the above code, the following code may seem strange:
margin-bottom:-12px; . He is responsible for moving the tip half up. Why is 12 half? Because right at the beginning we specified a line height of 24px using the following rule: font:normal 11px/24px Arial; // Arial 11px 24px 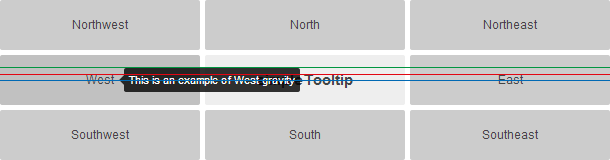
The blue line is
bottom:50% , the red line is margin-bottom:-5px , the green line is margin-bottom:-12px .The work is in full swing: the dough is swollen and is waiting for the filling to arrive in time. We rush to stuff and remember the powder without which our dish will not look aesthetically pleasing.
Do you have a little jQuery from the last cooking?
By and large, tooltips can be stuffed and eaten right now, but before you do this, you need to know something:
- if there is a lot of text in the tooltip, then it will drag on in one line for its entire width thanks to
white-space:nowrap; - if the element with a hint has a static positioning (
position:static;), which all elements without a specificposition, then the hint will not work properly because it is positioned absolutely element; - if the direction of the tooltip is set as northern or southern, then it will not be 100% consistent with it due to absolute positioning and implicit width.
Based on this, you can not use JavaScript when you are sure that:
- an element with a hint is relative or absolutely positioned;
- the direction of the tooltip is any other than southern or northern;
- The hint text does not take up a lot of space on the screen.
Otherwise, here's your powder:
/** * @param (int) . */ (function(){ $.simpleTooltip = function(max){ var max = max ? max : 300, body = $('body'), t = !1; $('[data-tooltip]').each(function(){ t = $(this); t.attr('data-title', this.title).removeAttr('title'); /** * , , , * , . */ if (t.css('position') == 'static') { t.css('position', 'relative'); } }).on('mouseenter mouseleave', function(e){ if (e.type == 'mouseenter') { t = $(this); /** * * . */ body.append('<div id="tooltip_width">'+ t.data('title') +'</div>'); var width = $('#tooltip_width').width(), styles = ''; /** * , @max * . */ if (width > max) { width = max, styles = '[data-tooltip]:before{width:'+ width +'px;text-align:left;line-height:17px;padding:2px 5px;white-space:normal}'; } /** * , : * padding , * , . */ if (t.data('tooltip').slice(-2) == 'th') { styles += '[data-tooltip$=th]:before{margin-left:-'+ ((width + 10) / 2) +'px}'; } /** * , , , DOM * . , * , . */ if (styles) { body.append('<style id="tooltip_style">'+ styles +'</style>'); } } else { $('#tooltip_style, #tooltip_width').remove(); } }); }; })(jQuery); $(document).ready(function(){ $.simpleTooltip(); }); The only possible argument of the function can be the maximum width, which is defined in pixels and for all prompts. It is given this way:
$.simpleTooltip(400); // , 400 - . As for the stages of the plug-in, they are described in the comments to the code and, I hope, in accessible language.
The prevalence in the kitchens of the world
- IE8 - with the replacement of the RGBA color format on HEX. Without rounded corners * .
- The rest of browsers that support the CSS function attr () and pseudo-elements do not know the troubles.
* - in the source files there is corners.htc, which will force the old versions of the MS browser to round the corners, but the size of this file is 4Kb, which is 1Kb more than the size of the entire project files without it.
From the chef
Summary:
The dish is ready. It is not extravagant or eccentric. This is an ordinary meal with its own advantages and disadvantages, and it is up to you to decide what to do for supper. But note: without trying and you do not know you like something or not.
Expectations:
I hope that the recipe was not too complicated and each item is given a very clear description. But, in any case, questions are not forbidden.
Useful materials
- http://firstvector.org/simpleTooltip - demonstration of work;
- https://github.com/BR0kEN-/simpleTooltip - repository on GitHub;
Take ready
Version 1.0 with support for IE8 * or 1.0.1 without it.
* - in version 1.0, you must put the text of the tooltip in the
data-title attribute.Use on health!
Source: https://habr.com/ru/post/185110/
All Articles