Create a ListView with Context Action Bar as in the new Gmail
What we want to get
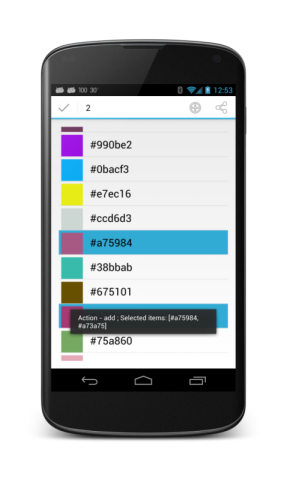
Make a smoothly working list with the ability to select rows by either clicking on the row icon or by long pressing on it. Also, so that the selection is not in vain, we must enable the user to perform certain actions with the selected objects.
')
Creating markup for the list
So, first of all we need to create a layout in which there will be a list, it looks like this:
<RelativeLayout xmlns:android="http://schemas.android.com/apk/res/android" xmlns:tools="http://schemas.android.com/tools" android:layout_width="match_parent" android:layout_height="match_parent" android:paddingLeft="@dimen/activity_horizontal_margin" android:paddingRight="@dimen/activity_horizontal_margin" android:paddingTop="@dimen/activity_vertical_margin" android:paddingBottom="@dimen/activity_vertical_margin" tools:context=".MainActivity"> <ListView android:id="@android:id/list" android:layout_width="fill_parent" android:layout_height="fill_parent"/> </RelativeLayout> In addition to the many padings that were kindly created for me by the android developer studio , there is nothing interesting here. Unless I remind you: android: id / list is a dedicated ID that ListActivity and ListFragment know.
Next, create a layout that will be each row in our ListView:
<?xml version="1.0" encoding="utf-8"?> <RelativeLayout xmlns:android="http://schemas.android.com/apk/res/android" android:layout_width="match_parent" android:layout_height="match_parent" android:orientation="vertical" android:background="?android:attr/activatedBackgroundIndicator"> <View android:id="@+id/item_image" android:layout_width="45dp" android:layout_height="45dp" android:layout_margin="5dp" android:padding="10dp"/> <TextView android:id="@+id/item_text" android:layout_width="wrap_content" android:layout_height="wrap_content" android:layout_toRightOf="@id/item_image" android:layout_marginTop="10dp" android:layout_marginLeft="10dp" android:text="TextView" android:layout_gravity="center_vertical|left" android:textAppearance="?android:textAppearanceListItem"> </TextView> </RelativeLayout> Here we have a TextView, located to the right of View. In place of the View is usually a picture, but in this example we will simply display a randomly generated color.
Also note the android: background = "? Android: attr / activatedBackgroundIndicator" in the layout properties. Without this attribute, the visual effect of the selection will not be visible.
Create a ListView and populate it.
Immediately bring the code activity, and then explain it:
public class MainActivity extends ListActivity { public static final String TAG = "FOR_HABR"; private Random randomGenerator = new Random(); @Override protected void onCreate(Bundle savedInstanceState) { Log.d(TAG, "onCreate"); super.onCreate(savedInstanceState); setContentView(R.layout.activity_main); // int size = getRandomNumber(200); ListView listView = getListView(); // Integer[] colors = generateListOfColors(size).toArray(new Integer[0]); ArrayAdapter<Integer> customAdapter = new CustomAdapter(this, R.layout.list_view_row, colors, listView); listView.setAdapter(customAdapter); } @Override public boolean onCreateOptionsMenu(Menu menu) { Log.d(TAG, "onCreateOptionsMenu"); getMenuInflater().inflate(R.menu.main, menu); return true; } // private List<Integer> generateListOfColors(int size) { List<Integer> result = new ArrayList<Integer>(); for (int i = 0; i < size; i++) { result.add(generateRandomColor()); } return result; } // private int generateRandomColor() { return Color.rgb(getRandomNumber(256), getRandomNumber(256), getRandomNumber(256)); } private int getRandomNumber(int maxValue) { return randomGenerator.nextInt(maxValue); } } Here we first find the ID layout in which our sheet will be placed, and assign it to the content of this activity. In order to fill the ListView with information, we first generate a list of numbers and pass it to the constructor of our custom adapter.
An adapter is a bridge between data and a display, in which we tell the system where and what component of each row of the list we would like to see. Here is the code for our adapter:
public class CustomAdapter extends ArrayAdapter<Integer> { private ListView listView; public CustomAdapter(Context context, int textViewResourceId, Integer[] objects, ListView listView) { super(context, textViewResourceId, objects); this.listView = listView; } static class ViewHolder { TextView text; View indicator; } @Override public View getView(final int position, View convertView, ViewGroup parent) { Integer color = getItem(position); View rowView = convertView; // , if (rowView == null) { LayoutInflater inflater = ((Activity) getContext()).getLayoutInflater(); rowView = inflater.inflate(R.layout.list_view_row, parent, false); ViewHolder h = new ViewHolder(); h.text = (TextView) rowView.findViewById(R.id.item_text); h.indicator = rowView.findViewById(R.id.item_image); rowView.setTag(h); } ViewHolder h = (ViewHolder) rowView.getTag(); h.text.setText("#" + Integer.toHexString(color).replaceFirst("ff", "")); h.indicator.setBackgroundColor(color); return rowView; } } We rewrite just one method from the parent class - the getView method. This method is called whenever a new row of the list appears in the user's field of view. Accordingly, from it we have to return the View object exactly in the form in which we want to display it to the user.
Here we use a popular template that allows us to slightly (up to 15%) increase the ListView performance by reusing objects. Read more about this template here .
At this stage, you can run the application, and we will see a list with colors, but, of course, without any interaction.
Add the ability to select a row
This requires the following:
// ListView, listView.setChoiceMode(ListView.CHOICE_MODE_MULTIPLE_MODAL); // listView.setMultiChoiceModeListener(new MultiChoiceImpl(listView)); The handler looks like this:
public class MultiChoiceImpl implements AbsListView.MultiChoiceModeListener { private AbsListView listView; public MultiChoiceImpl(AbsListView listView) { this.listView = listView; } @Override // public void onItemCheckedStateChanged(ActionMode actionMode, int i, long l, boolean b) { Log.d(MainActivity.TAG, "onItemCheckedStateChanged"); int selectedCount = listView.getCheckedItemCount(); // Context Action Bar setSubtitle(actionMode, selectedCount); } @Override // CAB xml public boolean onCreateActionMode(ActionMode actionMode, Menu menu) { Log.d(MainActivity.TAG, "onCreateActionMode"); MenuInflater inflater = actionMode.getMenuInflater(); inflater.inflate(R.menu.context_menu, menu); return true; } @Override public boolean onPrepareActionMode(ActionMode actionMode, Menu menu) { Log.d(MainActivity.TAG, "onPrepareActionMode"); return false; } @Override // Item AB public boolean onActionItemClicked(ActionMode actionMode, MenuItem menuItem) { String text = "Action - " + menuItem.getTitle() + " ; Selected items: " + getSelectedFiles(); Toast.makeText(listView.getContext(), text , Toast.LENGTH_LONG).show(); return false; } @Override public void onDestroyActionMode(ActionMode actionMode) { Log.d(MainActivity.TAG, "onDestroyActionMode"); } private void setSubtitle(ActionMode mode, int selectedCount) { switch (selectedCount) { case 0: mode.setSubtitle(null); break; default: mode.setTitle(String.valueOf(selectedCount)); break; } } private List<String> getSelectedFiles() { List<String> selectedFiles = new ArrayList<String>(); SparseBooleanArray sparseBooleanArray = listView.getCheckedItemPositions(); for (int i = 0; i < sparseBooleanArray.size(); i++) { if (sparseBooleanArray.valueAt(i)) { Integer selectedItem = (Integer) listView.getItemAtPosition(sparseBooleanArray.keyAt(i)); selectedFiles.add("#" + Integer.toHexString(selectedItem).replaceFirst("ff", "")); } } return selectedFiles; } } You probably noticed that here we are inflating a new Action Bar (context_menu). It looks like this:
<menu xmlns:android="http://schemas.android.com/apk/res/android"> <item android:id="@+id/cab_add" android:icon="@android:drawable/ic_menu_add" android:orderInCategory="1" android:showAsAction="ifRoom" android:title="add"/> <item android:id="@+id/cab_share" android:icon="@android:drawable/ic_menu_share" android:orderInCategory="1" android:showAsAction="ifRoom" android:title="share"/> </menu> So now in order. In ListView, we set a special selection mode - CHOICE_MODE_MULTIPLE_MODAL , which means that we will slip a ListView class that implements the AbsListView.MultiChoiceModeListener interface. In this class, we implement methods in which we indicate that we want to get to the selection event, click on the item in the CAB, or destroy the CAB.
Now it remains to add the ability to select a row by clicking on the icon. To do this, you need to attach it to the getView OnClickListener method:
h.indicator.setOnClickListener(new View.OnClickListener() { @Override public void onClick(View v) { selectRow(v); } private void selectRow(View v) { listView.setItemChecked(position, !isItemChecked(position)); } private boolean isItemChecked(int pos) { SparseBooleanArray sparseBooleanArray = listView.getCheckedItemPositions(); return sparseBooleanArray.get(pos); } }); Here, if the series is already selected, remove the selection, otherwise select.
That's all. The full code of the example can be found on my BitBucket .
UPD. Practically everything that was used in this article was added to API 11, and something even at 14. So, if you want compatibility with API <11, I advise you to look here .
There is also a wonderful development of a friend - HoloEverywhere
Source: https://habr.com/ru/post/185004/
All Articles